
[.blog-callout]
TL;DR
- Google Sheets can track inventory manually, but formulas, permissions, and multi-user editing get messy fast.
- Softr Databases give you a purpose-built, relational alternative, or you can keep your data in Google Sheets and connect it to a Softr app for a proper interface, permissions, and automations.
- Google Forms can add a lightweight data-entry layer on top of a spreadsheet if you want to avoid direct editing.
- For anything beyond a handful of SKUs and one user, a dedicated inventory management app will save you far more time than patching spreadsheet formulas. [.blog-callout]
Google Sheets is often the first tool teams reach for to track inventory, and it can work for keeping an eye on stock levels, spotting trends, and avoiding stockouts. There are three main ways to approach it:
- Managing your inventory in Google Sheets manually.
- Managing your inventory in Google Sheets, using Google Forms for data entry.
- Building a proper inventory management app on top of Softr Databases, or on top of your data in Google Sheets, using Softr.
The first two methods work as a stopgap. The third is what most growing teams eventually need, since spreadsheets weren't built to handle permissions, multiple simultaneous editors, or the kind of relational data that a real inventory system requires.
Managing your inventory in Google Sheets manually
If you need a quick, accessible way to start tracking inventory, Google Sheets can get you there. With real-time collaboration, an intuitive interface, and integration with the rest of Google Workspace, setting up a spreadsheet from scratch is fast, though you'll eventually need some formula skills to keep it accurate as your catalog grows.
Step 1: Set up the column headers
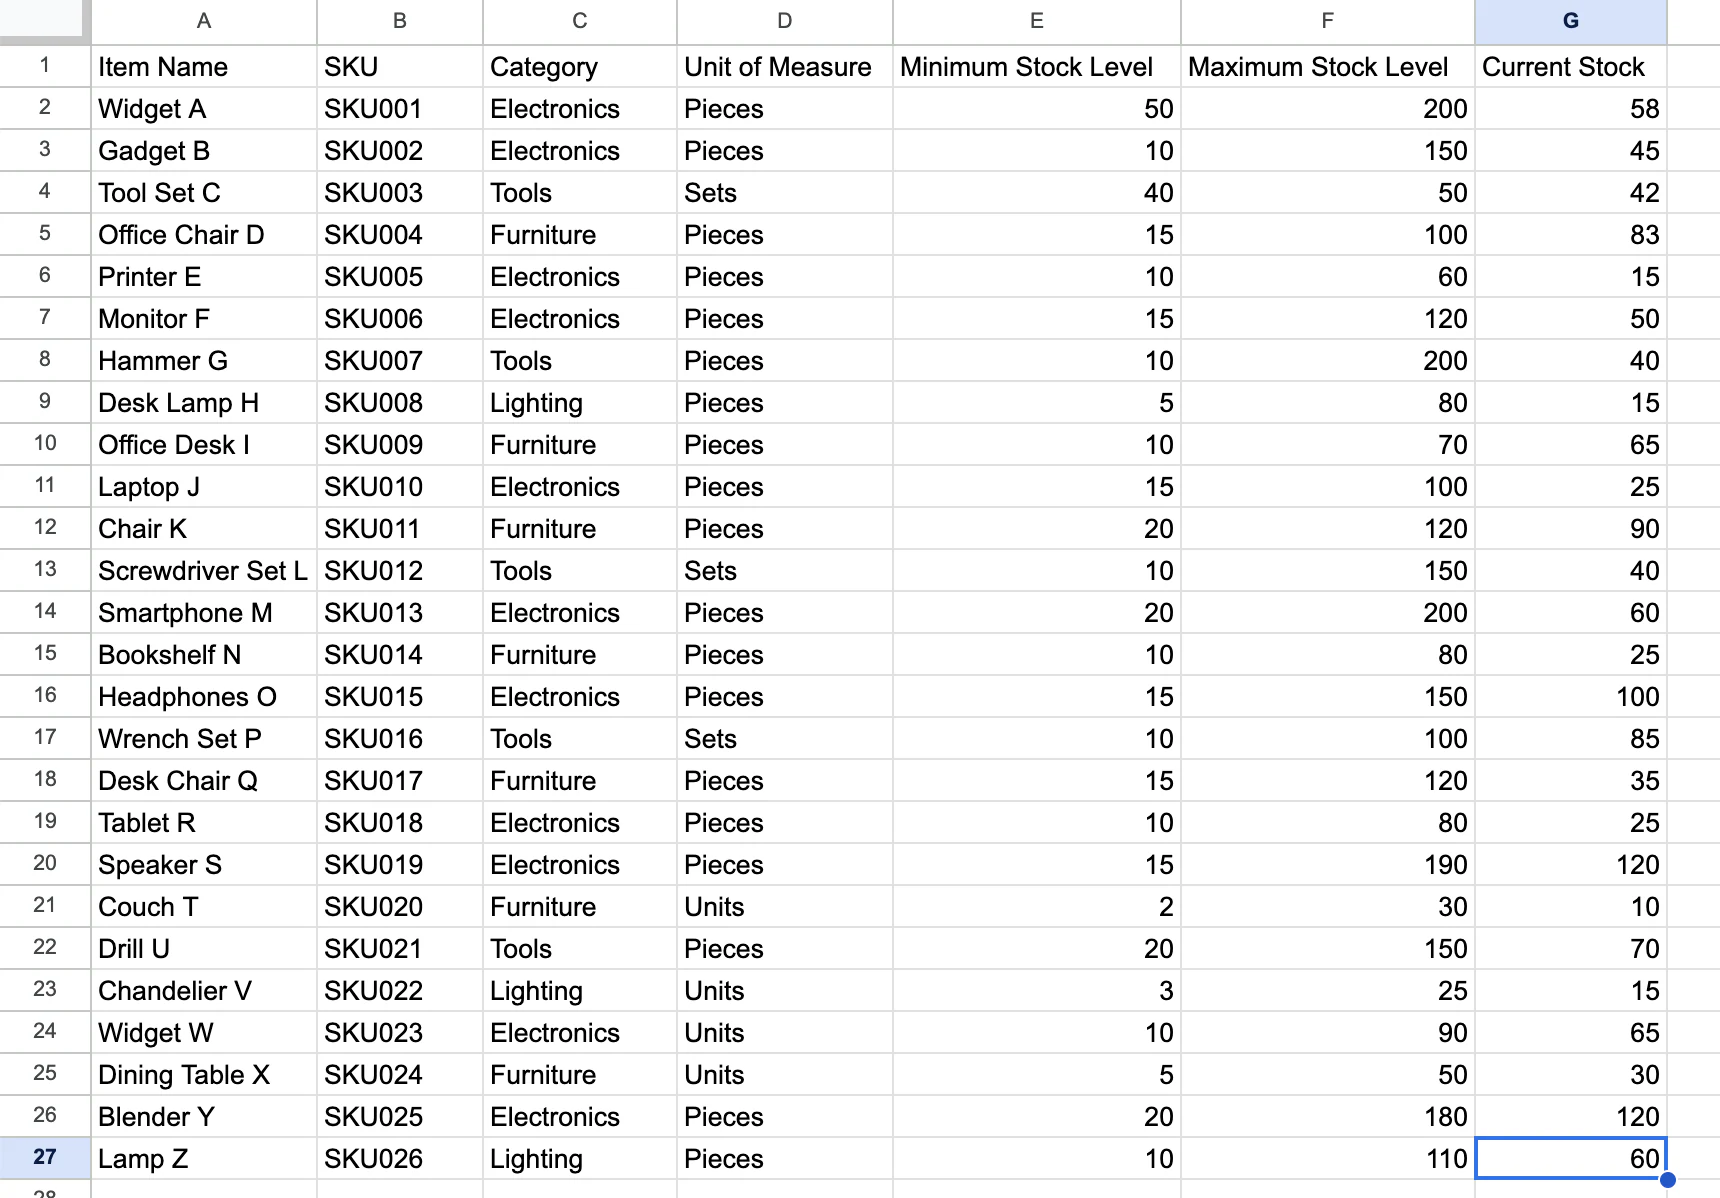
In your spreadsheet in Google Sheets, which you can create instantly by typing "sheets.new" in your browser's address bar, use the first row for column headers. These organize your inventory data. Common headers include: Item Name, Item ID or SKU, Description, Quantity in Stock, Unit Price, Total Value, Date Added, Supplier, and Location.

Step 2: Add your data
Populate your spreadsheet by manually entering your inventory data into the corresponding columns. Each row represents an individual item in your inventory.
Step 3: Share your spreadsheet
You can now choose to share your spreadsheet by clicking the "Share" button in the top-right corner.

Step 3.1: Select with whom you want to share
Once you've clicked Share, a dialog box appears. Look for the General Access section, click the dropdown menu, and select "Anyone with the link." After making this selection, click "Done."
Alternatively, you can share directly with someone by entering their email in the "Add people and groups" field and choosing their individual access level.

This approach works for a single person tracking a small, stable catalog. The moment you add a second or third person editing the same sheet, though, you lose control over who changed what, and one broken formula can throw off every stock count downstream.
"Managing external partners through emails and spreadsheets is a nightmare. A portal allows you to only surface the information that is relevant to them and make approvals on the fly." - Shiran Brodie, Head of Marketing at Softr
Managing your inventory with Softr
Instead of patching a spreadsheet with more formulas and tabs, you can build a proper inventory management app with Softr. The recommended approach is to use Softr Databases as your native data layer: it's purpose-built for structured business data, with relational fields, row-level permissions, and no external API rate limits to worry about as your catalog grows. If your data already lives in Google Sheets and you're not ready to migrate, Softr also connects directly to your existing spreadsheet, along with 21+ other data sources like Airtable and HubSpot, so you don't have to start from scratch.
Either way, you get a real interface on top of your data: forms for logging purchases, tables and Kanban boards for tracking stock, and permissions so warehouse staff, buyers, and managers each see exactly what they need. One customer summed up the difference well:
"It helps me track my orders, profits, and product catalog better. It is simple, intuitive, and the best free, scalable alternative for a CRM." - Verified User, Retail (Small Business), G2 review
Step 1: Sign in or register to Softr
First, log in to Softr. If you don't have an account, sign up to Softr for free.

Step 2: Choose how to start your app
With your account set up, you have three ways to start building your inventory app. Describe your use case to the AI Co-Builder and it will generate a complete app, database tables, pages, and blocks, in minutes. If you prefer a head start with less setup, pick a pre-built template. Or build entirely from scratch if you want full manual control from the first click.

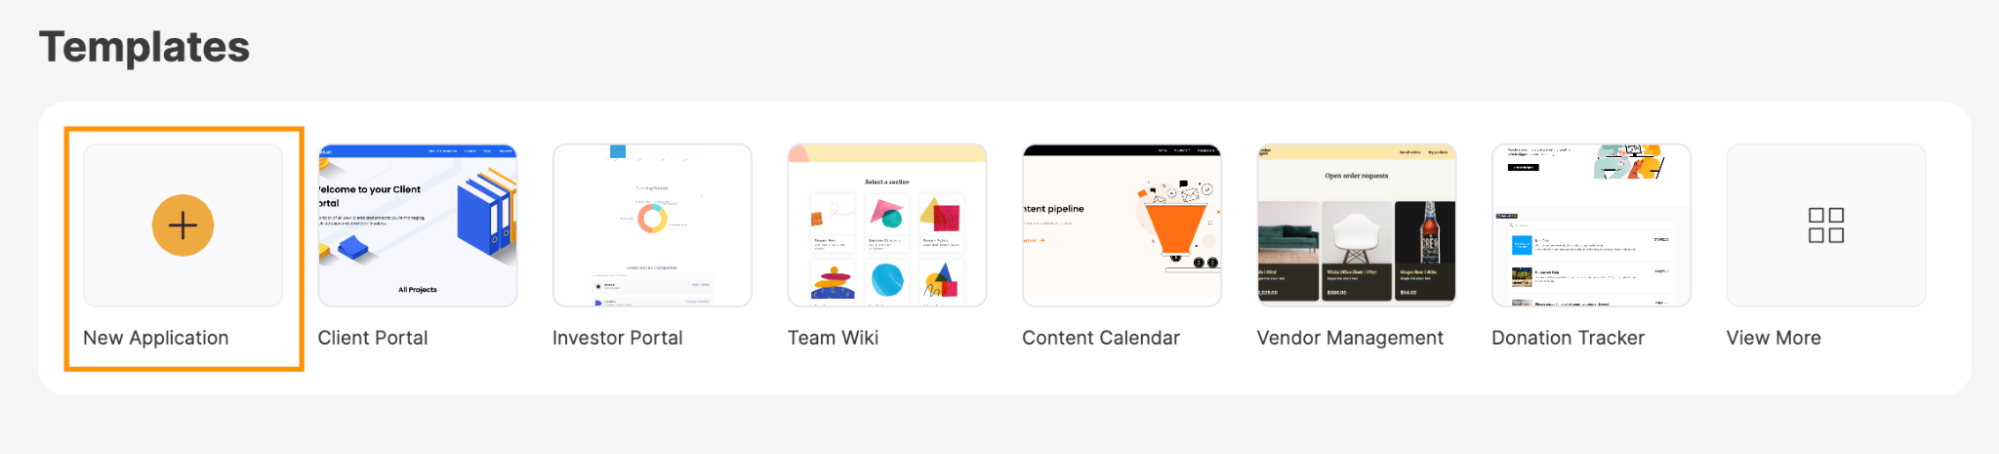
In this guide, we'll use a template to keep things concrete. Softr offers a wide variety of templates, including the Vendor Management Template, which simplifies the process of building apps around vendor and stock data. Locate a template by typing its name in the search bar and select it to proceed.

Step 3: Use the template
Review the template's features and functionalities, then click "Use Template" once you're ready.
Step 4: Choose your data source
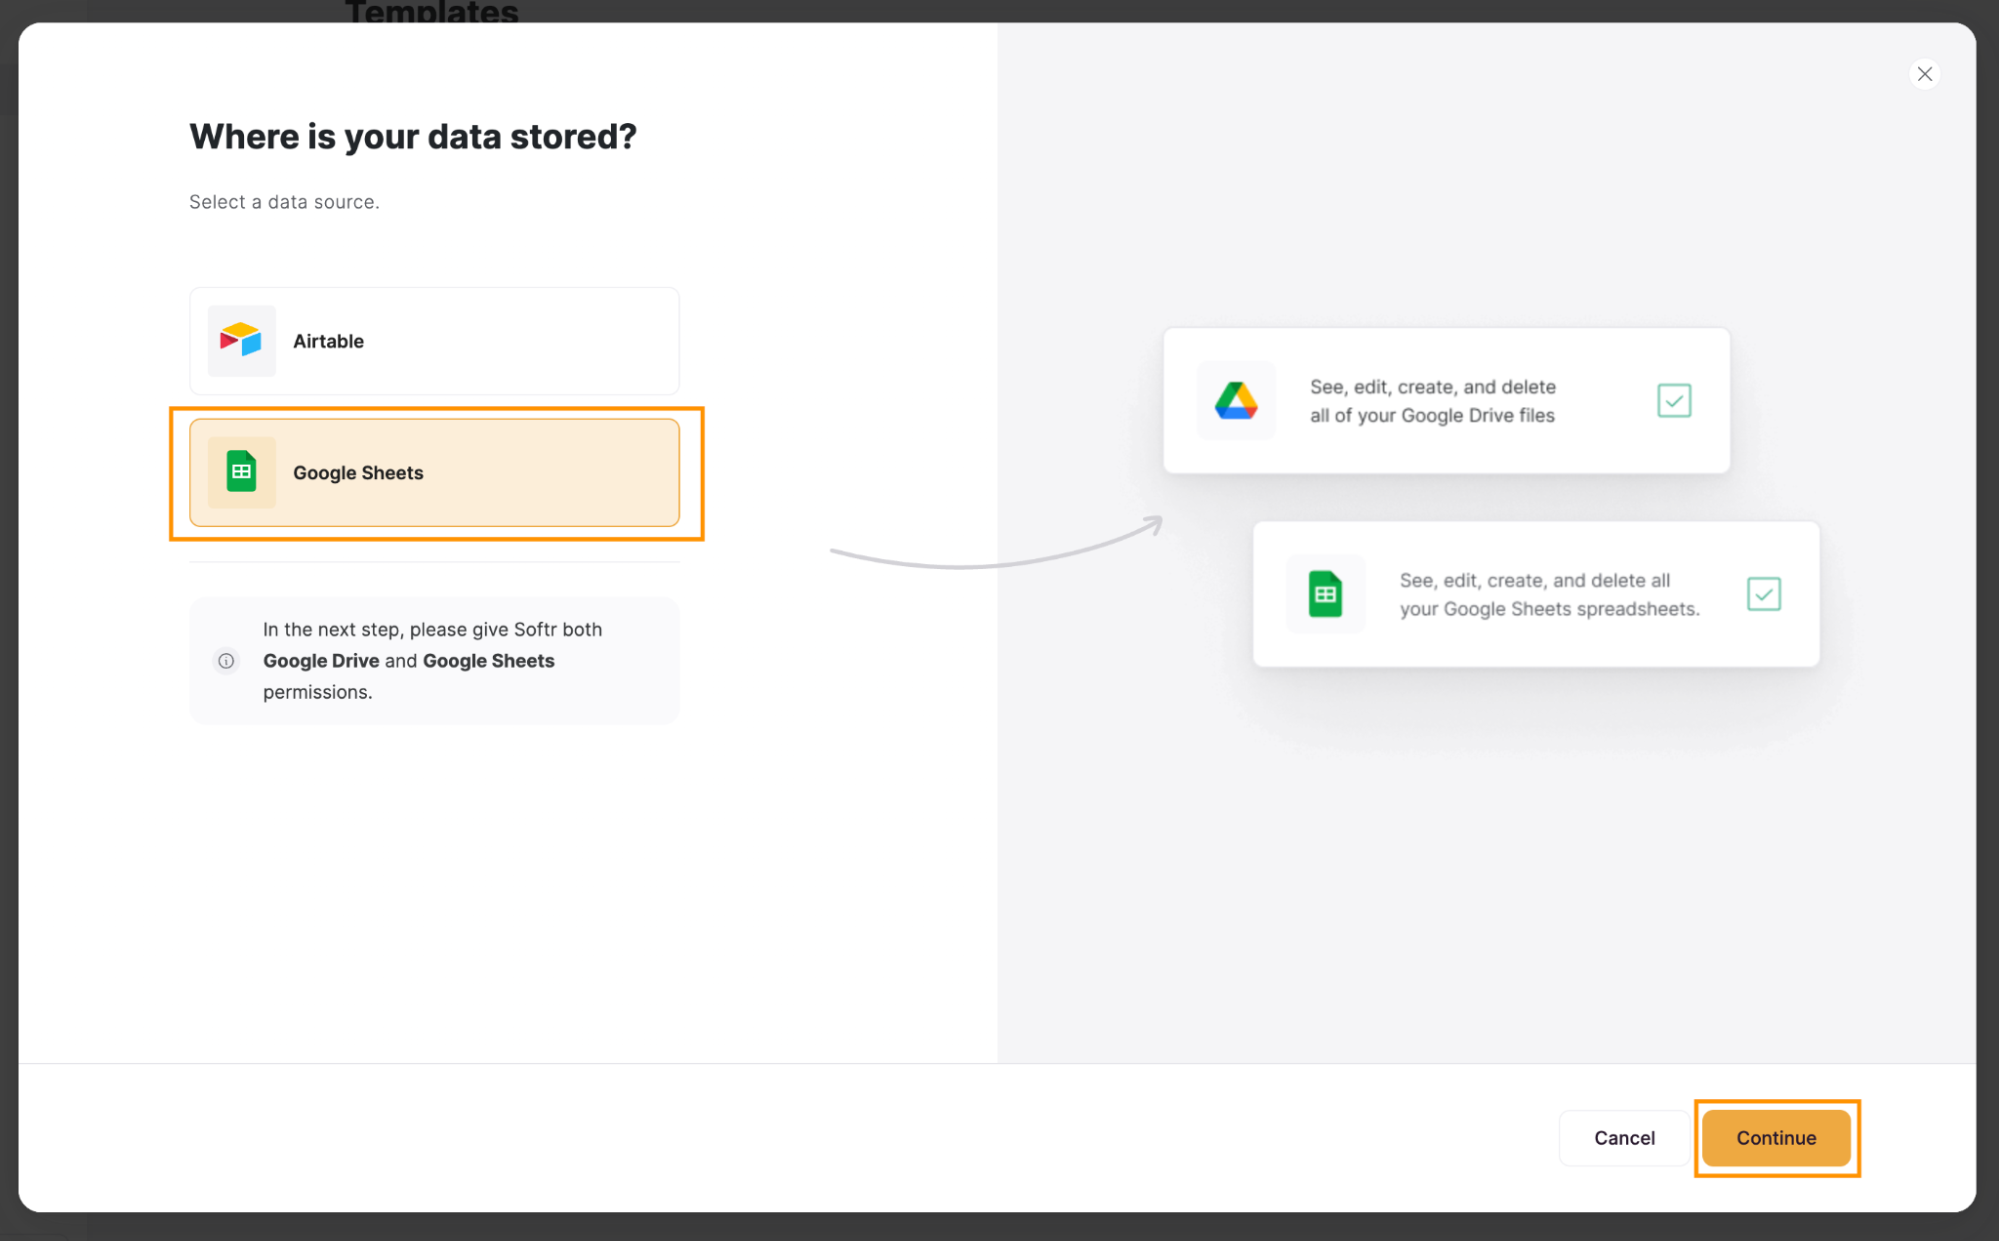
Once you've selected your template, you'll be prompted to choose a data source. If you want your data to live natively in Softr, select Softr Database. If you want to keep working from your existing spreadsheet, select Google Sheets and click "Continue."
Step 5: Connect to Google Sheets
If you selected Google Sheets, you'll need to connect your Softr app to your Google account. Follow the steps below.
Step 5.1: Select a Google account
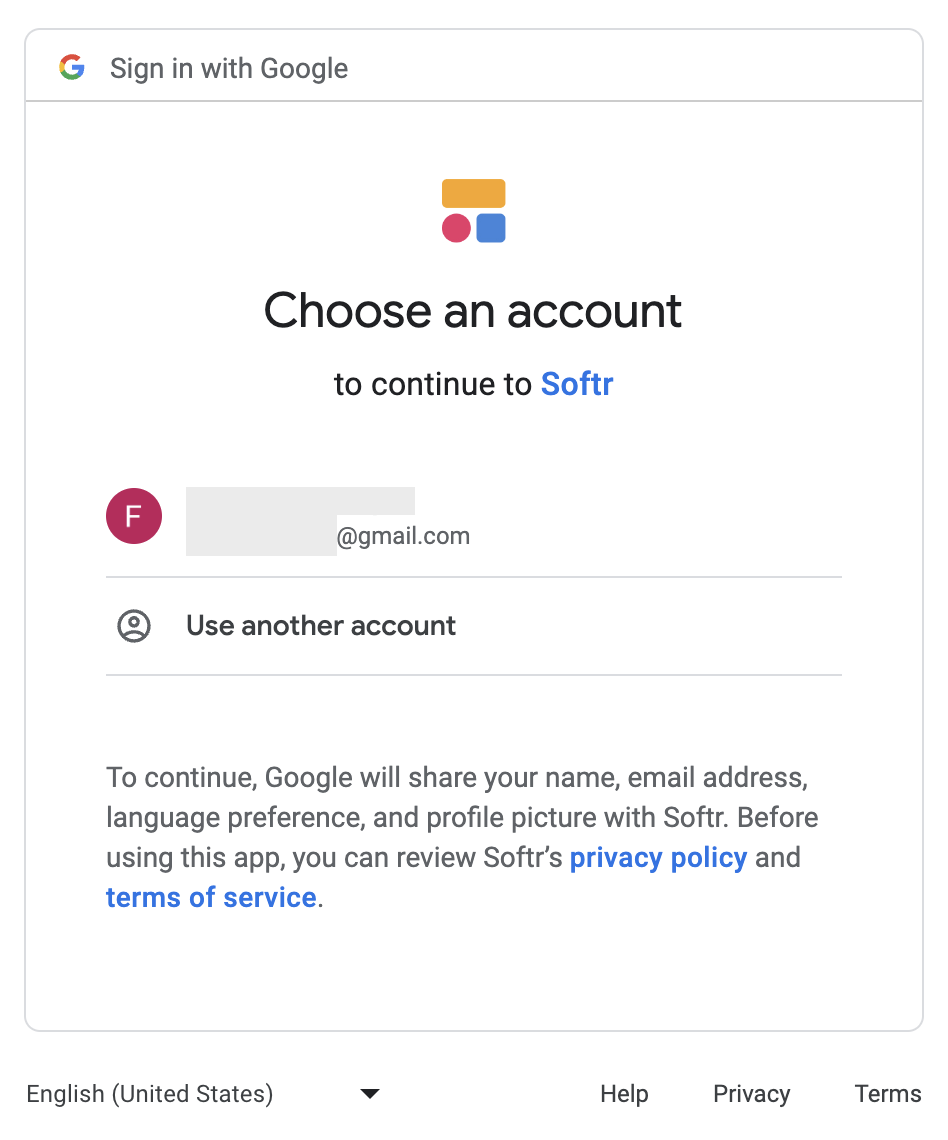
A new window will open for you to log in to or select your Google account.
Step 5.2: Grant additional access
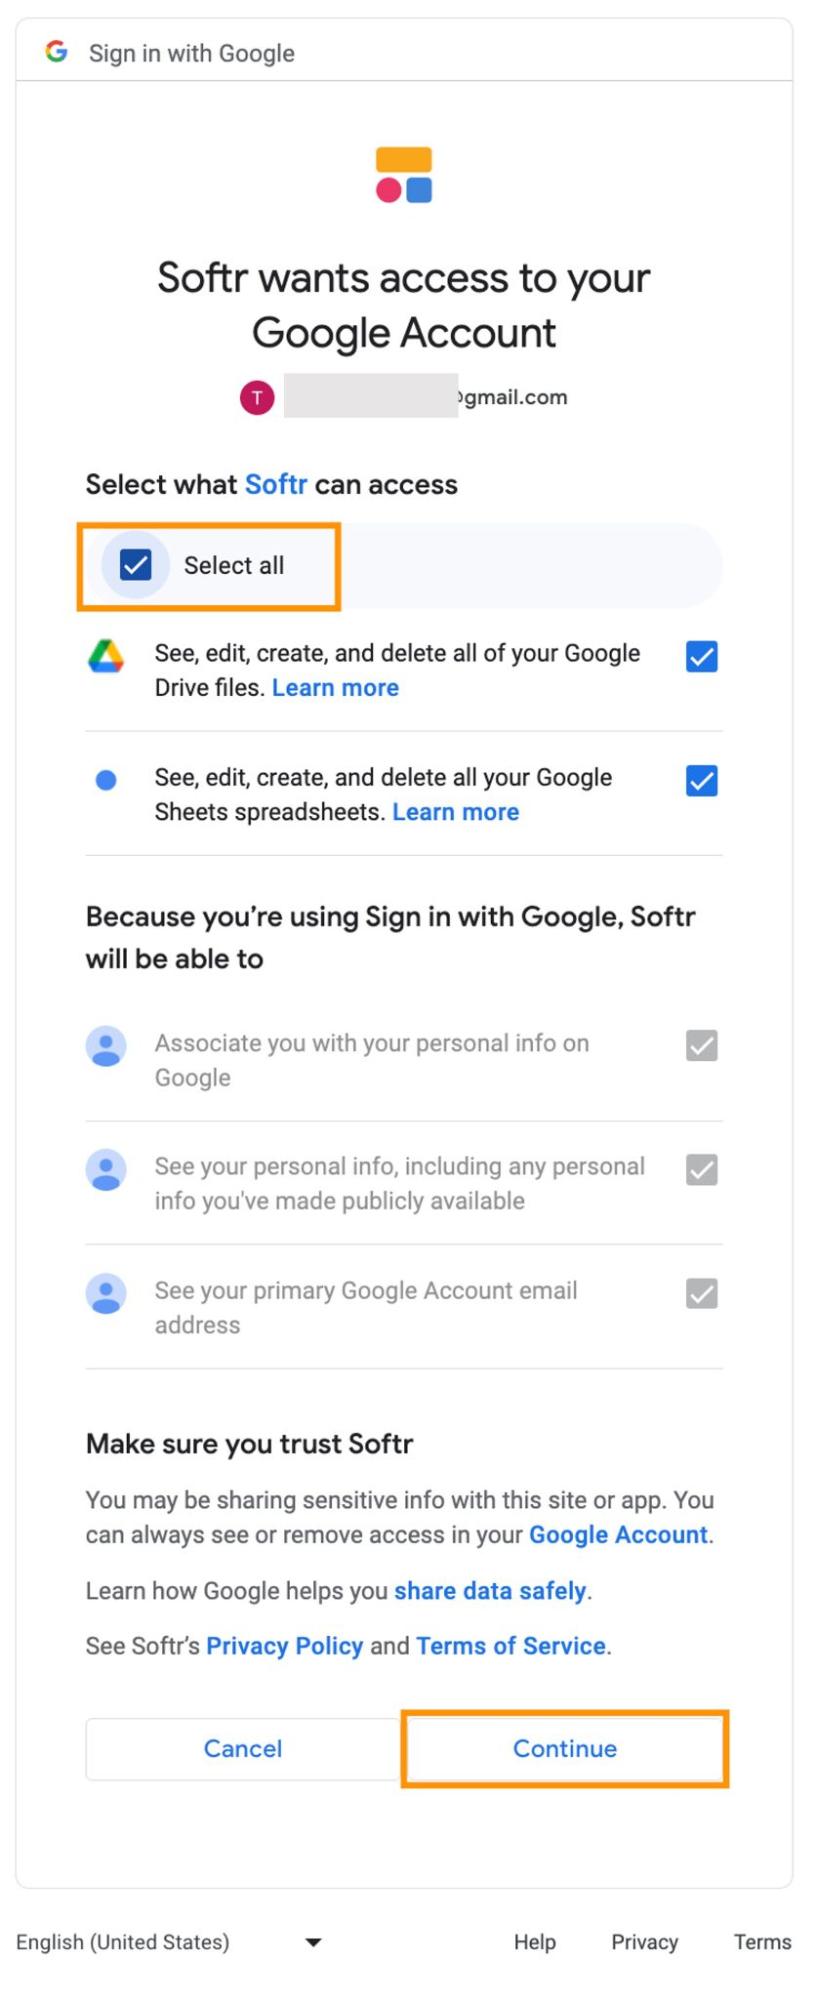
You'll need to grant Softr access to a set of features. Click "Select all" and then hit "Continue."
Step 5.3: Go to your app
Now that your Google account is connected, click "Go to application."

Step 6: Personalize your app
You now have a fully operational app, though it may still lack some of the features you need. The steps below cover how to turn the template into your own inventory management app.
Step 6.1: Navigate to the Products page
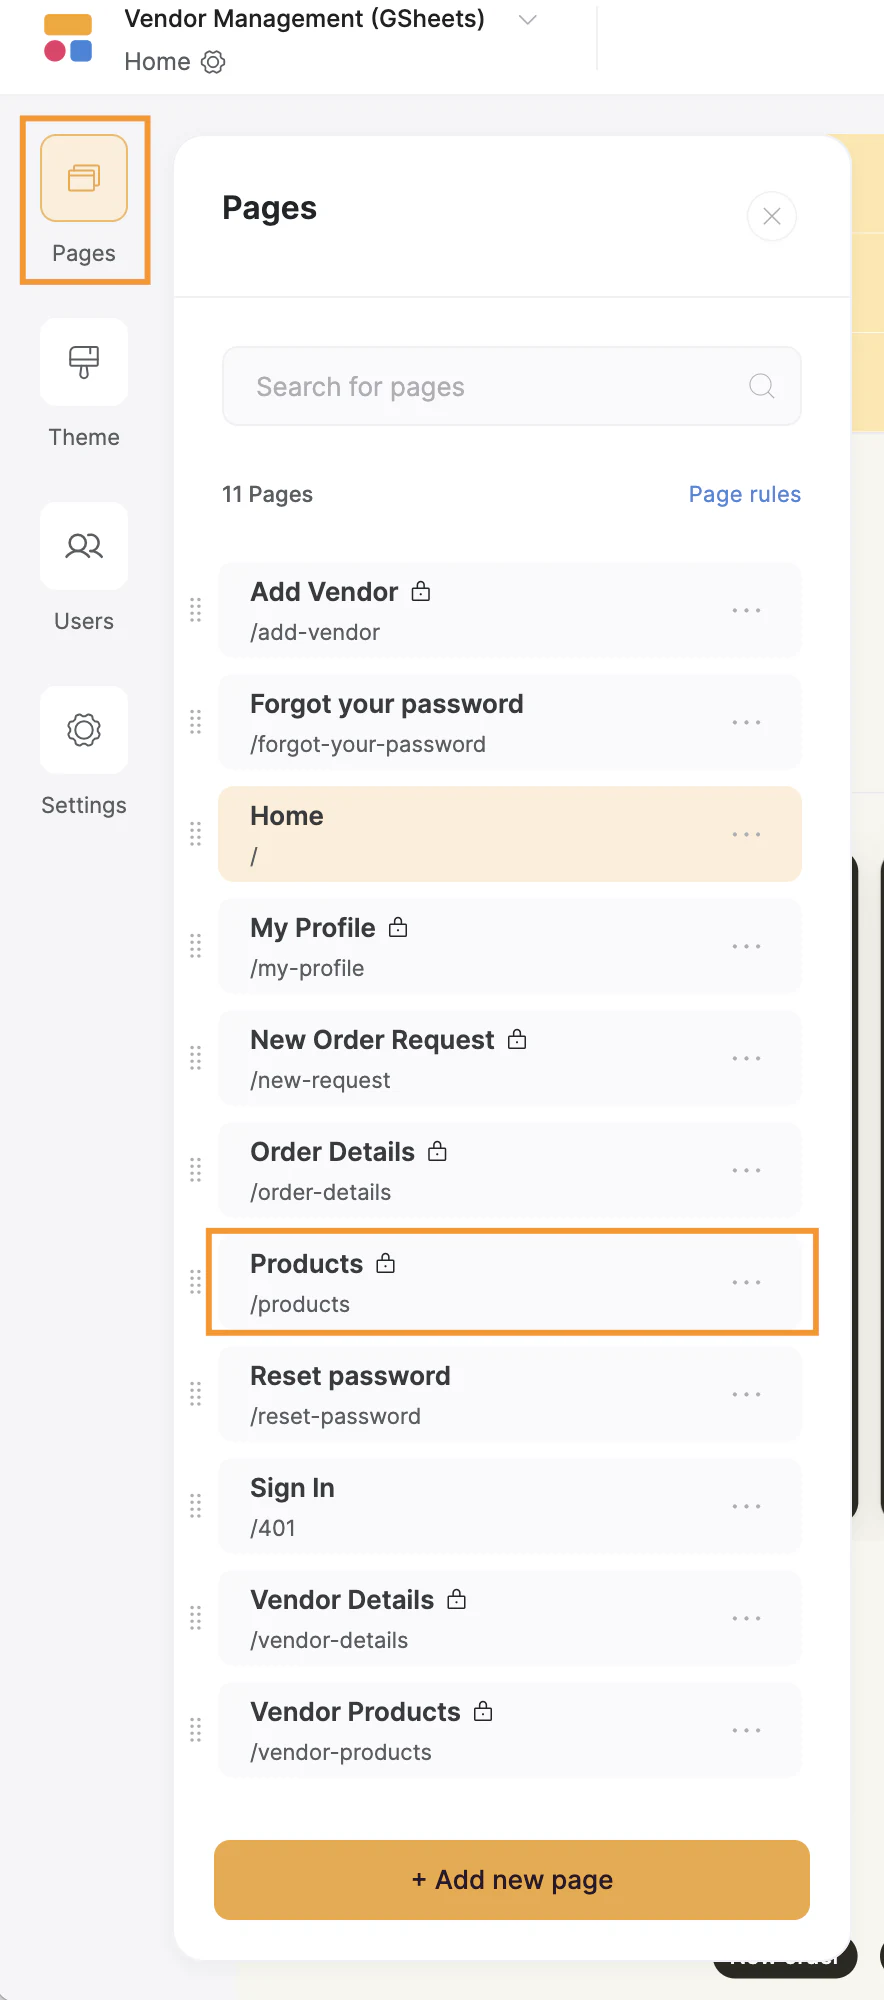
Navigate to the Products page by clicking "Pages" on the left sidebar of the Softr Studio.
Step 6.2: Add blocks
On the Products page, click the "+" button in the top-left corner, or the buttons that appear when you hover over a block. In the sidebar, select the "List with horizontal cards" block. You can also ask the AI Co-Builder to add a block for you by describing what you need, such as "add a form to log new purchases."
Softr has a variety of pre-built block designs, including forms, tables, Kanban boards, and charts. To manage inventory, a form block is useful for registering new purchases or orders so your stock stays up to date.
Step 6.3: Select a data source
On the right side of the screen, Softr shows you the block's settings. In the Source tab, click the dropdown and choose your data source, which is the Google account or Softr Database where your data is stored.

Step 6.4: Select the Google Sheets file
If you're using Google Sheets, select the spreadsheet and the specific sheet where your data lives by clicking the "Document" and "Sheet" options.

Step 6.5: Add columns
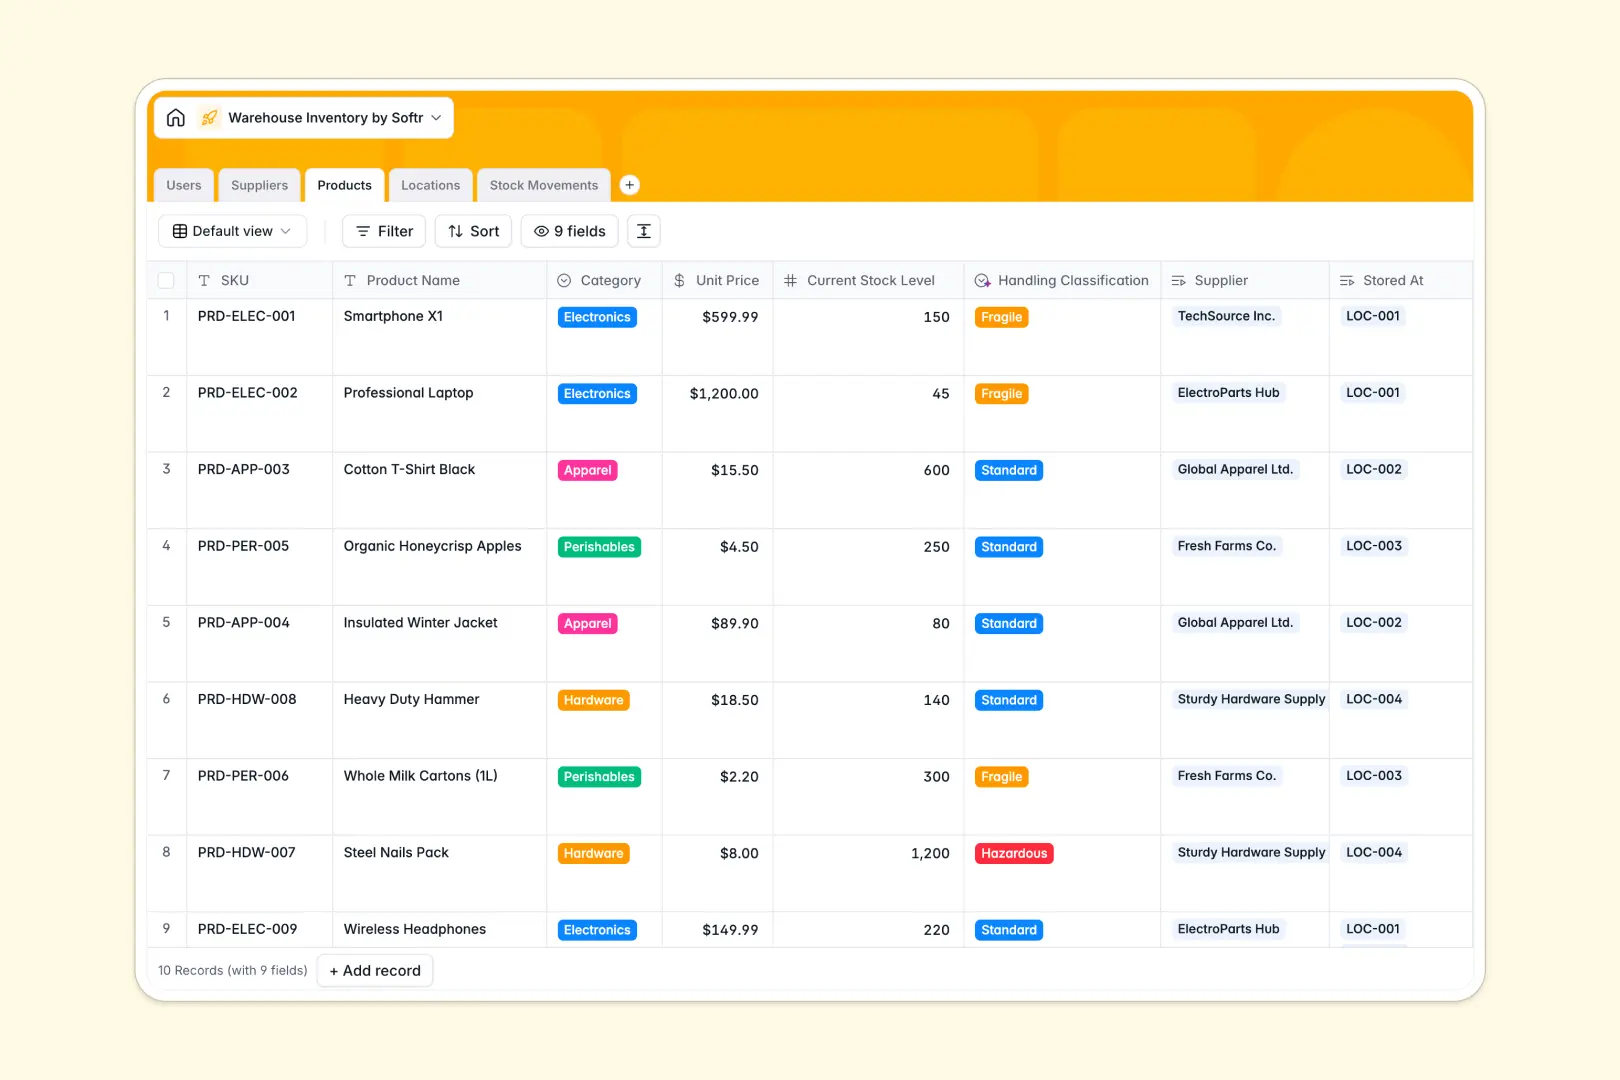
If you need additional fields, you can open your Google Sheet and add a new header after the last column, then populate it with data. If you're using a Softr Database instead, you can add fields directly in the database editor, or describe the fields you need to the Database AI Co-Builder and let it update your schema for you.
Step 6.6: Configure the blocks to fit your needs
Softr lets you configure a wide variety of settings for each block, so you can customize the appearance and the data shown to match your company's brand and workflow.
Step 7: Publish your inventory management app
Once you've added and personalized your blocks, click "Publish" in the top-right corner of the page. A small popup appears, just click "Publish" again to confirm.

Step 8: Your inventory management app is now live
You've created an inventory management app connected to your data, whether it lives in a Softr Database or in Google Sheets.

For a sense of what this looks like at scale, one construction company used Softr and Airtable to build a merchandise ordering system for 100+ employees with per-user budget limits and real-time spending visibility. Within five weeks of launch, the team processed over 2,500 orders worth more than €600,000, all through an app built in a few weeks rather than months.
Managing your inventory in Google Sheets, using Google Forms
If you want a lighter-weight solution and aren't comfortable editing spreadsheets directly, you can use Google Forms to feed data into Google Sheets and treat the spreadsheet purely as a dashboard. Let's start by creating the spreadsheet, then build the forms to feed it data.
Step 1: Set up the column headers
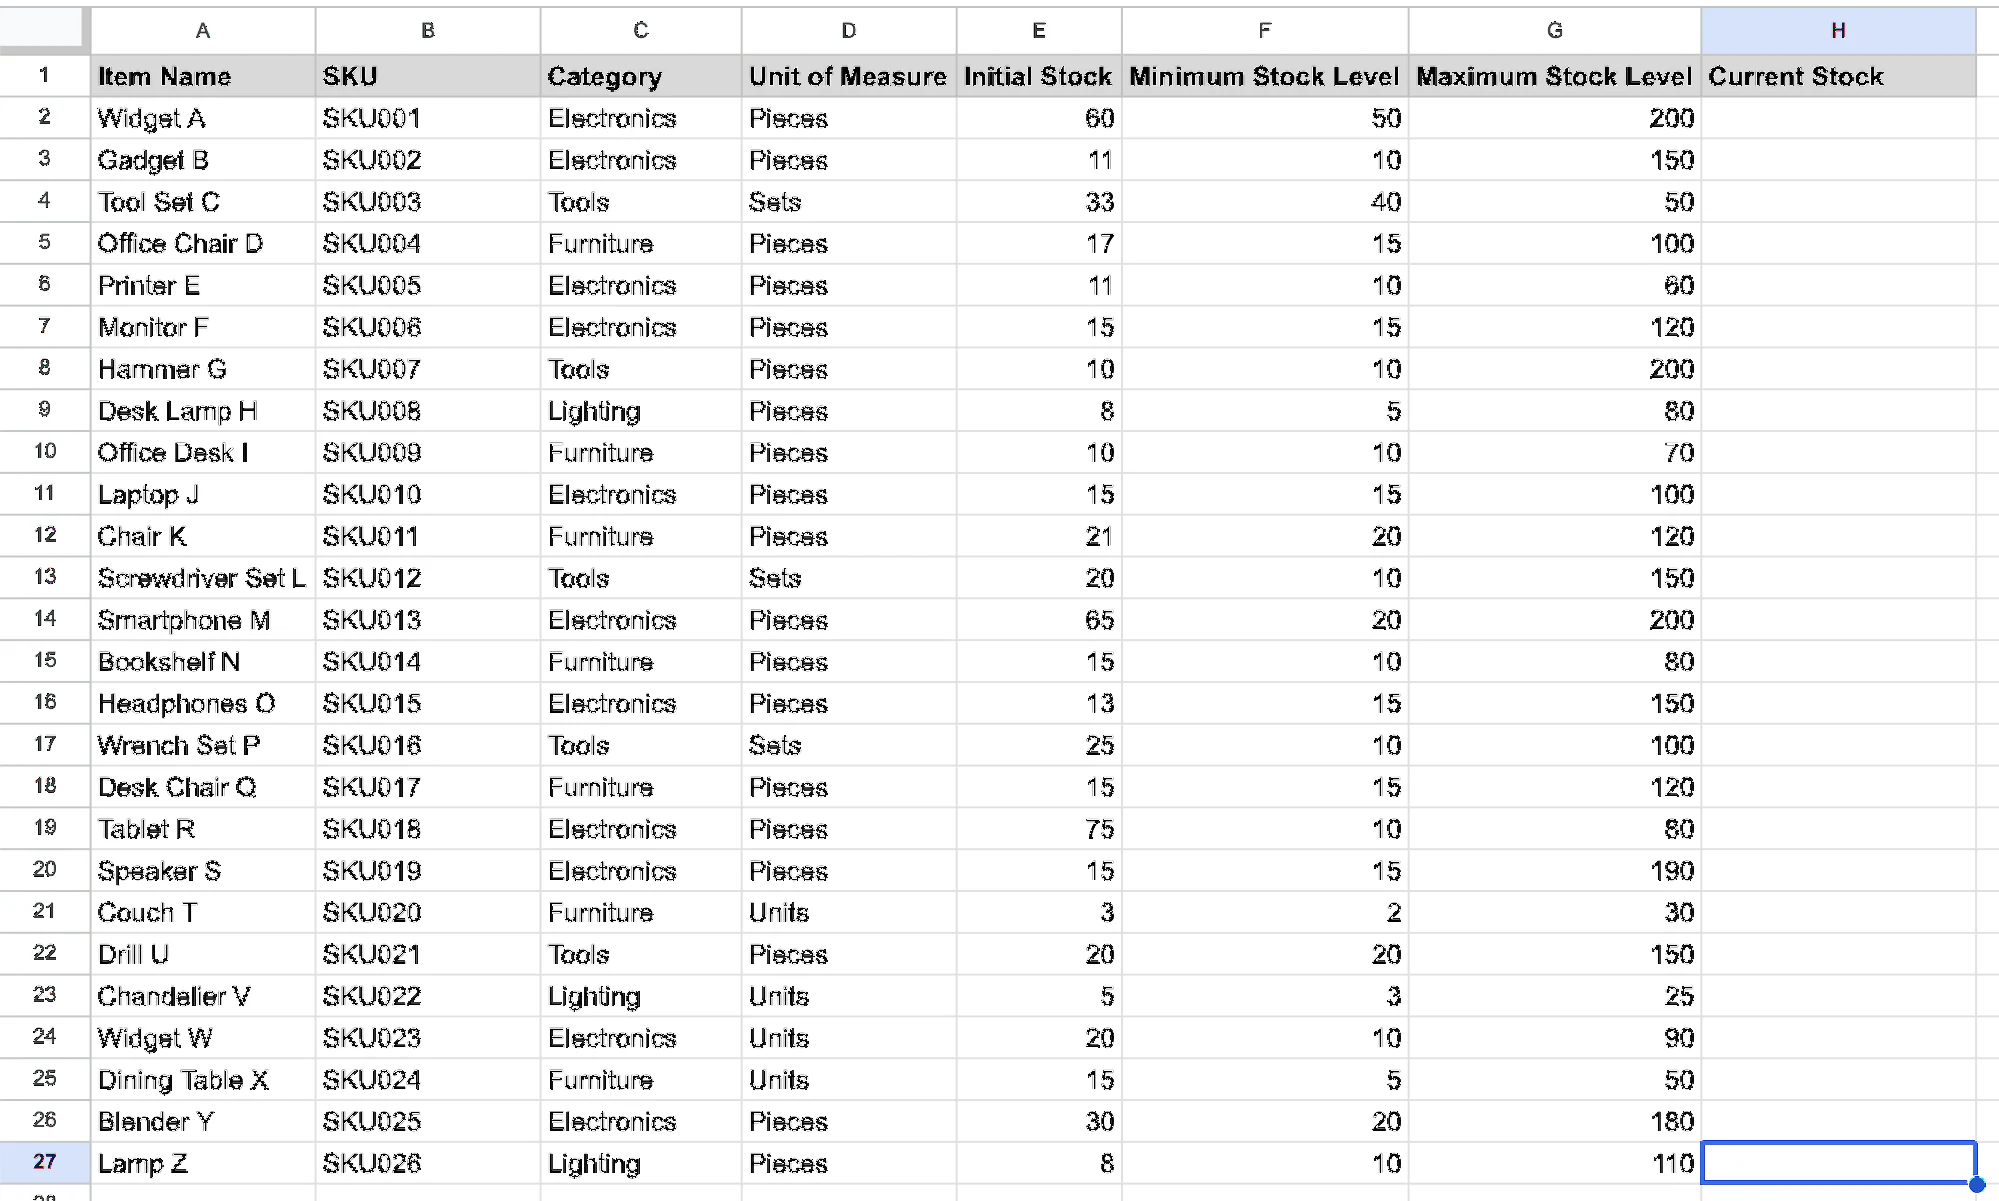
Open a new spreadsheet in Google Sheets and, on the first row, create your column headers. The options are endless, but a solid starting set is: "Item Name," "SKU," "Category," "Unit of Measure," "Initial Stock," "Minimum Stock Level," "Maximum Stock Level," and "Current Stock."

Step 2: Add your data
Populate your spreadsheet by manually entering your inventory data into the corresponding columns. Each row represents an individual item in your inventory.
Step 3: Create a Google Form
To track sales and purchases, you'll need one form and one sheet for each action.
You can create a form from your Drive by typing "forms.new" in your browser's address bar, or start the creation directly from your spreadsheet, which connects the form to the spreadsheet immediately. Under the "Tools" menu, click "Create a new form."
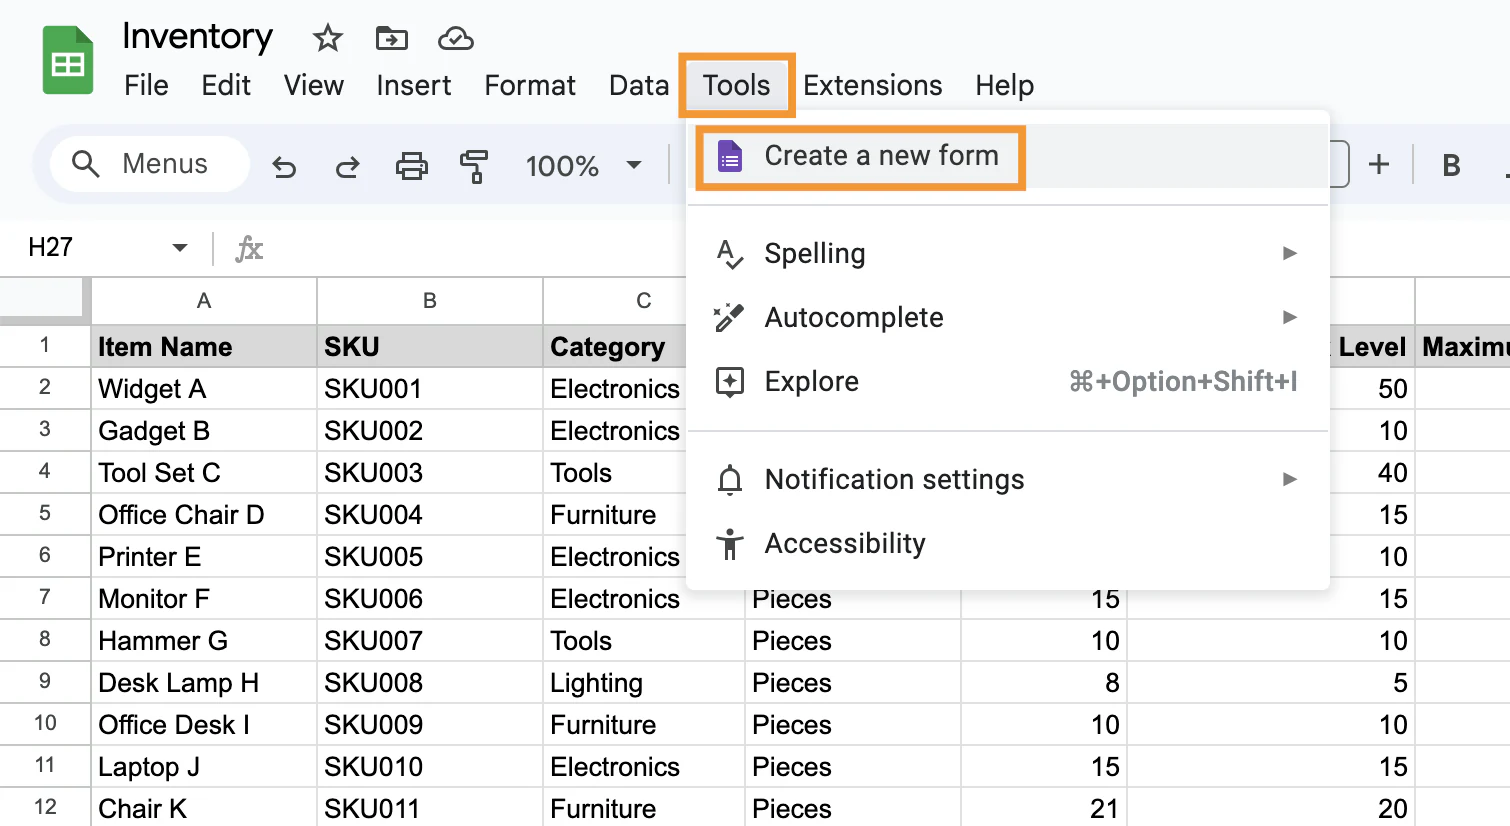
This action automatically creates a new sheet in your document, which will contain the results of every form submission. Follow the sub-steps below to add the fields that feed your inventory data.
Step 3.1: Rename your form
If you created the form directly from Google Sheets, it will inherit your spreadsheet's name. If you created it another way, it will be unnamed. Click the current name to rename it, and update the title as well.

Step 3.2: Add the first question
In this example, we only need two fields (and columns) in our "Sales" and "Purchases" forms and sheets: the product and the quantity sold or bought.
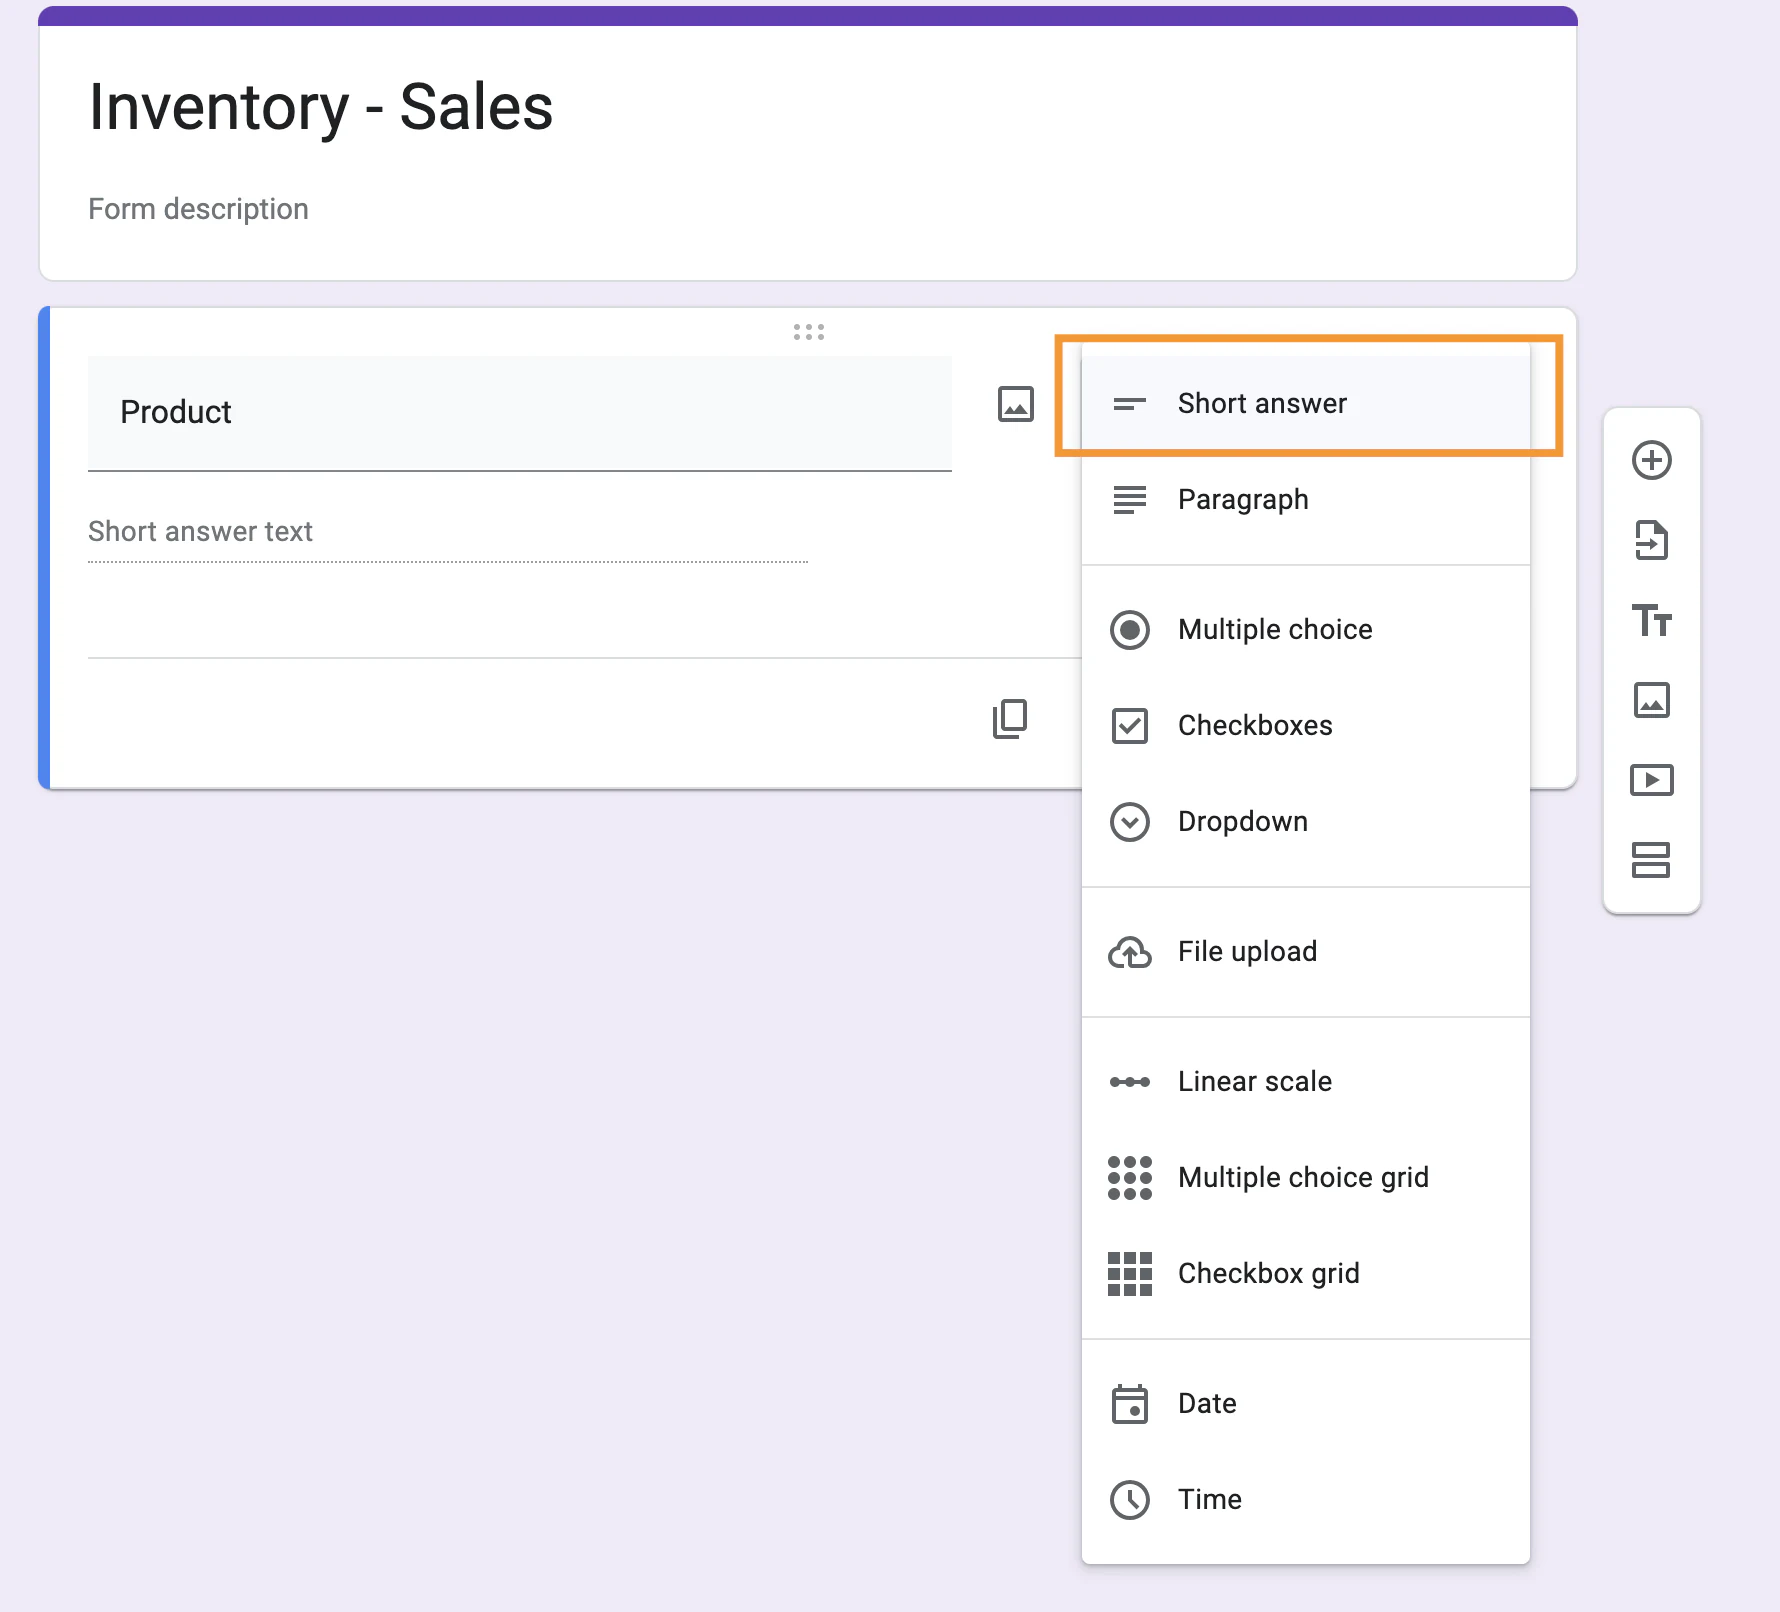
Click "Untitled Question" to change the field's title. Type "Product" or "Product SKU," since we're using the SKU to locate products in the spreadsheet.

Step 3.3: Select the answer type
Google Forms offers several answer types for different inputs:
- Short answer: A basic single-line text field. Ideal for brief answers, e.g., "What is your email address?"
- Paragraph: A multi-line text field for detailed, open-ended answers, e.g., "How can we improve our customer service?"
- Multiple choice: Lets respondents pick one option from a list, e.g., "How should we contact you?"
- Checkboxes: Lets respondents select multiple answers, e.g., "What topics would you like on our newsletter?"
- Dropdown: Displays answers in a dropdown to minimize visual clutter for questions with many options, e.g., "What is your budget?"
- Linear scale: Lets respondents rate something on a scale, e.g., "Rate our customer service from 1 to 5."
- Grid: Multiple choice or checkbox grids for comparing multiple items on the same scale.
- Date and time: Fields for capturing specific dates or times, e.g., "What's your birth date?"
Click the dropdown menu and choose "Short answer."
Step 3.4: Add a new question
To capture quantity, click the plus (+) sign to add a new question below the current one. Name it "Quantity" and repeat step 3.3 to set the answer type.

Step 4: Create a form for sales
Repeat step 3 to create a second form in Google Forms for purchases.

Step 5: Rename the new sheets
After creating a form linked to Google Sheets, you'll find a corresponding sheet added to your spreadsheet for the answers.
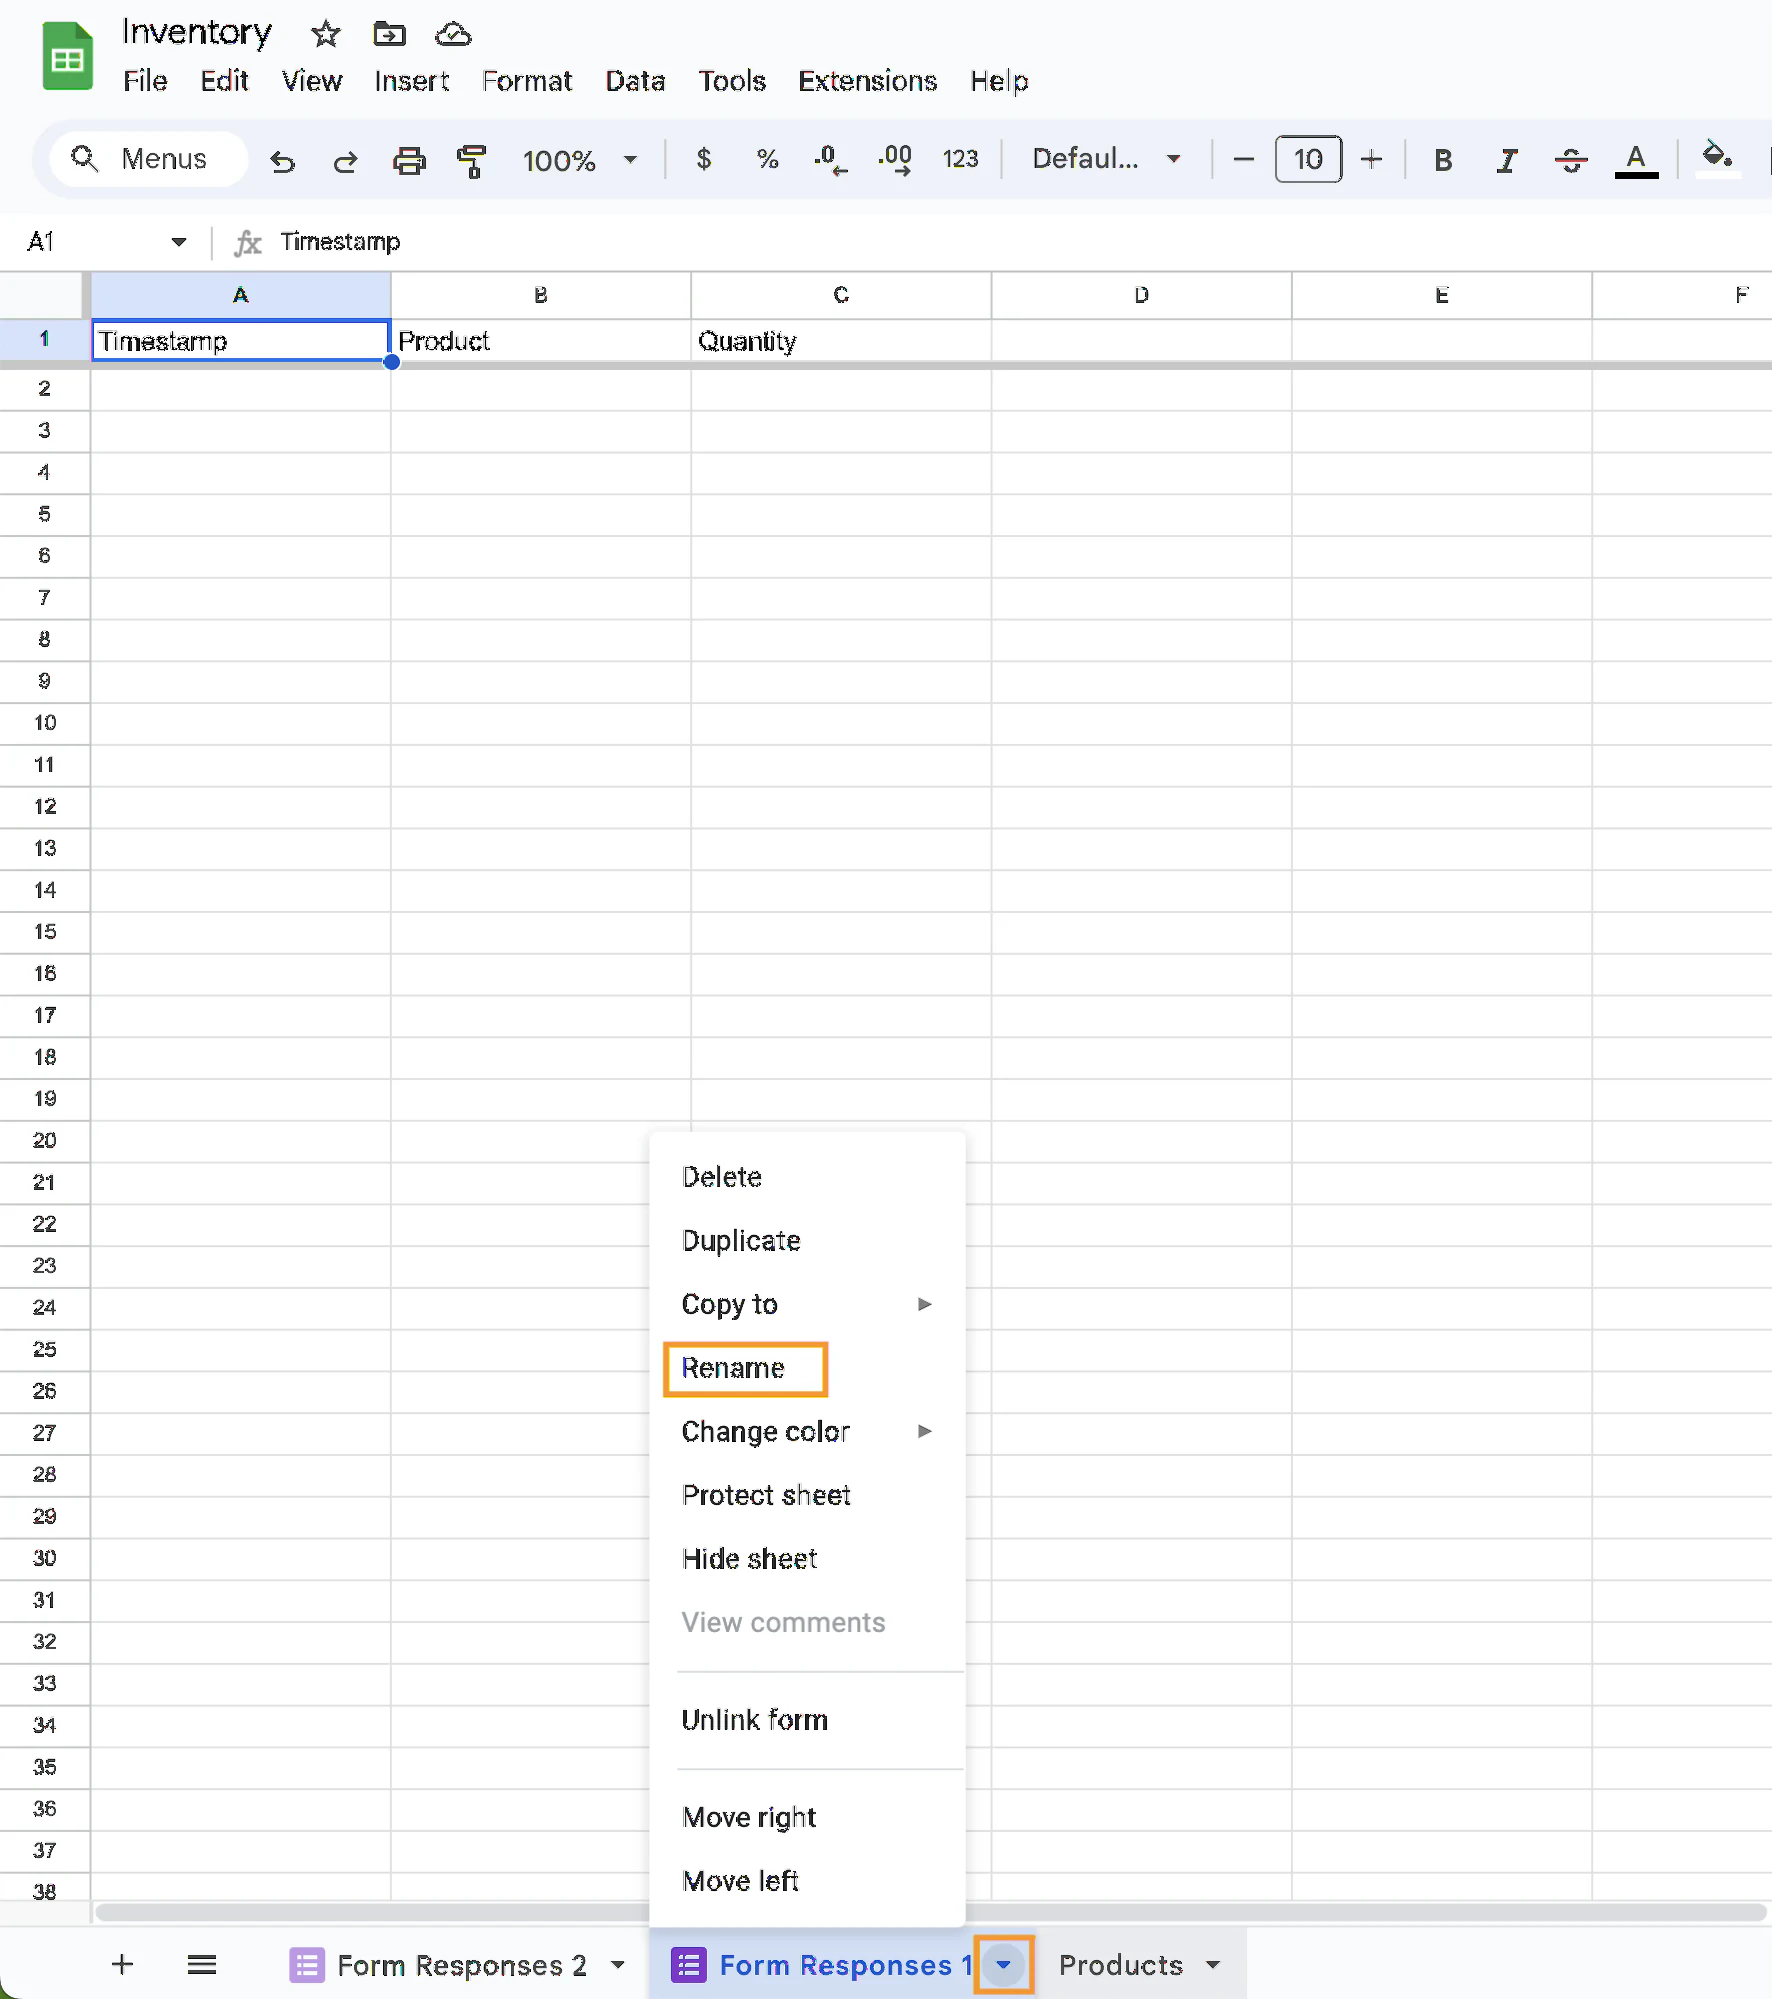
Click the arrow next to the sheet's name and select "Rename." Choose a clear, descriptive name. In this example, we're using "Sales" and "Purchases."
Step 6: Create a formula to manage stock
Now that you have the initial stock for each product in the "Products" sheet, along with two sheets tracking sales and purchases, you need a formula in the "Current Stock" column.
Step 6.1: Select the first cell
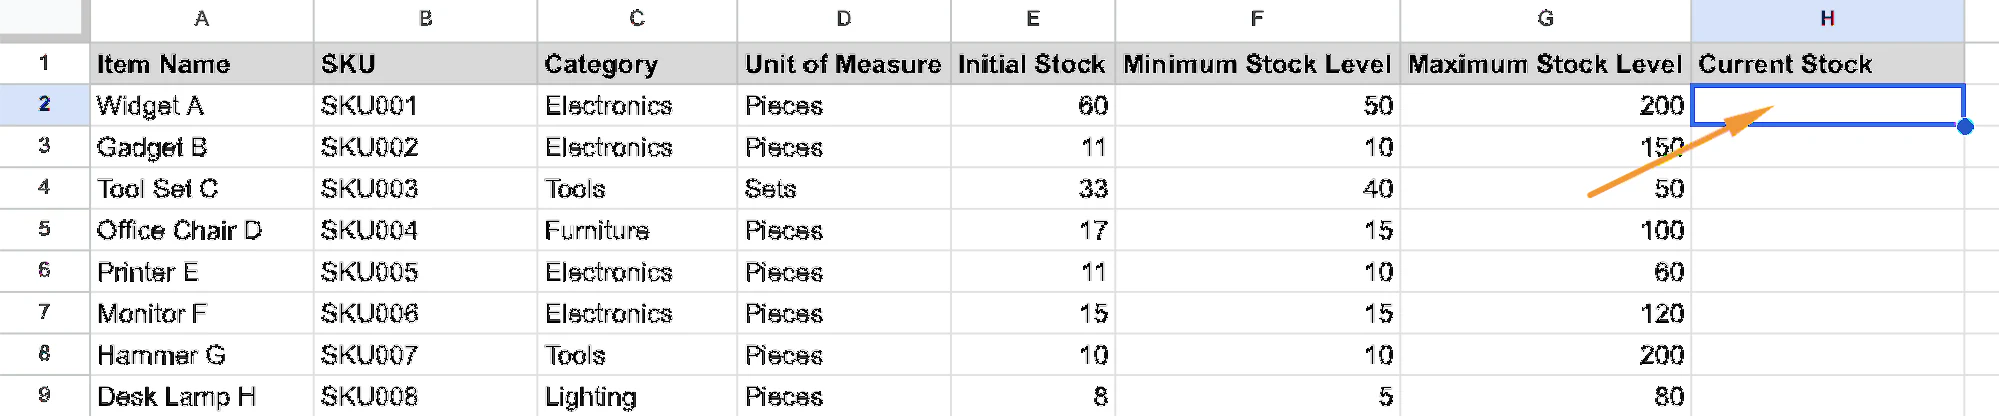
Click the first cell of the Current Stock column. If you're following this guide exactly, that cell is "H2."
Step 6.2: Type the formula
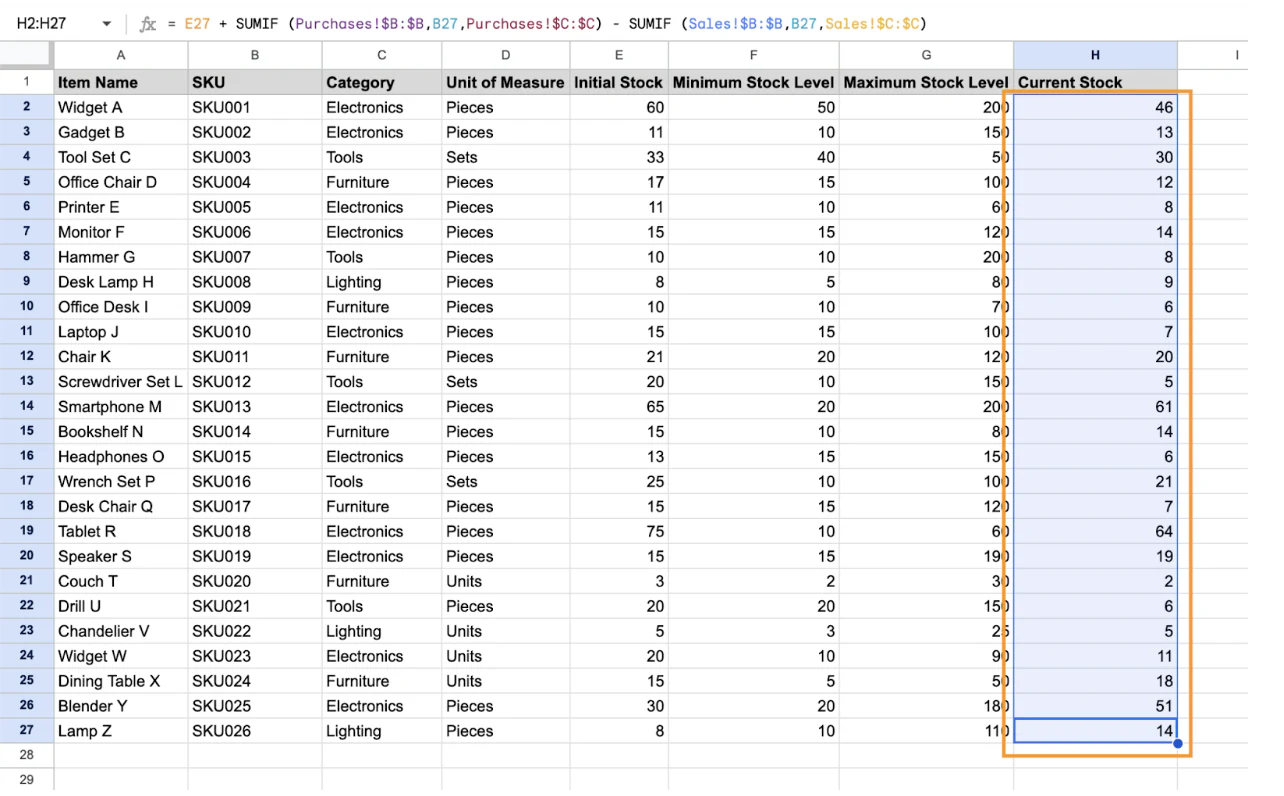
Each cell in this column should represent the initial stock plus purchases minus sales for the corresponding product. For cell H2:
- Start with the value in cell E2.
- Add total purchases (from the "Purchases" sheet) matching the product's SKU in cell B2.
- Subtract total sales (from the "Sales" sheet) matching the same SKU.
The formula is:
= E2 + SUMIF(Purchases!$B:$B, B2, Purchases!$C:$C) - SUMIF(Sales!$B:$B, B2, Sales!$C:$C)
Here's a breakdown:
- E2: References the initial stock for this product.
- SUMIF(Purchases!$B:$B, B2, Purchases!$C:$C): Searches column B of the Purchases sheet for values matching B2 (the SKU), then sums the corresponding values in column C. The result is the total purchased quantity for that SKU.
- SUMIF(Sales!$B:$B, B2, Sales!$C:$C): Works the same way but on the Sales sheet, returning the total quantity sold for that SKU.
- The $ signs fix the referenced columns, so the formula still works correctly if you drag it to other cells.

Step 6.3: Fill the rest of the cells
Drag the formula through the rest of the column by clicking the bottom-right corner of the selected cell and dragging, or copy the formula and paste it into the other cells.
Step 7: Configure your inventory management sheet
With all data listed in one document and current stock calculated automatically, you can add conditional formatting to flag when a product falls below its minimum quantity.
Step 7.1: Select the cells to format
Select the cells you want to format by clicking the first cell and dragging to the last one.
Step 7.2: Open conditional formatting
In the menu, click "Format," then "Conditional formatting."

Step 7.3: Set the formatting rules
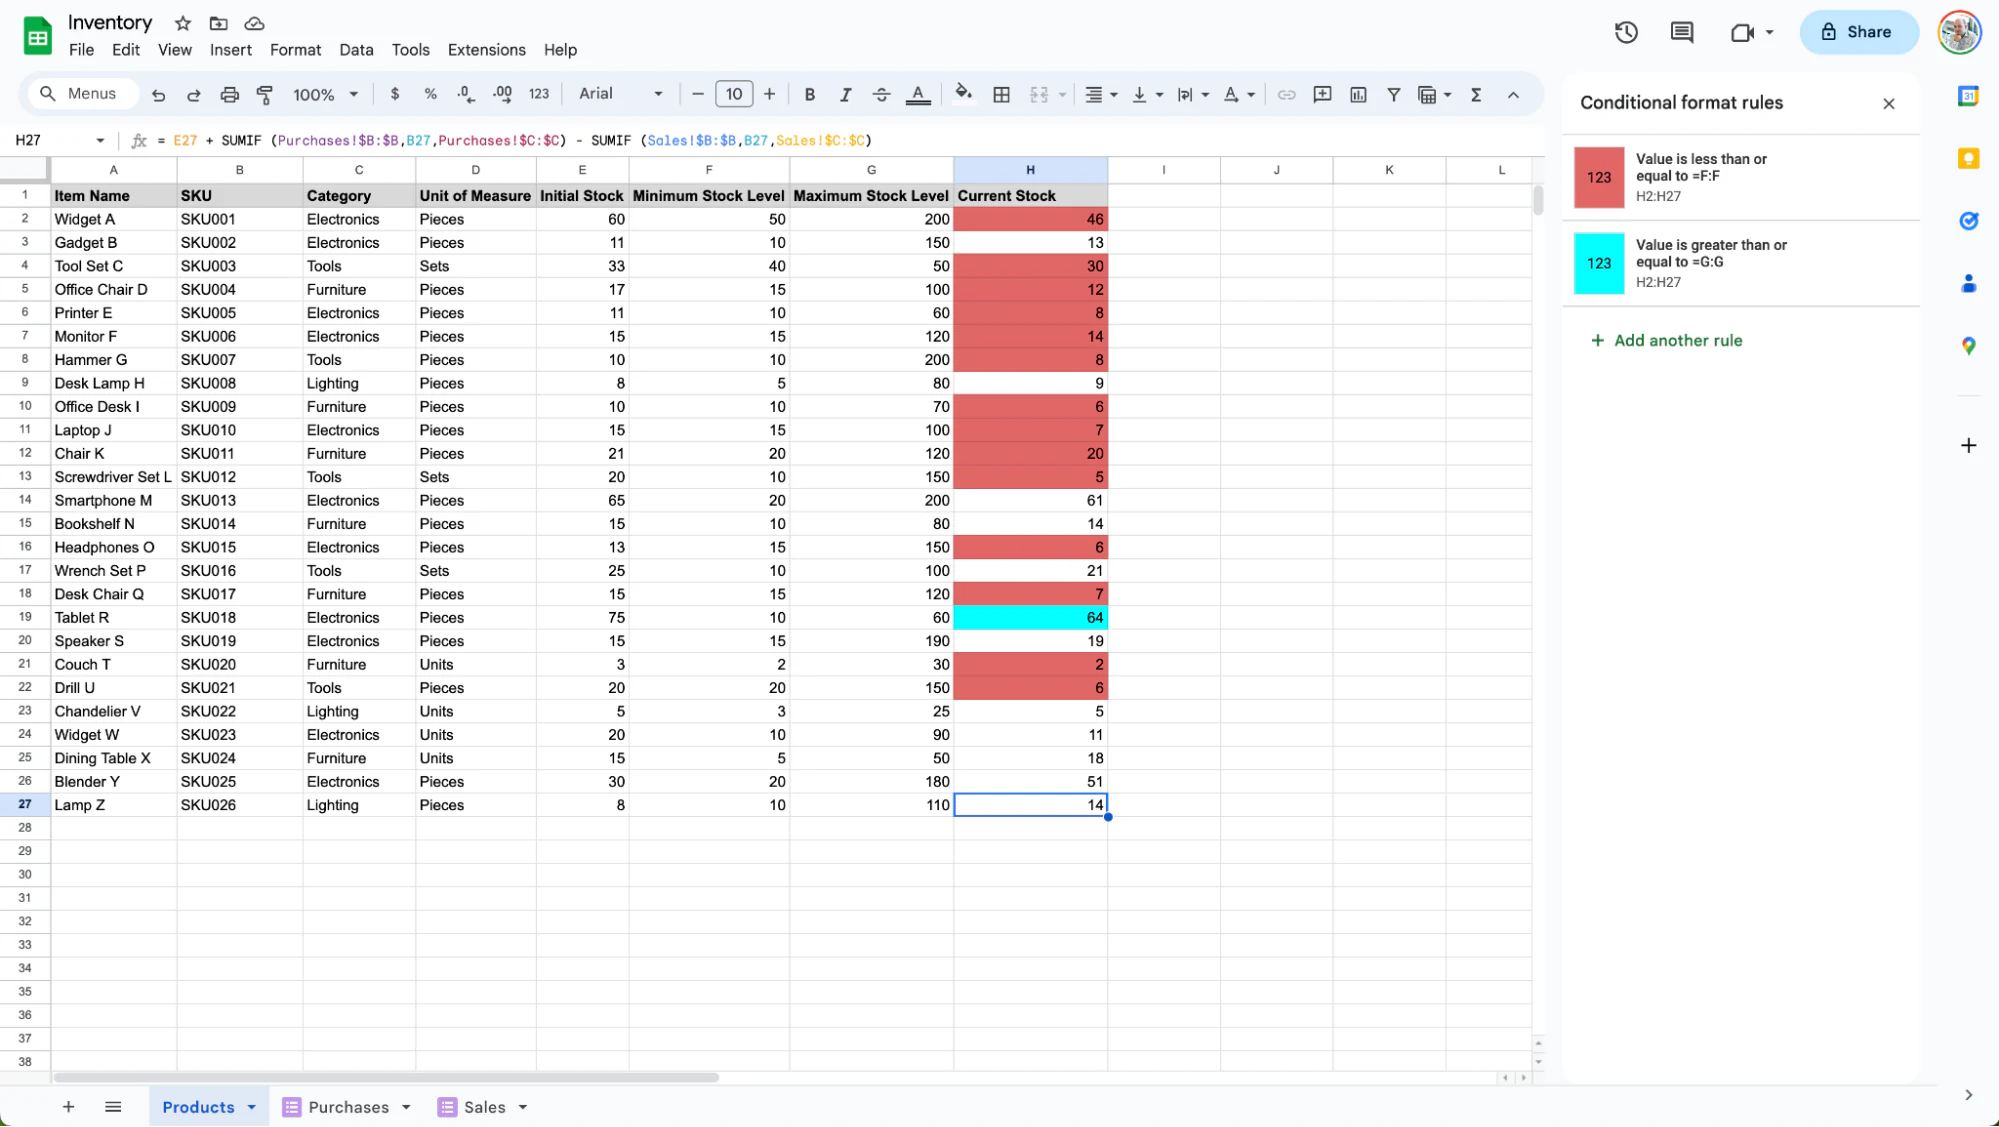
A sidebar opens with your cell range pre-selected. To highlight cells with stock below the minimum quantity in red, under "Format rules," set:
- "Format cells if..." to "Less than or equal to."
- "Value or formula" to "=F:F."
- Adjust the color under Formatting style.
You can add a second rule for stock above the maximum level using "Greater than or equal to," the formula "=G:G," and a different style.

Step 8: Your inventory management system is finished
Now that your spreadsheet and forms are set up, share them according to your team's needs.
Choosing the right approach for your team
A manual spreadsheet works if you're a single person tracking a small, stable list of items. Adding Google Forms helps once you need multiple people logging sales and purchases without editing the sheet directly. But once you have more than one team member updating stock, need permissions between roles, or want mobile-friendly data entry for warehouse staff, a dedicated app is worth the switch.
Building that app doesn't mean abandoning your spreadsheet on day one. You can keep your data in Google Sheets and connect it to Softr for the interface, forms, and automations, then migrate to a Softr Database later if you need faster performance or more advanced permissions. If you'd rather skip the manual setup entirely, check out our guide on how to build a custom inventory management system or grab a ready-made template to get started today.
Frequently asked questions
Can Google Sheets handle inventory management for a growing business?
What's the difference between using Google Sheets manually and connecting it to Softr?
Do I need to migrate my data out of Google Sheets to use Softr?
Can Google Forms replace a full inventory management system?
What features should an inventory management app have beyond a spreadsheet?