How to build a custom inventory management system with Softr


Managing inventory can quickly become a mess of spreadsheets, scattered emails, and manual tracking. This often leads to stockouts, overstocking, and a lack of clear visibility for your team. A custom inventory management app solves this by centralizing your data and streamlining your workflows, giving everyone on your team the exact information they need, when they need it.
In this guide, you'll learn how to build a powerful, secure inventory management app using Softr. We offer a few ways to get started, depending on your learning style and how quickly you need a solution.
- For the fastest solution: You can launch our pre-built Inventory Management template and have a working app in minutes.
- For a guided video walkthrough: You can follow along with the full video course on Softr Academy.
- To learn by reading and customize every detail: This step-by-step article is the perfect guide. It will walk you through creating a system where employees can log in, view stock levels, track sales, and manage suppliers, all without writing a single line of code.
What is Softr and how does it help build an inventory system?
Softr is an AI-powered business app creation platform that empowers business operators to build custom applications like client portals, internal tools, and CRMs on top of their data. It gives you the flexibility to build your app using Softr's own powerful, built-in database, or connect seamlessly to your existing data from sources (+17 sources available, including Airtable, HubSpot, Supabase, SQL databases, or any REST API). This unique approach allows you to turn complex data, wherever it lives, into simple, interactive apps.
For an inventory management system, Softr is the perfect solution because it lets you:
- Centralize your data: Manage your inventory, sales, and supplier data directly within the integrated Softr Database, or connect to an external source like Airtable—all from a single, user-friendly interface.
- Control data access: Set up specific permissions for different user roles (like warehouse managers and sales reps) to ensure team members can only see and edit what's relevant to their job.
- Automate workflows: Build forms for creating purchase orders, tracking sales, and adding new products, eliminating manual data entry and reducing errors.
What you'll learn in this inventory management tutorial
By the end of this guide, you’ll have a fully functional app and the skills to:
- Structure a relational database in Airtable to power your app.
- Connect your data to Softr and build a beautiful front-end interface.
- Set up user roles and permissions to control data visibility and actions.
- Create dynamic dashboards with interactive charts to visualize key metrics.
- Build forms for creating, updating, and managing inventory, sales, and purchase orders.
- Configure a two-step ordering process to track items from draft to fulfillment.
Who’s this app for?
This inventory management app is designed for small to mid-sized businesses that need a central hub to manage stock, sales, and supplier relationships. It provides clear, role-based access for different team members, ensuring everyone can work efficiently and securely.

We’ll configure two primary user groups:
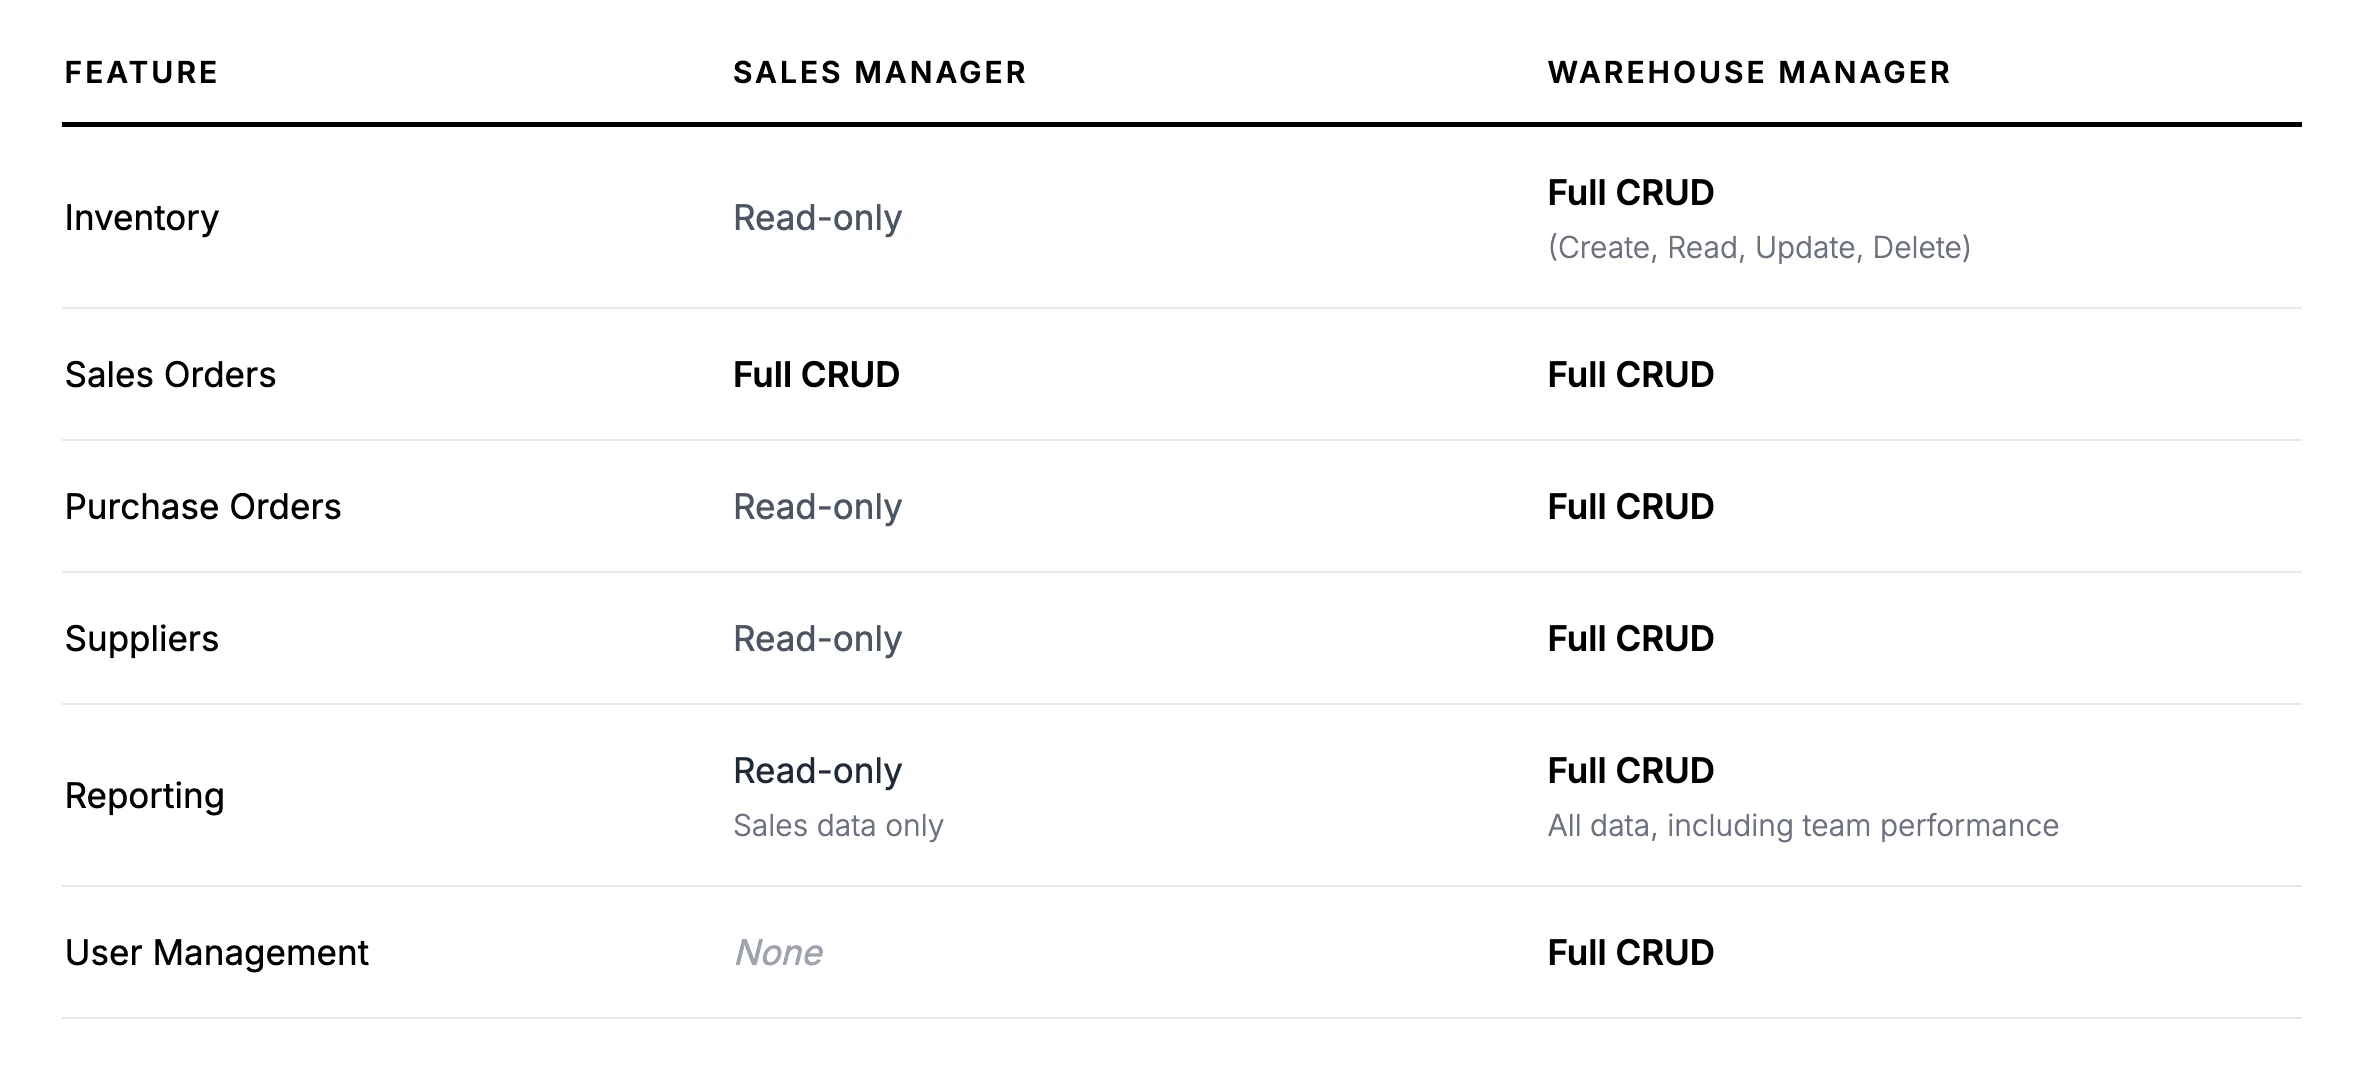
- Warehouse Managers (Admins): They have full administrative access. Their job is to oversee all inventory, manage supplier relationships, and add new team members to the app.
- Sales Managers: Their focus is on the sales process. They can view inventory levels and supplier information but have restricted access to modifying core inventory or purchase data.
To define their permissions, we’ll use the CRUD framework:
- Create: Add new data.
- Read: View data.
- Update: Edit existing data.
- Delete: Remove data.
CRUD details:
The app’s core structure
Our application will consist of several key pages, each connected to a specific table in our Airtable database. This separation of data and design is what makes the app both powerful and easy to manage.
App pages
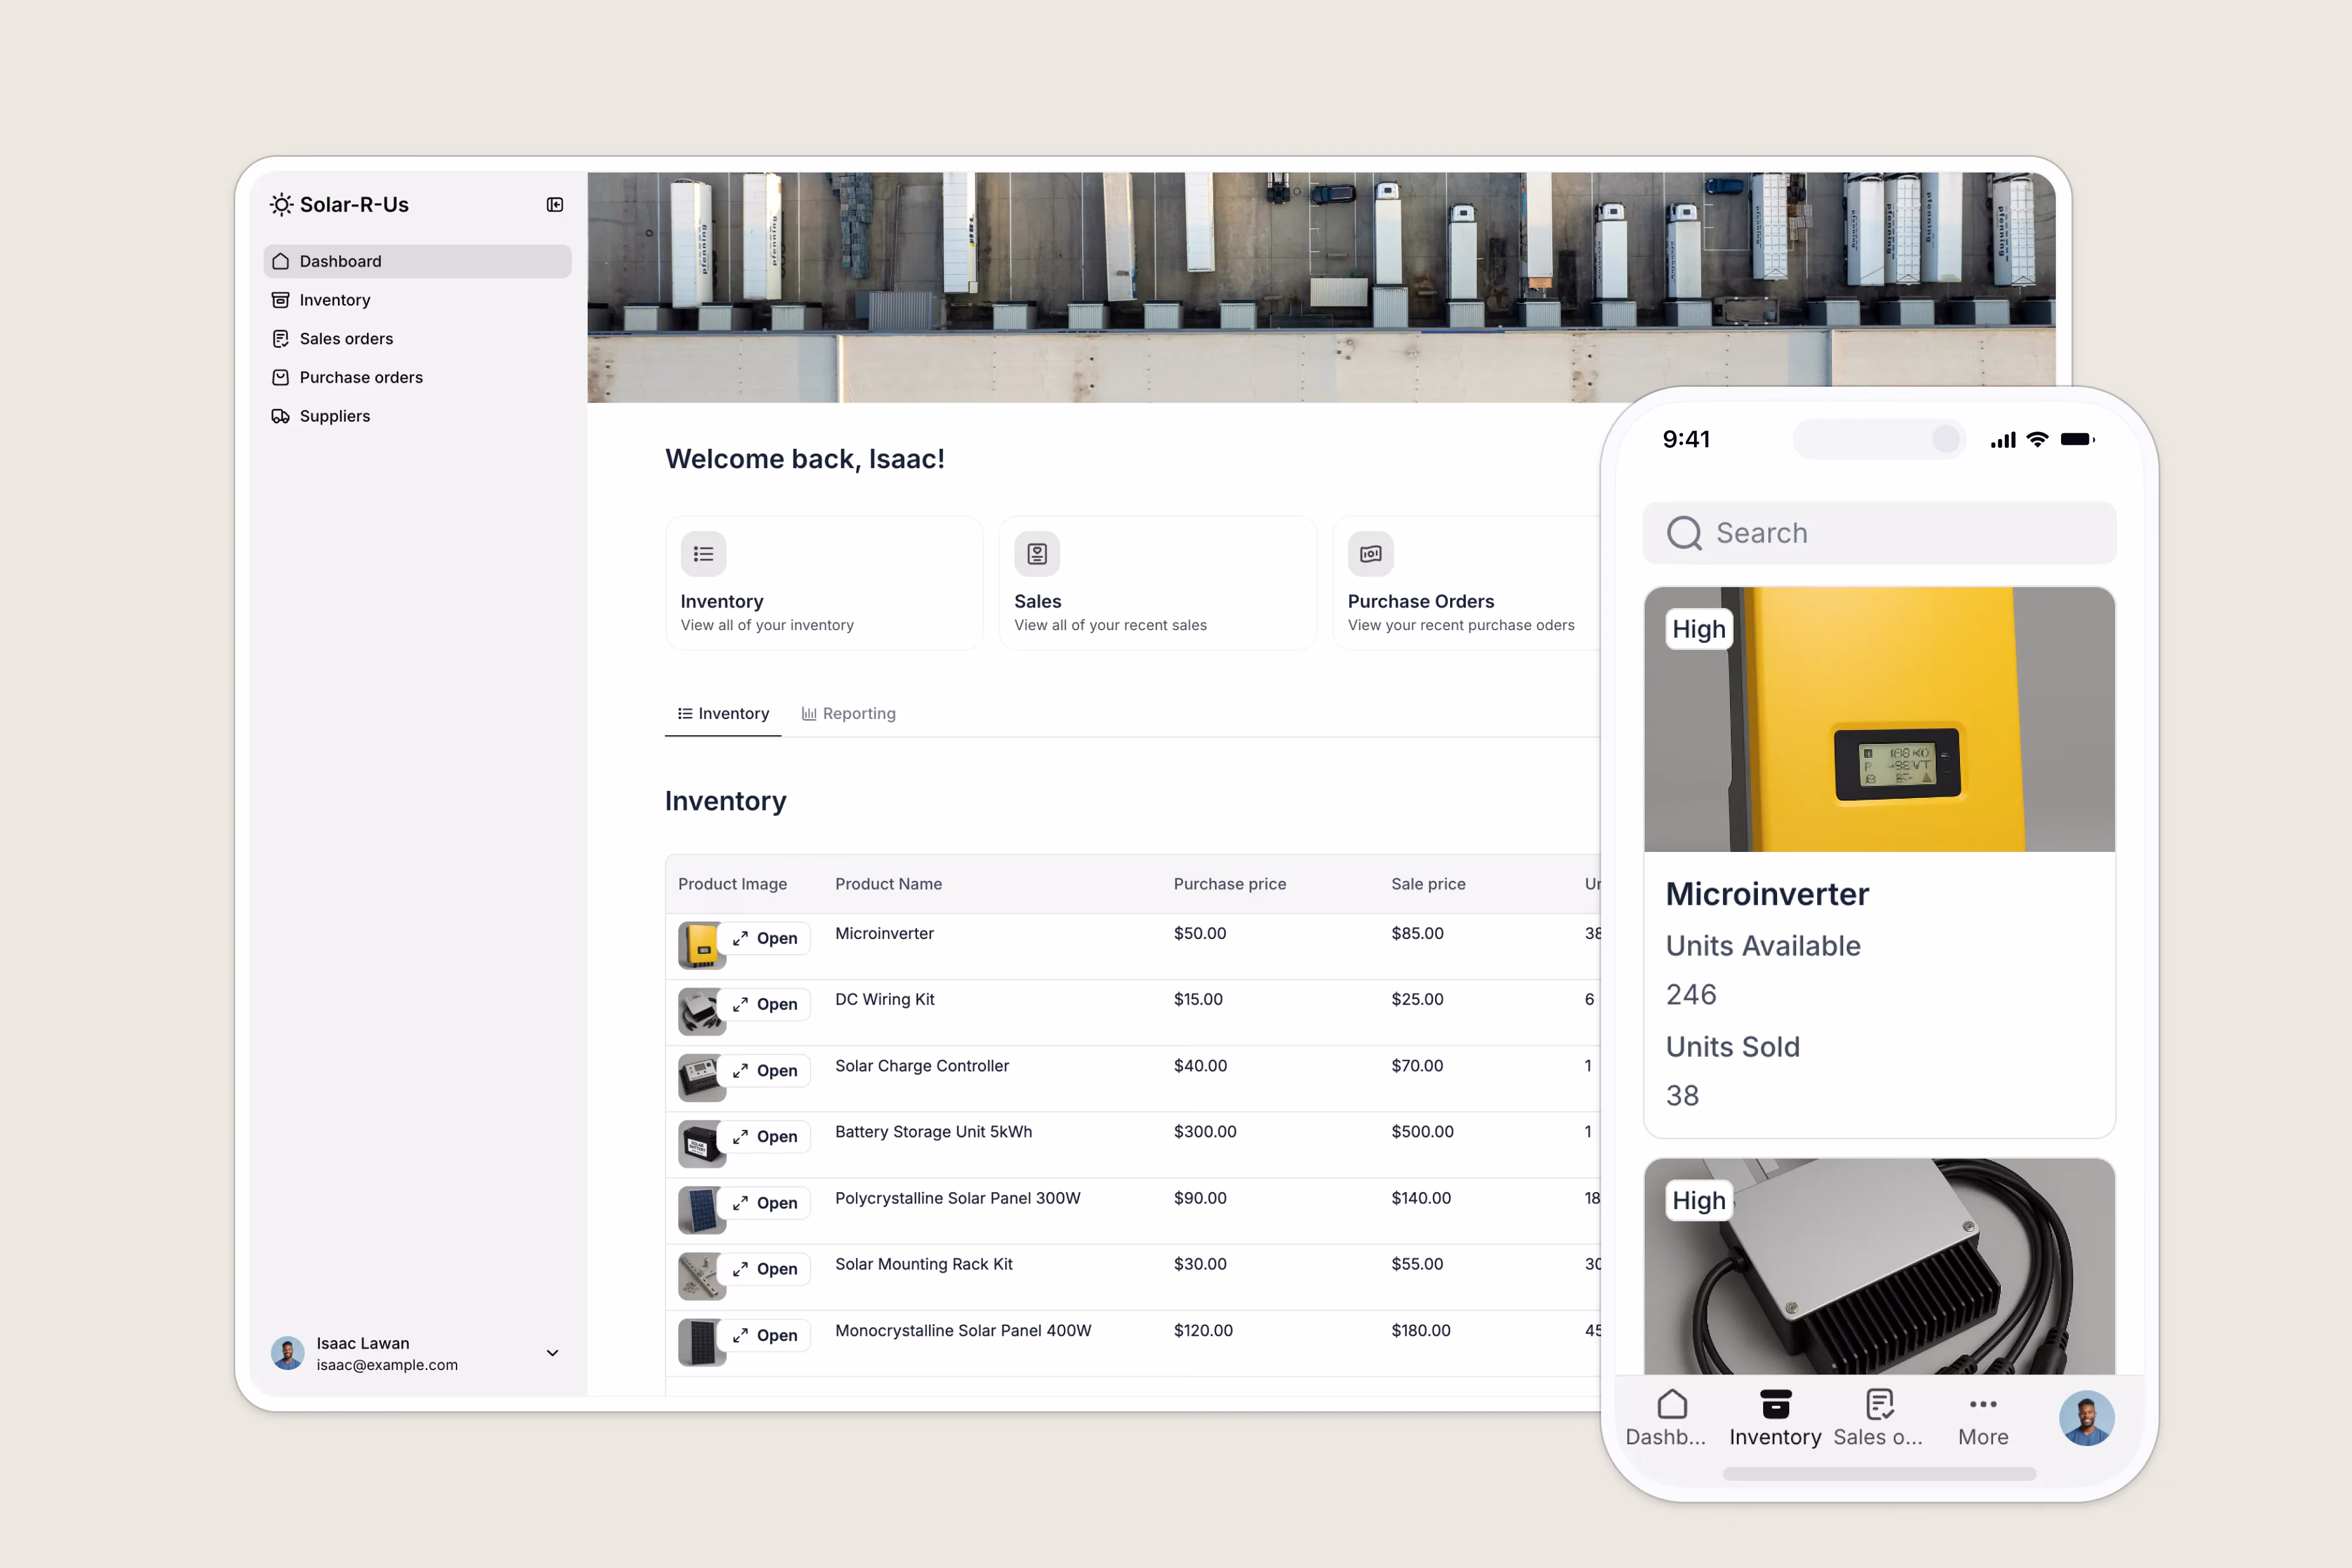
- Dashboard: A central hub with quick links, an overview of inventory, recent orders, and reporting charts.
- Inventory: A page to view all products, check stock levels, and (for admins) add new items.
- Inventory Details: A dedicated view for each product, showing detailed information and related sales orders.
- Sales Orders: A list of all sales, with the ability to create new ones.
- Purchase Orders: A page for managing orders from suppliers.
- Suppliers: A directory of all vendors, with contact information and related purchase history.
Database tables
We'll use Airtable as our database. It will contain the following tables:
Users: Stores login information and roles for all team members.Products: Our inventory catalog, with details like price, quantity, and images.Sales Orders&Sales Order Items: Tracks customer sales and the specific products included in each sale.Purchase Orders&Purchase Order Items: Tracks inventory orders from suppliers.Suppliers: A list of all our vendors.
Ready to get started? Let’s dive in!
Part 1: Structuring your database in Airtable
Before we build anything in Softr, we need a solid foundation for our data. A relational database like Airtable is perfect because it allows us to link related information across different tables. For example, we can link a Sales Order to the specific User who made the sale and the Products that were sold.
1.1. Key tables and fields
Here’s a quick overview of the most important tables and fields in the template:
UsersTable: This is the heart of your app’s security.Email: The unique identifier for each user's login.Name: ASingle line textfield for the user's name.Role: ASingle selectfield with two options:Warehouse ManagerandSales Manager. This is crucial for setting up permissions in Softr.Sales Orders: ALinked recordfield that connects to theSales Orderstable, allowing us to see which sales each user is responsible for.
ProductsTable: Your complete inventory catalog.Product Name:Single line text.Units Available: AFormulaorLookupfield that calculates the current stock level in real time by tracking units purchased and units sold.Related Orders: ALinked recordto theSales Order Itemstable.
Sales OrdersandSales Order ItemsTables: These work together to track sales. A singleSales Orderrecord can be linked to multiple records in theSales Order Itemstable. This allows a customer to buy multiple products in one transaction.Purchase OrdersTable: Used to track inventory replenishment.Status: ASingle selectfield with options likeDraft,Sent, andReceivedto track the fulfillment process.
Part 2: Creating your Softr application
With your database ready, it’s time to bring it to life in Softr. We’ll start a new application from scratch and connect it to our Airtable base.
- From your Softr dashboard, click New Application and choose Start from scratch.
- Select Airtable as your data source and connect to the Inventory Management base you just set up.
- Softr will ask which tables to sync. Select all of them and click Continue. Softr will intelligently generate a set of pages for your app based on your tables, giving you a fantastic head start.
2.1. Configure theme and branding
First, let's make the app look like your own.
- Navigate to the Theme tab on the left sidebar.
- Set your brand’s Accent color. Softr will intelligently apply this color to buttons and other elements across your app.
- Go to Settings > General in the top left. Here, you can upload your Logo and set your App Name.
2.2. Set up navigation
Softr created a default navigation menu for us. Let's clean it up.
- Click on the header block to open its settings.
- You’ll see a list of linked pages. Rename the default
Userspage toDashboardandProductstoInventory. - You can also change the icons for each link to make them more intuitive.
- Remove pages we don't need in the main navigation, like
Purchase Order ItemsandSales Order Items. We'll access that data through other pages.
Part 3: Setting up user access and permissions
This is where Softr's power really shines. We’ll sync our users from Airtable and use their roles to create a secure, personalized experience. Learn more about user groups and permissions in our docs.
3.1. Sync your users
- Navigate to the Users tab on the left sidebar.
- Click Sync with Data Source and select your Airtable base.
- Map the Softr fields to your Airtable fields:
EmailtoEmail,NametoName, andAvatarto your profile picture field. - Click Save and Sync. Your users from Airtable will now appear in Softr.
3.2. Create user groups
Next, we’ll create user groups that automatically enroll users based on their role in Airtable.
- In the Users tab, go to the User Groups sub-tab.
- Click New User Group and select Condition-based.
- Name the first group
Warehouse Manager. Set the condition toIf 'Role' is 'Warehouse Manager'. - Create a second group named
Sales Managerwith the conditionIf 'Role' is 'Sales Manager'.
Now, any user synced from Airtable will be automatically placed in the correct group.
3.3. Configure authentication settings
Let's decide how users will sign up and log in.
- Go to the Authentication sub-tab.
- For Sign Up, choose Domain restricted. This is a great security feature that ensures only people with your company’s email domain (e.g.,
@yourcompany.com) can register. - For Log In, select One-time code sent to email. This is a user-friendly option that avoids the hassle of forgotten passwords.
Part 4: Building a personalized dashboard
The dashboard is the first page users see after logging in. We'll build a central hub with key information and navigation links.
- On the
Dashboardpage, delete the default table block. - Add a Static > Hero block for a top banner. Remove the default text and button, and add a background image to give it a professional look.
- Add a Static > Quick Links block. Configure four links:
Inventory,Sales,Purchase Orders, andSuppliers. Set each one to open the corresponding page. - Add a Container > Tab Container block. This will organize our dashboard information neatly. Create three tabs:
Inventory,Orders, andReporting.
4.1. The Inventory and Orders tabs
- Inside the
Inventorytab, add a Dynamic > Table block. - Connect it to your
Productstable in Airtable. - Configure the fields to show key information like
Product Image,Product Name,Purchase Price, andUnits Available. - Next, duplicate this table, move it into the
Orderstab, and change its data source to theSales Orderstable. Adjust the fields to showCustomer,Status, andOrder Amount.
4.2. The Reporting tab
This is where we’ll visualize our data.
- Inside the
Reportingtab, add a Container > Column Container with two columns. - In the first column, add a Dynamic > Chart block. Configure it to show Total Revenue by Customer, using your
Sales Orderstable as the source. - In the second column, add another Chart block to show Inventory Levels by product, using the
Productstable. - Finally, add one more Chart block below the columns. Configure this to show Revenue by Sales Rep. This chart contains sensitive performance data, so we'll make it visible only to admins.
- Click on the chart block, go to the Visibility tab, and set it to be visible only to the
Warehouse Manageruser group.
- Click on the chart block, go to the Visibility tab, and set it to be visible only to the
Part 5: Building the inventory management pages
Now, let's build the core functionality: viewing and managing our product inventory.
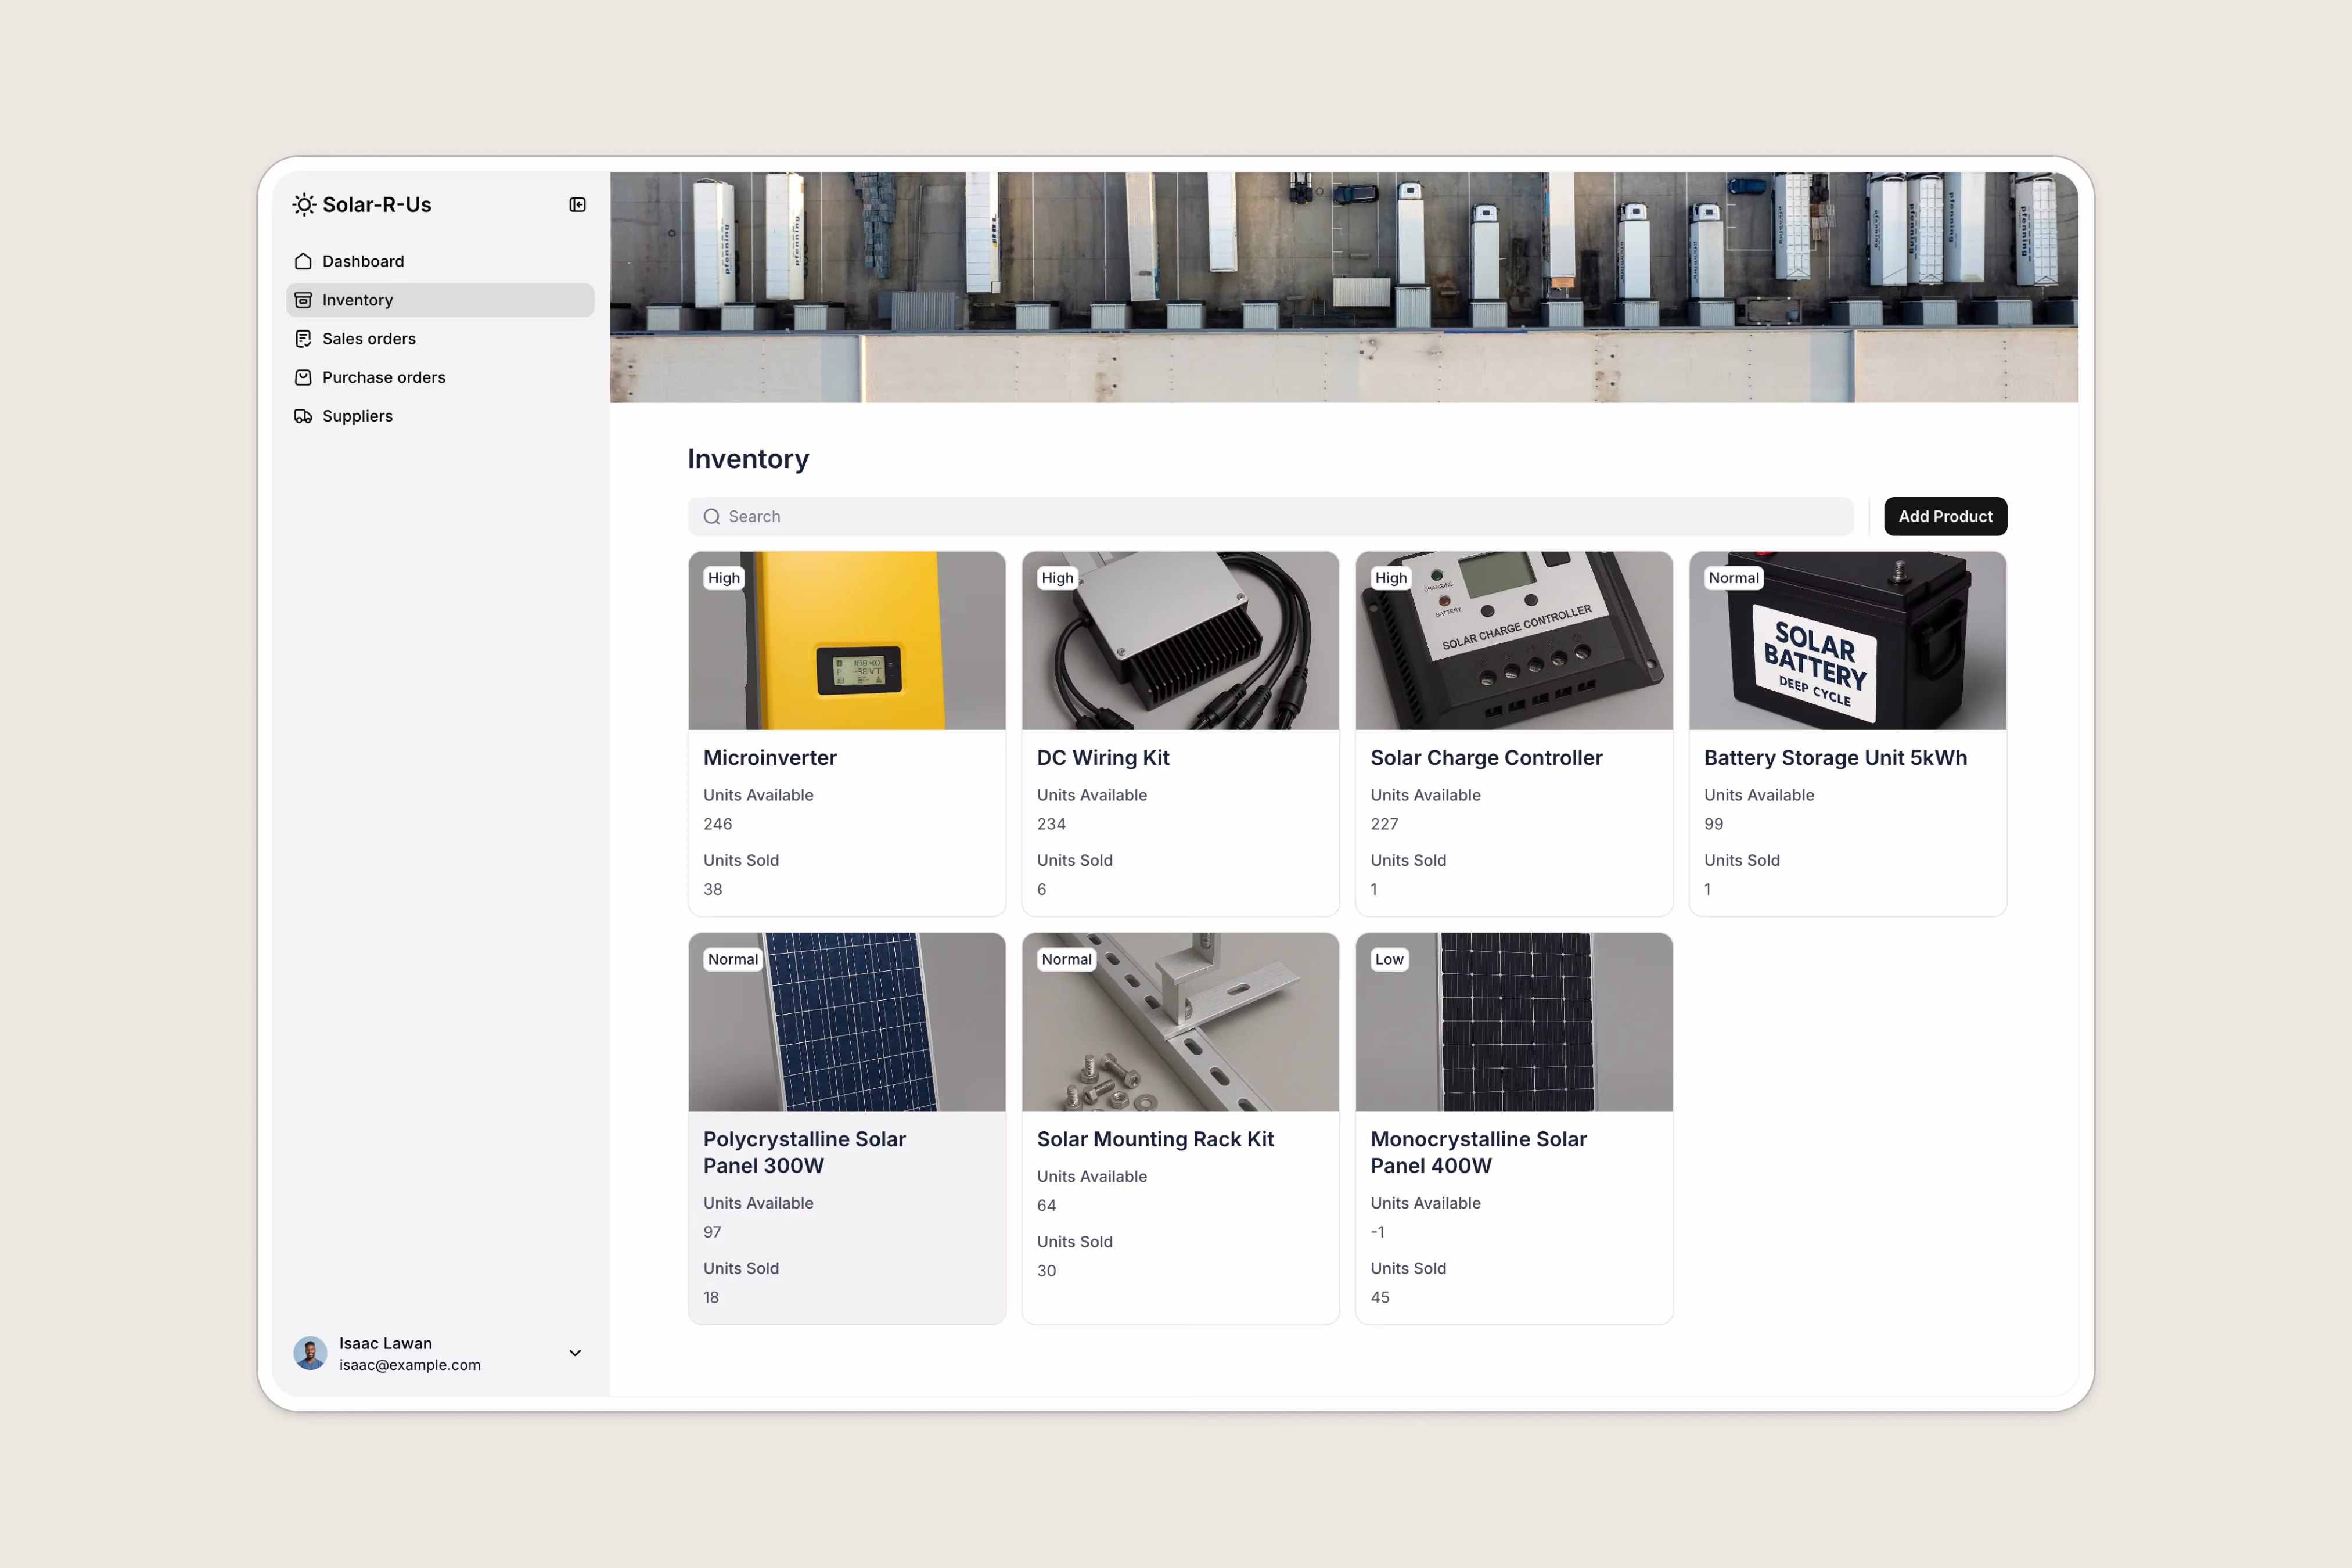
5.1. The inventory list page
- Navigate to the
Inventorypage (which was auto-generated from yourProductstable). It likely has a list or card block already. - Click the block and customize the fields displayed. For example, show the
Product Name,Units Available, andUnits Sold. - This page should have an Add Product button. Click on it to configure the associated form. Select the fields you want users to fill out, like
Product Name,Description,Sell Price,Purchase Price, andImage. - Crucially, set the Visibility of this
Add Productbutton to theWarehouse Manageruser group only. Sales managers can view inventory, but not add new products. - Finally, configure the On-Click Action for the list items to Open Details Page. This will link each product card to its own dedicated detail page.

5.2. The inventory detail page
Softr automatically created a detail page for your products. Let's customize it.
- Navigate to the
Inventory Detailspage. - Configure the Item Details block to display all relevant product information, like purchase and sell prices, units sold, and total revenue.
- This block will have default Edit and Delete buttons. Configure their visibility so that only
Warehouse Managerscan see and use them. This prevents unauthorized changes to your inventory. - At the bottom of the page, there should be a block showing linked items. Configure this block to display Related Sales Orders.
- Add a Conditional Filter to this block with the rule:
Show records where 'Order Items' includes the 'Product Name' of the current page's record. This powerful feature ensures you only see the sales orders relevant to the specific product you're viewing.
- Add a Conditional Filter to this block with the rule:
Part 6: Building the supplier management pages
Managing suppliers is just as important as managing inventory. The process is very similar to what we just did for products.
6.1. The suppliers list page
- Go to the
Supplierspage. - Customize the list block to show the supplier's
Logo,Name,Contact Email, andProducts Carried. - Configure the Add Supplier button and its form.
- Set the visibility of the
Add Supplierbutton toWarehouse Manageronly.

6.2. The supplier detail page
- On the
Supplier Detailspage, configure the Item Details block to show all contact information. - Set up the Edit Supplier and Delete Supplier buttons, making them visible only to
Warehouse Managers. - Configure the linked block at the bottom to be a Table that shows related Purchase Orders.
- Add a Conditional Filter to show only purchase orders where the
Supplierfield matches the supplier on the current detail page.
Part 7: Building the purchase order management pages
This section is more advanced, as we'll build a two-step process for creating a purchase order and then adding items to it.
7.1. The purchase orders list page
- On the
Purchase Orderspage, replace the default block with a Table block for a more compact view. - Connect it to the
Purchase Orderstable and add filters forSupplierandStatus. - Configure the Create Order button, making it visible only to
Warehouse Managers. - In the form for creating an order, add a Hidden Field. Set its value to map to the
Statusfield in Airtable, with a default value of "Draft". This ensures every new order starts as a draft. - Set the On-Click Action for the table rows to open the
Purchase Order Detailspage.
7.2. The purchase order detail page
This is where the second step of our process happens.
- Configure the Item Details block to show the key order information.
- Set up several action buttons, all visible only to
Warehouse Managers:- Update Order: A standard edit button.
- Delete Order: A standard delete button.
- Send Order: Use the Call API action type. This can be configured to trigger a Softr Workflow for automated order processing, or connect to an external system via native integrations with Zapier or Make.
- Update to Received: Use the One-click update action. Configure it to change the
Statusfield to "Received" instantly.
- Below the details, add a table block connected to the
Purchase Order Itemstable. - Configure the Add Item button on this table. In its form, use a Hidden Field to pass the
Record IDof the current purchase order page. This automatically links any new item to the correct parent order.
Part 8: Building the sales order management pages
Now it’s your turn to put your new skills to the test! Your challenge is to build the Sales Orders and Sales Order Details pages. The process is nearly identical to the purchase order workflow, with one key difference: both Sales Managers and Warehouse Managers can create and manage sales.

Here's the solution breakdown:
- On the
Sales Orderslist page, the Create Order button should be visible to both user groups. - On the
Sales Order Detailspage, you'll need a Confirm Order button.- This should be a One-click update button that changes the order
Statusfrom "New" to "Confirmed." - Use the Show on specific records visibility setting to make this button appear only if the order's
Statusis "New." This prevents users from re-confirming an already confirmed order.
- This should be a One-click update button that changes the order
- The table for
Sales Order Itemsshould be configured just like the one for purchase orders, allowing users to add multiple products to a single sale.
Part 9: Finalizing your app
We’re almost there! Let’s add the final touches to make your app professional and secure.
9.1. Clean up unused pages
Go to the Pages tab and delete any auto-generated pages you didn't end up using, like Sales Order Items Details.
9.2. Personalize utility pages
All useful pages like Login, Sign Up, Account Settings, 404, etc come out of the box with Softr. You can then go ahead and customize them further if you’d like, for example by adding a background image to the sign up block.
9.3. Add global data restrictions
As a final layer of security, we'll set up Global Data Restrictions. This powerful feature lets you create app-wide rules that are enforced on the server. It's a crucial safety net that ensures users can never access or modify data they aren't supposed to, even if you miss a visibility setting on a specific button or block.
For our inventory app, we'll add a few rules to lock down permissions for the Sales Manager group:
- Navigate to Users > Data Restrictions.
- Create a new rule for the
Sales Managergroup on thePurchase Orderstable. - Disable their ability to Create, Update, and Delete records.
- Repeat this for the
Supplierstable. This ensures your data remains secure at the application level.
9.4. Go live
It's time to launch!
- Publish: Click the Publish button in the top right. Your app is now live on a Softr subdomain.
- Custom Domain: In Settings > Custom Domain, you can connect your own domain (e.g.,
inventory.yourcompany.com) for a fully branded experience. - Progressive Web App (PWA): In Settings > Mobile App, you can enable the PWA option. This allows users to "install" the app on their phone's home screen for easy access, just like a native app. 📱
Your app is live
Congratulations! You have successfully built a powerful, custom inventory management app using Softr. You've learned how to structure a database, connect it to a front-end, manage user permissions, build dynamic dashboards, and create complex, multi-step forms.
From here, you can continue to customize and expand your app to perfectly fit your business needs. For example, you could be adding our brand new Ask AI feature to your dynamic blocks to enable the end users to chat with an AI assistant that answers based on the block’s data. Hours can be saved when enabling such features.
Happy building!
Frequently asked questions
- What is an inventory management system?
- Why should I build a custom inventory app instead of using off-the-shelf software?
- What is a no-code inventory management system?
- Can my team use the inventory software on their mobile devices?
- How does a custom inventory app improve data security for my team?