How to build a custom company intranet for your business


Most companies start off with a DIY patchwork of Slack channels, Google Docs, and pinned emails masquerading as an internal knowledge hub. It’s meant to keep everyone informed, but new hires spend their first week asking, “Where do I find the org chart?” or “What’s the PTO policy?” instead of getting productive—while even seasoned employees struggle to keep track of important updates.
A company intranet fixes that by giving your team one secure place for company news, documents, directories, and internal communication. The catch is that building one traditionally meant paying for rigid off-the-shelf software or waiting months on IT.
This guide walks you through building a custom company intranet in Softr—so you can create a centralized internal hub without the usual bottlenecks.
If you’d rather skip straight to a finished setup, grab the Company Intranet template or watch the full live build session on YouTube.
What is Softr, and why use it to build an intranet?

Softr is an AI-powered business app builder that turns your data into secure, functional tools without writing code. With Softr's AI Co-Builder, you just describe your ideal intranet in plain English, and it generates the database, interface pages, and business logic instantly. You can build from scratch with the drag-and-drop editor, start from a template, or let AI do the heavy lifting while retaining full visual control over the final result.
Softr is uniquely suited for internal tools like intranets because it handles the complex parts for you. Instead of worrying about database architecture or security rules, you can rely on Softr's native user management and granular permissions. Employees only see what they are allowed to see. So whether you’re sharing company-wide announcements or team-specific resources, the right people always see the right content.
What you'll learn in this intranet tutorial
You can choose to use the AI Co-Builder to generate this entire structure from a single prompt, or follow along to configure it manually. In this guide, we’ll cover how to build and configure:
- A relational database with three core tables for users, departments, and announcements.
- Role-based access with two user groups (admins and employees) so admins can post announcements while employees view them.
- A company announcement feed sorted by date, with rich text content and cover images.
- A native commenting system where employees can react to and discuss announcements.
- An employee directory with search, department filters, and clickable email contacts.
- An admin form with hidden inputs that automatically capture the author and publish date.
- AI-powered categorization of announcements using Database AI Agents.
- An “Ask AI” chatbot that reads company announcements and knowledge resources, answers questions, and helps employees take action right inside your intranet.
- A department directory built with the Vibe Coding block for a custom layout.
- A Slack notification workflow that alerts the team whenever a new announcement is published.
Who is this app for?
This intranet is designed for teams of all sizes—from small startups of 10+ employees to companies with 500-person workforces—that want to replace scattered information with one secure intranet system. It's especially useful for operations leads, HR managers, or anyone else who keeps hearing "I didn't see that announcement."
User groups and responsibilities
The app serves two roles:
1. Admins (HR, ops leads, department heads)
These users manage the intranet's content. Their jobs include:
- Publishing company announcements with rich text and cover images.
- Managing the employee directory (adding/removing team members).
- Overseeing departments and team structure.
2. Employees (everyone else)
These users consume information and collaborate. Their jobs include:
- Reading company news and announcements.
- Searching for colleagues by name, department, or role.
- Commenting on and reacting to announcements.
- Using AI chat to quickly find answers across all published content.
The intranet blueprint
Before jumping into the build, it helps to map out the structure of your intranet first. Defining your data model, user roles, and page layout upfront makes the rest of the setup much easier—and helps make sure everything connects cleanly once you start building.
Here’s the structure we’ll use:
1. One database, multiple tables
We'll use Softr Databases to create three interconnected tables:
- A table for users: This encompasses all employees and admins, distinguished by a “Role” field. This table also powers the app's authentication.
- A table for departments: This includes all the teams and/or divisions within your company (Ops, Marketing, Engineering, etc.).
- A table for announcements: This refers to company news, updates, and communications posted by admins.
2. Table relationships
- Users ↔ Departments: Each user belongs to one department, and each department has many users.
- Users ↔ Announcements: Each announcement is posted by one user (the author).
3. Intranet pages
- Homepage (single page app): A layout with separate tabs for Announcements, Directory, Departments, and an admin-only New Announcement form.
- Announcement details: A sliding modal that displays full announcement content and comments when opened from the feed.
💡Pro tip: Want to skip the manual setup? Use the AI Co-Builder. Simply type: "Build a company intranet with announcements, an employee directory, and departments. Include an Admin role that can post news, and an Employee role that can read and comment." Softr will generate this exact database schema, sample data, and corresponding pages in minutes. If you want to understand the mechanics or build it yourself, skip straight ahead to Part 1.
Part 1: Build your database
We start with data. Always.
In Softr, the database is used to store, manage, and organize all your application data. Getting the structure right upfront makes the rest of the build much easier.
1.1. Configure the Users table

Open your Softr Database and locate the default Users table. This table will hold everyone who accesses the app.
- Set
Emailas the primary field (type: Email). Always use email as the unique identifier since names are not unique. - Add a
Full Namefield (type: Text). - Add a
Rolefield (type: Single Select) with two options: Admin and Employee. This field drives the entire permission system. - Add a
Job Titlefield (type: Text), for example, "Finance Manager" or "Engineering Lead." - Add an
Avatarfield (type: File) for profile pictures. - Add a
Departmentfield (type: Linked Record) connected to the Departments table. This creates a two-way relationship.
Add a few sample records:
💡 Pro tip: If you already have employee data somewhere, you can import a CSV or use Softr's one-click migration from Airtable. Your data will land here without manual entry.
1.2. Configure the Departments table
Create a Departments table. Each record represents a team or division.
- Set the primary field to
Department Name(type: Text). - The
Userslinked record field was automatically created when you set up the relationship in step 1.1. This means the two-way connection is already live. - Add a Rollup field named
Number of Employees. Configure it to get data from the Users table, select the Email field and set the aggregation to Count. This will automatically calculate how many people are in each department. - Add your departments: Ops, Marketing, Tech, or whatever structure your company uses.

1.3. Configure the Announcements table
This is the content engine of your intranet. Each record is one company announcement.
- Set the primary field to
Title(type: Text). - Add a
Contentfield (type: Long Text). Enable rich text formatting so admins can use headings, bold font, links, and bullet points directly in the announcement body. - Add a
Datefield (type: Date) to track when the announcement was published. - Add a
Cover Imagefield (type: File) for a visual header on each announcement. - Add a
Posted Byfield (type: Linked Record) connected to the Users table. This logs which admin published each announcement. - Add a
Typefield (type: Single Select) with options: Office News, Security News, Company News, Other. We'll auto-fill this with AI shortly.
💡 Pro tip: Use the Database AI Co-Builder to generate sample announcement records. Just say: "Add seven records of dummy data in the announcements table," and you'll have realistic placeholder content to work with while building the interface.
1.4. Add AI auto-categorization
Instead of asking admins to manually categorize every announcement, let AI handle it.
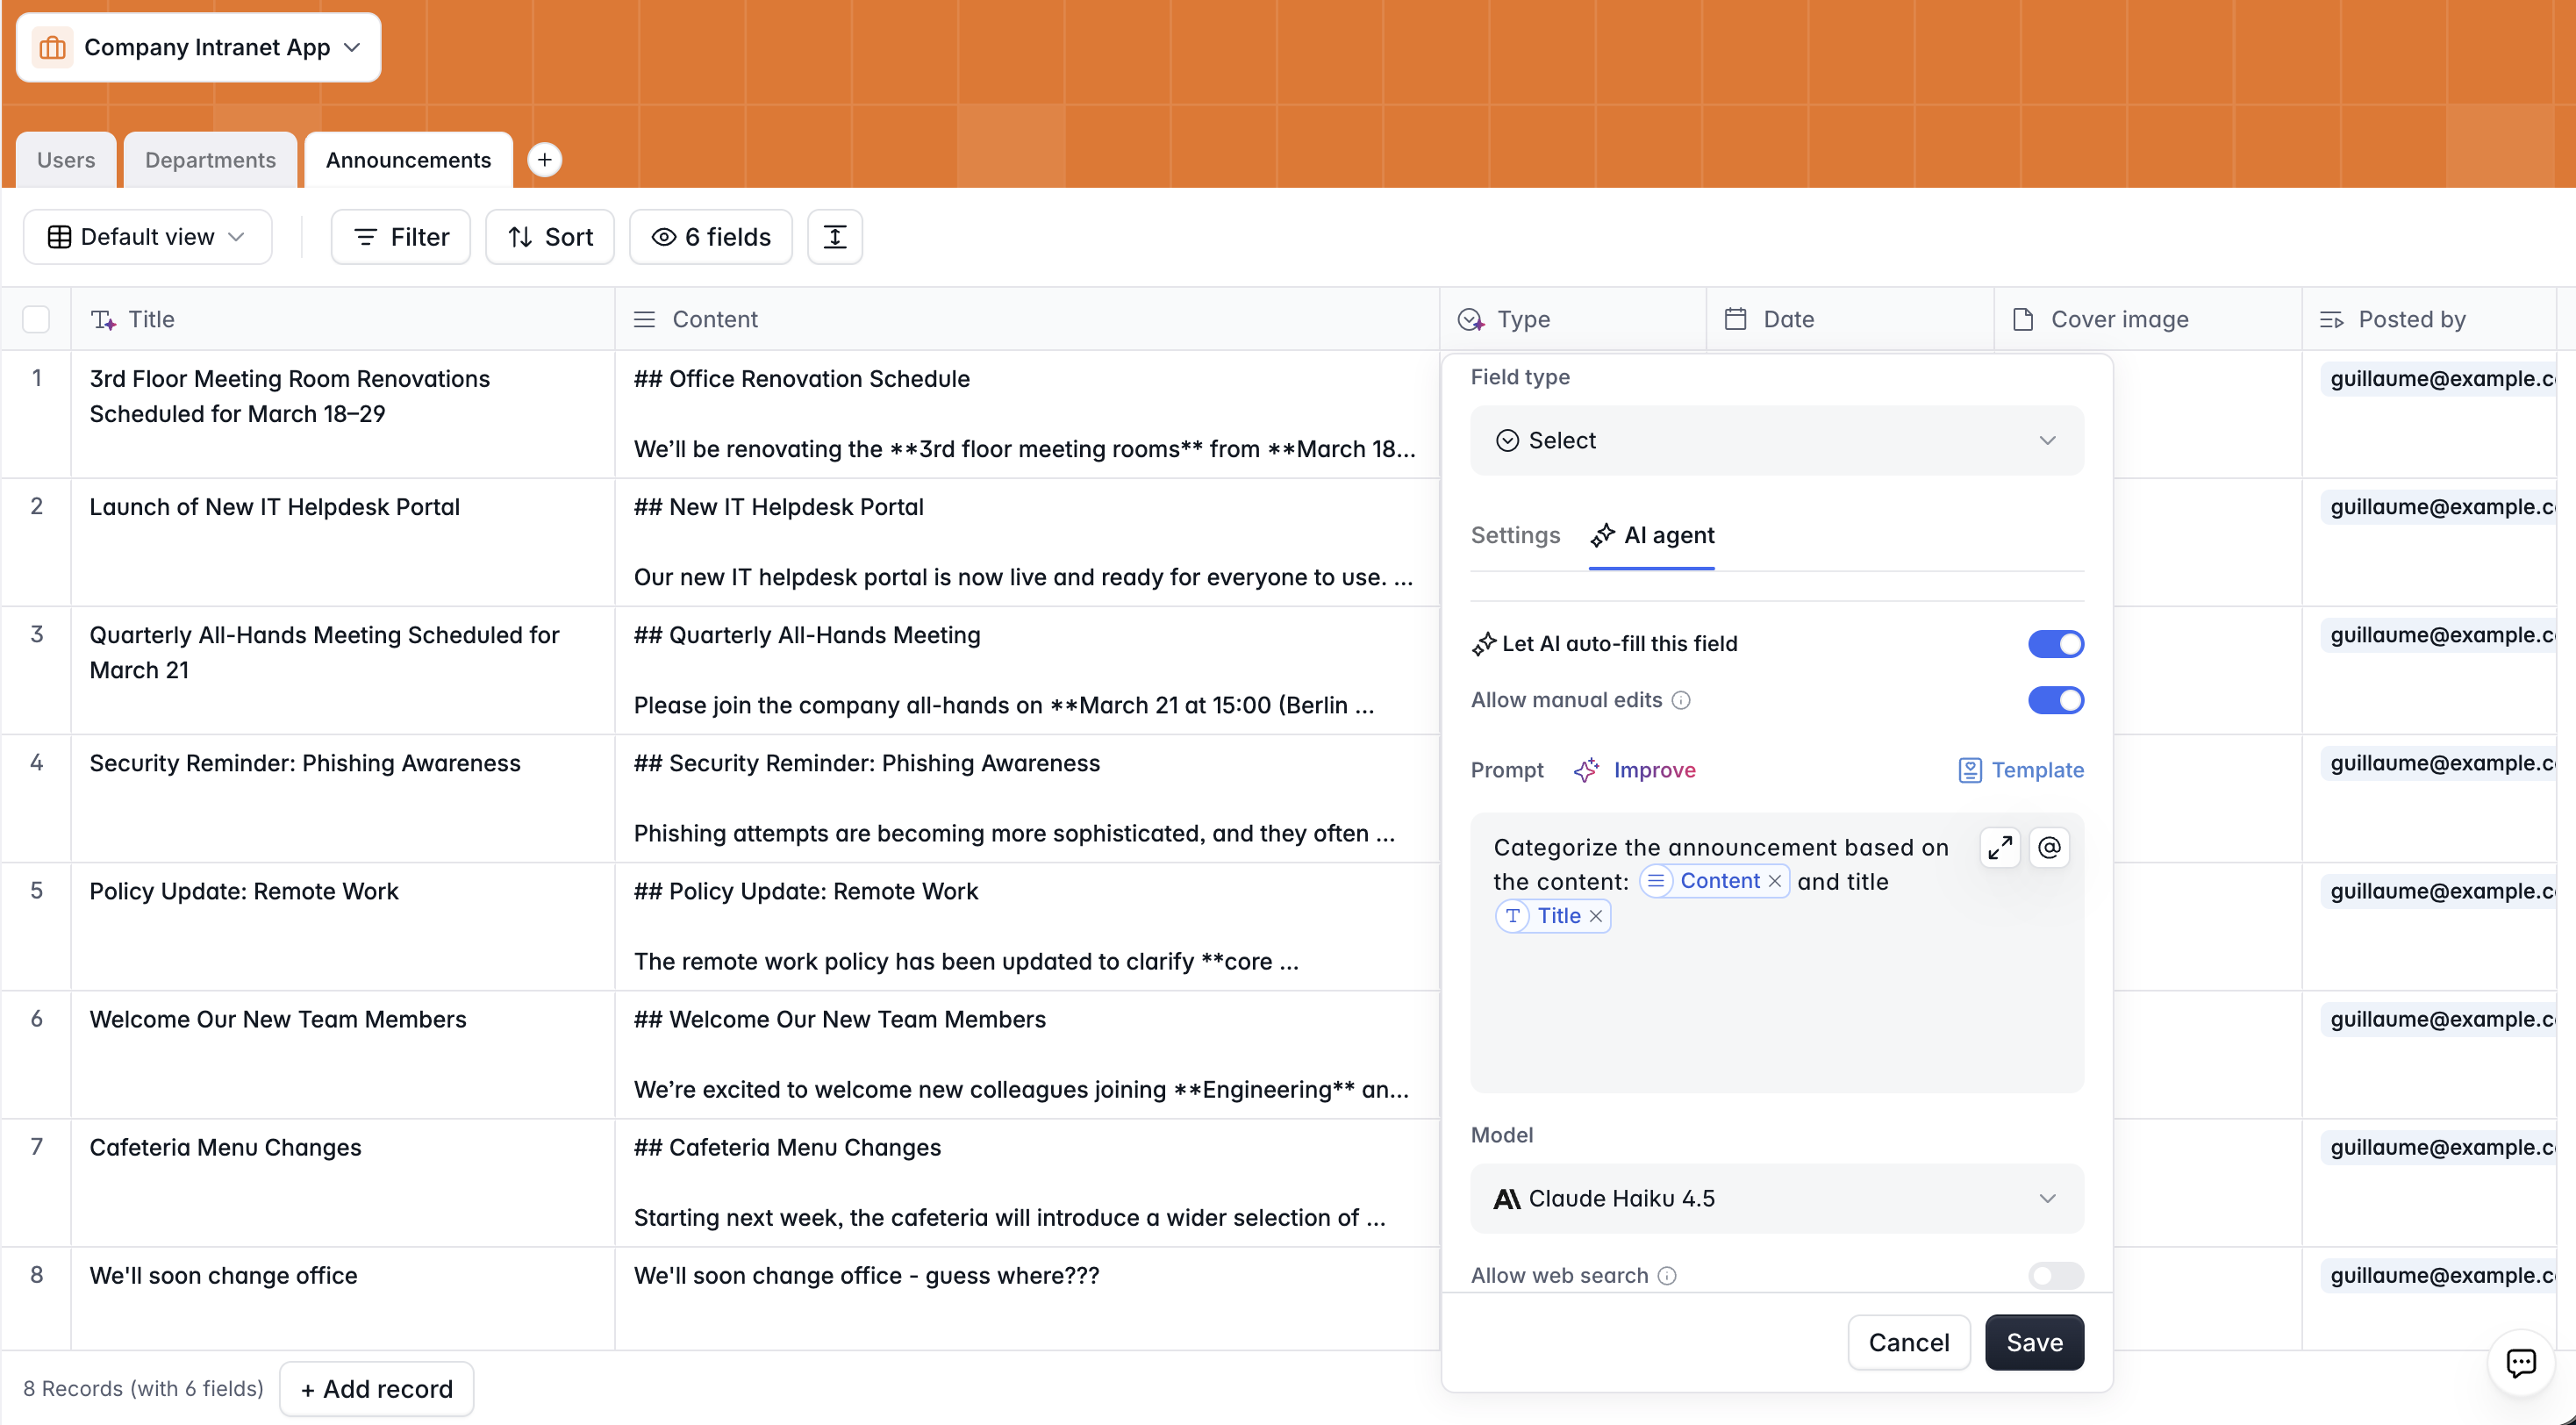
- Select the
Typefield you just created. - Enable the AI Agent setting for this field.
- In the prompt, write: "Categorize this announcement based on the @Title and @Content."
- Choose a model (Gemini Flash or Claude Haiku work well for classification tasks).
- Set the trigger to When created or Triggered manually.
- Enable Manually editable so admins can override the AI's choice if needed.
Now, whenever a new announcement is published, the database automatically tags it as "Office News," "Security News," or "Company News" with zero effort from the admin.
You can apply the same pattern to auto-generate titles. To do this, just add an AI Agent to the Title field with the following prompt: "Write a short title for this company news based on the @Content." This means the admin only needs to paste the announcement content, and both the title and category are filled automatically.

Part 2: Set up users and permissions
2.1. Sync users
Navigate to the Users section in the Softr Studio. Click Sync with Data Source and connect it to your Users table.
Map the fields for Email, Full Name, and Avatar. Click Save and Sync. Your sample users will be imported and will automatically become app users.
Key advantage: Whenever you add a new row to the Users table, that person automatically gets app access. No separate invitation process is needed.
2.2. Configure authentication
In Authentication settings, you control how users log in:
- Method: Choose between email/password, one-time code (passwordless sign-in), or both. For an internal tool, one-time codes via email are simple and secure.
- Google sign-in: Enable this if your company uses Google Workspace for SSO.
- Sign-up: For an internal intranet, disable public sign-ups. Only people you add to the Users table should have access. Alternatively, restrict sign-ups to your company domain (e.g.,
@softr.io) so only employees can register.
2.3. Create user groups
Go to User Groups and create two groups:
- Admin: Condition—
Role is Admin. - Employee: Condition—
Role is Employee.
Because these groups are dynamic (condition-based), changing someone's role in the database instantly updates their permissions in the app.

On data restrictions: For a basic intranet, you likely don't need global data restrictions since most content is meant to be shared with all employees. However, if you were building an HR-focused intranet with sensitive employee records, you could set restrictions so employees only see their own personal data while admins see everything.
Part 3: Build the interface
3.1. Set up the homepage
Your homepage is the single entry point for the intranet. Set its visibility to Logged-in users only—this ensures nothing is exposed publicly.
Start by adding a Welcome static block at the top. This block comes with a built-in global search bar and gives the app a polished, native feel immediately.
Beneath the welcome block, add a Tab Container to organize the intranet into sections:
- Tab 1: Announcements
- Tab 2: Directory
- Tab 3: Departments
- Tab 4: New announcement (admin-only)
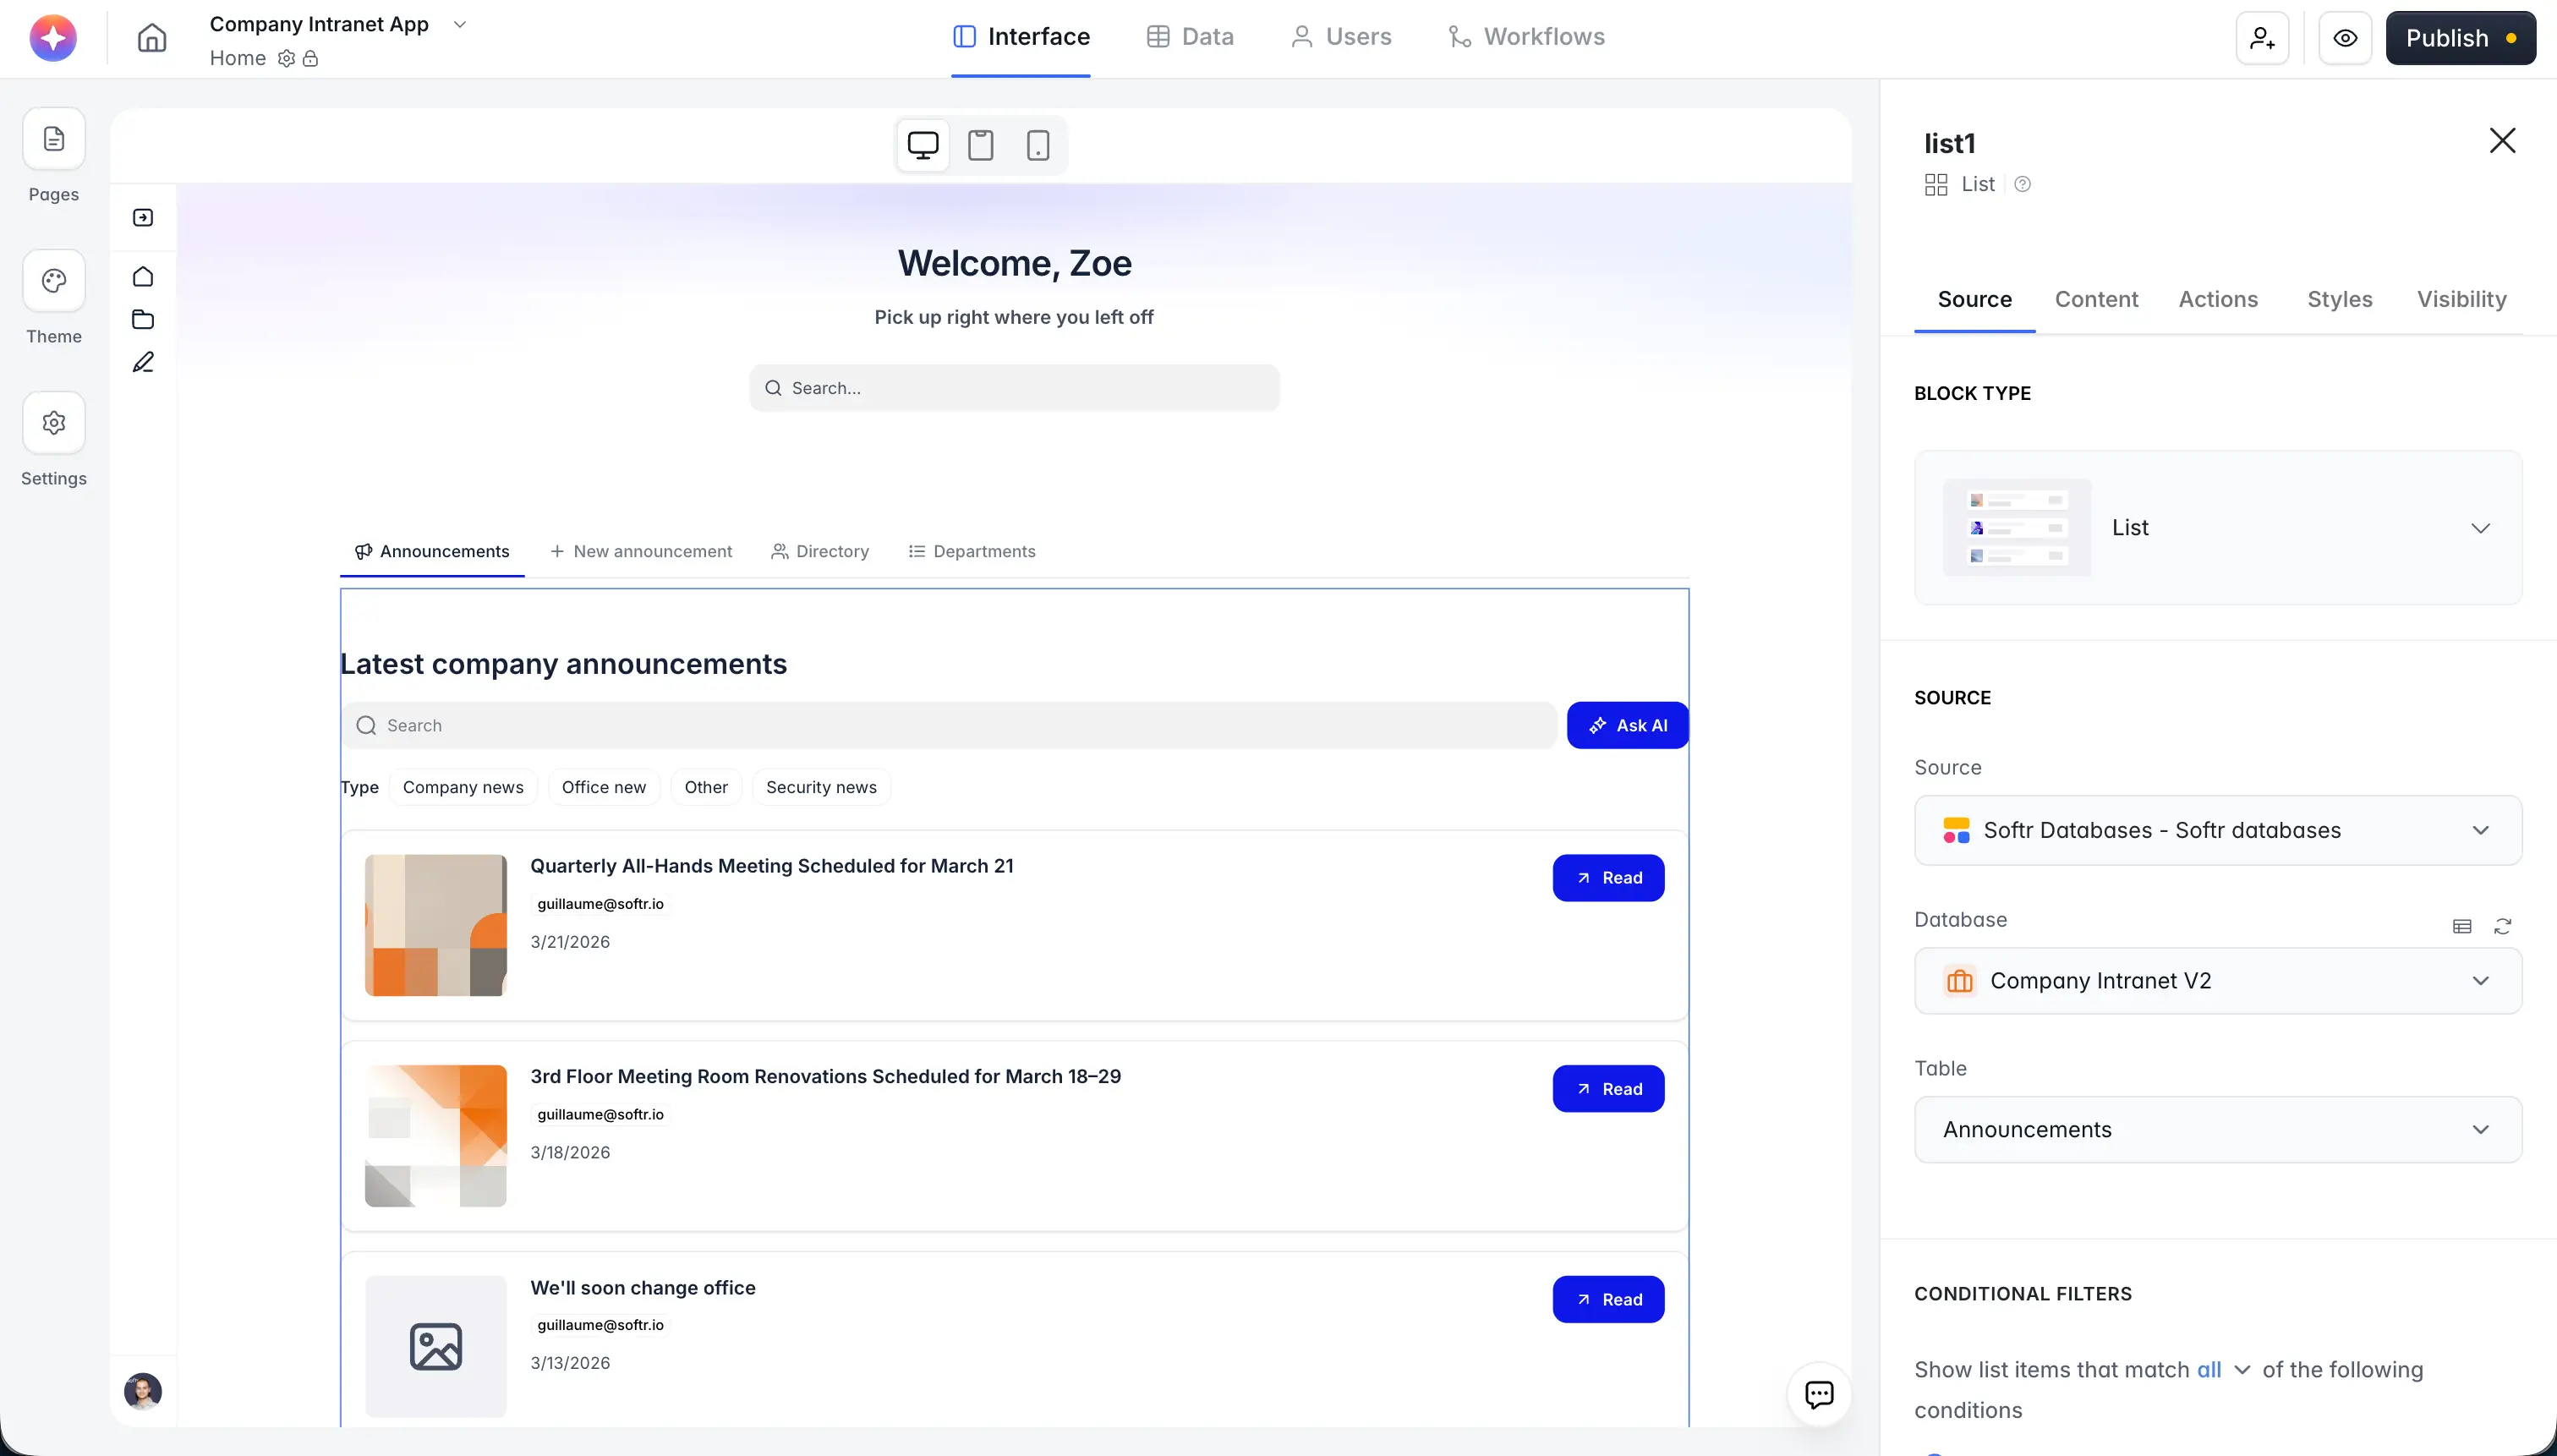
3.2. Build the announcement feed (Tab 1)
Add a List block inside the first tab and connect it to the Announcements table.
Configure the display:
- Set sorting to
Date—newest to oldest. - Show the
Cover Image,Title,Posted By, andDatefields. - Hide the full
Contentfrom the list view (users will read it in the detail modal). - Add the
Typefield as a filter tag so employees can browse by category (Office News, Security News, etc.).
Set up the detail action:
- Add an Item Button (on-click action) that opens a Detail Page in a Sliding Modal. Name the page "Announcement Detail."
- Label the button "Read."
This creates a clean, intuitive experience. Employees can scroll through announcements, see the headline and cover image, and click "Read" to open the full content without leaving the page.
3.3. Build the announcement detail page
On the Announcement Detail page, configure the List Details block:
- Show the
Cover Imageas a header image (set aspect ratio to 16:9 or similar). - Display
Titleas H1. - Show
Posted ByandDatebelow the title. - Show the full
Contentfield with rich text formatting enabled so headings, links, and bullet points render properly. - Add an Edit action button and set its visibility to Admins only. Admins can click this to update the announcement's title, content, cover image, and date.
Enable commenting: Toggle on the native Comments feature. Configure it to display as a block below the announcement content. Make sure to enable:
- Mentions—so employees can tag colleagues.
- Email notifications—so tagged people get notified.
- Reactions—for quick emoji responses.
This commenting system is fully native, featuring editing, deleting, reactions, and threaded replies built and tested by Softr's engineering team. Building this from scratch with vibe coding would take dozens of prompts and still produce a less reliable result.

3.4. Build the employee directory (Tab 2)
Add a Grid block inside the second tab and connect it to the Users table.
Configure the display:
- Show
Avatar,Full Name,Job Title,Department, andEmail. - Set the
Emailfield behavior to Send email (opens the user's email client with the address pre-filled) or Copy to clipboard. - Add a Conditional Filter:
Email is not Logged-in user's Email. This hides the logged-in user from the directory since they don't need to see themselves. - Sort by
Full Namealphabetically.
Enable search and filters:
- Turn on the search bar and make
Full Name,Job Title, andDepartmentsearchable. - Add a filter for
Departmentusing tag-style buttons. This lets employees quickly browse by team.
Admin actions:
- Add an Add Record action button visible to Admins only. This lets admins add new employees directly from the directory, filling in their email, name, role, department, and job title.
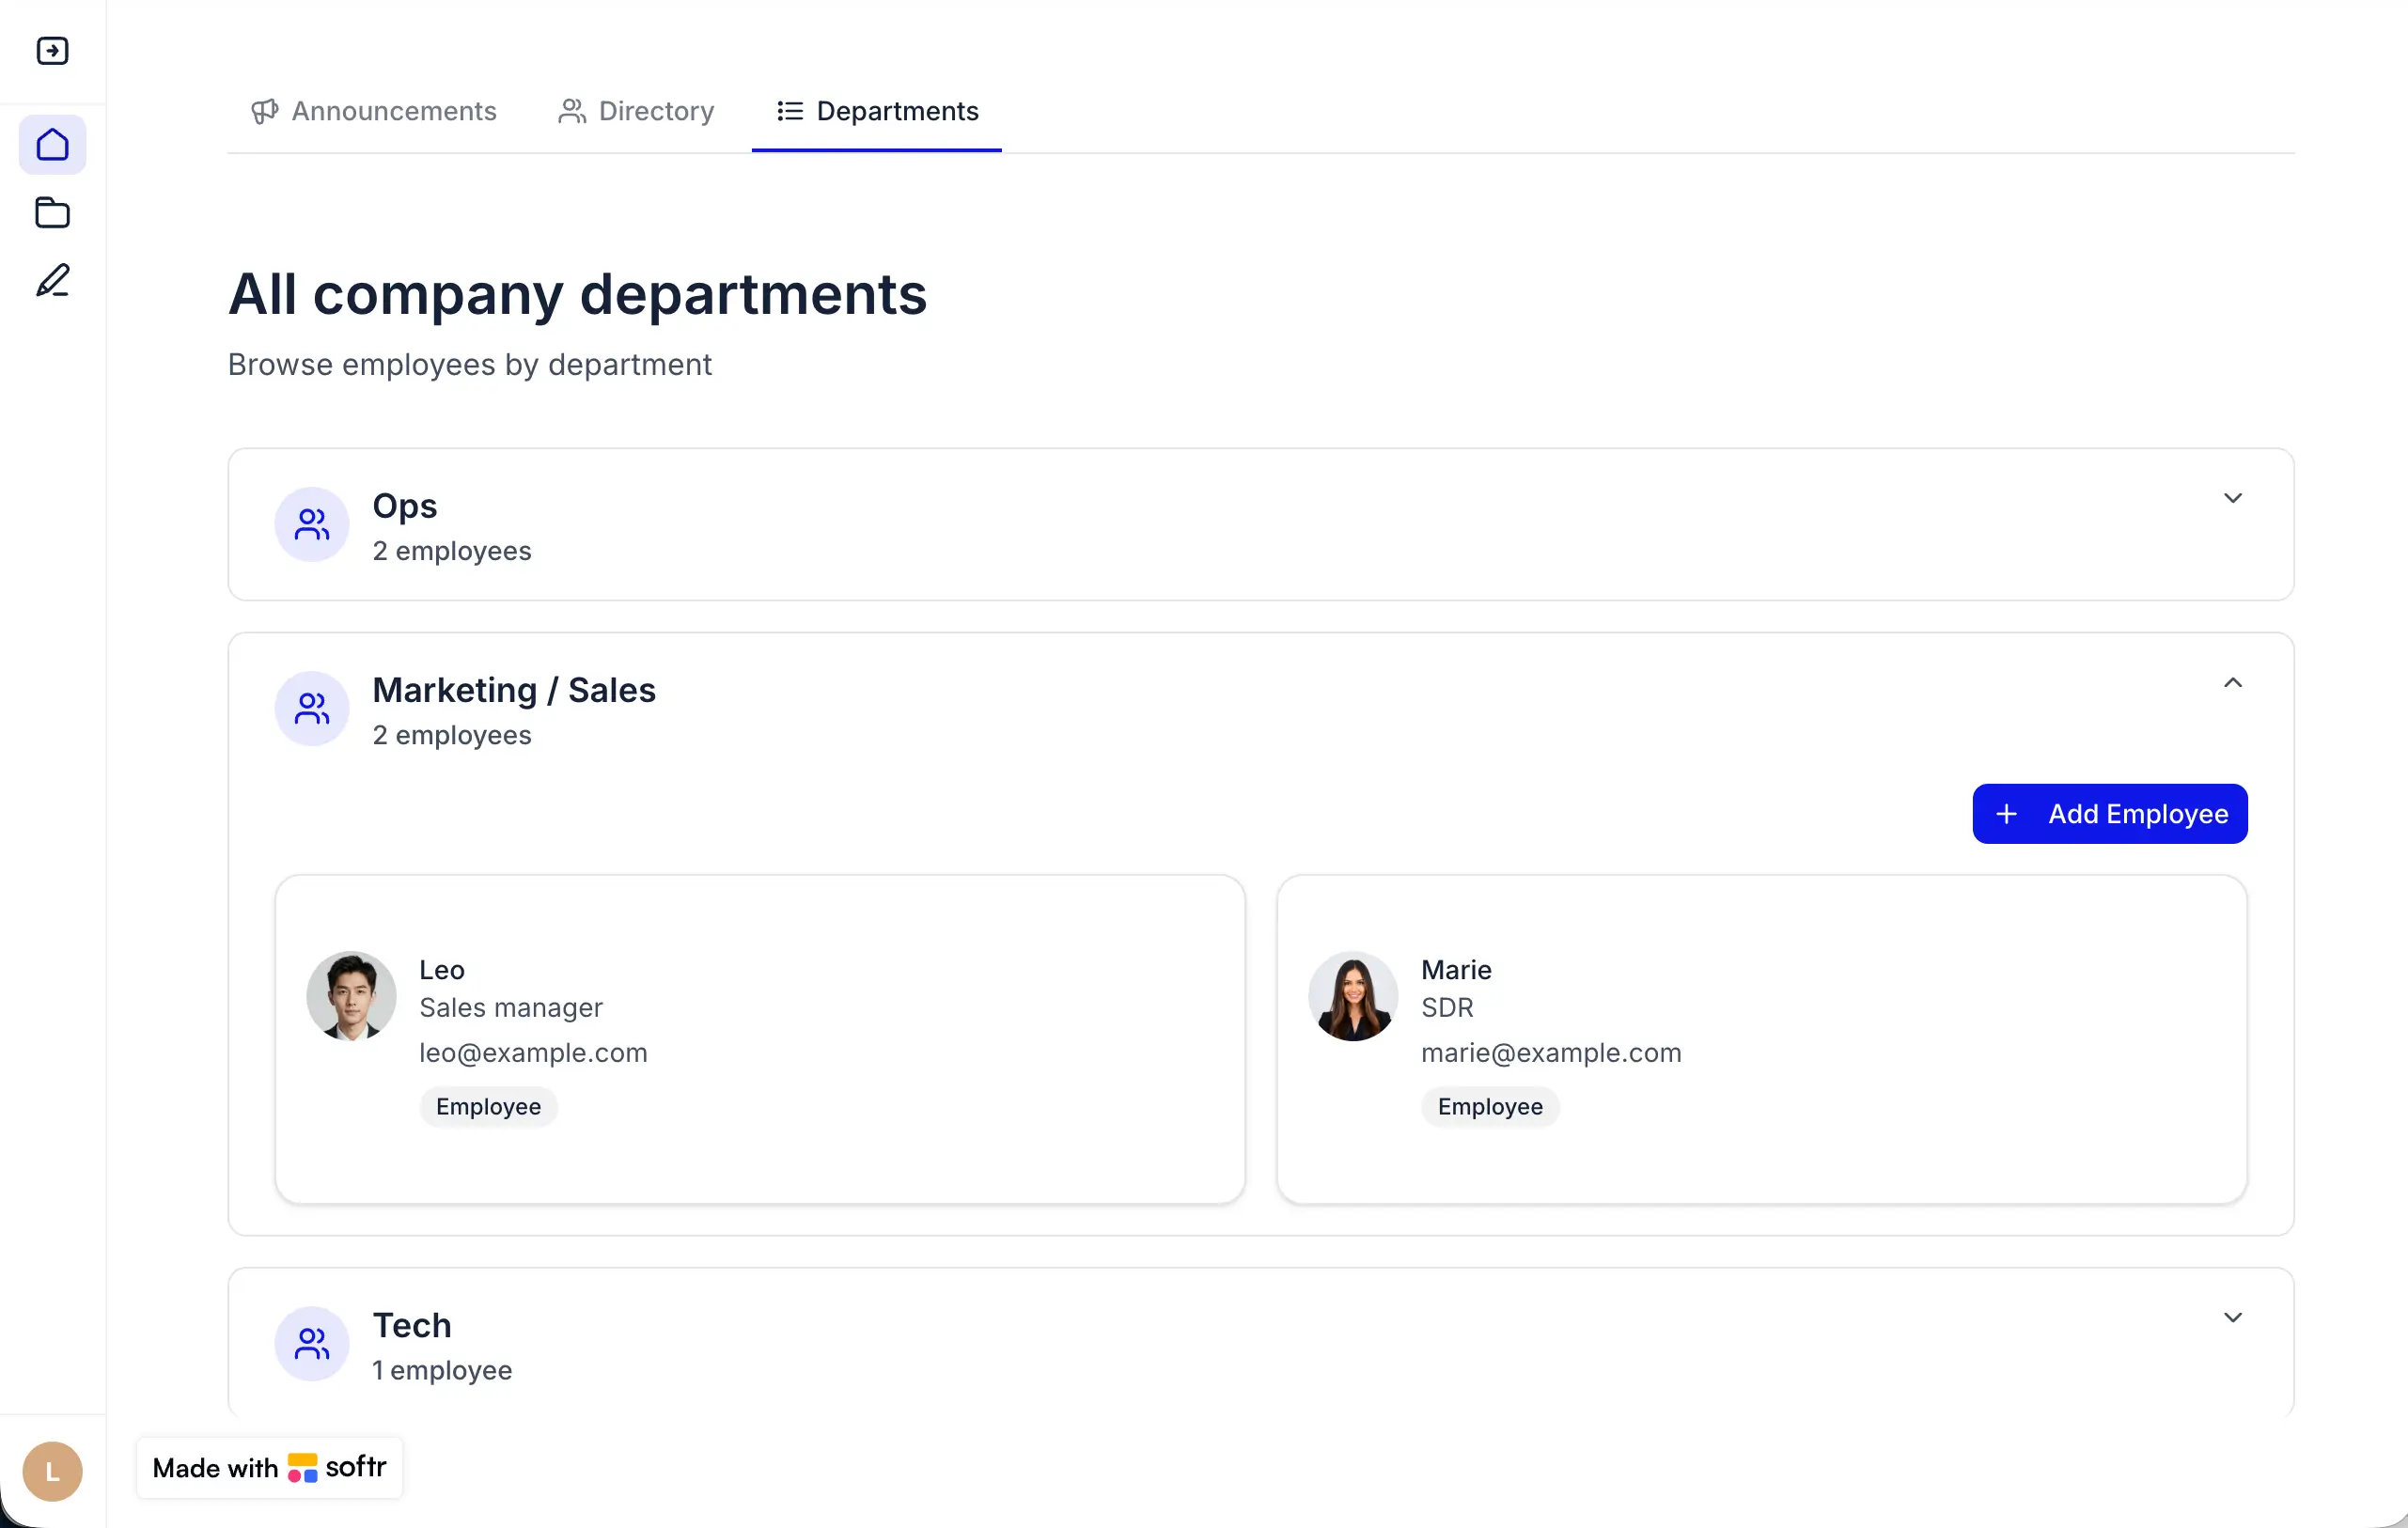
3.5. Build the department view (Tab 3)
For a custom department overview, use the Vibe Coding block. Connect it to the Users table. (Since users have a department field, the block can group them.)
Prompt example:
"Display the different departments we have. Group users by their Department field. When we click on a department, show the employees assigned to that department. Include an option for admins to add a new employee to a specific department with a plus button."
This generates a custom, interactive department view that goes beyond what a standard list or grid block can offer. The block inherits your app's theme (colors, fonts, border radius) automatically.
Follow-up prompts to refine:
- "Can you make the title and subtitle editable settings?" This lets you change the title from the Settings panel without re-prompting.
- "Add some space at the bottom." This is a great way to execute quick layout fixes.
The Vibe Coding block supports full CRUD operations. When an admin clicks the "+" button in a department, they can fill out a form to add a new employee, and that employee is automatically assigned to the correct department.
3.6. Build the admin announcement form (Tab 4)
Add a Form block inside the fourth tab. Set the entire tab's visibility to Admins only.
Configure the form:
- Connect it to the Announcements table (destination: create new record).
- Add visible fields:
Title,Content(with a placeholder like "Write the post content"), andCover Image. - Add Hidden Inputs:
Posted Byusing auto-fill with Logged-in user's Email.Dateusing auto-fill with Current Date and Time.
- Set a success message: "The announcement has been shared with the team!"
Because the Posted By and Date fields are hidden and auto-filled, the admin doesn't have to manually enter their own name or pick a date. The form stays clean and fast.
Remember: With the AI auto-categorization we set up in Part 1, the Type field will be automatically filled after submission. If you also set up AI auto-titling, admins could even skip the Title field, meaning they just paste the content and hit publish.
Part 4: Add AI-powered search with Ask AI
This is one of the most powerful features you can add to an intranet, and it takes one click.
On the Announcements list block (Tab 1), enable Ask AI in the block's actions.
Configure the AI:
- Set the instructions: "You answer concisely about company announcements. Your responses must be very clear and easy to understand for employees."
- Choose whether the AI answers based on the visible fields or all fields from the data source.
Now, instead of scrolling through dozens of announcements or trying to guess which filter to use, employees can simply ask:
- "Are there any renovations scheduled?"
- "What was the latest security update?"
- "Summarize all announcements from this month."
- "Who posted the news about the team offsite?"
The AI answers based on the actual data in the Announcements table, respecting all permissions. It's a massive upgrade over traditional search filters, especially as your announcement archive grows.

Part 5: Automate with workflows
5.1. Add a Slack notification for new announcements
Set up a workflow so the team is alerted immediately in Slack when a new announcement is published.
- Trigger: Softr Database → Record is Added → Announcements table.
- Action (optional): Add an AI Custom Prompt step to generate a one-sentence summary of the announcement. Map the
TitleandContentfields as input. - Action: Post to Slack. Select the
#generalchannel (or a dedicated#announcementschannel) and compose the message:
"Hey team! New announcement on our intranet: [Title]. Here's the summary: [AI summary]. Go check it out!"
Turn the workflow on, and every new announcement automatically notifies your team on Slack with a concise summary. No manual "Hey everyone, check the intranet" messages are needed. You can also ask the Workflow AI Co-Builder to generate this exact Slack automation for you with a simple prompt.
What you can add next
The core intranet we built covers the fundamentals: announcements, directory, commenting, and AI search. But a company intranet can grow to centralize much more of your team's daily needs. Here are some features you can layer on:
Open forum
Add a Forum Posts table and a dedicated tab where any employee (not just admins) can start discussions. Topics could range from event planning to improvement suggestions. Use the same commenting system for replies, and add AI auto-categorization to organize threads by topic.
Company perks and benefits
Create a Perks table listing gym memberships, meal vouchers, software discounts, and other benefits. Display them as a grid with categories and descriptions. Employees can browse instead of asking HR "do we get a gym discount?"
Document library
Add a Documents table with fields for Title, Category (Policy, Handbook, Template), File, and Description. Employees can search and download onboarding guides, company policies, brand assets, or expense report templates. Enable Ask AI on the documents list so employees can ask "What's our remote work policy?" instead of hunting through PDFs.
Org chart
Use the Vibe Coding block to build a visual organization chart based on the Users and Departments tables. Display reporting lines, team structure, and headcount to assist new joiners in navigating the company.
Event calendar
Add an Events table and display upcoming company events (town halls, team outings, training sessions) in a native calendar block.
The beauty of building on Softr is that each of these is an incremental addition: create a new table, add a tab, connect the data. Your intranet grows with your team's needs.
A fully operational intranet
Congratulations: You've built a complete company intranet, a unified platform where your team can find announcements, discover colleagues, comment on news, and get AI-powered answers, all secured behind role-based permissions.
The key insight from building this is the same principle that applies to any internal tool: you don't need to vibe-code every feature from scratch. The announcement feed, commenting system, directory search, and permission controls are all native blocks that work reliably out of the box. The Vibe Coding block comes in for the custom department view, which handles the 20% that genuinely needs something different.
And remember, you can always use the AI Co-Builder to generate the foundation instantly, combining the speed of AI generation with the reliability of robust native components.
Get started with the Company Intranet template or build your own from scratch.
Frequently asked questions
- What is a company intranet and why would I build one?
- Can I build the intranet on top of existing data in Airtable or Google Sheets?
- How do I control who can post announcements versus who can only read them?
- Is the company intranet secure? Can non-employees access it?
- Can I add more features to the intranet later without rebuilding it?
.webp)