How to add an MCP server to Claude on the web, Desktop, and Claude Code



One of my clients hosted a technology leadership roundtable last month. The topic? Governing AI tool sprawl.
15 IT directors, CIOs, CISOs, and engineering leaders came together. They vented about shadow AI. They asked questions about AI connection ownership once it's live. And most of all, they kept circling back to the “Claude problem.” A few crafty employees are hooking it up to various systems, and there’s zero governance to oversee it.
Most companies haven’t rolled out Claude MCP servers organizationally-wide, beyond a handful of users. That aligns with what I see in the BD and growth world. Two sales reps might connect Claude to their CRM without telling IT at all.
So let's fix that. Here’s how to add MCP servers to all three versions of Claude and how IT can roll out approved servers without creating a shadow AI mess.
MCP server basics: What you need before you start
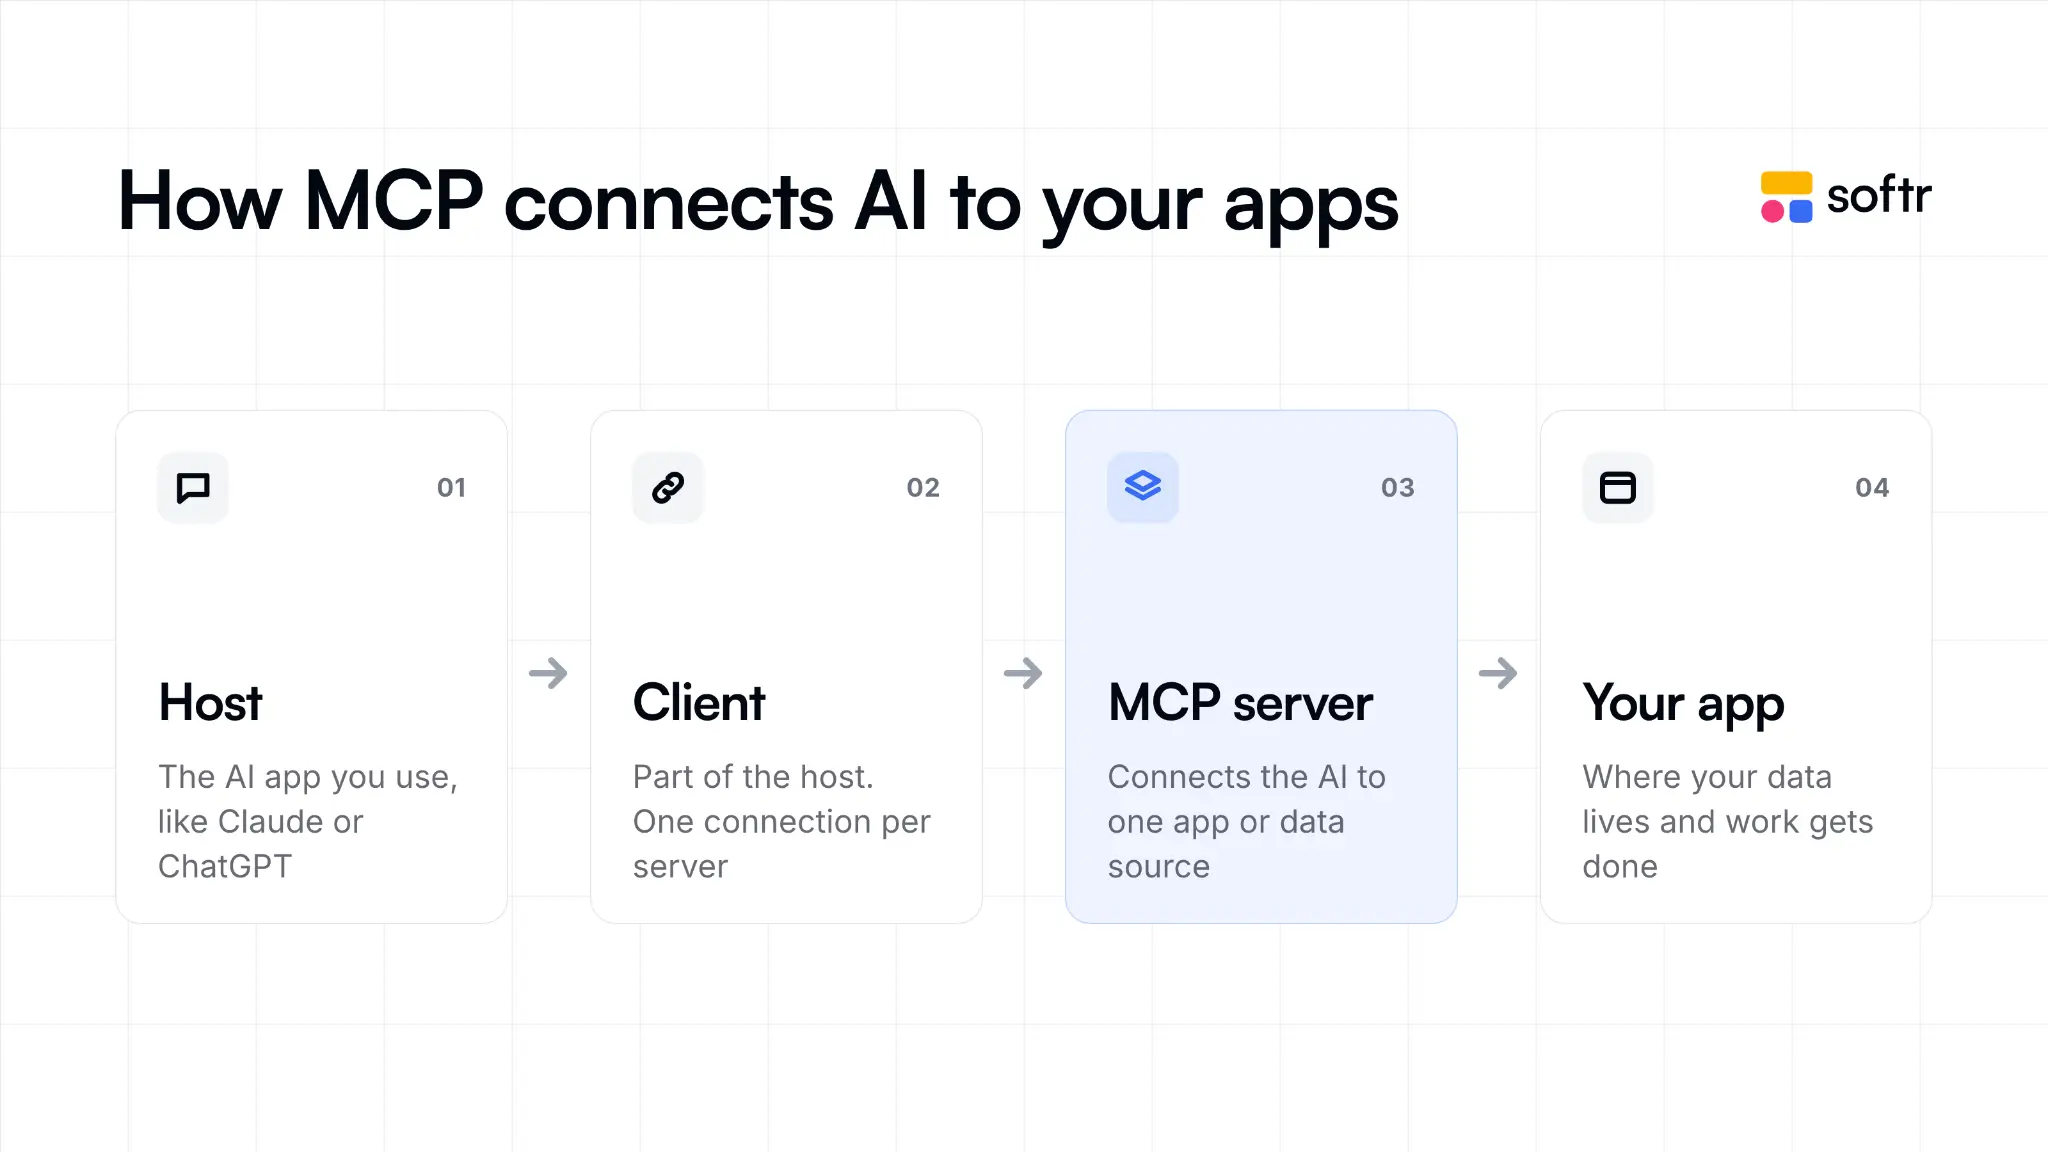
I noticed some confusion at this tech roundtable. So let’s clear up some vocab. Model Context Protocol (MCP) is an open standard that lets AI assistants connect to external tools and data sources. Instead of copying information into Claude manually, you can connect it to software like your CRM, project management platform, or database tool.
An MCP server exposes the tools and information Claude can use. Claude calls these integrations connectors in its user-facing interface. Claude Code can also connect to MCP servers directly through its command-line tools. Each has its pros and cons, with security implications depending on what you choose (we’ll dive into that later).
If you're still fuzzy on the underlying protocol, our What is MCP explainer covers the basics. Before adding a server, check three things:
1. Your Claude plan
Custom remote MCP connectors are available on Claude's Free, Pro, Max, and Ultra plans for individuals, and the Team, and Enterprise plans for organizations. Free users can add one connector, while paid plans offer additional capabilities and usage limits.
Team and Enterprise plans also provide organization-level controls, allowing authorized administrators to manage connectors for colleagues.
Just be warned that Claude Code has its own access and billing considerations. See our Claude Code pricing guide for more information.
2. Whether the server is local or remote
There are two main types of MCP servers:
- Local MCP servers run as programs on your own computer. They can interact with local files, development tools, and resources available on your network.
- Remote MCP servers run on infrastructure hosted by a provider or your organization. Claude connects to them over the network, typically using HTTP.
Claude on the web uses remote connectors. Claude Desktop supports remote connectors as well as local MCP servers. Claude Code supports both.
3. How you'll authenticate
Some servers require you to sign in using OAuth, which lets you authorize Claude through your account with the connected service. Others use API keys or personal access tokens.
Have the server's documentation and connection URL ready before you start. For remote servers, you'll usually need an HTTPS URL such as https://example.com/mcp.
Adding an MCP server
Before adding an MCP server, check whether the service is already available in Claude's connector directory. If it is, you can connect directly without entering a server URL.
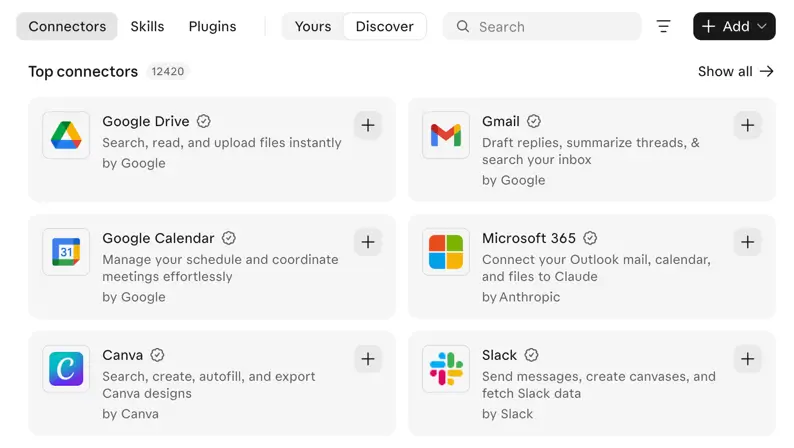
Otherwise, you can add a custom MCP connector manually using the URL provided by the service.
The setup steps differ depending on which version of Claude you're using and your role.
Claude on the web
The most popular path folks take. Be advised, the steps differ depending on whether you’re an admin adding it for a team or an individual adding it for yourself.
Claude on the web connects to remote MCP servers through its connector interface. You don't need to install a server on your computer.
Note: Anthropic is transitioning its Connectors interface into a unified Plugins experience. Depending on your account and rollout stage, you may see Plugins instead of Customize → Connectors. The connection process is similar, but menu labels can differ.
For individual users:
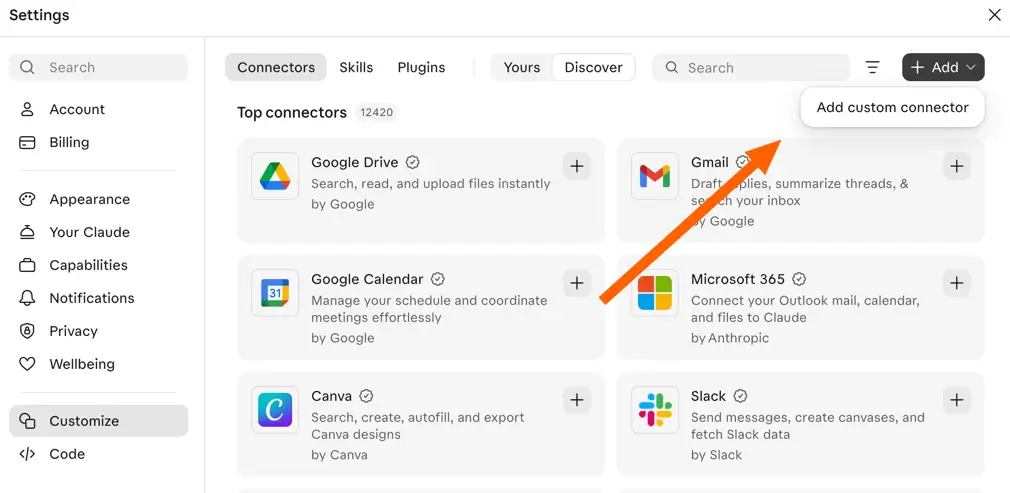
Step 1: Open Claude's connector settings.
Sign into Claude and open Plugins in the sidebar. If your account still uses the older interface, go to Customize → Connectors. Select Add custom connector.
Step 2: Enter the MCP server details.
Give the connector a recognizable name and paste the remote MCP server URL supplied by the provider.
For example:
https://example.com/mcp
Use the complete URL, including any path specified in the provider's documentation.
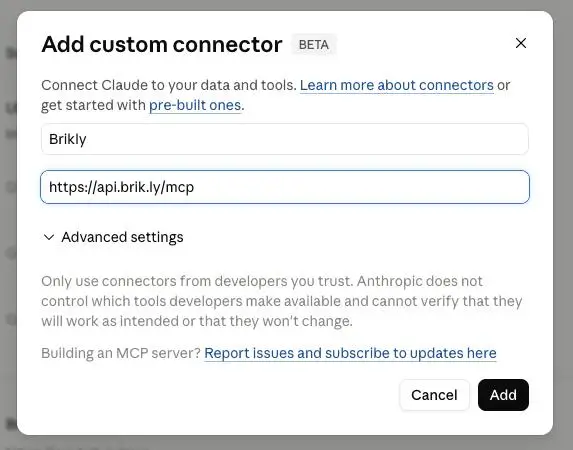
Expand Advanced settings if needed. Depending on the server, you may need to configure authentication details or supply credentials.
For OAuth-compatible servers, Claude may prompt you to sign in to the connected service and approve access.
Only provide API keys through supported credential fields. Avoid pasting secrets into ordinary chat messages.
Step 4: Add the connector and authorize access.
Select Add, then complete any sign-in or authorization steps required by the service.
Review the permissions before approving the connection.
Step 5: Test the connection.
Open a Claude conversation and ask a simple question that requires information from the connected service.
For example:
"Show me the projects I have access to in my connected workspace."
If Claude can retrieve the information, the connection is working.
You can manage connected services and tool access through Claude's connector controls.
The connectors don’t run automatically. Scroll to the bottom of the chat interface, select Connectors, and toggle on the one you need.
If you’re on a Team or Enterprise plan:
- Go to Organization settings → Connectors
- Click Add, hover over Custom, then select Web
- Enter a name for the connector
- Paste your remote MCP server URL exactly as listed in the provider documents, including any path (Ex: https://example.com/mcp). Then click Continue
- Review the authentication settings Claude detected. Under Authentication, choose how people connect: Sign in now, Sign in when needed, or No sign in
- Under OAuth client, choose how Claude identifies itself. “Use Claude’s published identity” is the recommended default for most compatible servers.
- If your server uses API keys instead of OAuth, add fixed credentials under Request headers
- Click Add to finish configuring the connector for your organization
Once the connector is live, employees need to connect individually:
- Navigate to Plugins in Claude. (Some accounts may still show Customize → Connectors.)
- Find the connector your Owner added.
- Click Connect to authenticate and start using it.
This separates two responsibilities: IT controls which connectors are made available, while individual users authenticate with their own accounts and permissions.
Important: Claude's remote connectors connect from Anthropic's cloud infrastructure, not directly from your laptop. A server available only through your computer's private network or VPN may need additional network configuration before Claude can reach it.
Claude Desktop
Claude Desktop supports the same remote MCP connectors as Claude on the web. If you've already connected a remote server through your Claude account, you can use that connector in Desktop without repeating the setup.
Unlike Claude on the web, Desktop also supports local MCP servers that run directly on your computer.
There are two ways to add an MCP server in Claude Desktop, depending on whether you're connecting to a remote or local server.
Method 1: Through the Connectors screen (remote MCP servers)
This is the easiest route for connecting Claude to hosted services, like your CRM or project management platform, without touching configuration files.
1. Open Claude Desktop and go to Customize → Connectors. Depending on your version, you may find connectors under Settings → Connectors.
2. Search the connector directory for the service you want to use. If it's listed, select it and follow the connection prompts.
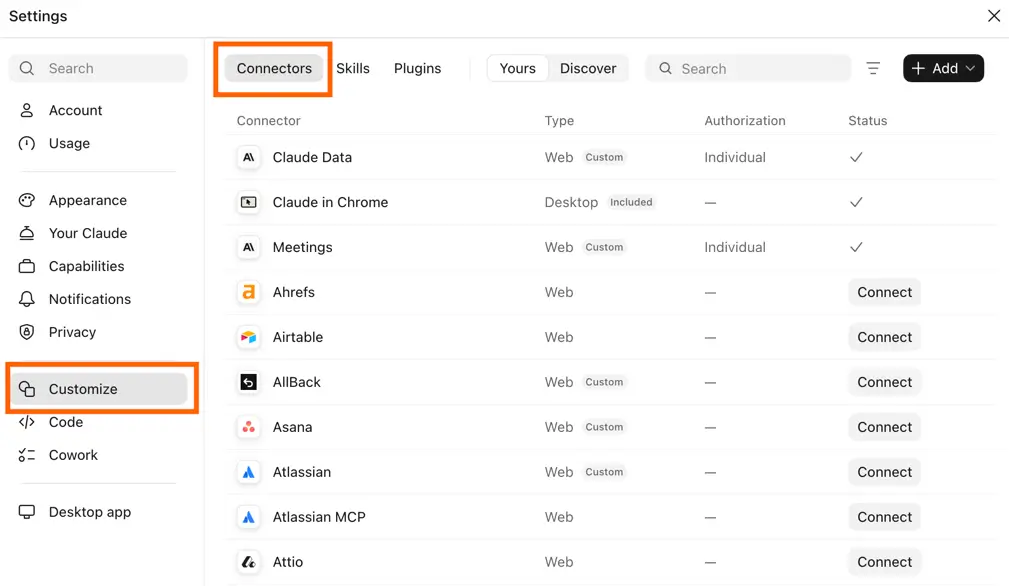
3. If it isn't listed, select Add → Add custom connector.
4. Enter a recognizable name and paste the MCP server URL provided by the service. Click Continue, review the settings, and add the connector.
5. Complete any required authentication, such as signing in through OAuth, and review the permissions you're granting.
Once connected, open a Claude conversation and check that the connector is available.
Method 2: Edit claude_desktop_config.json (local MCP servers)
This is the more hands-on route for a local MCP server that you launch with a command.
- Open Settings → Developer → Edit Config to open
claude_desktop_config.json. The menu path may differ depending on your version. If you can't find this option, you can open the configuration file directly using the file paths below. - Add your server under mcpServers. Here's a minimal example for a filesystem server:
{
  "mcpServers": {
    "filesystem": {
      "command": "npx",
      "args": [
        "-y",
        "@modelcontextprotocol/server-filesystem",
        "/Users/yourname/Desktop"
      ]
    }
  }
}
Replace /Users/yourname/Desktop with the folder you want Claude to access. Make sure the folder exists and only grant access to files you're comfortable making available to Claude. This example requires Node.js and npm.
- Save the file and completely quit Claude Desktop. You need a full restart for the configuration to reload.
- Reopen Claude Desktop and check that the server and its tools are available in your conversation.
Here are the configuration file paths by OS:
- macOS: ~/Library/Application Support/Claude/claude_desktop_config.json
- Windows: %APPDATA%\Claude\claude_desktop_config.json
If you're on a Team or Enterprise plan, your organization's administrators may restrict which remote connectors you can add. If an option is unavailable, check with your organization owner.
Claude Code
Claude Code is where MCP servers earn their keep. It’s also where the setup gets super technical. Unlike Web and Desktop, Claude Code manages servers via the command line. So when you add a server, ask yourself: “Is this just for me, a project, or an entire team?”
The scope determines who can see the server you add. The options?
- Local (default): Only loads in the current project, and only you can see it (Good for personal experiments).
- Project: Config gets written to.mcp.json in the project root. Commit that file to Git, and anyone who clones the repo gets the same server setup.
- User: Available across all projects on your machine, but only visible to your account.
To select a scope, add --scope local, --scope project, or --scope user to your command. If you don't specify one, Claude Code uses local scope by default.
Next, you add the server. The command structure is claude mcp add with a transport and a scope. Transport is how Claude talks to the server: http for remote servers, stdio for local processes.
For a remote server:
claude mcp add --transport http sentry https://mcp.sentry.dev/mcp
For a local database connection, use -- to separate Claude Code’s flags from the server’s command:
claude mcp add --transport stdio db -- npx -y @bytebase/dbhub \
  --dsn "postgresql://readonly:<DB_PASSWORD>@prod.db.com:5432/analytics"
Use a read-only database account for this kind of connection, and avoid putting real passwords directly into commands. They could end up in shell history or shared documentation.
Verify it worked. Run claude mcp list so see every configured server with its status: ✔ Connected, ! Needs authentication, or ✘ Failed to connect.
If a server needs a login, run /mcp inside a session and complete the browser flow. In headless environments or SSH sessions, use claude mcp login <name> from your shell. It detects when no local browser is available and prints the authorization URL instead.
If you're using project scope, Claude Code will ask you to approve .mcp.json servers the first time you open that repo. That's a security feature; a cloned repo shouldn't be able to silently run things on your machine. If you dismissed the prompt, run claude mcp reset-project-choices and restart to see it again.
This is pretty dense material. The Claude Code MCP quick start documentation will always be your best bet.
And if you’re integrating Softr into the mix, we have a separate guide on how to add Softr MCP server to Claude Code. It covers what you need to start, how to add the MCP server, and choosing what Claude Code can access in your Softr workspace.
Worked example: Connecting a business-data MCP server
Say your team uses Softr, the AI app builder for creating real business software without code. You can connect Claude to your Softr workspace through the Softr MCP Server, a remote server that uses OAuth authentication. Each person signs in with their own Softr account.
Once connected, Claude can help you build and manage apps, query and update databases, create and edit vibe coding blocks, browse connected integrations, and build workflows—all through natural-language prompts.
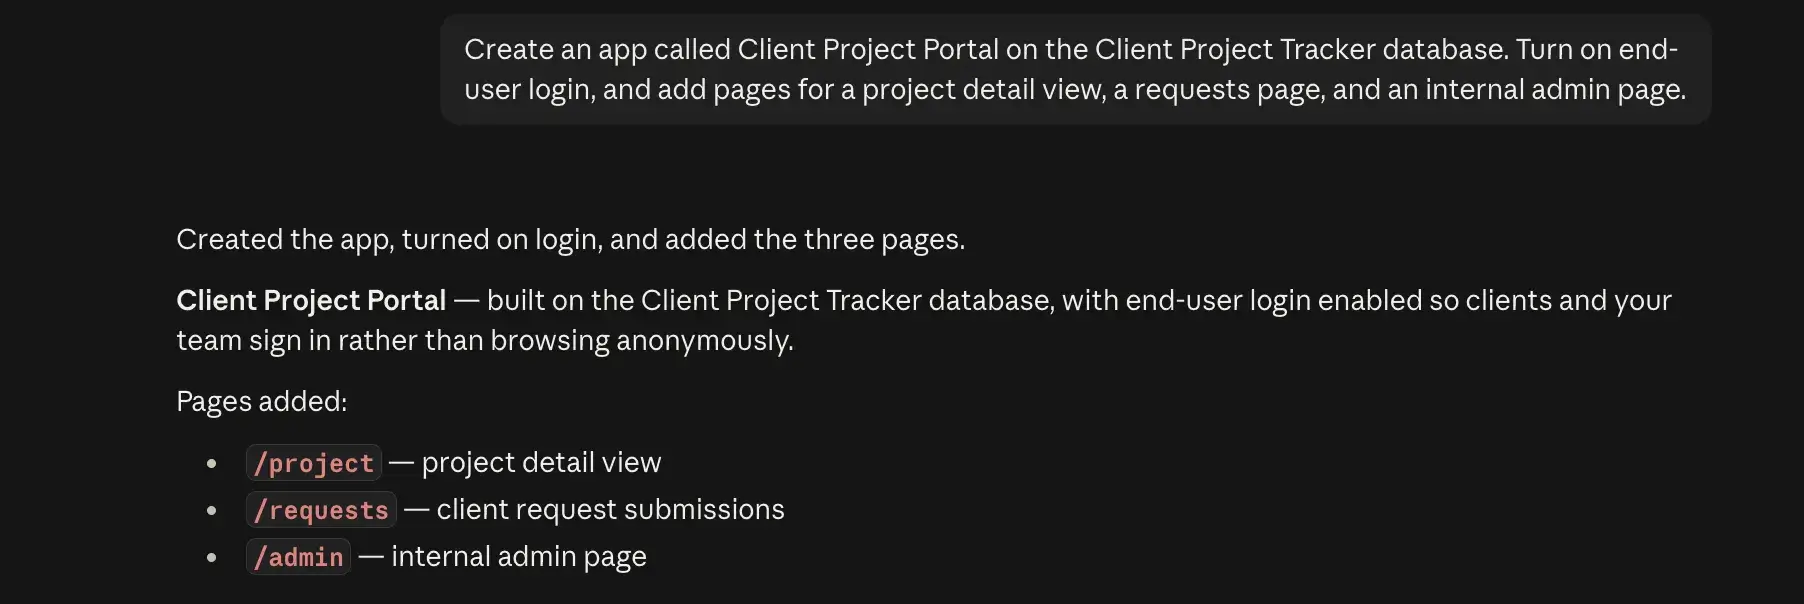
Here's how to connect it across all three versions of Claude:
- Claude on the web: Open Softr in Claude's connector directory, click Connect to Claude, and authorize your Softr account.
- Claude Desktop: Use the same Softr connector. It works in the desktop app without installing a local MCP server.
- Claude Code: Add Softr using the following command, then complete OAuth authentication through /mcp.
claude mcp add --transport http softr https://mcp.softr.io/mcp
During authorization, choose which Softr workspaces Claude can access and set permissions across three areas:
- Applications & Forms: Read only lets Claude inspect apps, pages, blocks, user groups, permissions, and connected integrations. Full access also lets it create and edit vibe coding blocks, manage app settings and user groups, preview changes, and publish apps.
- Databases: View only lets Claude read and query records. Edit data also allows it to create, update, and delete records, while Full access extends to database structures, including tables and fields.
- Workflows: Read only lets Claude inspect workflows and their steps. Full access allows it to build, edit, test, and publish workflows.
You can also select None for any area you don't want Claude to access.
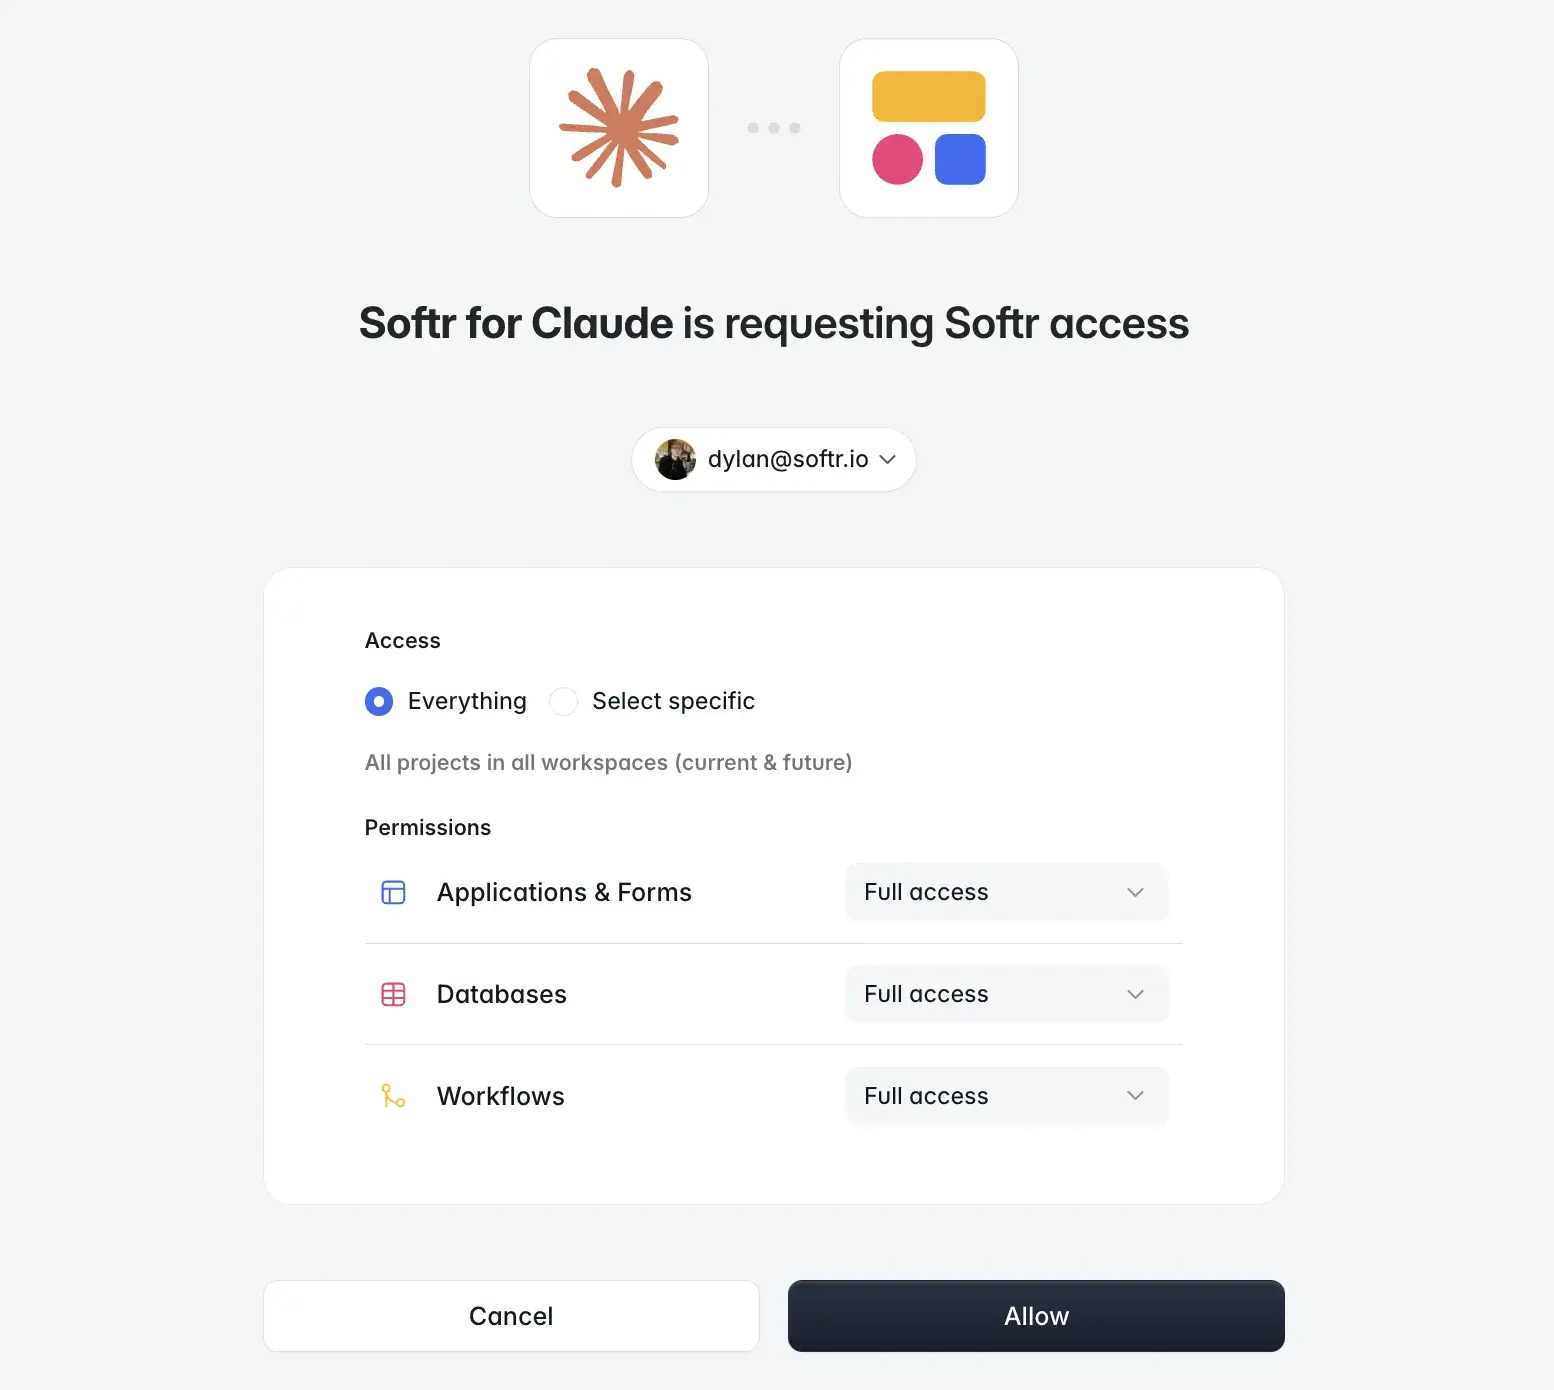
For example, if your team only needs Claude to review customer records, grant View only access to Databases. If you want Claude to build app interfaces using vibe coding blocks, you'll need Full access to Applications & Forms.
Once connected, try asking Claude: “List my Softr apps.”
For detailed instructions, see Softr's MCP connection guide.
MCP governance: Rolling out MCP servers to your team
The nice thing about central connector management is that you can set it up one time for everyone. So if you’re the IT person or just running point on Claude MCP governance, here’s what it looks like:
- Add once, approve org-wide: Once Team and Enterprise Owners add and enable custom connectors, they're available to all members. Each person authenticates individually on their account, but all centralized approval goes to you.
- Connectors carry over to Claude Code: No reinventing the wheel. Anytime you add connectors in Claude.ai, they show up in Claude Code automatically, as long as users sign in to the same account and not an API key.
- Set allow-list and deny-list: You can govern which MCP servers Claude Code is allowed to load. Use allowedMcpServers and deniedMcpServers in managed settings, or deploy a managed-mcp.json file that locks the server list entirely. Deny-list entries overpower allow-list matches; no exceptions.
- Share project configs: When you need everyone on a repo to use the saved, approved servers, you can use.mcp.json to check the file into your repo. So everyone who clones it gets the same server setup with the same scopes.
Take advantage of these governance controls. It's how you can prevent the shadow AI mess Claude MCP adoption often creates.
Approved-server policy and what to check
A recurring issue at my client’s technology roundtable was IT leaders approving an MCP server without a security review or policy guidelines, and regretting it later.
So here’s a simple checklist you can run through. Print it. Take it up above your desk. And have it accessible:
- Accountability: Who maintains the server? Can you name the operator? If you can't identify who runs the server or where the code lives, don't approve it.
- Sign-ins: How does authentication work? Is single sign-on (SSO) enforced? Can users log in with shared credentials? Confirm that the server uses strong authentication (OAuth, SSO, or managed API keys). Avoid generic admin logins and approving servers that lack robust sign-in controls.
- Permissions: What scopes does it request? Claude Code lets you pin requested scopes with oauth.scopes in.mcp.json. Nevertheless, you still need to confirm which permissions the provider grants. If it asks for broader access than the job needs, clamp it down or deny the request.
- Data location: Where does the server store or process your data? Is any sensitive information leaving your internal systems or region? Approve only if data residency and storage meet your compliance requirements.
- Tools exposed and data access: Querying your CRM and deleting records are different risk levels. How many tools are connected? And which are read-only vs. write or execute commands?
MCP connection and authentication options
Adding MCP servers requires some security decisions.
Local vs. remote
The general rule of thumb: Remote servers are easier to govern because you can disable access centrally if something goes wrong, rather than relying on employees to remove a local installation.
OAuth vs. personal access tokens
My recommendation? Prioritize OAuth wherever it’s supported. It gives IT more control over who can access what, without having to chase down shared credentials or rotate keys every time someone leaves the company.
Keeping context costs down
Don’t overlook Claude’s context window. Every MCP server adds to it. And the more servers and tools you connect, the more context Claude has to manage, eating into usage limits (even when you’re not actively using every integration).
A few ways to keep things under control:
- Check /context: In Claude Code, use this command to see what’s consuming the most of your context window. From there, evaluate whether to remove unnecessary servers or tools.
- Limit server access: Don’t give every employee 20 MCP servers. Often, they need only a few to do their jobs. Match access to role and the tools actually used.
- Use on-demand tool loading: Only enable the connectors you need for the task at hand. Disable servers you're not using and use Claude Code's tool search to avoid loading every tool definition upfront.
Main lesson: Sometimes, less is more. Adding 100 integrations doesn’t automatically make Claude more useful.
Troubleshooting common MCP errors
MCP servers don't always connect on the first try. Before you start reinstalling things, work through these common issues:
- Server won't connect: In Claude Code, run /mcp to check the status of your servers. If something looks wrong, run /doctor to check your installation and configuration.
- Local server fails to launch: Check the command and file paths in your MCP configuration. Relative paths can resolve differently depending on where you launch Claude Code, so use absolute paths where possible.
- Invalid JSON or connection errors: If you're running a local server over stdio, make sure debug messages aren't being written to stdout. MCP uses stdout for protocol messages, so send logs to stderr instead.
- Web connector won't authenticate: Check that your account has the required permissions in the connected service. If the sign-in fails, try disconnecting and reconnecting the connector from Claude's settings.
- Desktop server isn't showing up: If you edited claude_desktop_config.json, check the JSON syntax and fully quit and reopen Claude Desktop. A configuration change won't necessarily take effect until the app restarts.
- Still not working? Test the server independently with the MCP Inspector. It lets you connect directly to an MCP server, inspect its available tools, and test calls without involving Claude. This helps narrow down whether the problem is with the server itself or your Claude configuration.
Start using MCP servers with Claude
Adding an MCP server to Claude lets you connect your AI assistant to the tools and data you already use, whether you're working in Claude on the web, Desktop, or Claude Code.
The right setup depends on where you're using Claude and whether your MCP server is local or remote. Once connected, Claude can do more than answer questions: it can retrieve information, update records, and help you complete tasks across your tools, within the permissions you've granted.
If you're using Softr, the Softr MCP Server lets you connect Claude to your workspace to build and manage apps, databases, and workflows.
Frequently asked questions
Is Claude MCP free?
Where does Claude store MCP servers?
Are Claude connectors just MCP servers?
How is MCP different from an API?
What are the best MCP servers for Claude Code?