[.blog-callout]
TL;DR
- Google Sheets sharing is fast but blunt: people are a Viewer, Commenter, or Editor on the whole file, with no easy way to say "edit only your own rows."
- Use the built-in Share settings (covered step by step below) when you just need a few trusted people editing the same sheet.
- When access needs to depend on who the person is, build an app on top of your data with Softr's users and permissions and user groups, so each person sees and edits only the records meant for them.
- Google Sheets is one of 21+ data sources Softr connects to (alongside its own native database), and you can describe the app you want to the AI Co-Builder to get a head start.
[.blog-callout]
Granting edit access in Google Sheets lets multiple people work on the same document at the same time. Collaborators make changes in real time, everyone sees the latest data without passing new versions around, and they can comment and discuss updates right inside the document.
That works well for a handful of trusted people editing one shared sheet. The catch is that Google Sheets access is essentially all-or-nothing: once someone is an Editor, they can change any cell, add or delete sheets, and even reshare the file. There's no simple way to say "this person edits only their own rows" or "this group sees only their projects."
This guide covers both routes so you can pick the right one:
- Google Sheets sharing settings: quick to set up, with limited, file-level permissions;
- Softr: build a real app on top of your sheet when you need to granularly control who accesses and edits which data.
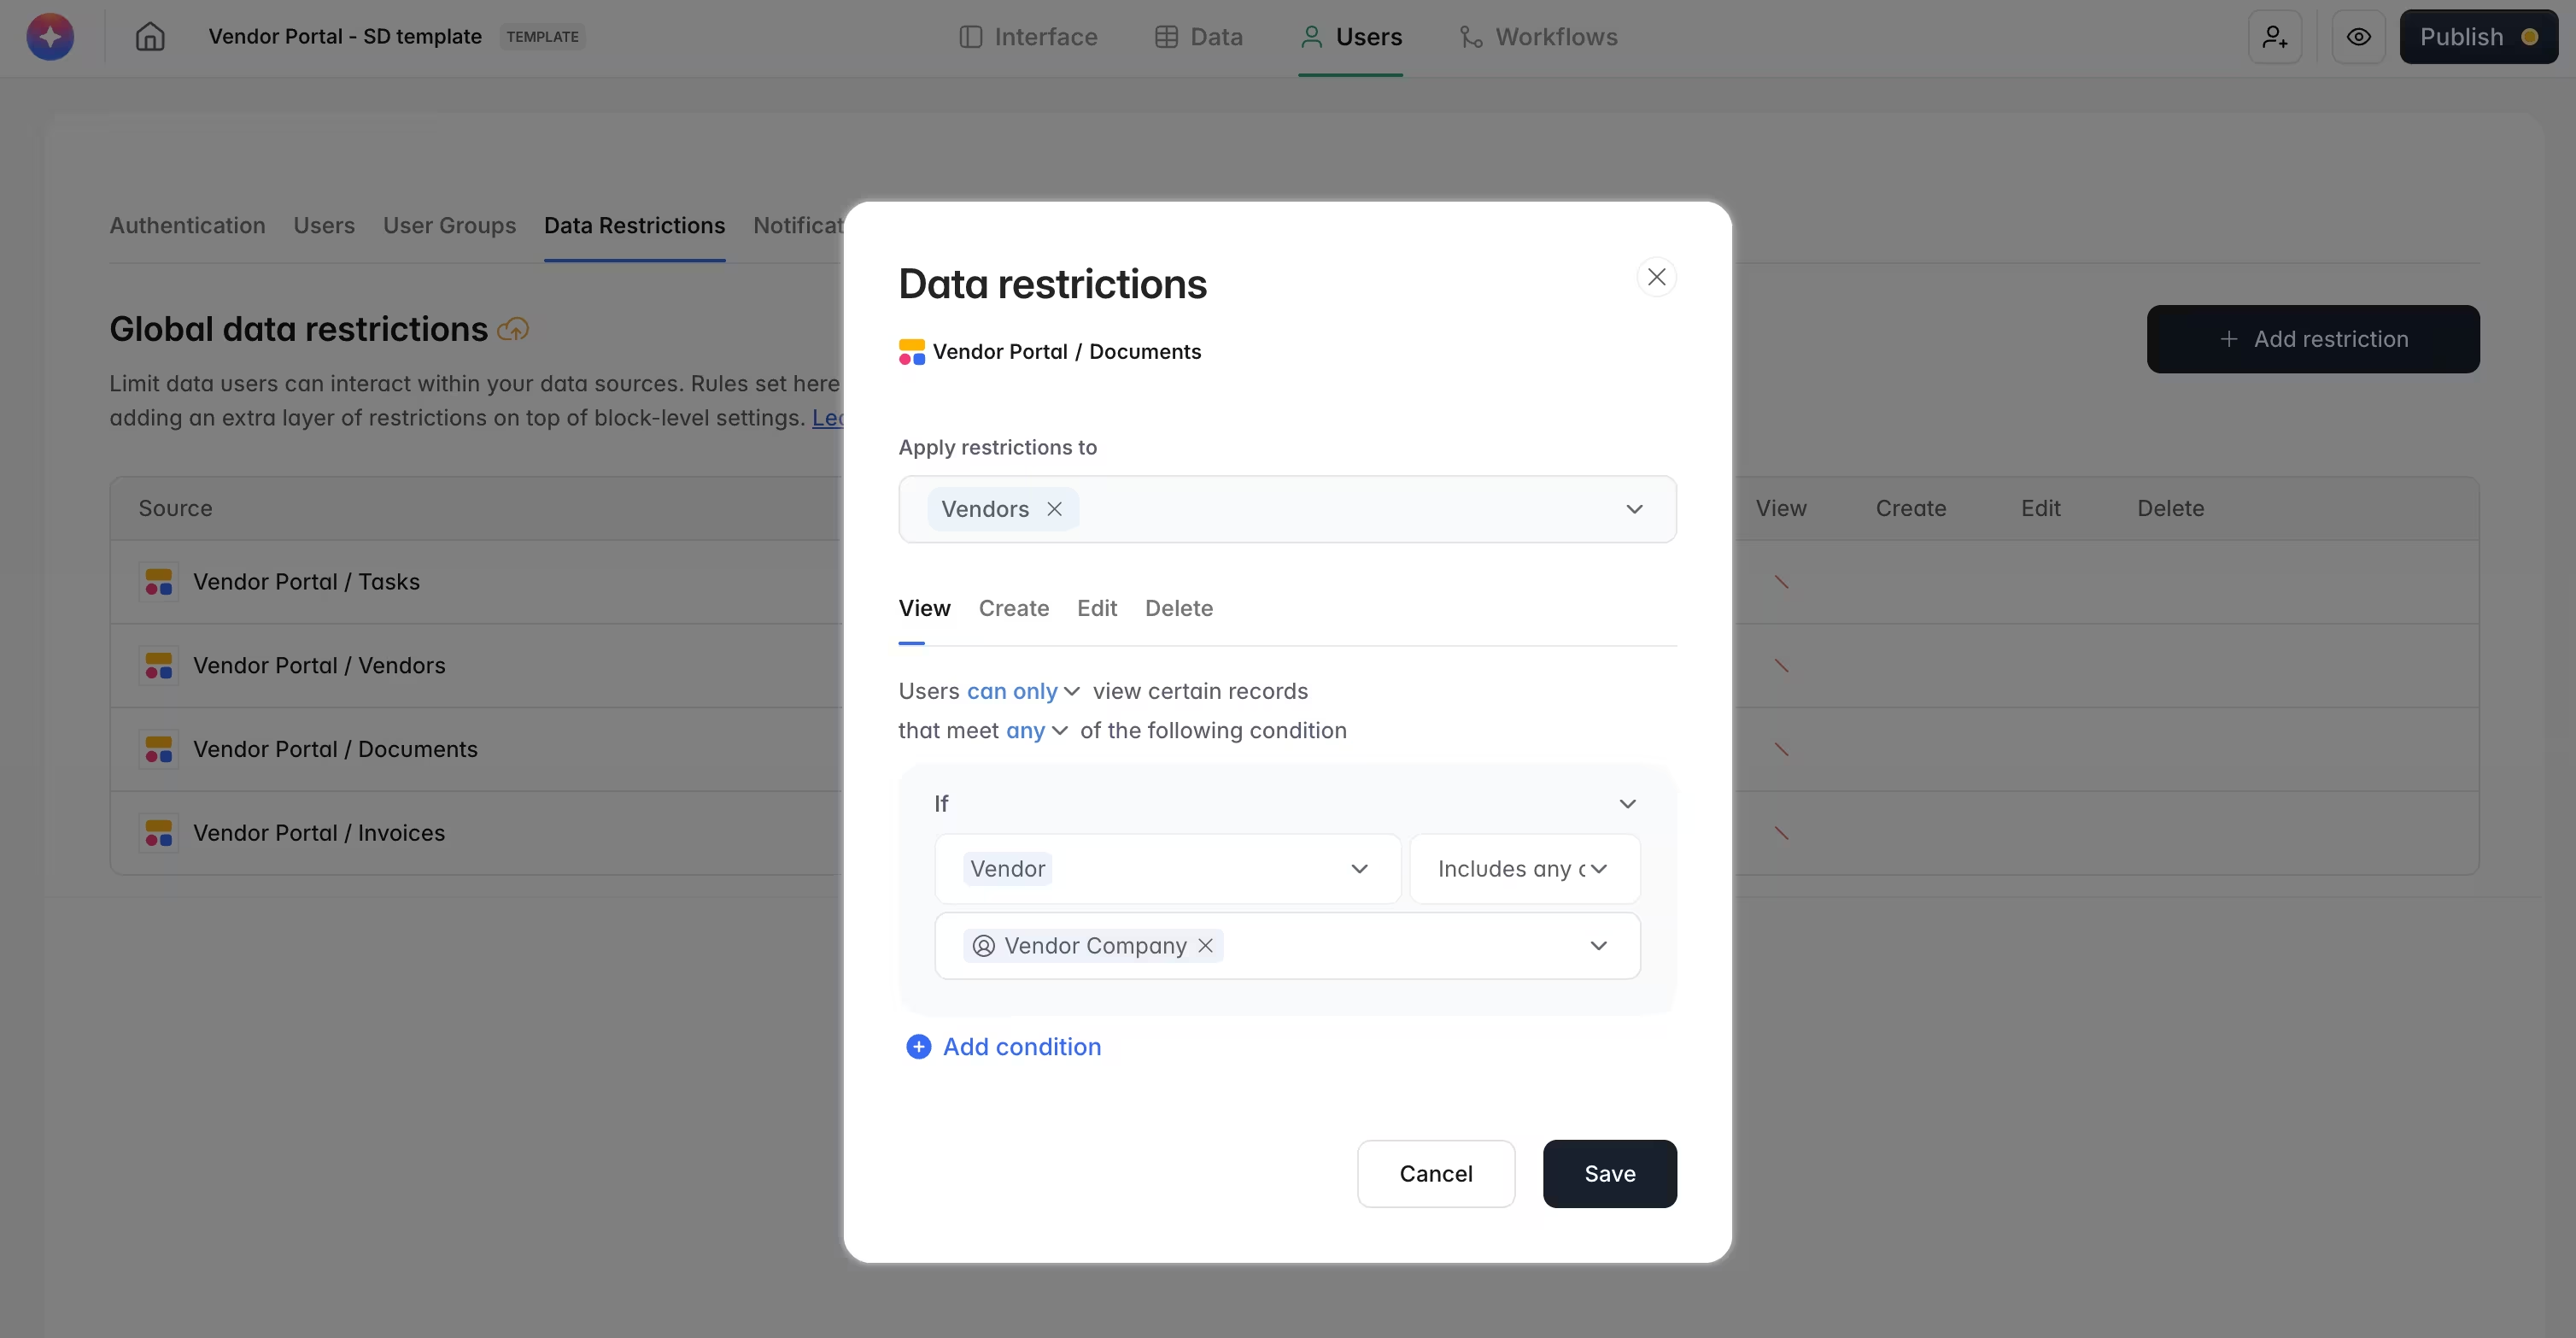
"Data restriction is a security setting used app-wide to prevent anyone from seeing data they shouldn't be seeing, ensuring external partners can only see their own records." - Guillaume Duvernay, Builder at Softr
How to give edit access with Google Sheets sharing settings
Cost: $0
Time: 2 minutes
This is the fastest route, and it's the right one when you simply want a few trusted people editing the same sheet. Keep in mind that edit access here applies to the whole file. When you give someone edit access using the Google Sheets sharing options, they can:
- Change cell values, insert new rows or columns, and delete existing content;
- Apply various formatting options, such as applying styles and changing fonts;
- Sort data and filter data to view specific subsets of information;
- Change the sharing settings of the document;
- Add new sheets or delete them;
- Add comments to cells.
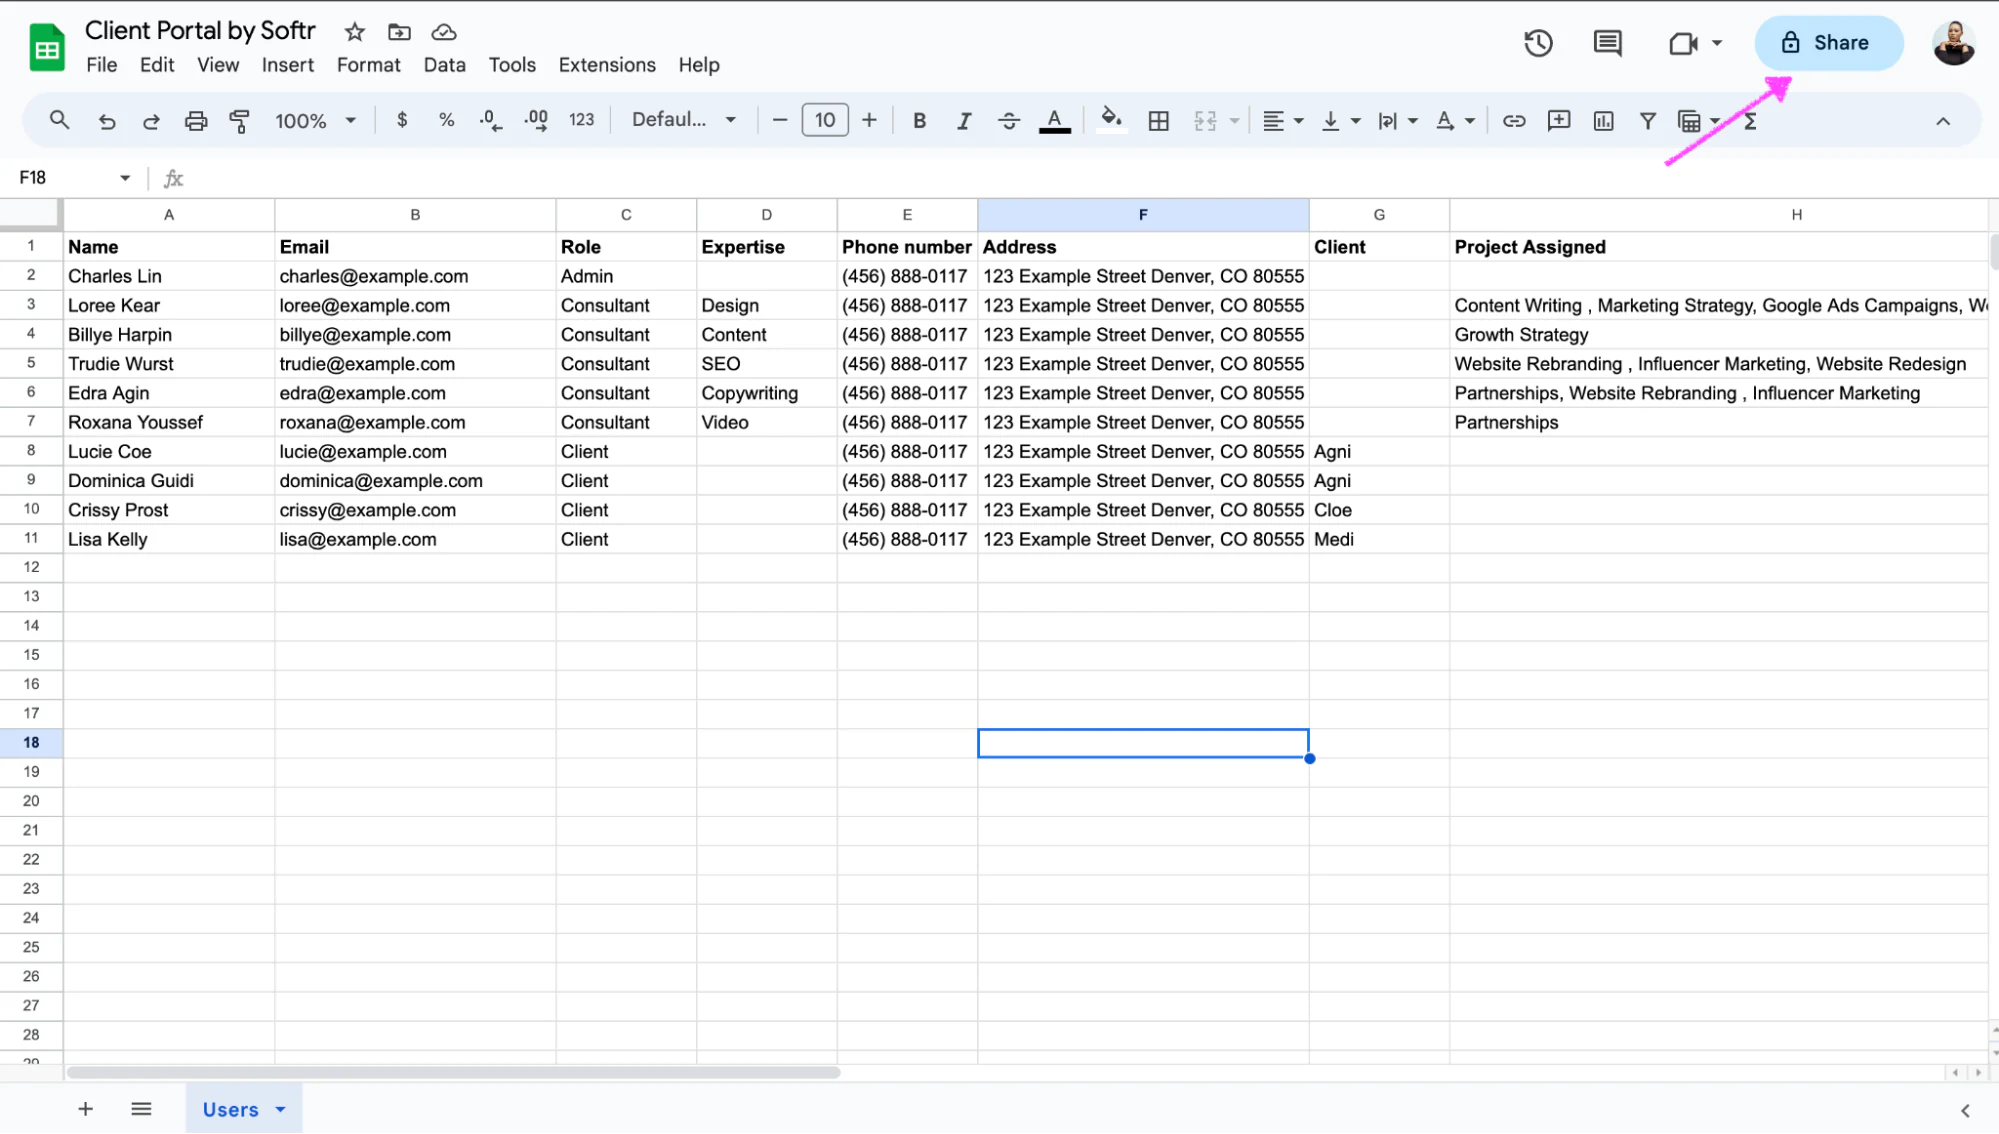
Step 1: Click on the “Share” button
After opening the spreadsheet you want to grant users to have edit access, click on the blue “Share” button with a lock sign at the upper-right corner of the screen.
Step 2: Type the email addresses of those you want to give edit access
In the popup box, type the email addresses of those you want to give access to edit the spreadsheet in the "Add people and groups" field. As you do so, Google Sheets will suggest email addresses from your contacts.

Step 2.1: Notify collaborators (optional)
You can choose to notify the collaborators by checking the box that says "Notify people." Type a custom message if you want to, or click on the send button to notify users without a custom message. They will receive an email notification with a link to the shared spreadsheet.

Step 3: Update the general permissions settings (optional)
If you don’t have the email addresses of those you want to give edit access to, you can update the general access settings. In the popup, you will see a section titled “General access.”. By default, it is set to "Restricted." Click to open the dropdown and select “Anyone with the link.”
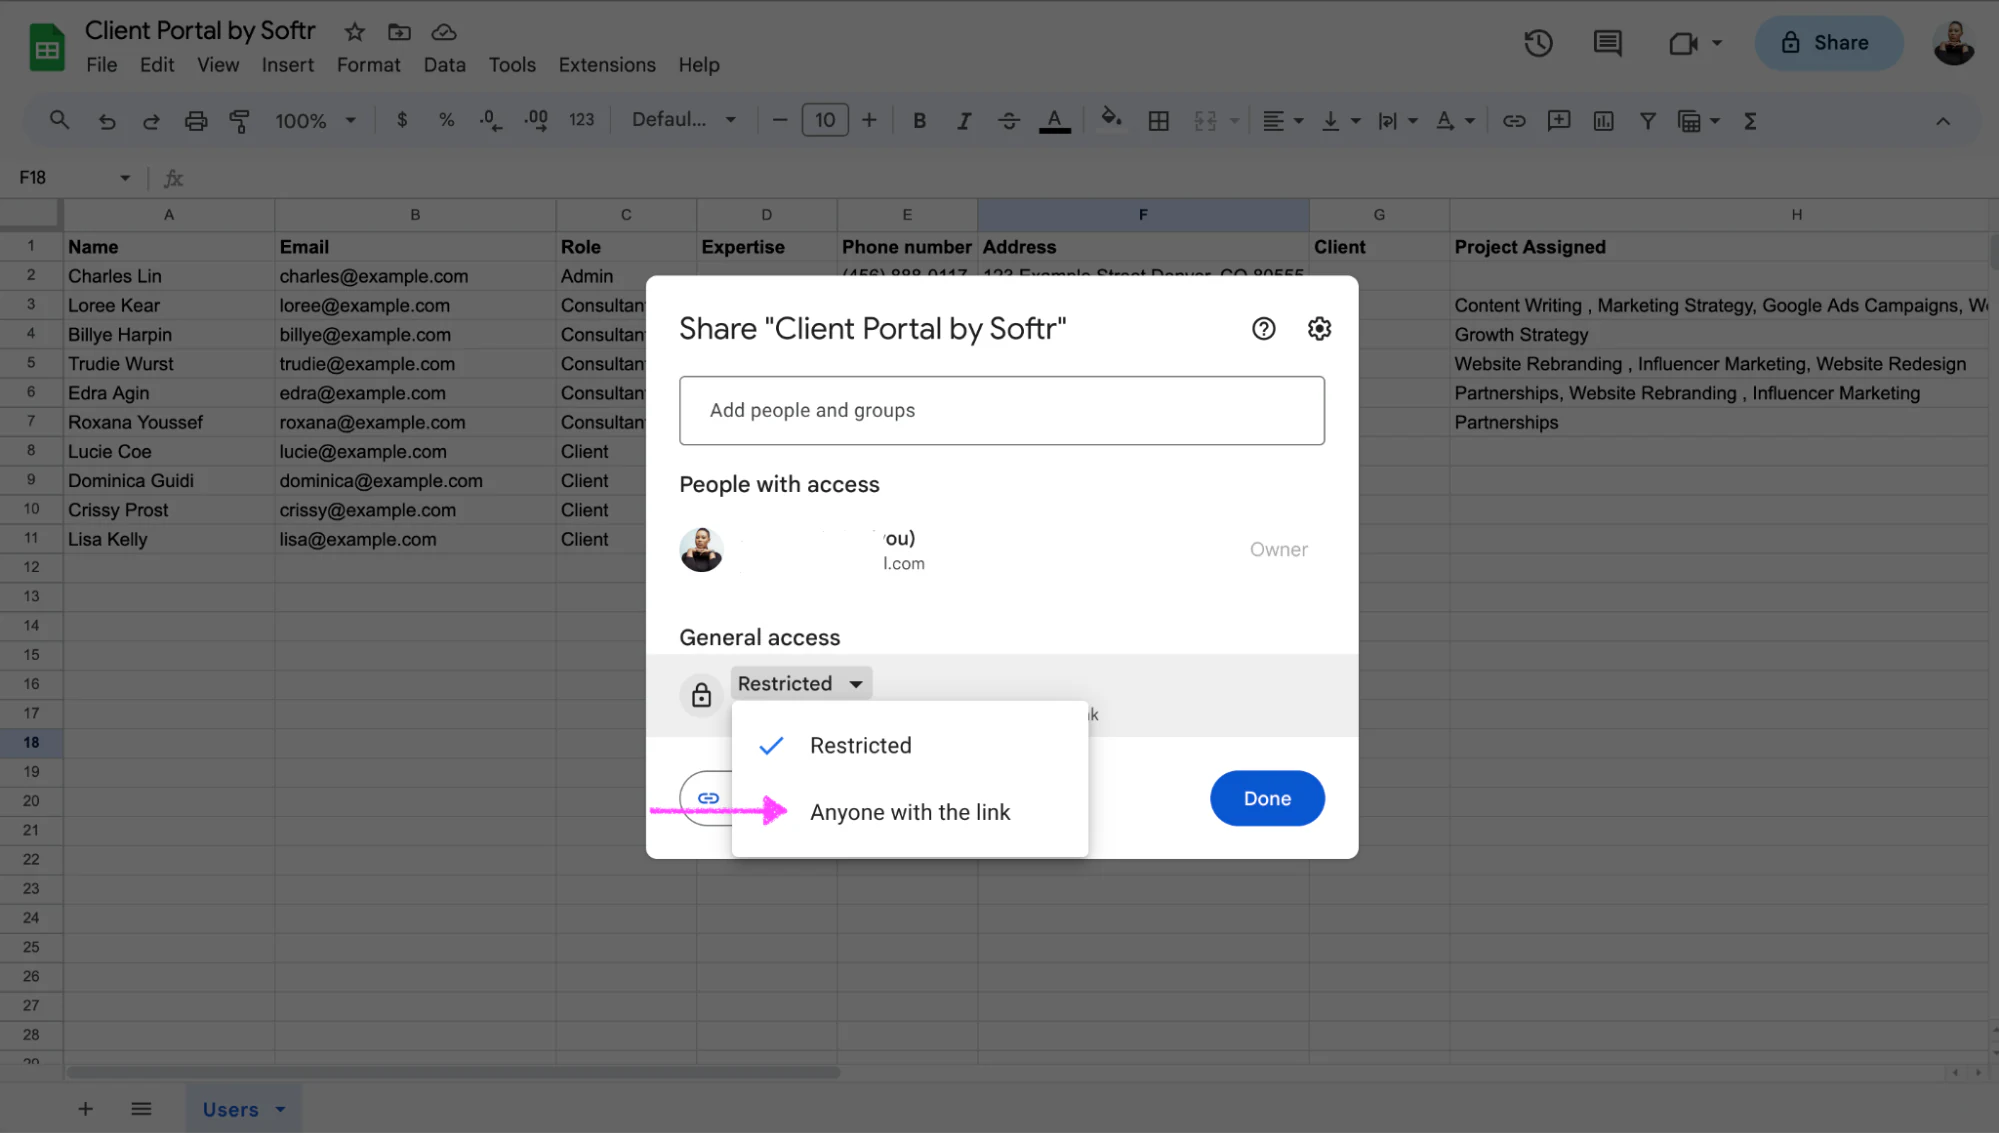
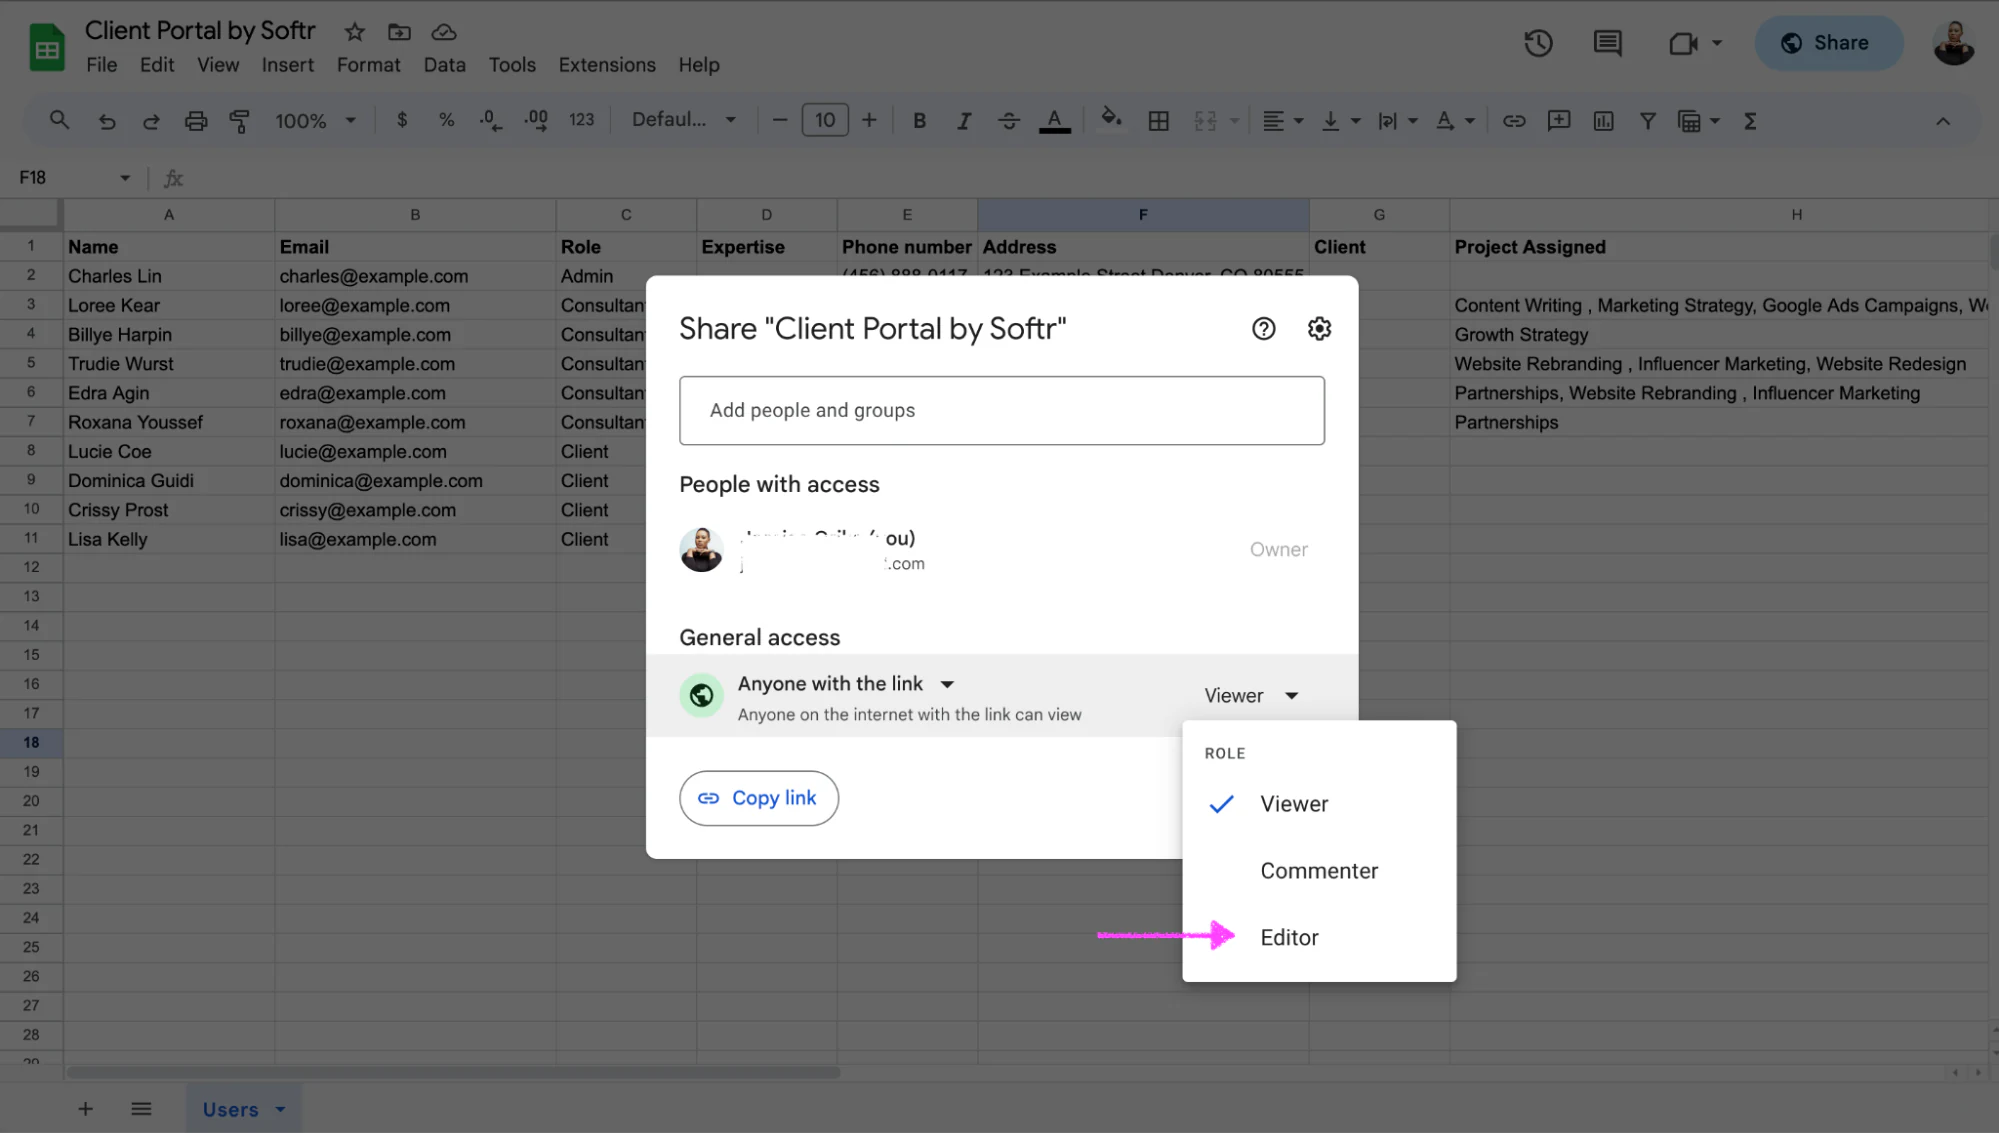
Step 3.1: Update the access level to “Editor”
After updating the general access permissions, by default, Google Sheets will grant "Viewer" access to the people with whom you share the link to your Google Sheets file. This means they can see the spreadsheet data and make a copy, download, or print it.
To update the setting, click to open the dropdown and select "Editor." This will ensure that anyone with the link can edit the spreadsheet, meaning add and delete content, as well as share the document with others.
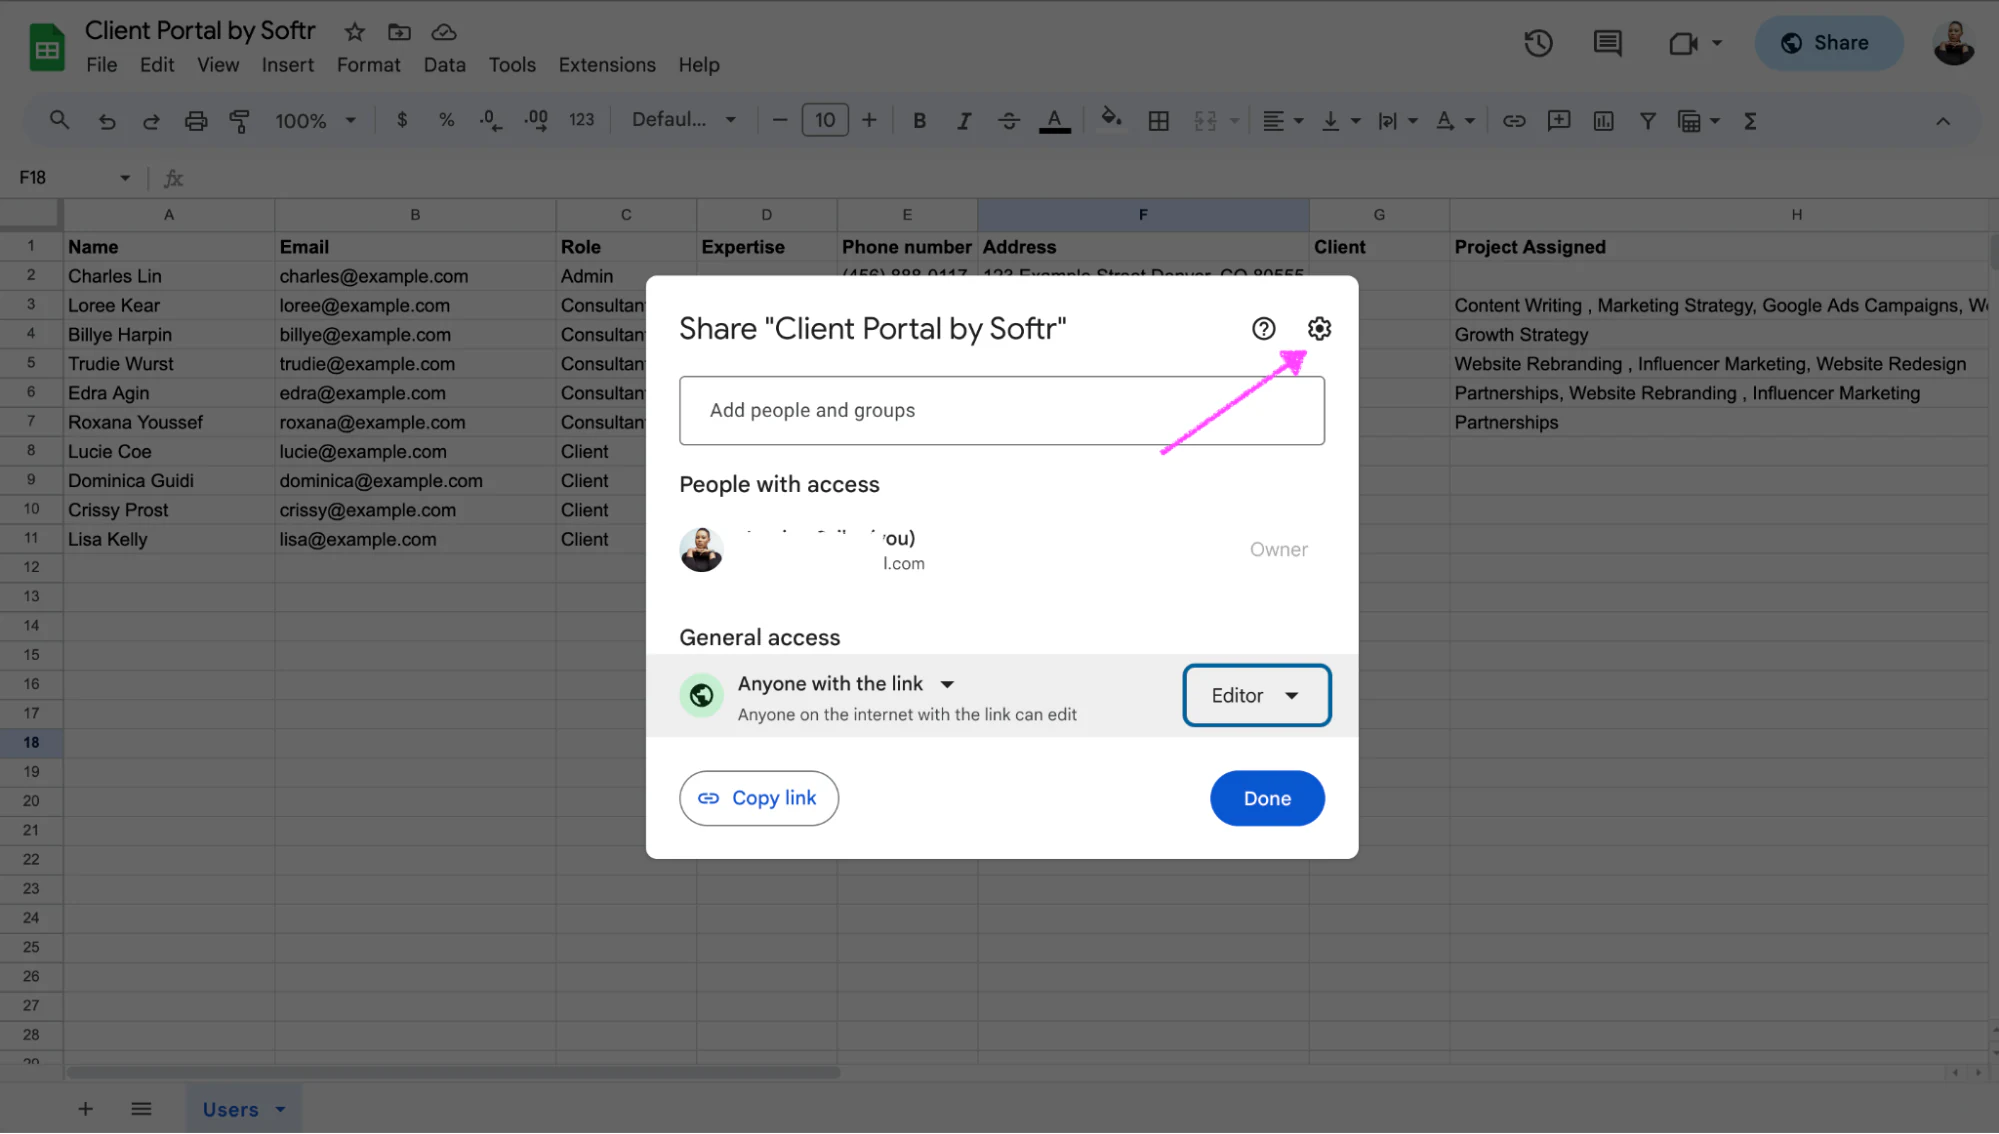
Step 4: Uncheck the box to stop users from sharing the sheet (optional)
You can choose to limit access for editors so they don’t share the sheet with unauthorized parties. To do this, click on the settings symbol at the top-right of the popup.
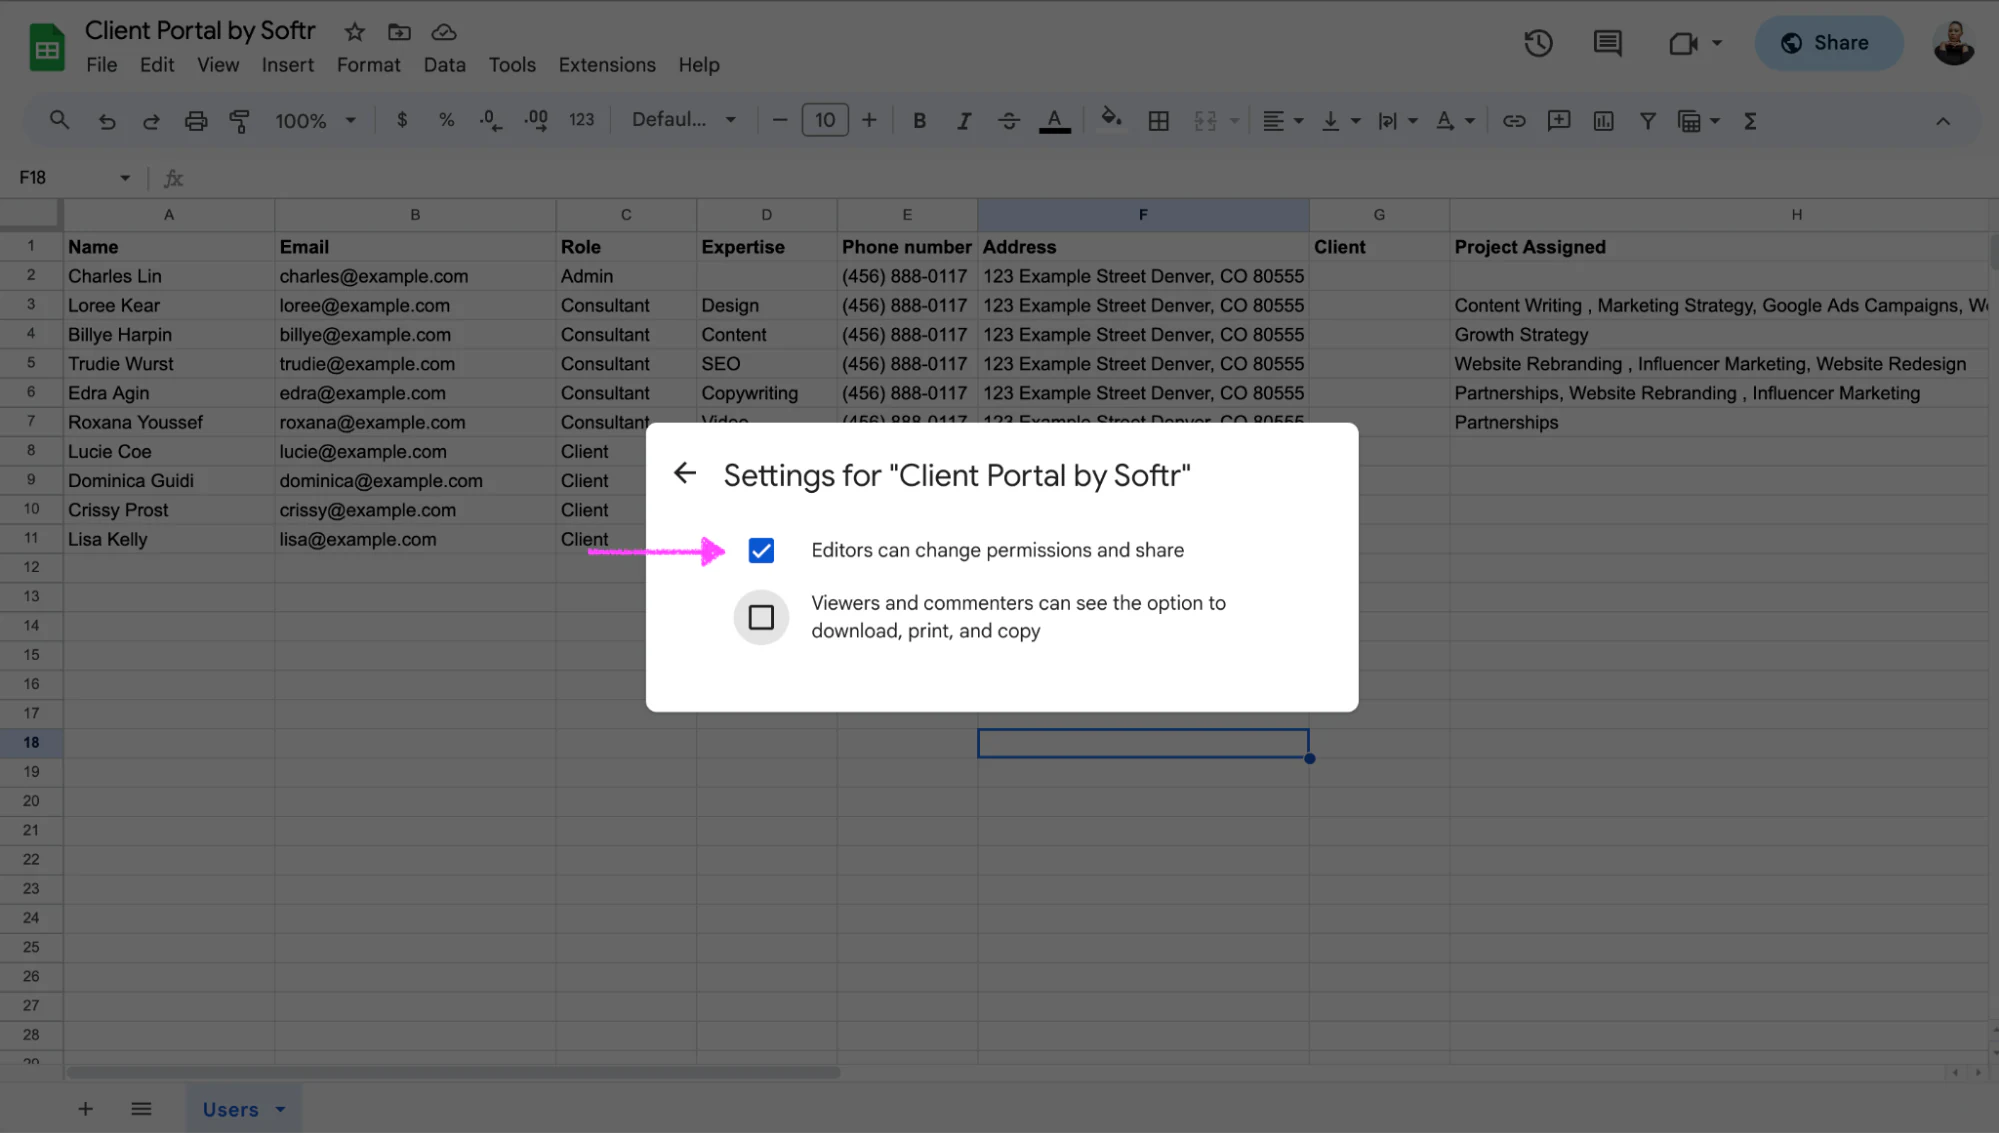
Then uncheck the box beside “Editors can change permissions and share.” This adds an extra layer of security to prevent editors from sharing your spreadsheet without permission.
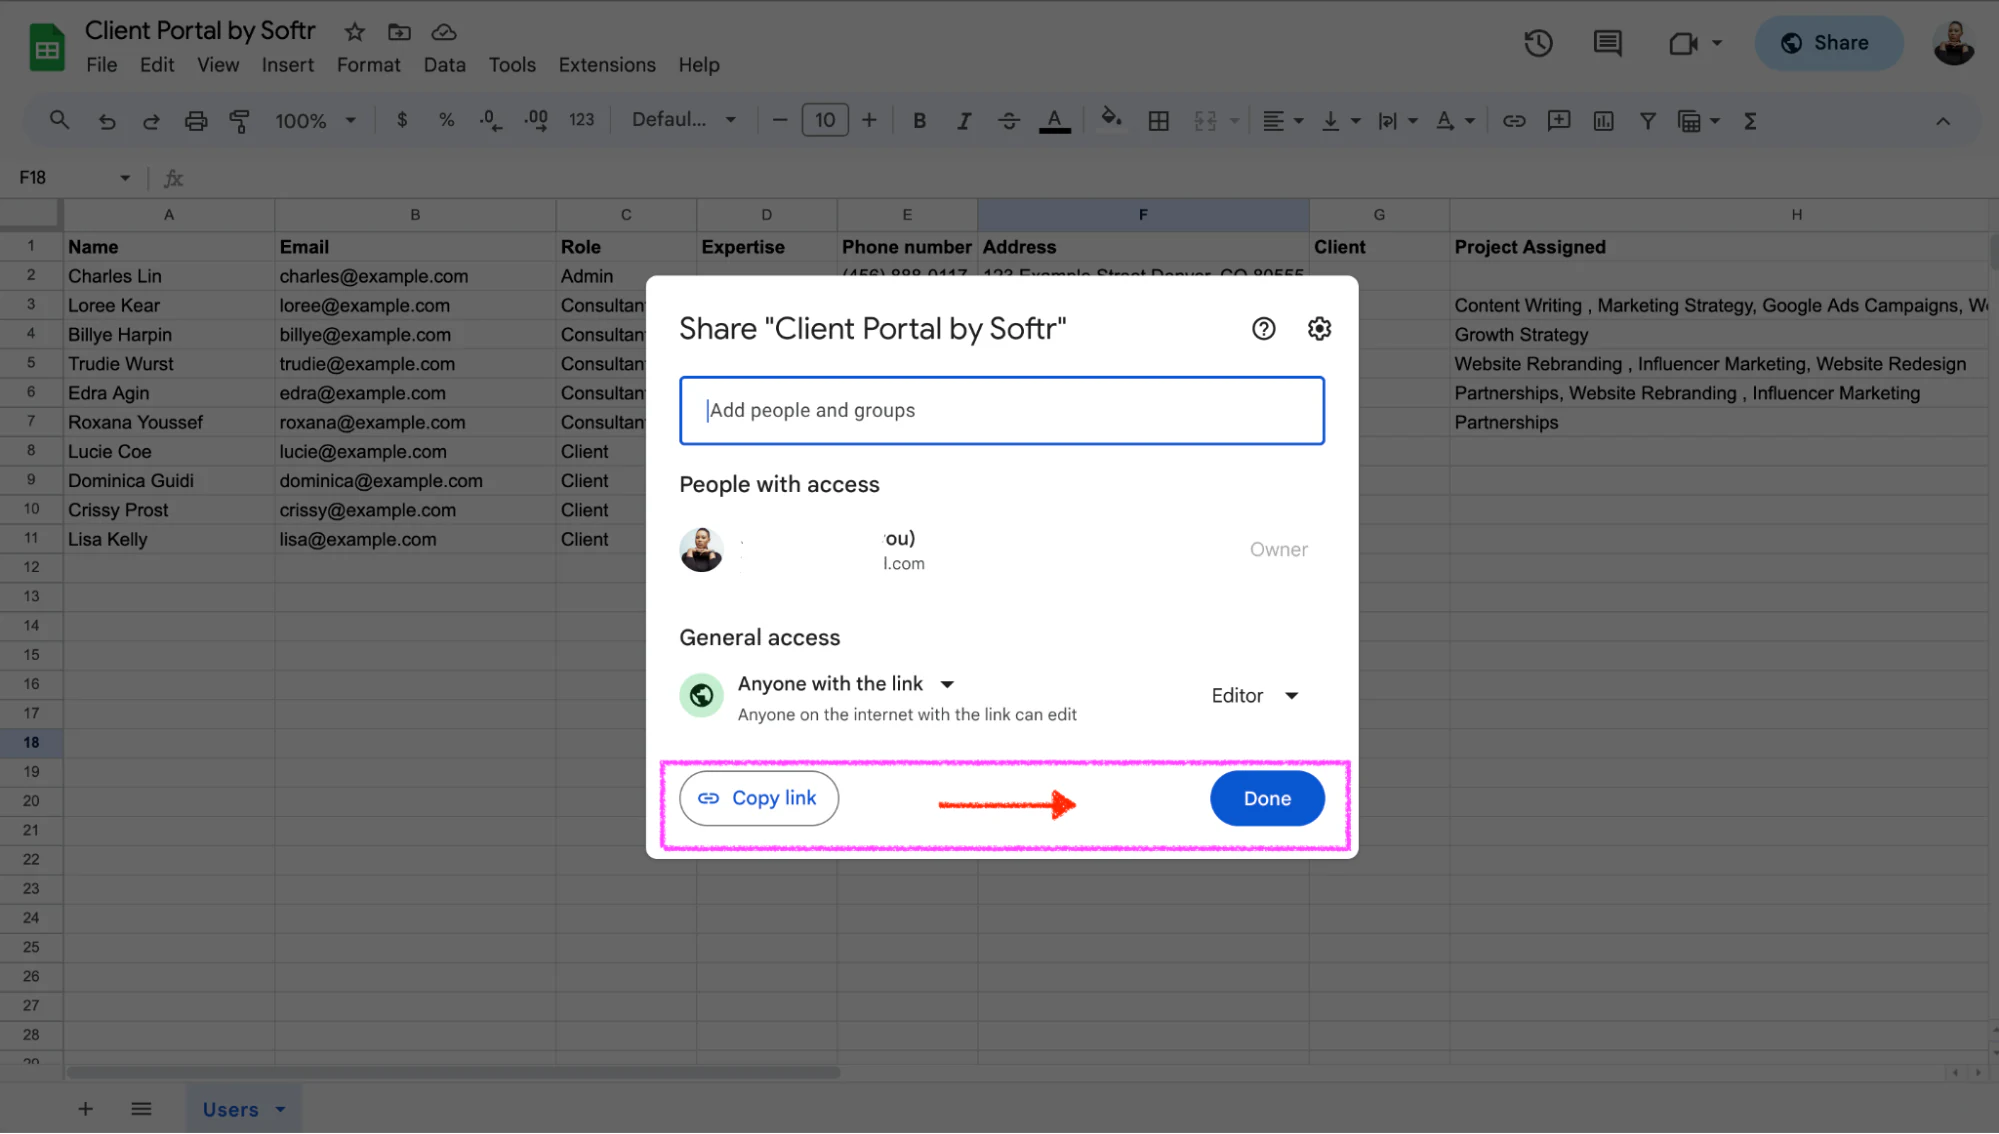
Step 5: Share the document
After configuring the settings, click the "Done" button to share the spreadsheet. An email notification will be sent to the invited collaborators, and they will be able to access and edit the spreadsheet according to the permissions you've granted.
How to control granular edit access with Softr
Cost: $0
Time: 5 minutes
The sharing settings above hit a wall as soon as access needs to depend on who the person is. If three different clients all need to edit "their" data in the same sheet, file-level sharing can't keep them apart. As we put it in our breakdown of things spreadsheets can't do, spreadsheets only offer all-or-nothing file access, while real business apps enforce permissions down at the record level.
Softr is a no-code platform for building client portals and internal tools on top of your data. You can use Softr's own native Softr Databases, or connect Google Sheets, Airtable, HubSpot, and 21+ other data sources. Instead of handing people the raw spreadsheet, you give them an app, and you decide page by page, block by block, and record by record what each person can see and edit using users and permissions and user groups.
That control is consistently what operators highlight about the platform:
"I appreciate its functionality in sending notifications, inviting users, and using magic links and other secure features. I also love the ability to control access globally, which is really important for data security and privacy." - Natalie S., Director of Operations, G2 review
The fastest way in is to describe the app you want to the AI Co-Builder and let it generate a starting point, complete with database and pages. You can also start from a ready-made template (the route we'll follow below) or build from a blank canvas if you prefer full control.
Step 1: Log in to Softr or create an account
If you don’t have an account, sign up for Softr for free. If you do, sign in to your account.

Step 2: Choose a template
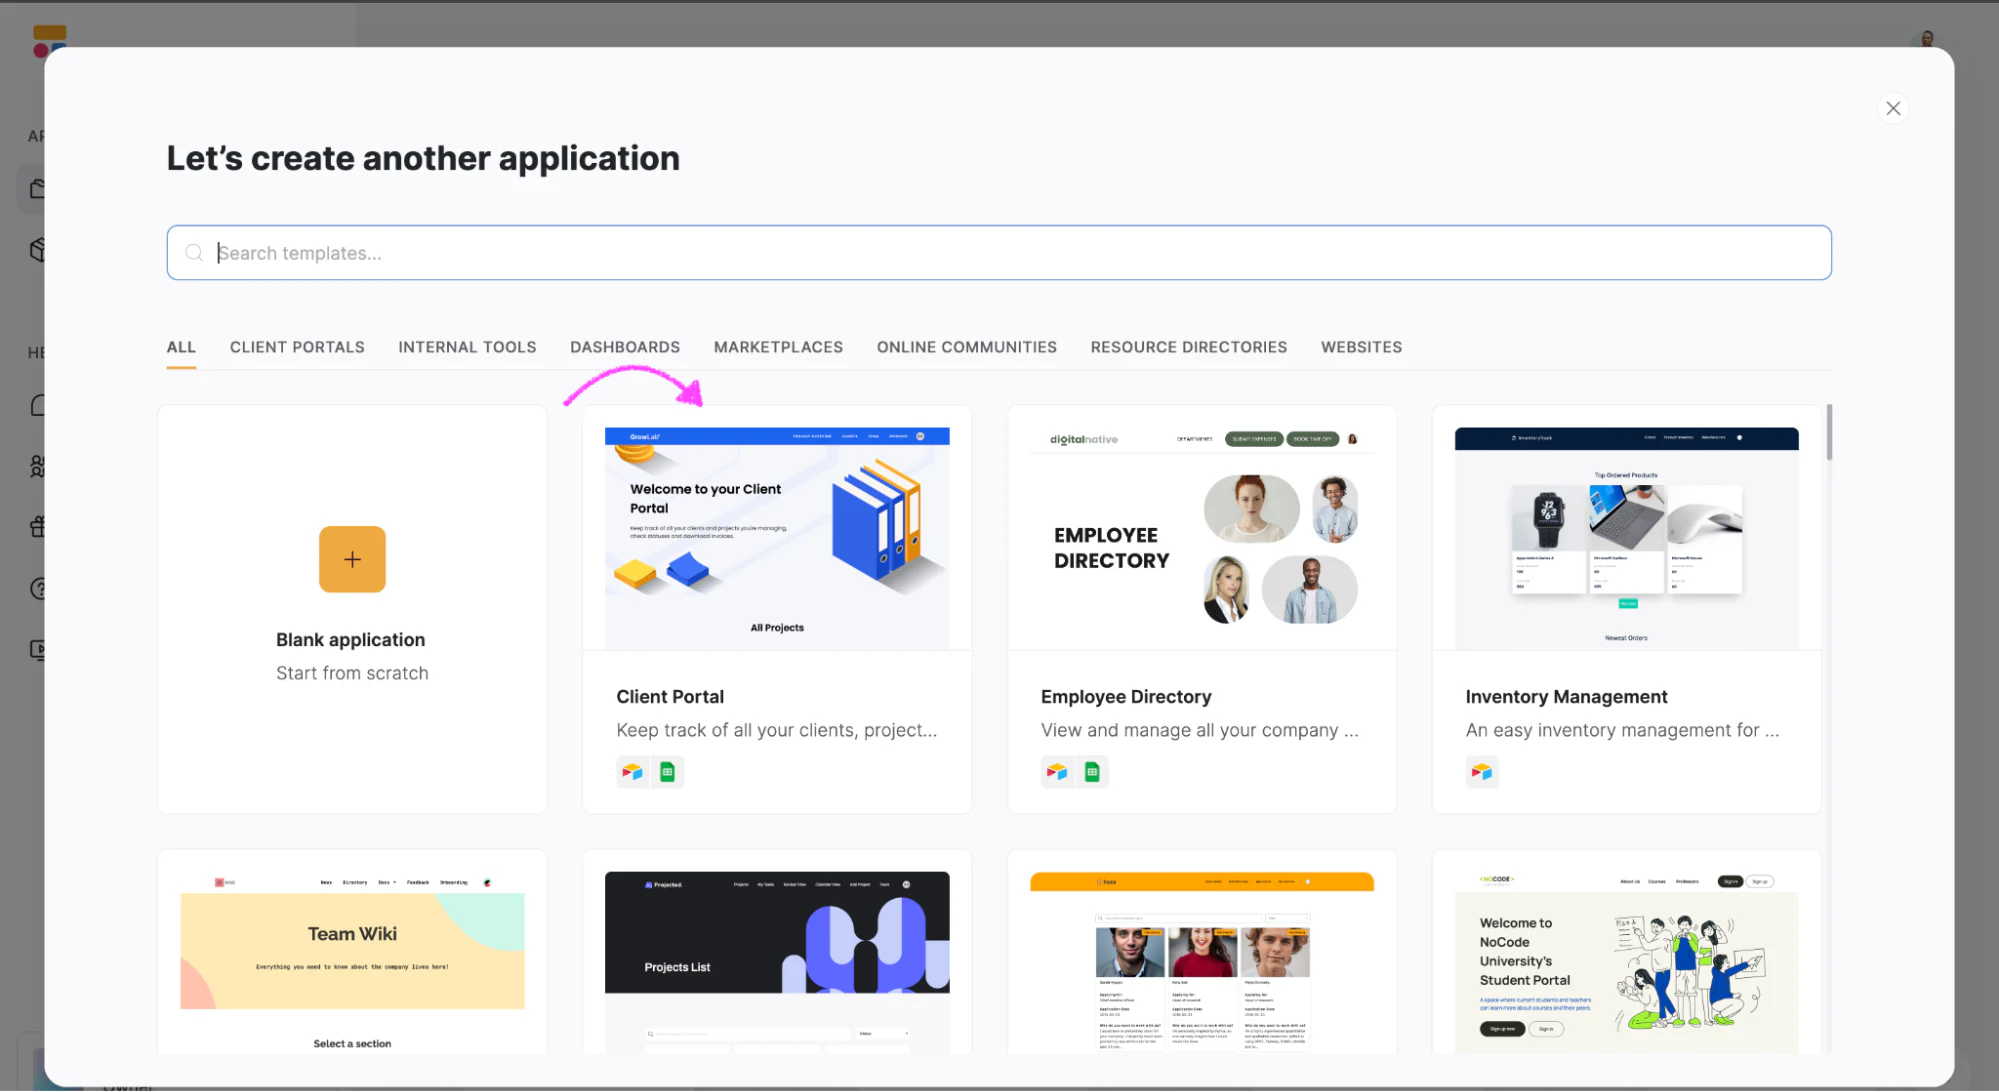
So you don’t have to start from scratch, Softr provides a wide range of customizable templates. To access them, click on “New Application.” (If you'd prefer, this is also where you can describe your app to the AI Co-Builder and have it generate the structure for you.)
Step 2.1: Select a template
To get started, you will be directed to the template gallery, where you can choose a pre-existing template that suits what you’re looking for. For this example, we will use the client portal template.
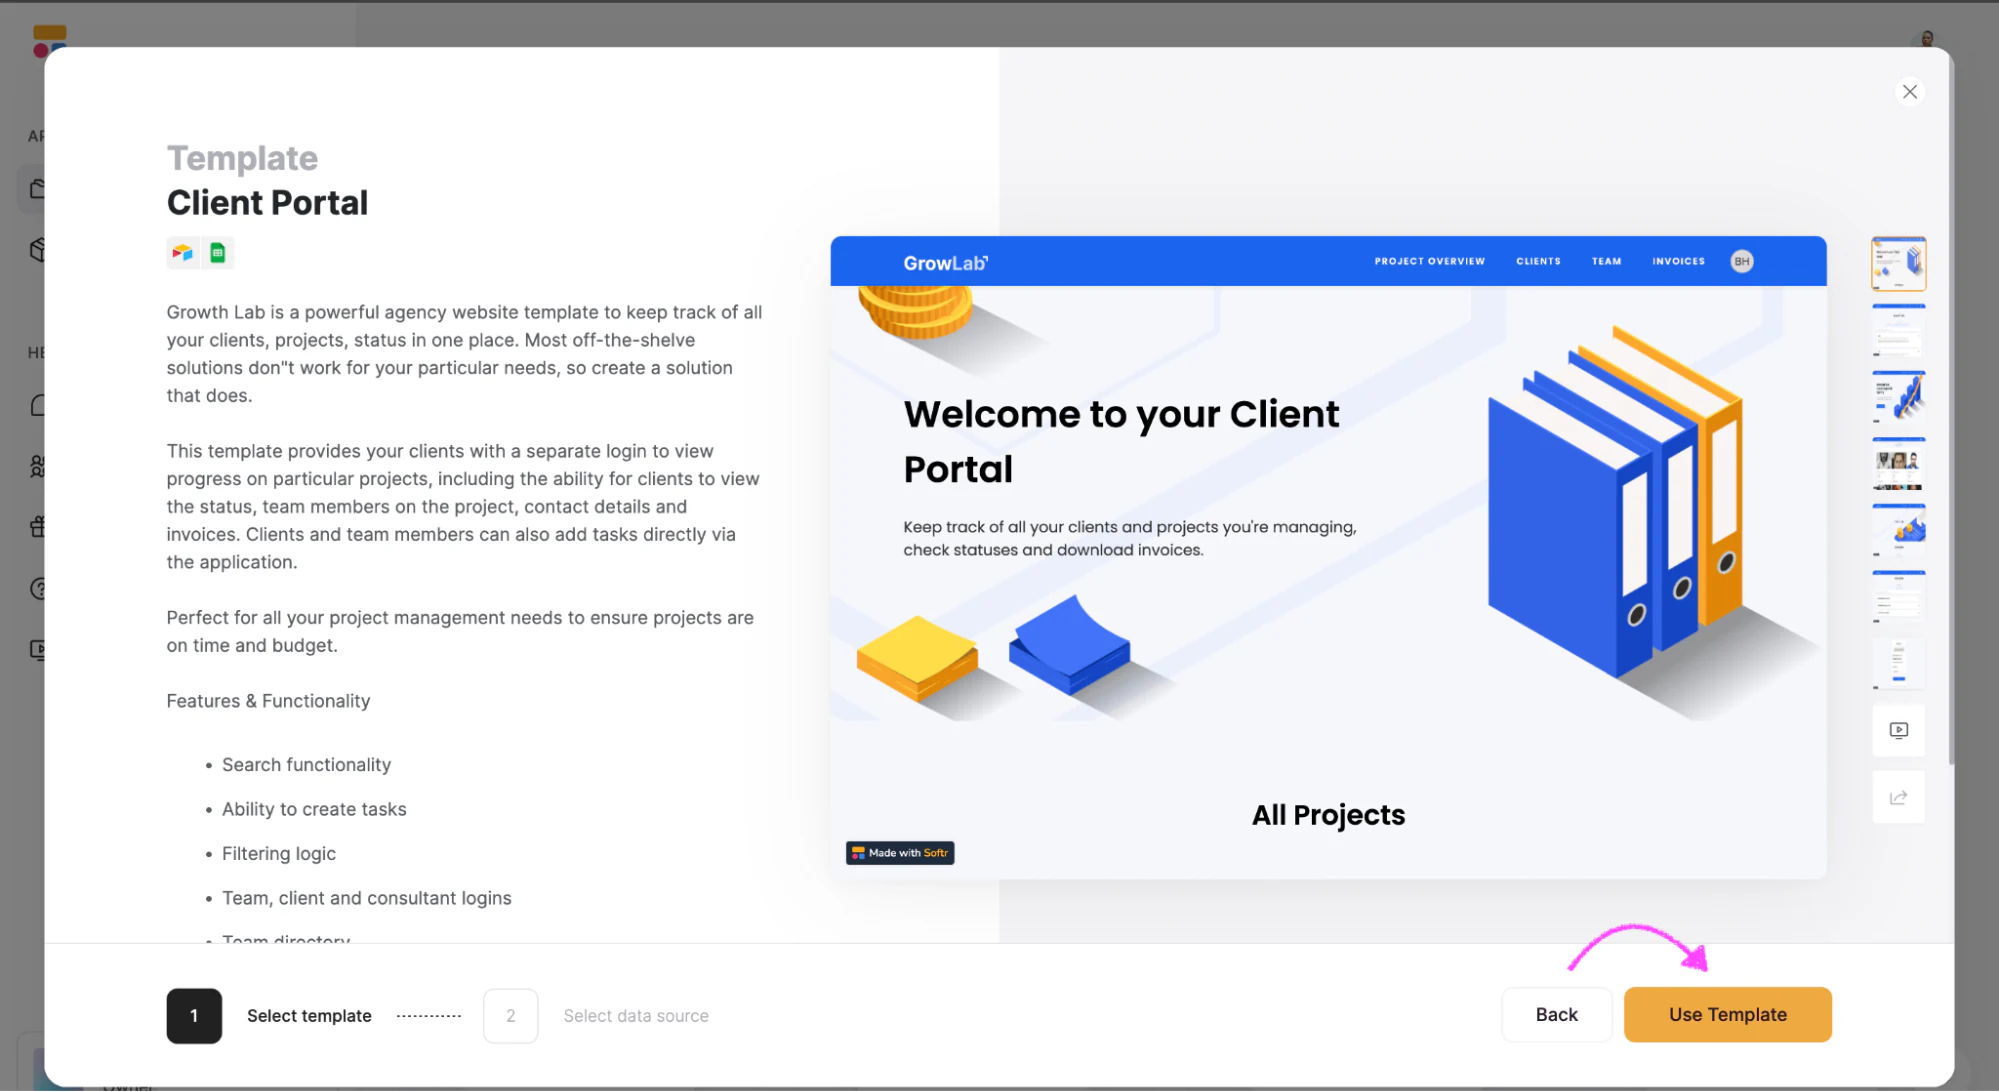
Step 3: Connect Softr and Google Sheets
Now, you have to connect both tools, so that you can use Softr to give granular edit access to your data in Google Sheets.
Step 3.1 Choose Google Sheets as the data source
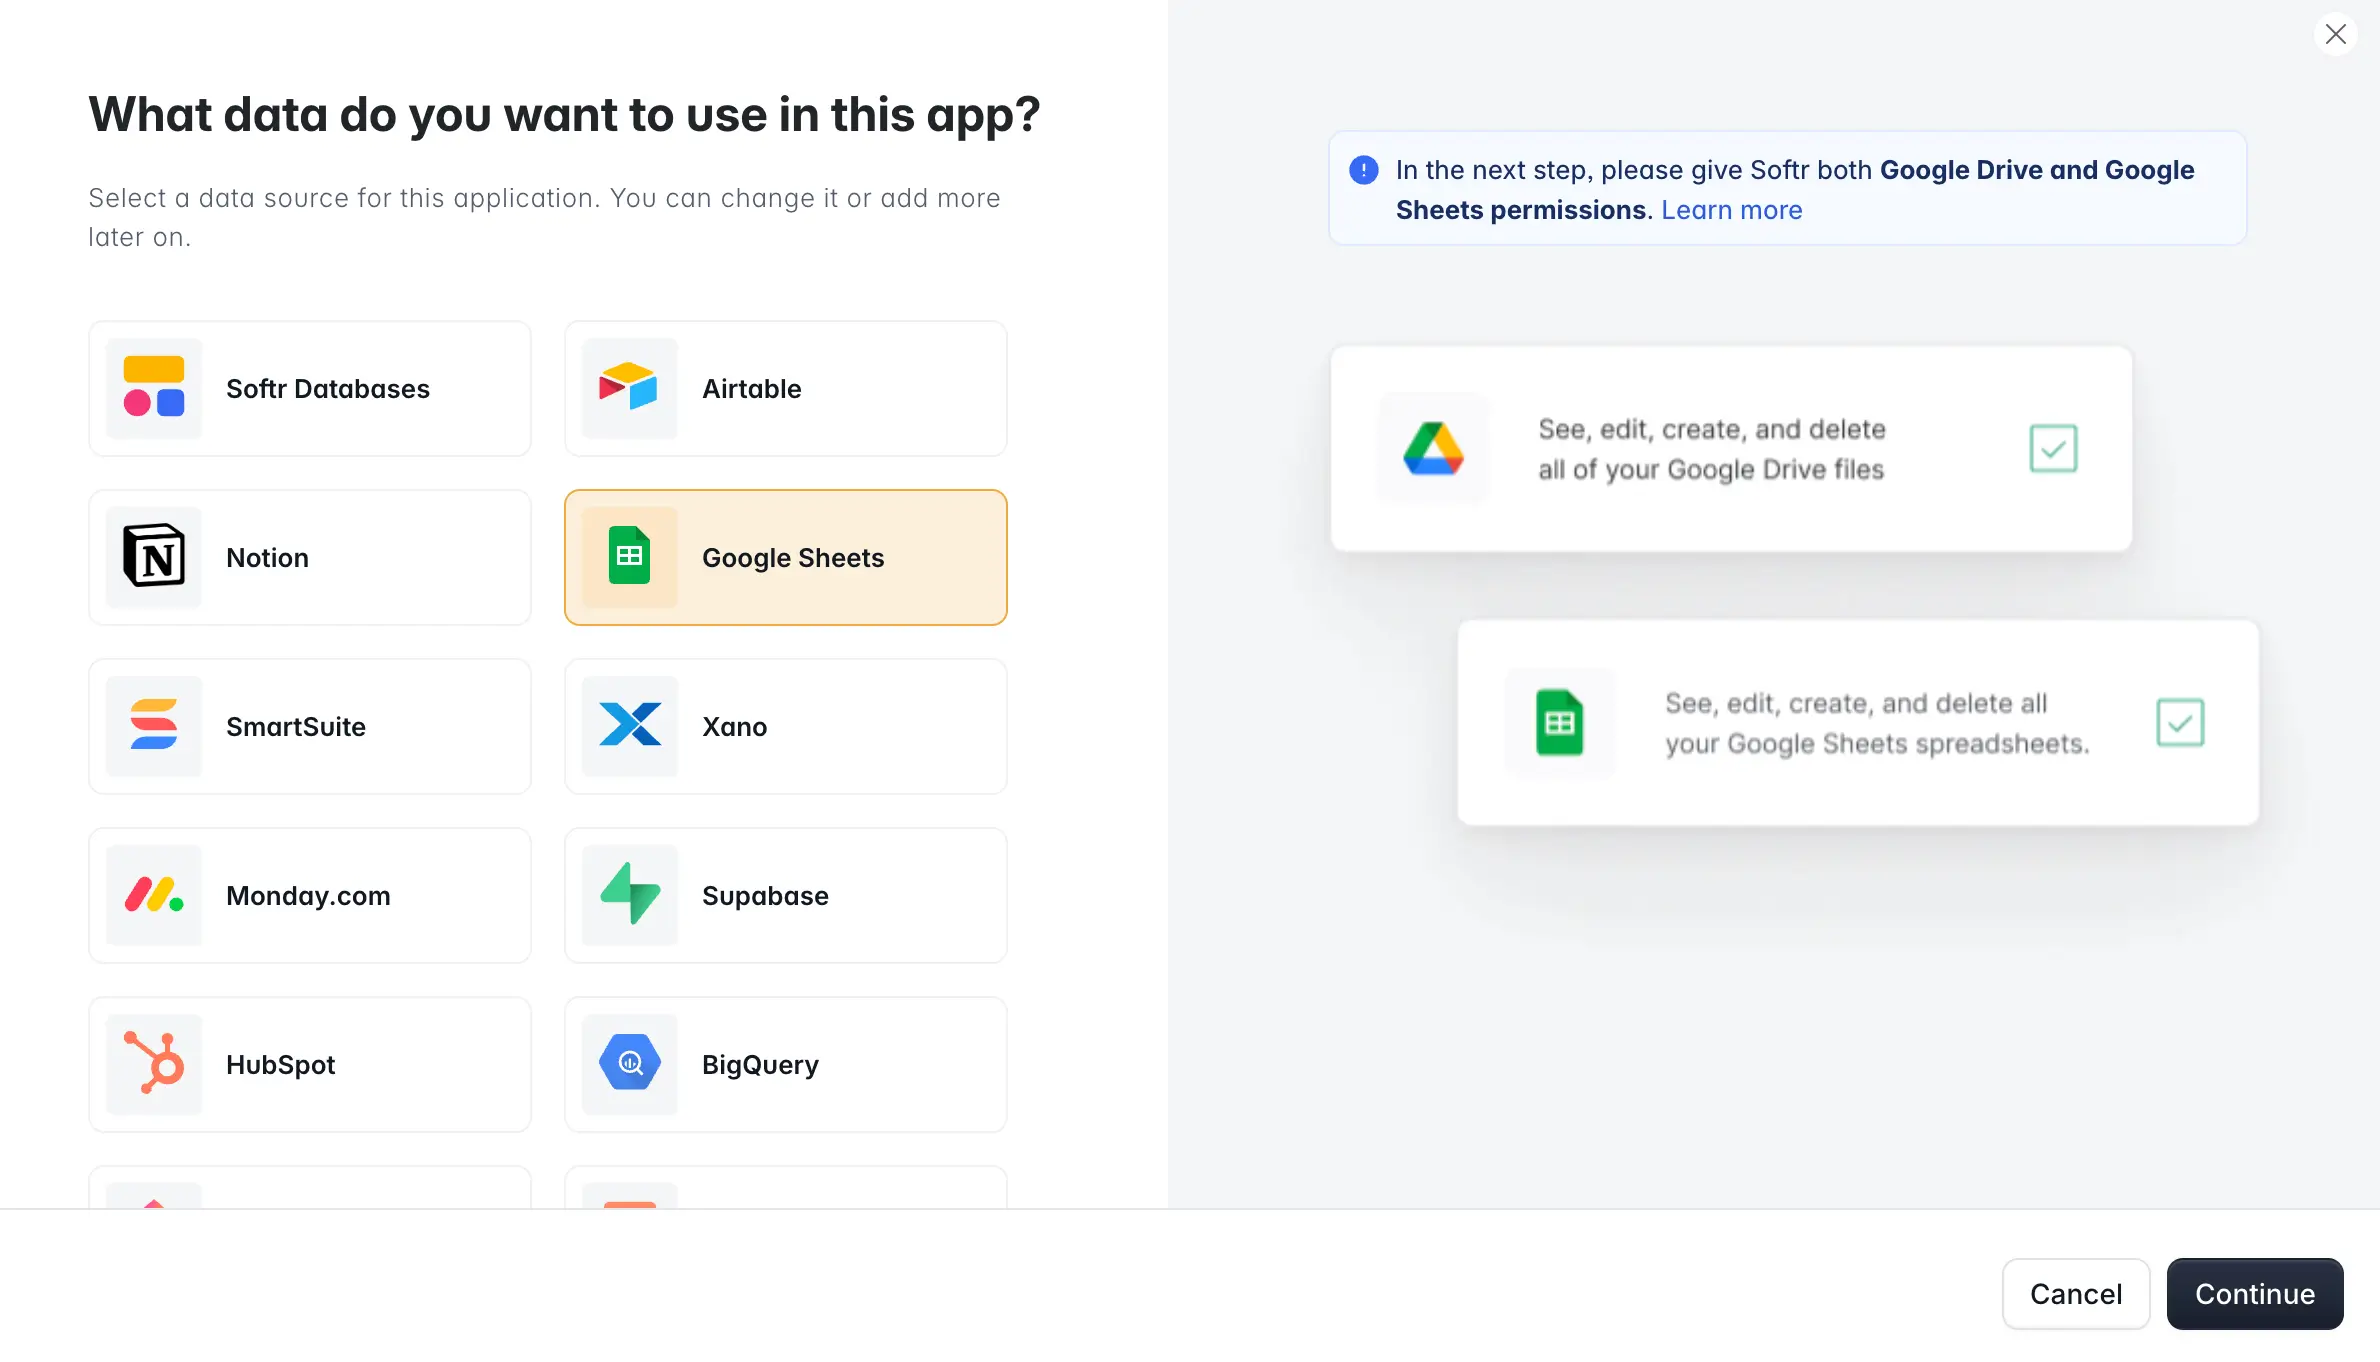
Start by opening the “Select data source” dropdown and choosing “Google Sheets.” Then click on “Continue.” This is also where you'd pick Softr's native database or any of the other supported sources if you weren't tied to a sheet.
Step 3.2: Log in to your Google account
If it's your first time connecting your Google account to Softr, you'll be redirected to the Google login screen. From there, select the account where the file is saved.

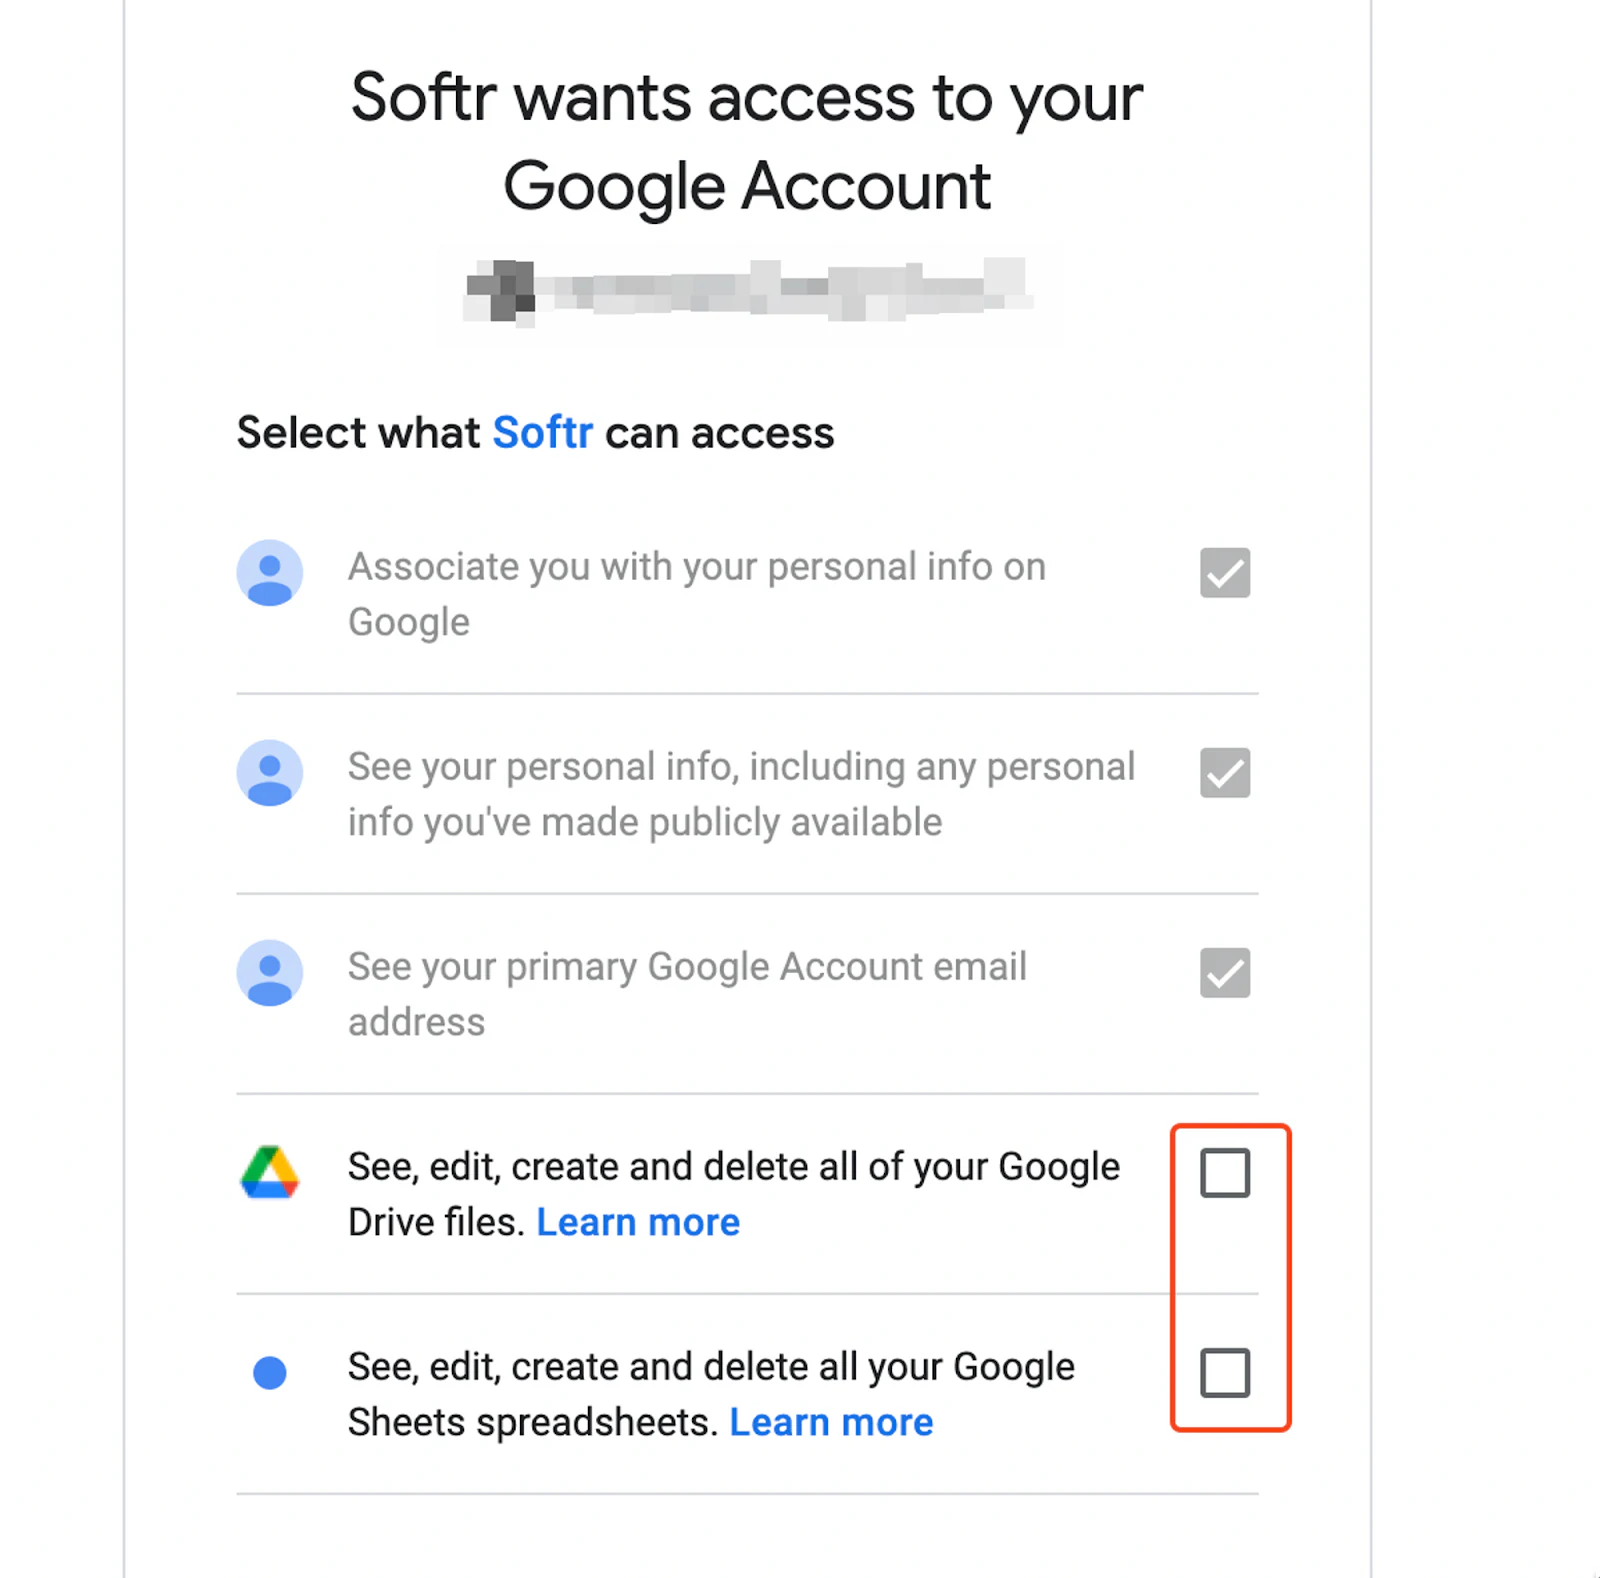
Step 3.3: Authorize Softr
Next, tick the two boxes highlighted in the image below to authorize Softr to make changes in your Google Sheets and Google Drive files. Then click on “Continue.”
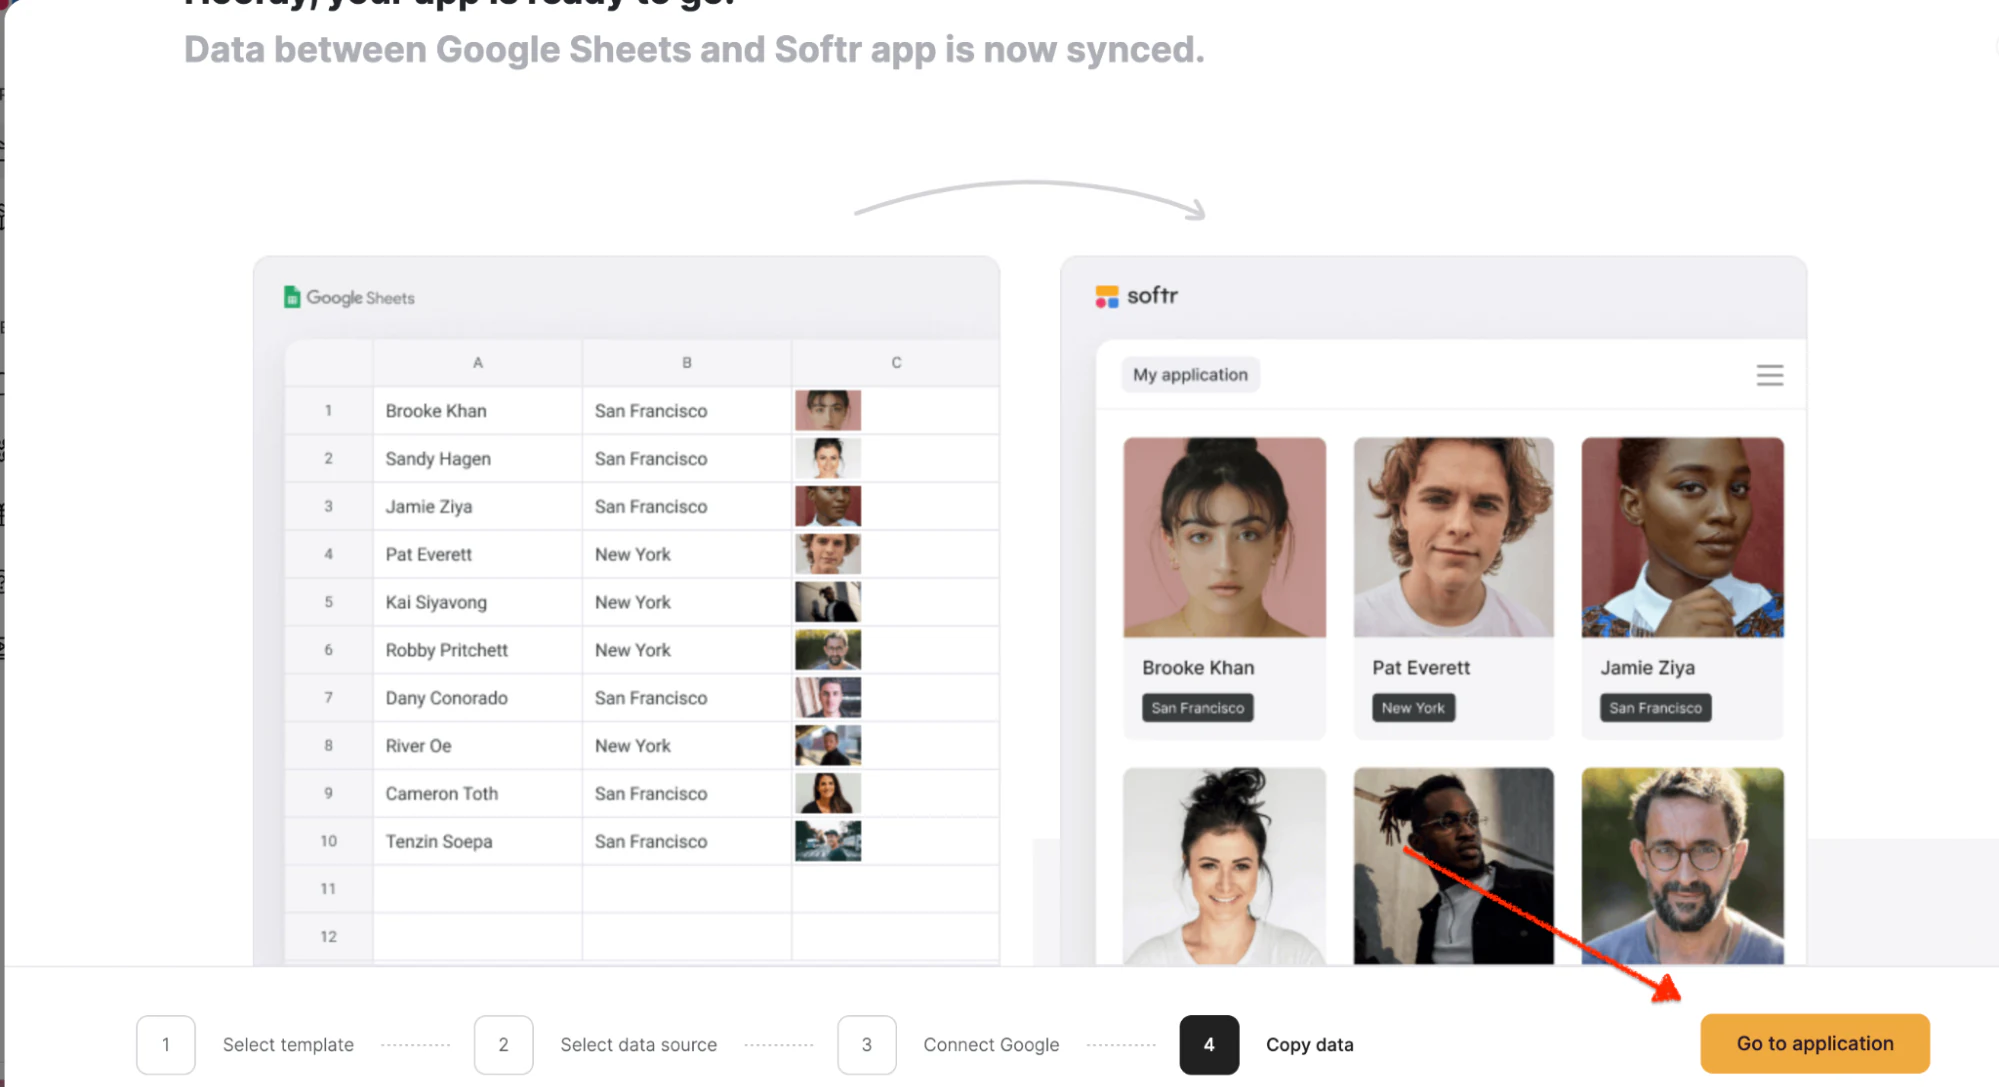
Step 4: Click on “Go to application”
After connecting Softr with Google Sheets, you will be redirected to the onboarding page. Click on "Go to Application" to continue creating a web application with your Google Sheets data, and you'll be directed to the design studio.
Step 5: Set Block Permissions
Using Softr, you can set permissions (give edit access) in two ways:
- Block: you can control who accesses and edits specific blocks on different pages of your web application;
- Pages: you can control who accesses and edits specific pages of your web application.
Let’s go over how to set block permissions.
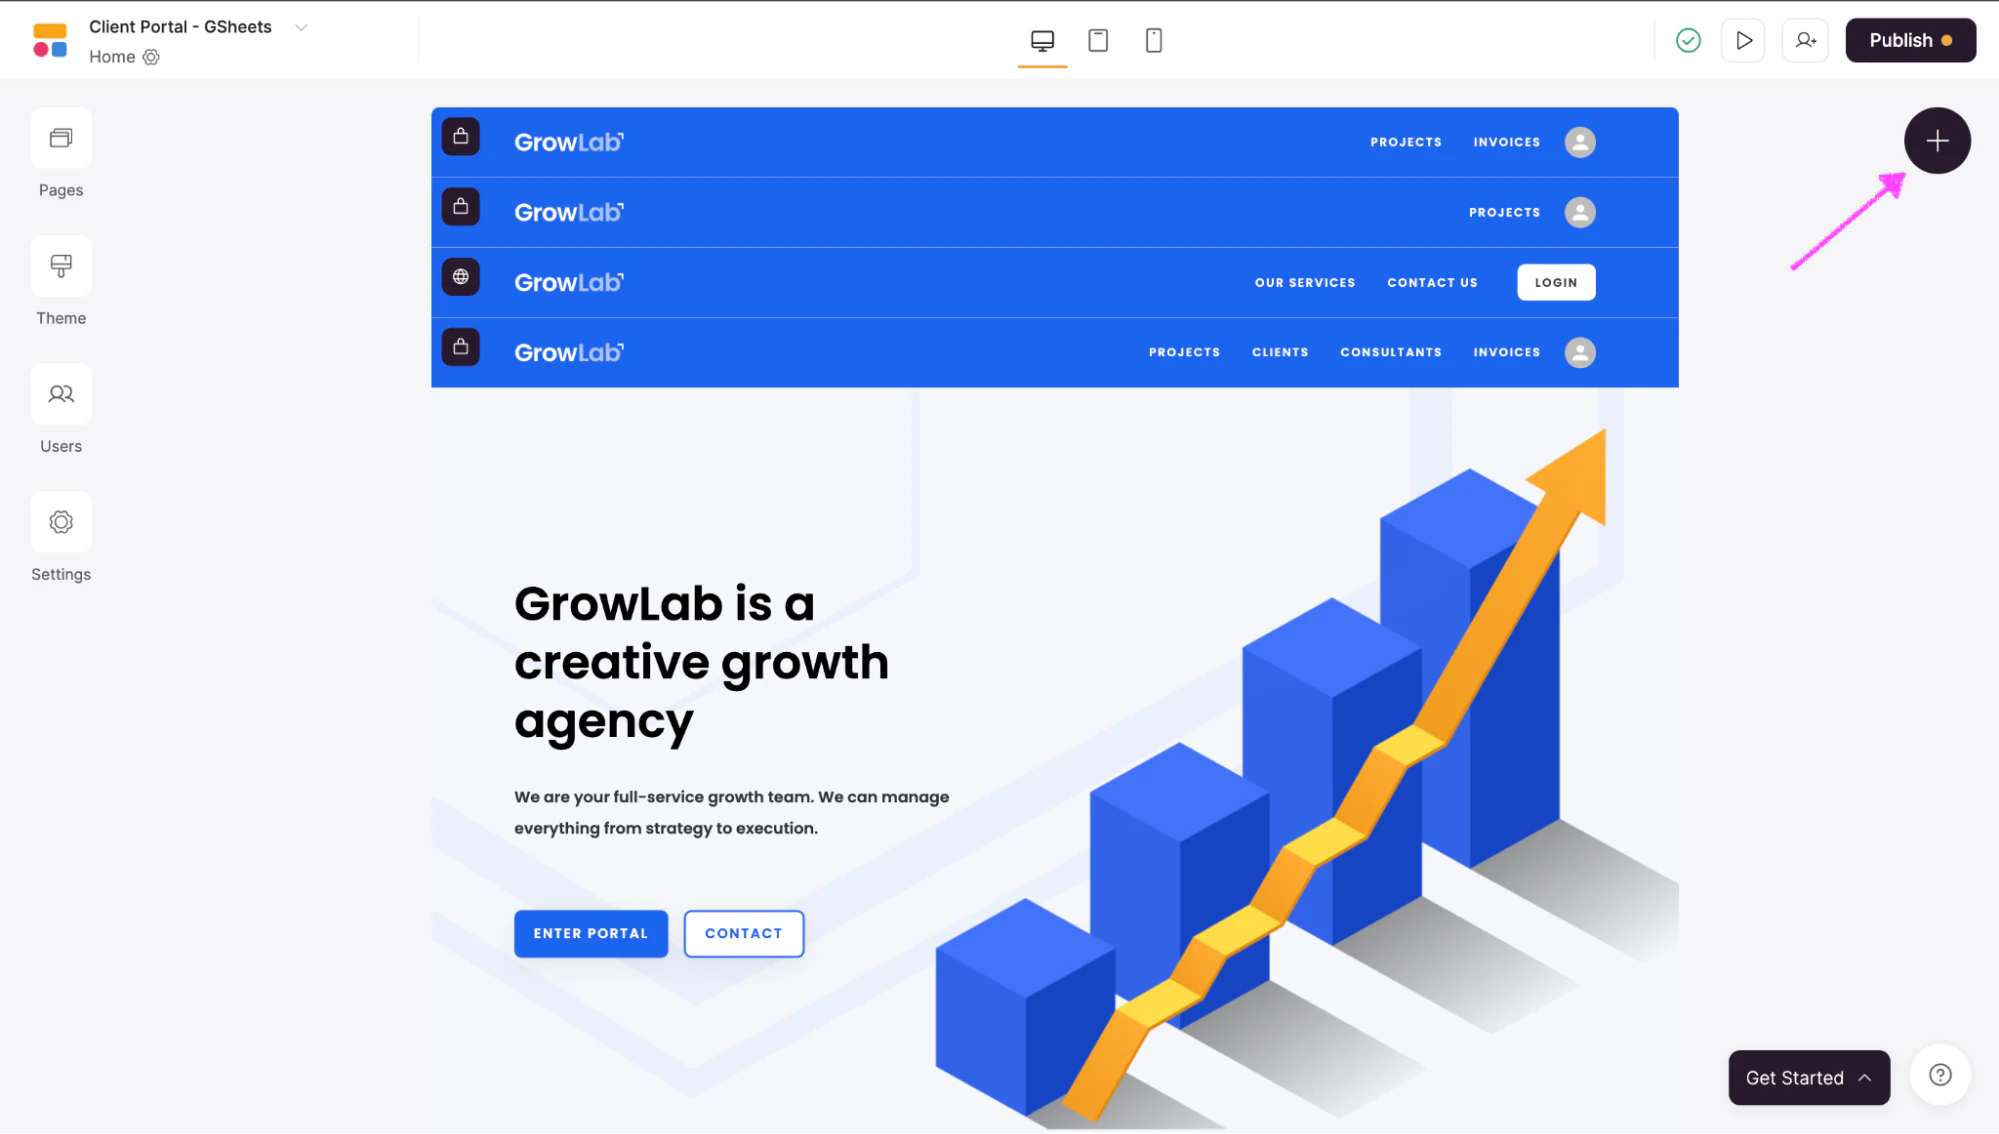
Step 5.1: Add a block
You need to add one of Softr’s pre-made blocks so that you can pull in your data from your Google Sheets spreadsheet. To do so, click on the “+” sign at the top right corner of your screen, or ask the AI Co-Builder to add the block for you by describing what you want it to show.
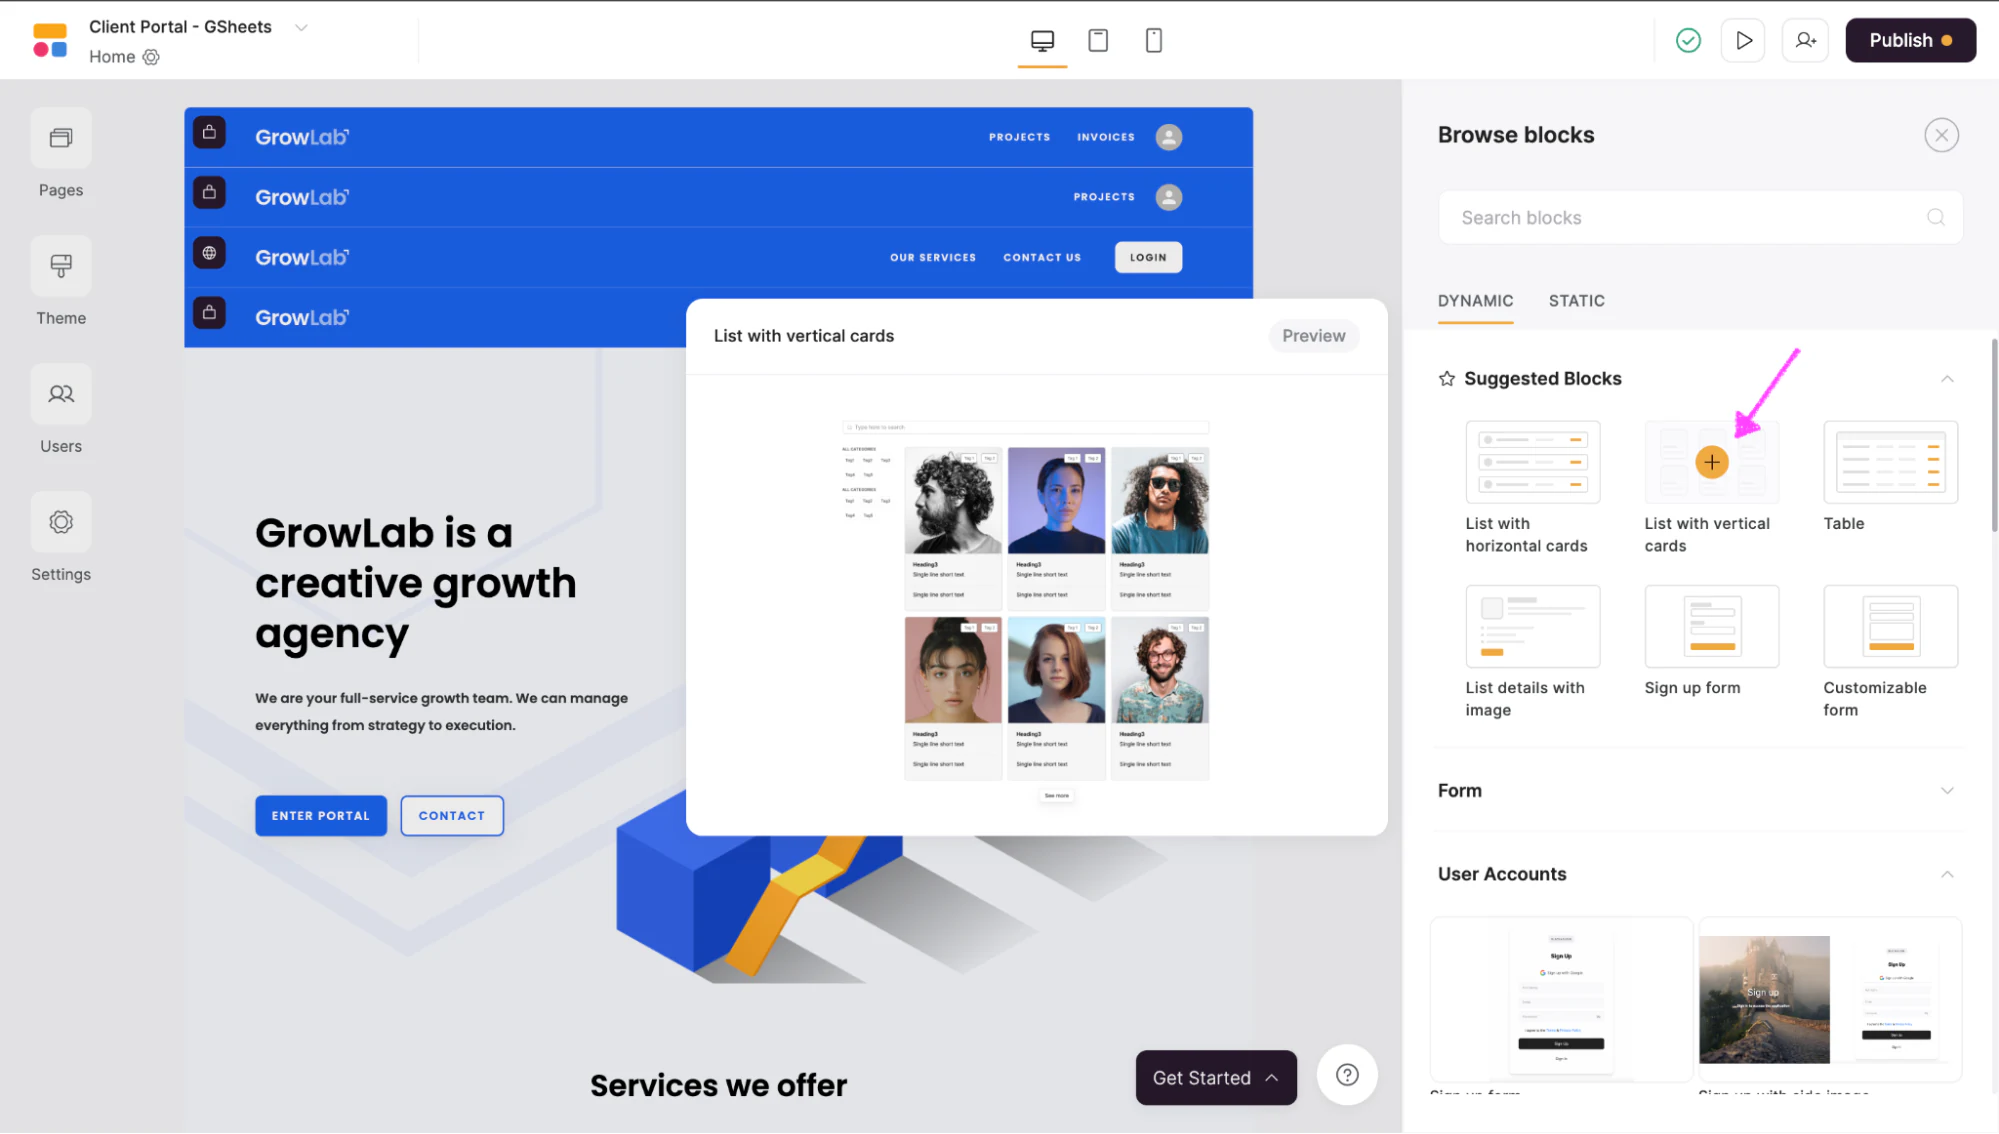
Step 5.2: Select a block
Once the block menu slides in, choose one block. In our example, we set ourselves to import client data from Google Sheets, so we selected “List with vertical cards.”
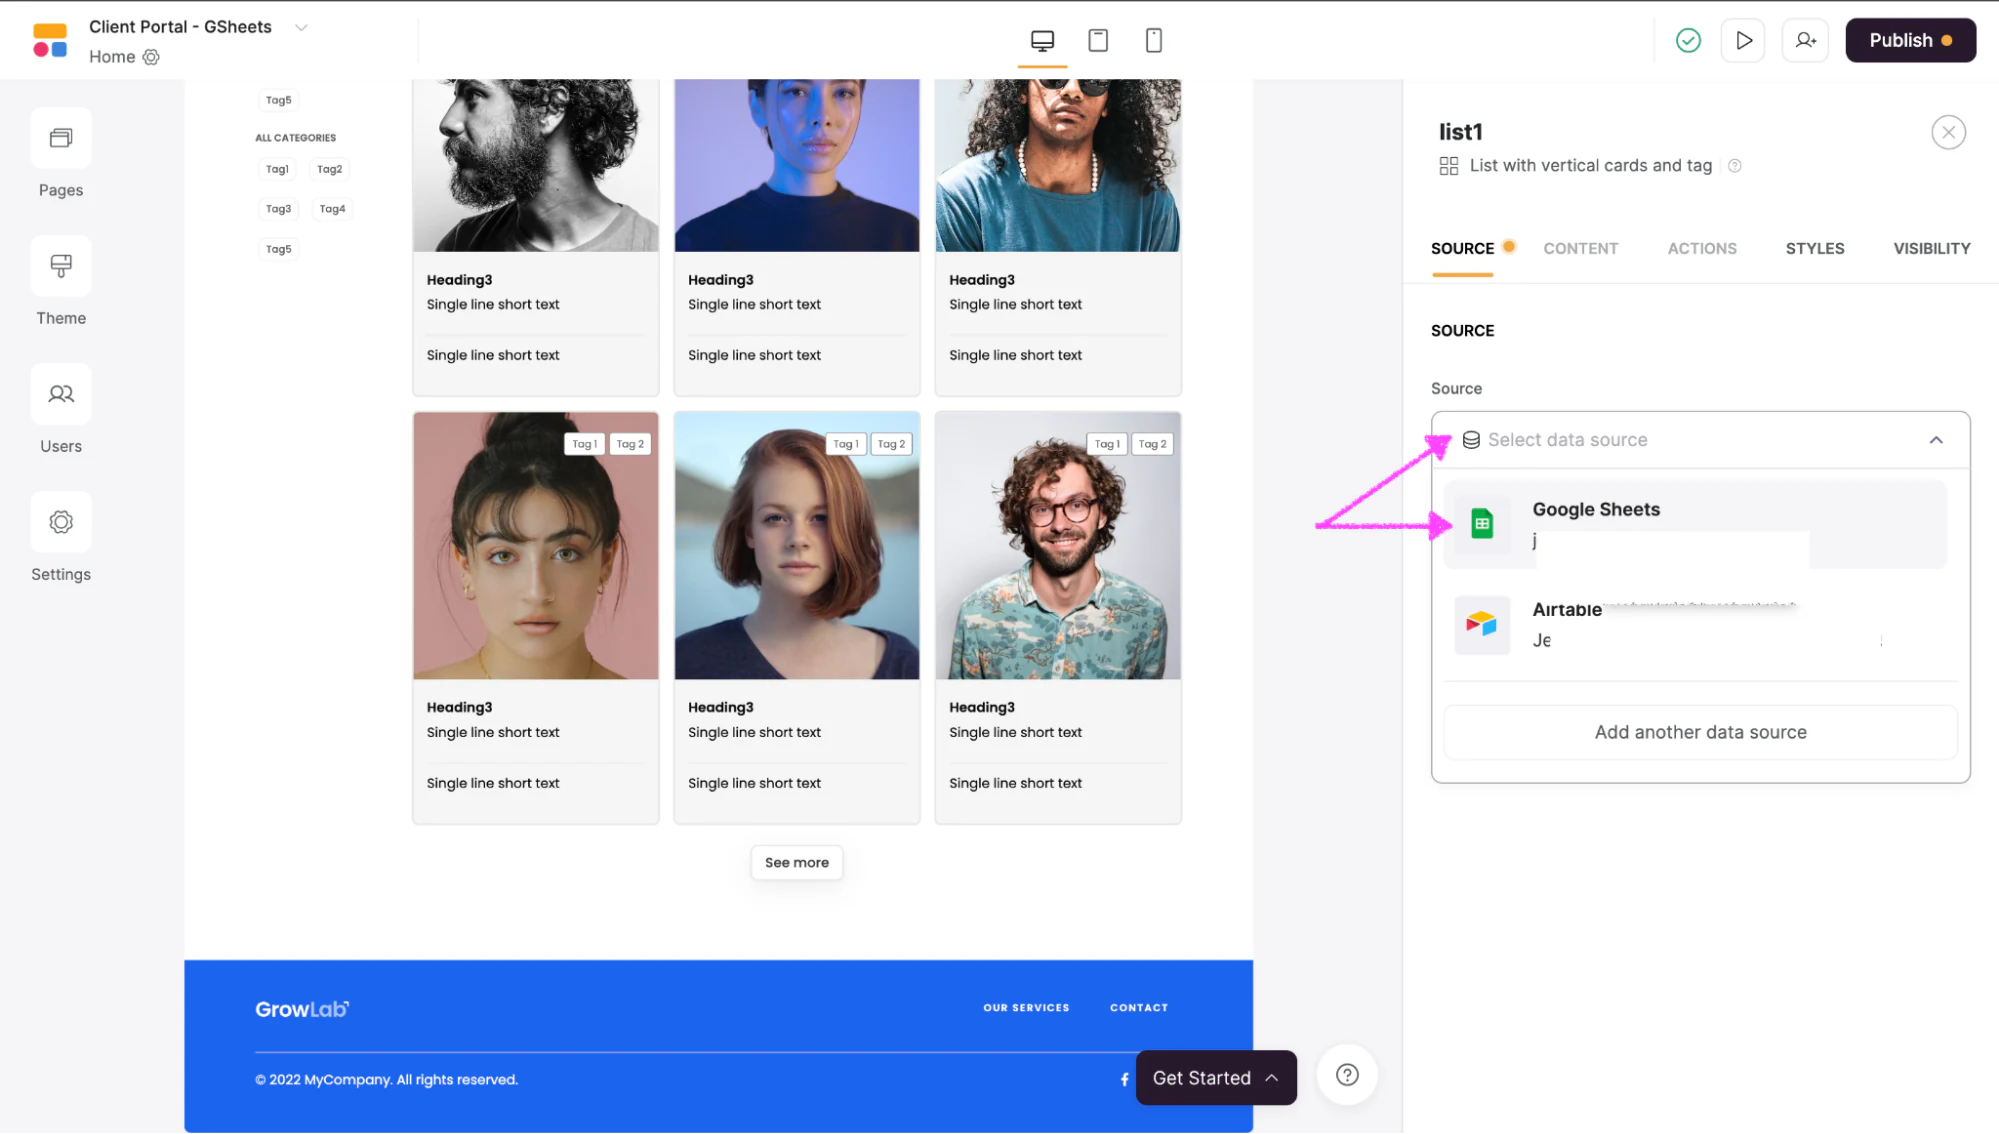
Step 5.3: Choose your source
Click on “Connect data source” under the Source tab, then choose your connected Google account.
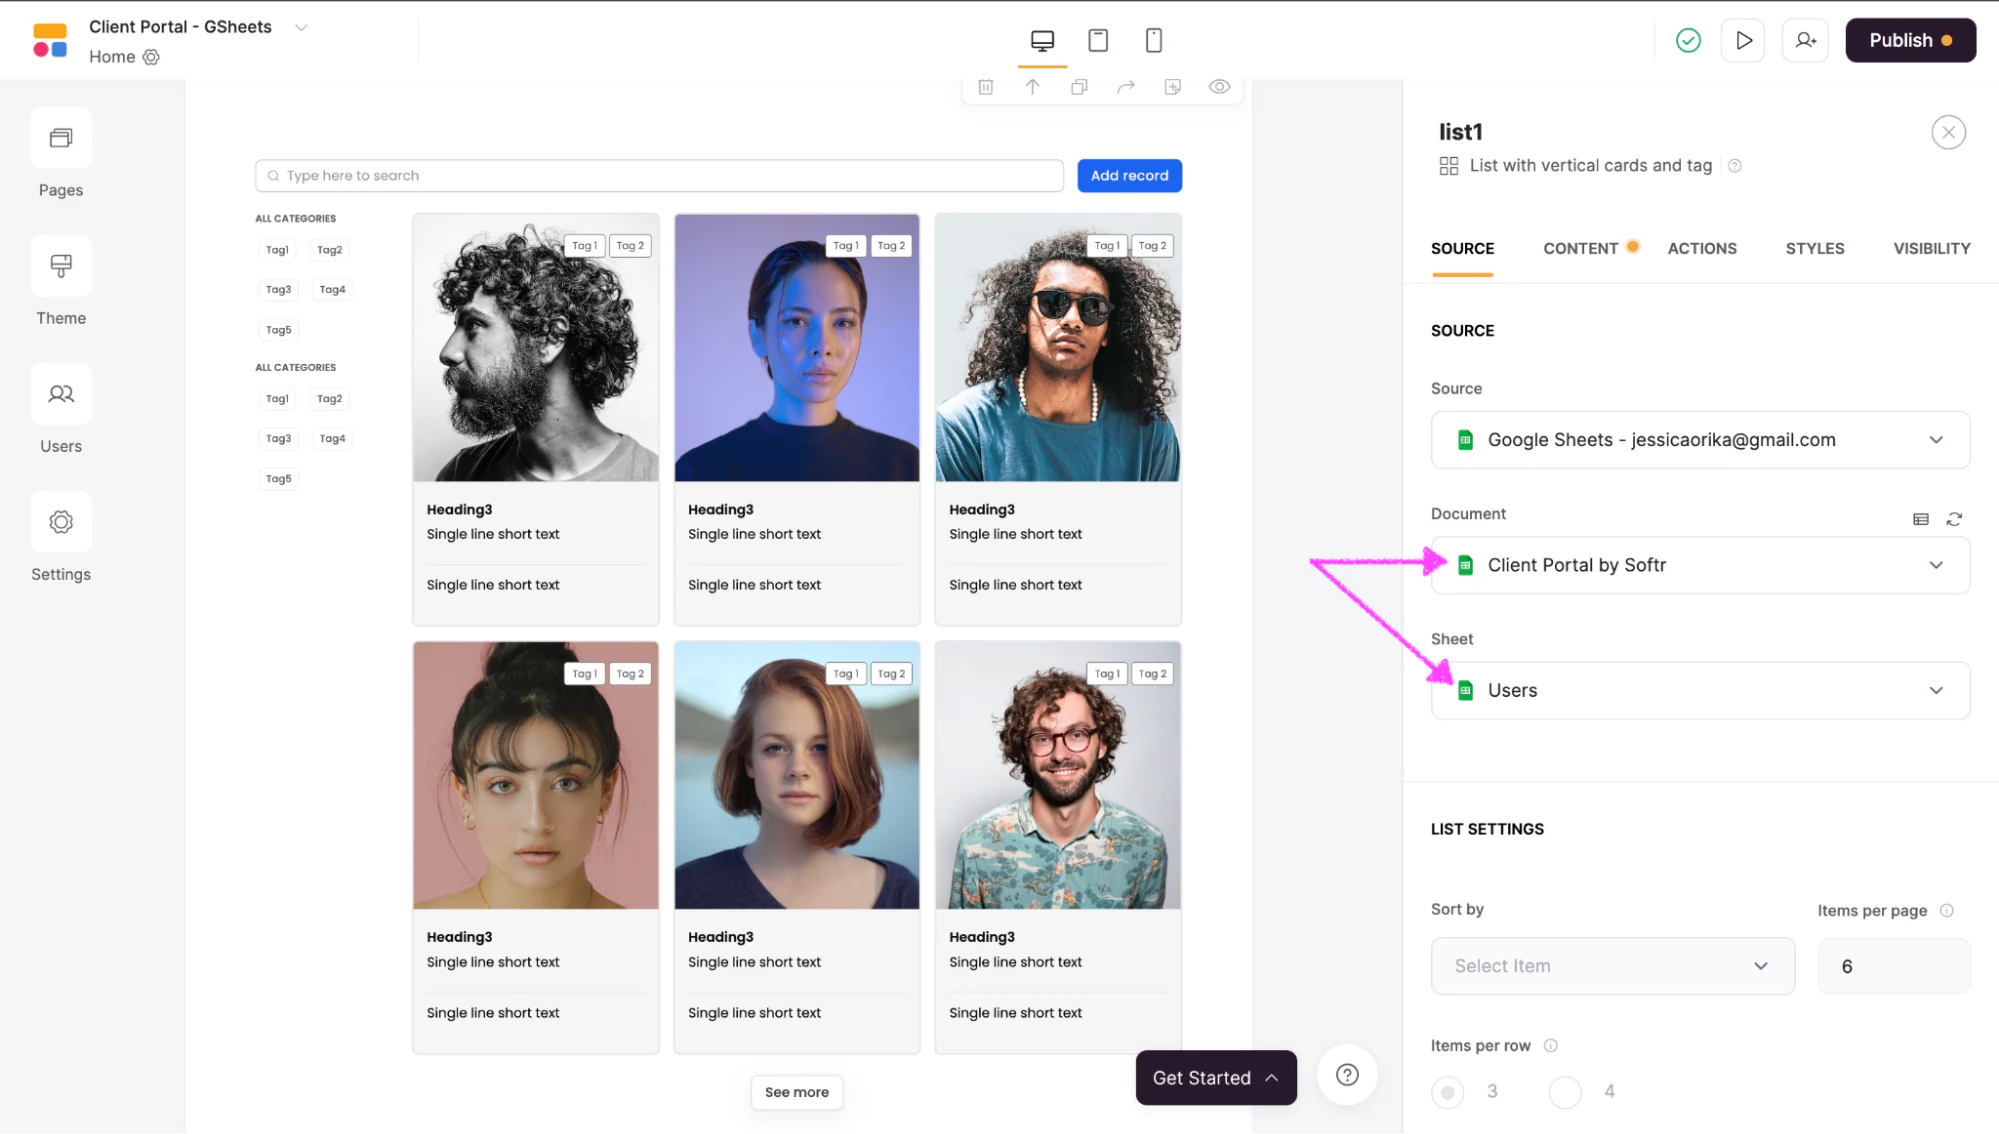
Step 5.4: Select your spreadsheet and sheet
Next, select the spreadsheet with the data you want to use. Then, select the specific sheet of that spreadsheet that contains the data you want to surface and protect behind login.
Step 5.5: Access the visibility options
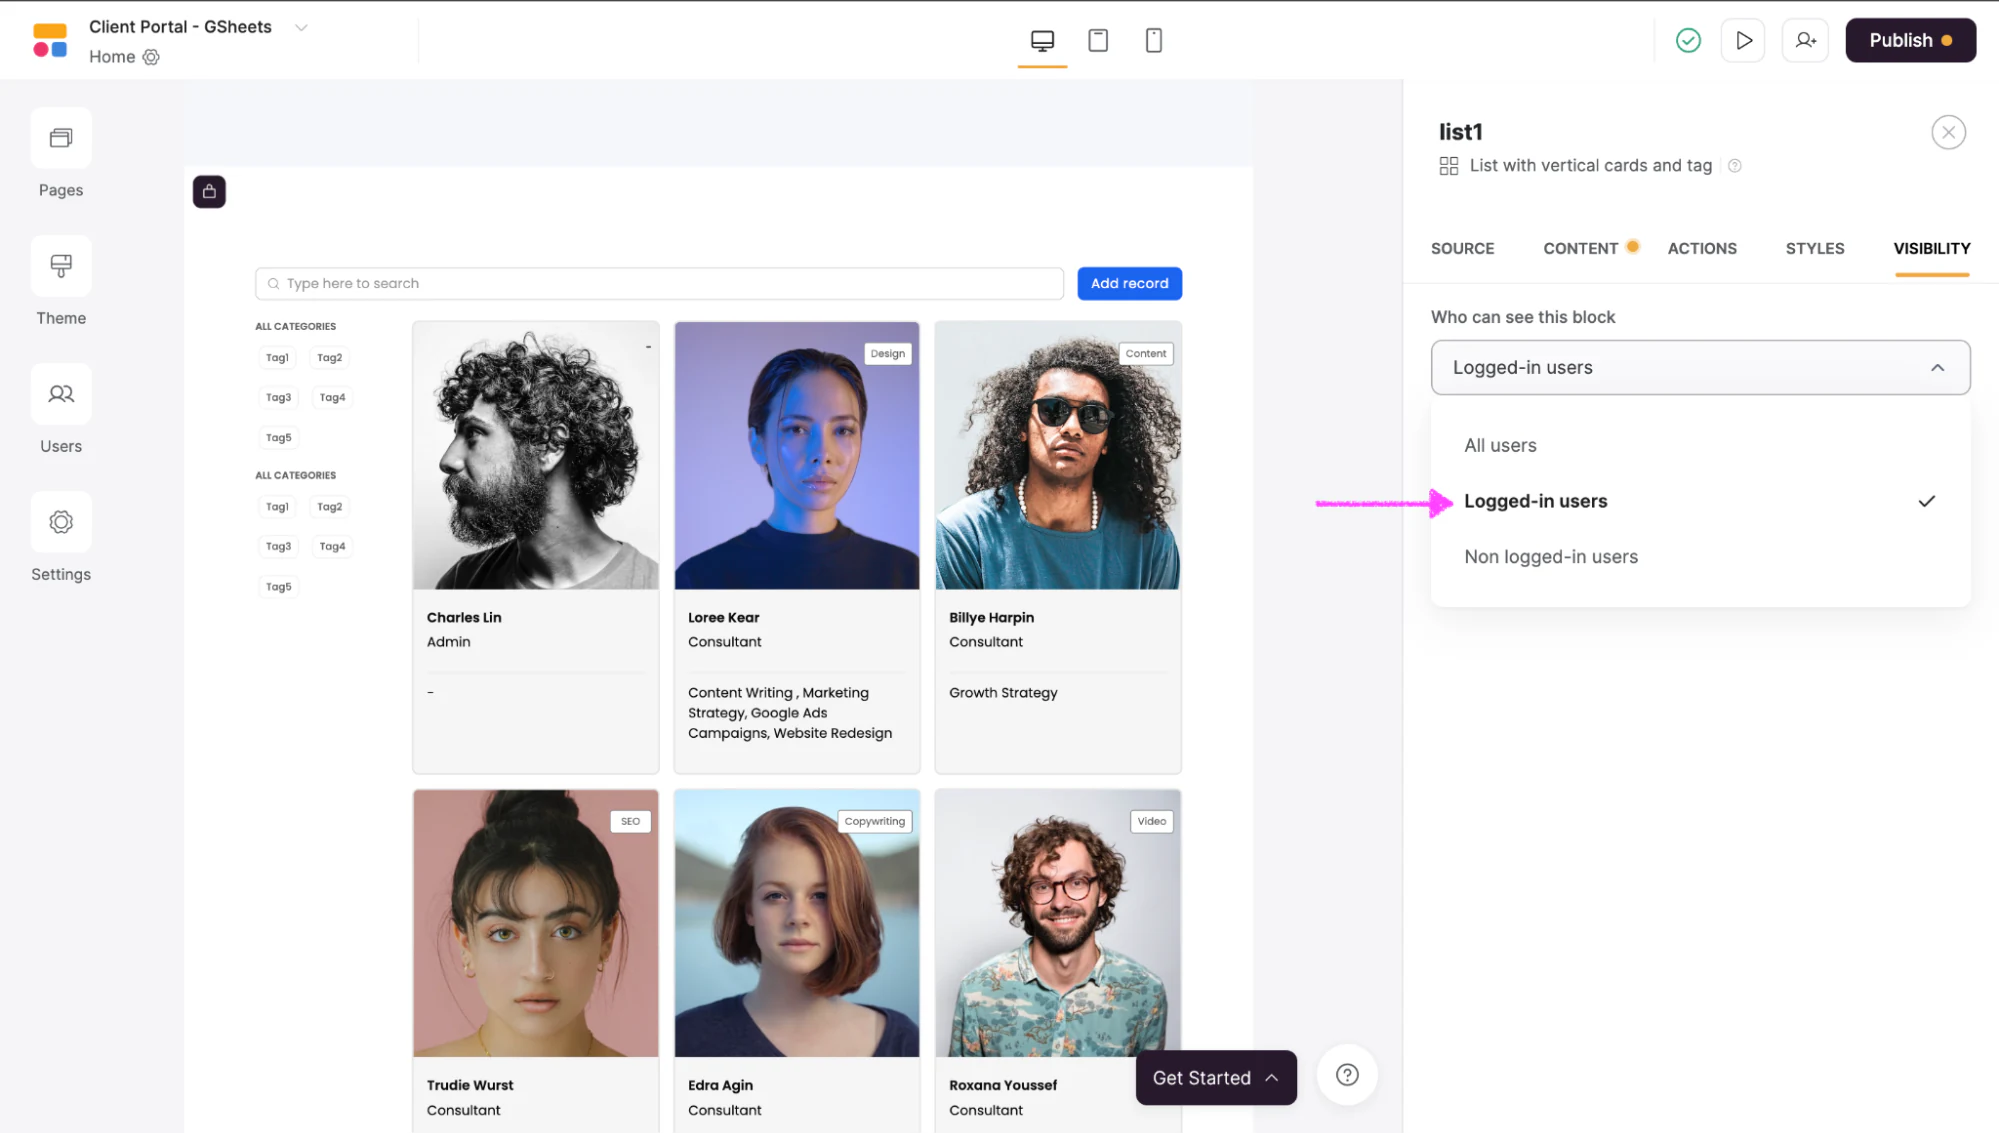
In the editor panel, click on the “visibility” option to select the people you want to access and edit this block. Then click the dropdown under “Who can see this block.” This is the heart of granular access: unlike a shared sheet, where everyone with the link sees everything, here you decide block by block.

There are three options to select from:
- All users: includes those who are logged in and those who aren’t;
- Logged-in users: only people who have signed in to your app;
- Non-logged-in users: only people who have not signed in.
If you want everyone to access the data, choose “All users,” but if you want to limit access, select “Logged-in users.”
Step 5.6 Choose which user groups see your data
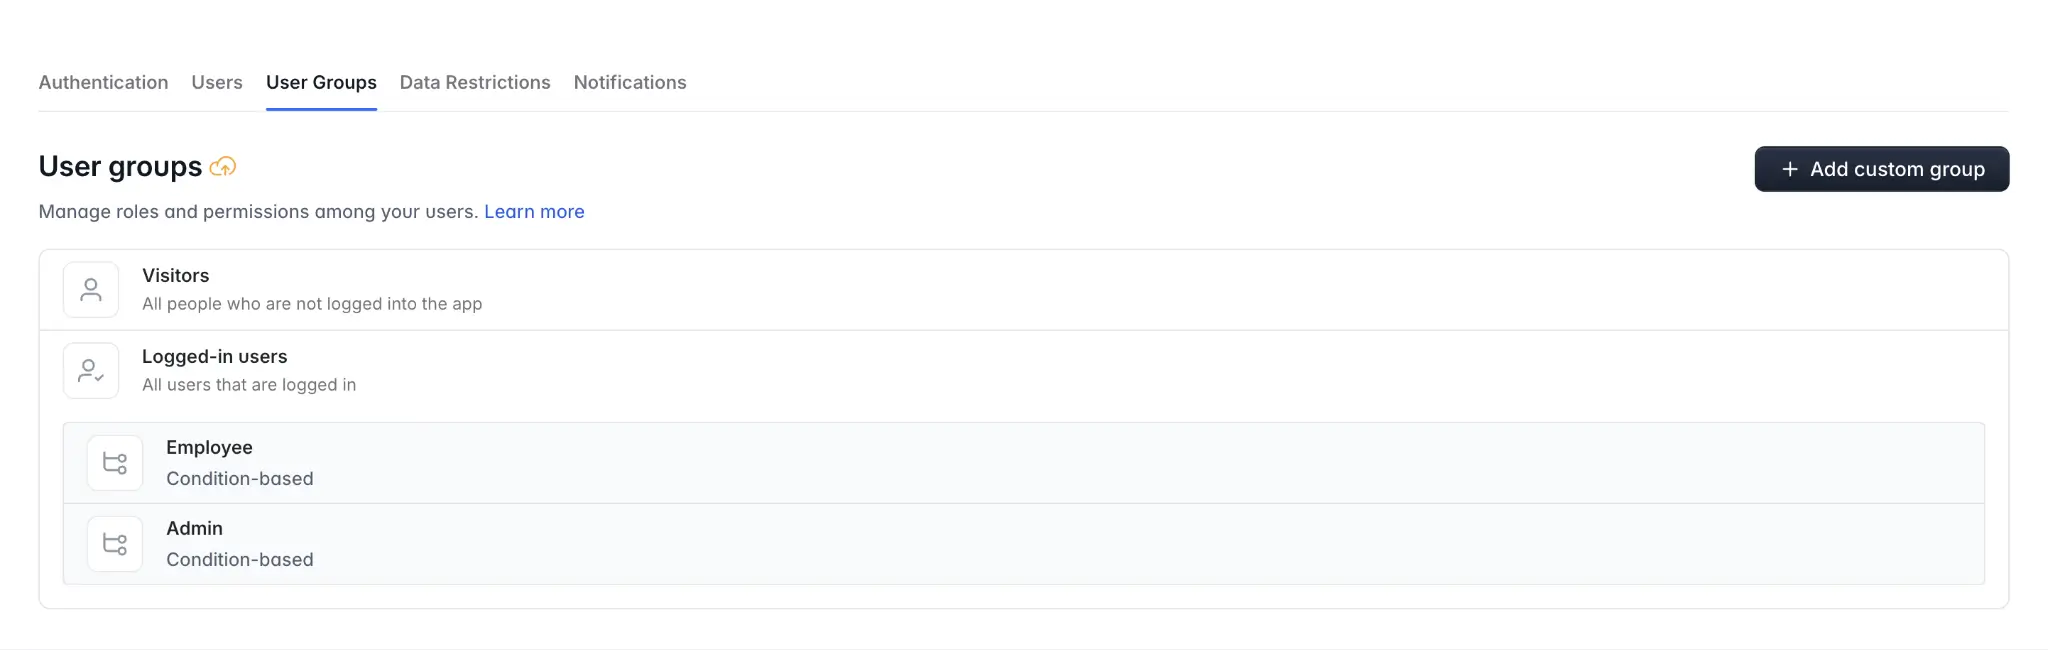
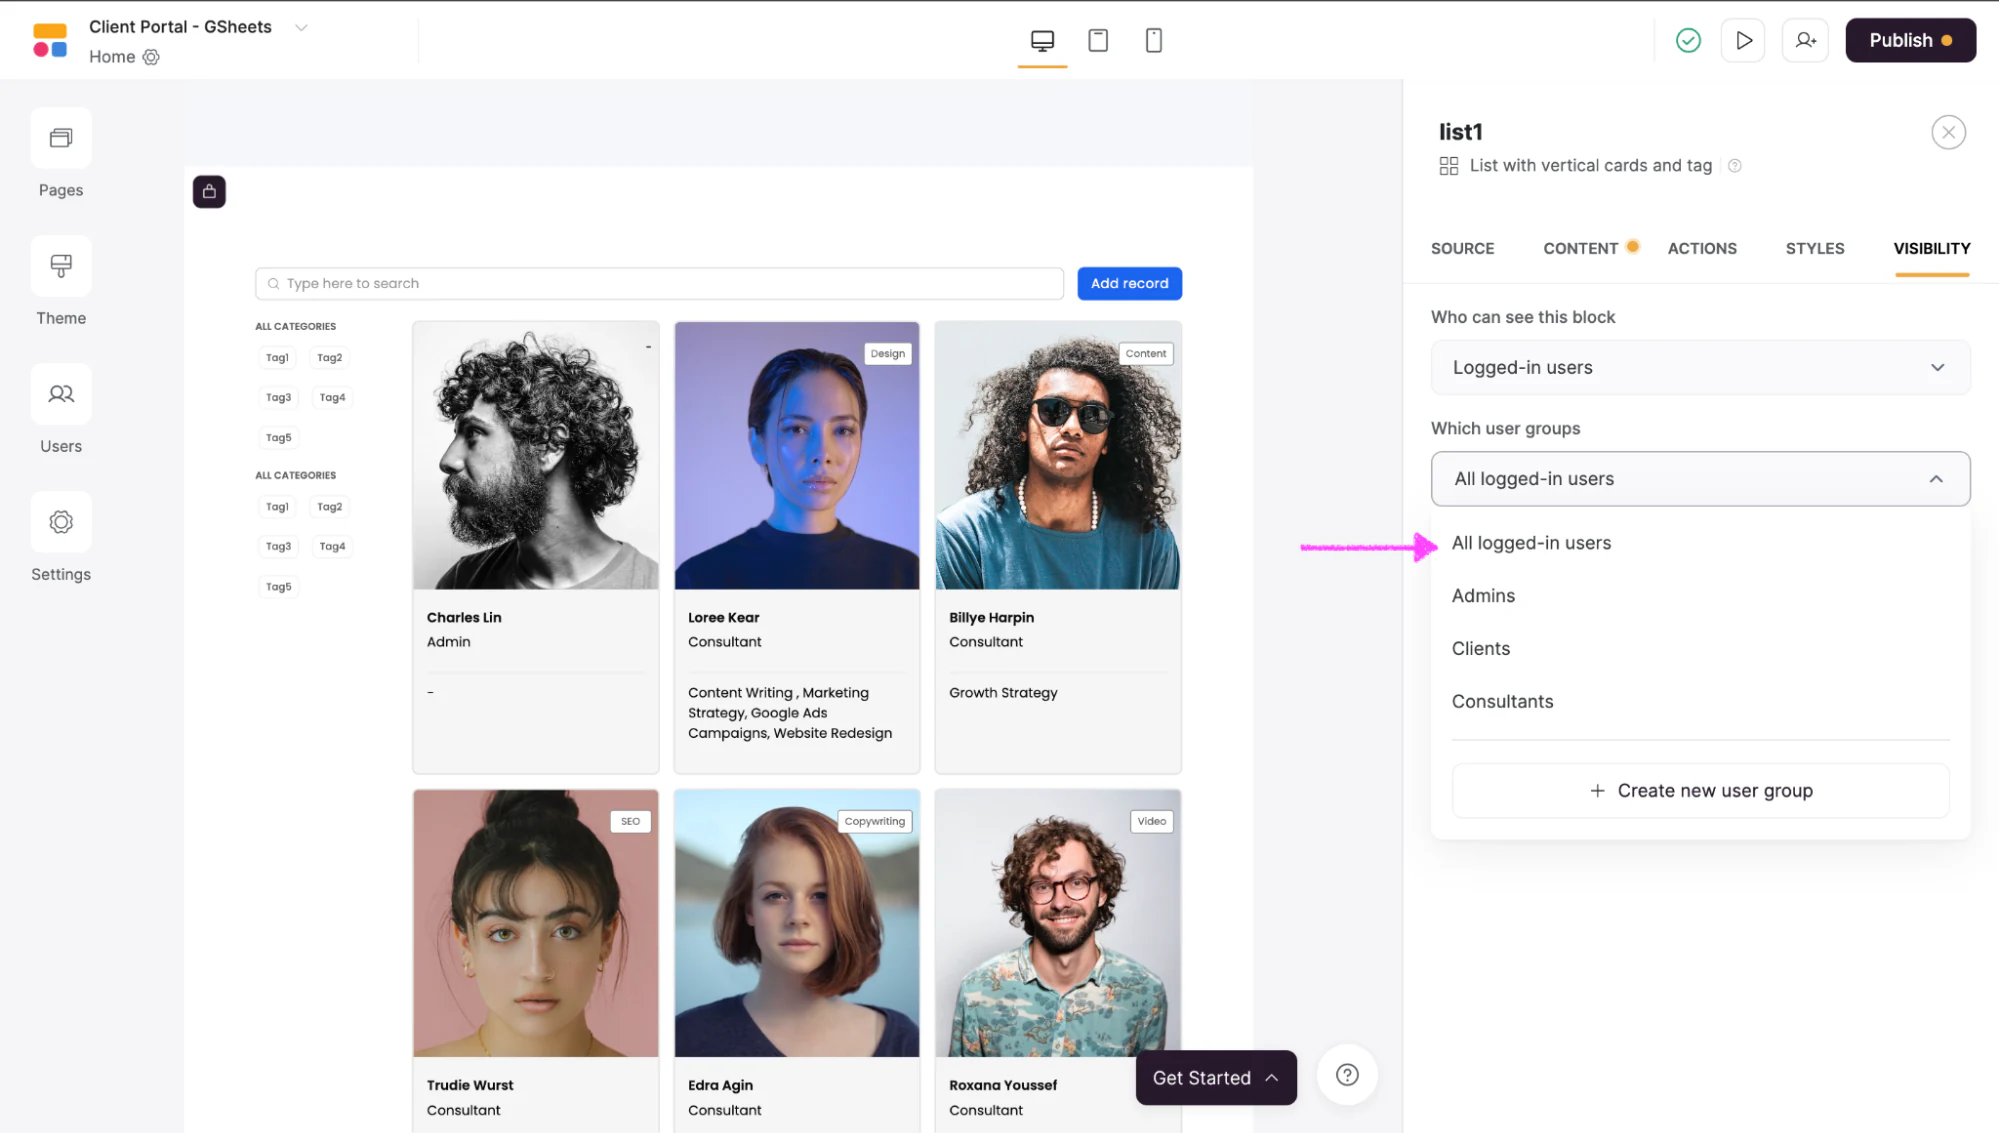
You can further limit who sees your data. Softr lets you assign edit access to a specific group of people using the user groups feature. These groups organize logged-in users into different categories so each person gets access to specific parts of your data. The client portal template already has user groups. If you want to go deeper on this, our guide on setting up user groups walks through condition-based membership in detail.
A big reason teams trust this model over a wall of spreadsheet permissions is that it stays inspectable:
"The Softr difference is that permissions live in a visible panel, not in generated code. Visual schemas make it simple to verify block-level visibility configurations in a visual editor rather than auditing a black box of generated code." - Artur Mkrtchyan, CTO and Co-founder of Softr
So to select a certain category of your logged-in users to access the portal, click on the “Which user group” dropdown and select your choice group.
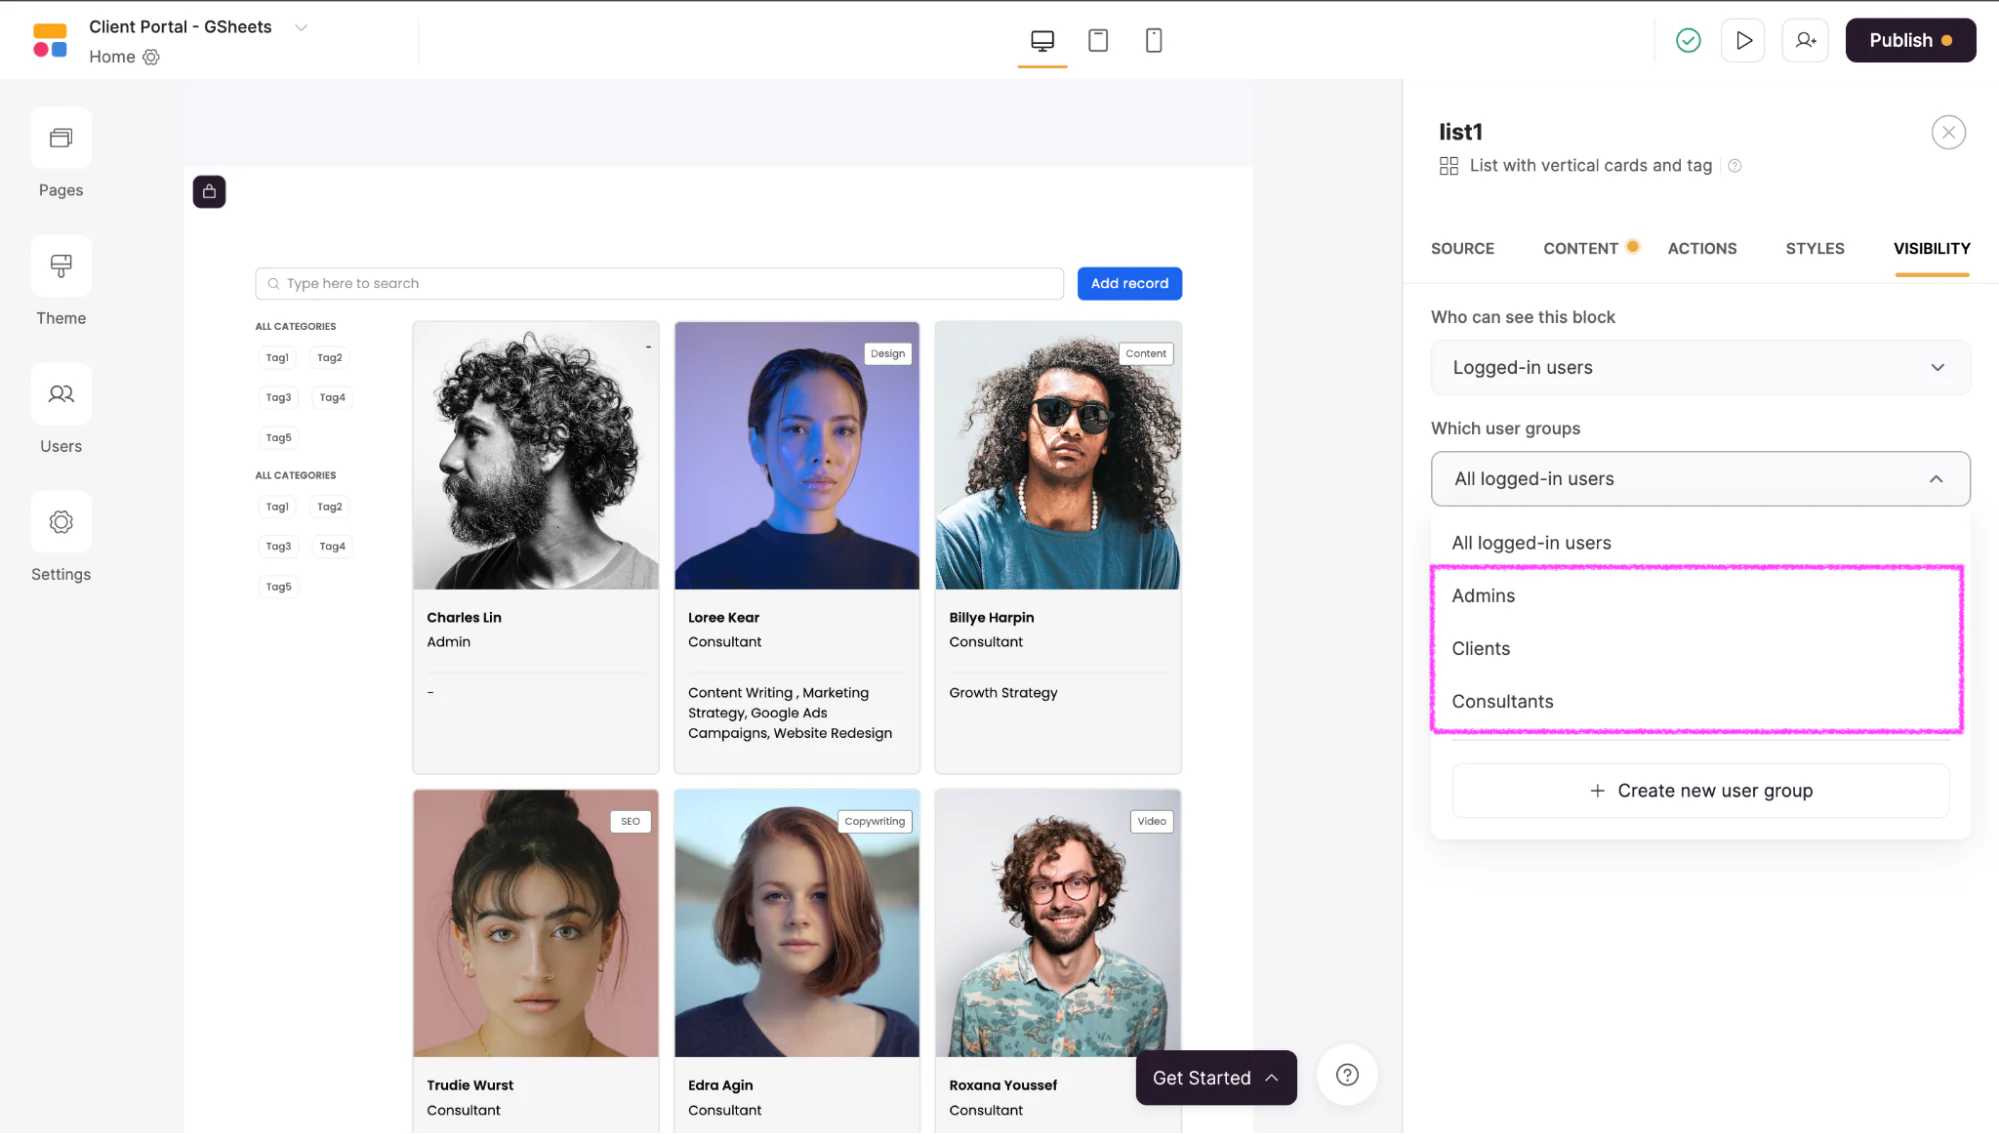
But if you want to give access to every single user who has signed in, select the “all logged-in users” option.
Step 5.7: Create a new user group
Alternatively, you can create a new user group. To do so, click on “Create a new user group” at the bottom of the dropdown list.

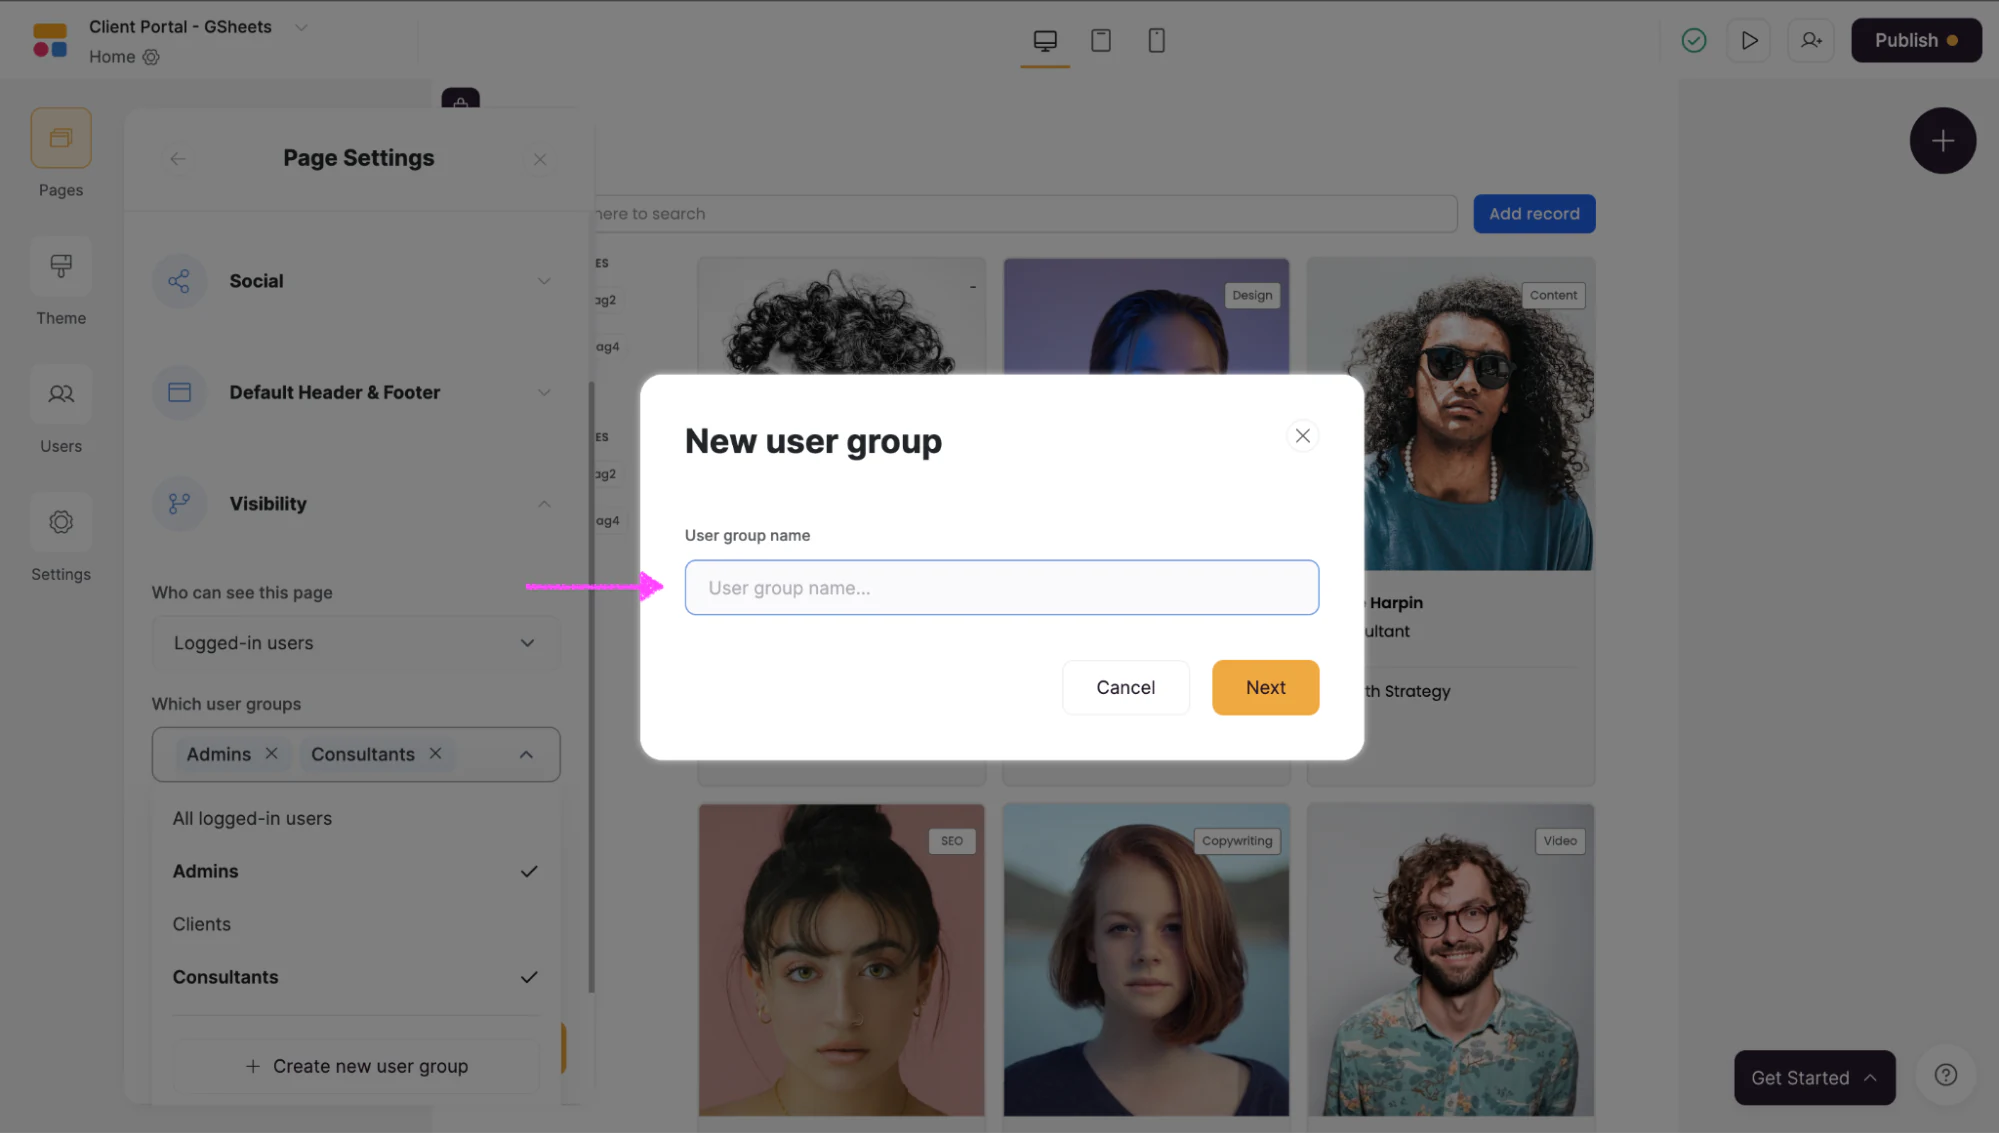
Step 5.8: Name your user group
After clicking on “Add user group,” a text box will pop up asking you to name your user group. Type the name you might use to identify a group of people, such as “Employees,” then click on “Next.”
Step 5.9: Add users to your new group
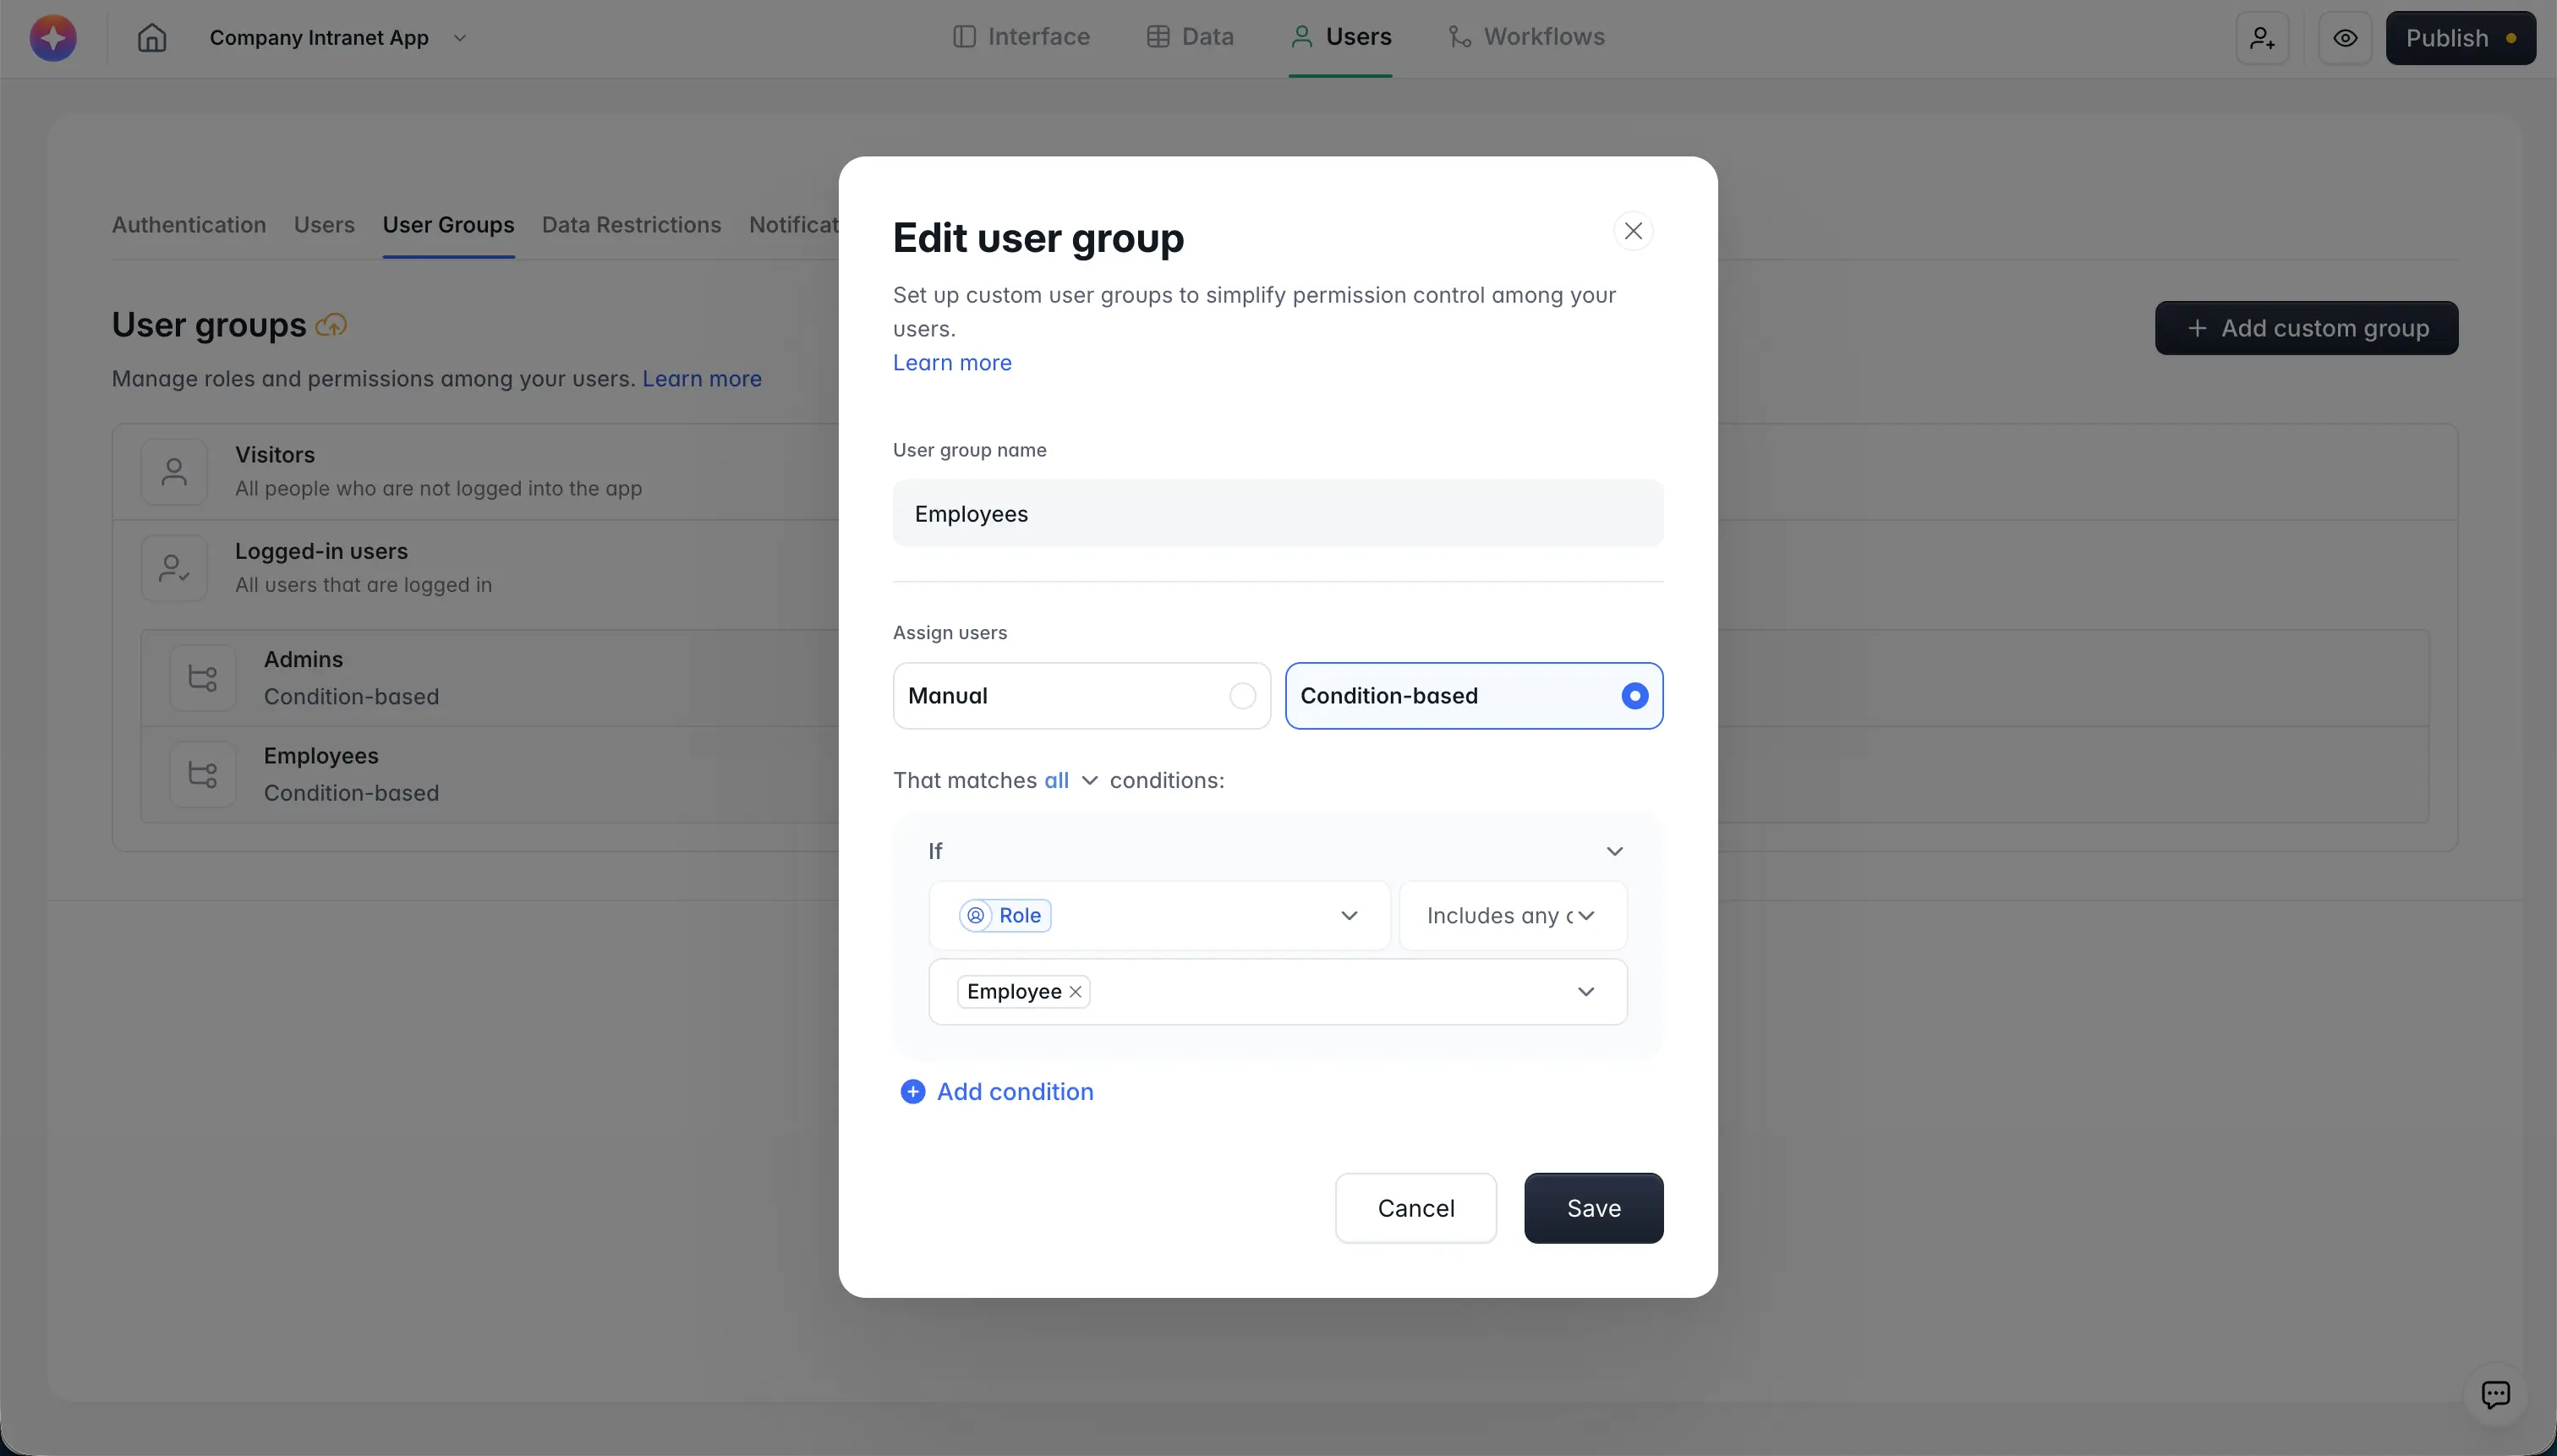
Once you have a user group, you need to add users to it. You can do this manually or, more powerfully, by setting conditions based on a field in your data (for example, anyone whose role is "Employee" joins automatically). Condition-based groups stay in sync with your database, so you don't have to maintain a manual list. After creating a user group, you can use it to control who can see a particular block or page.
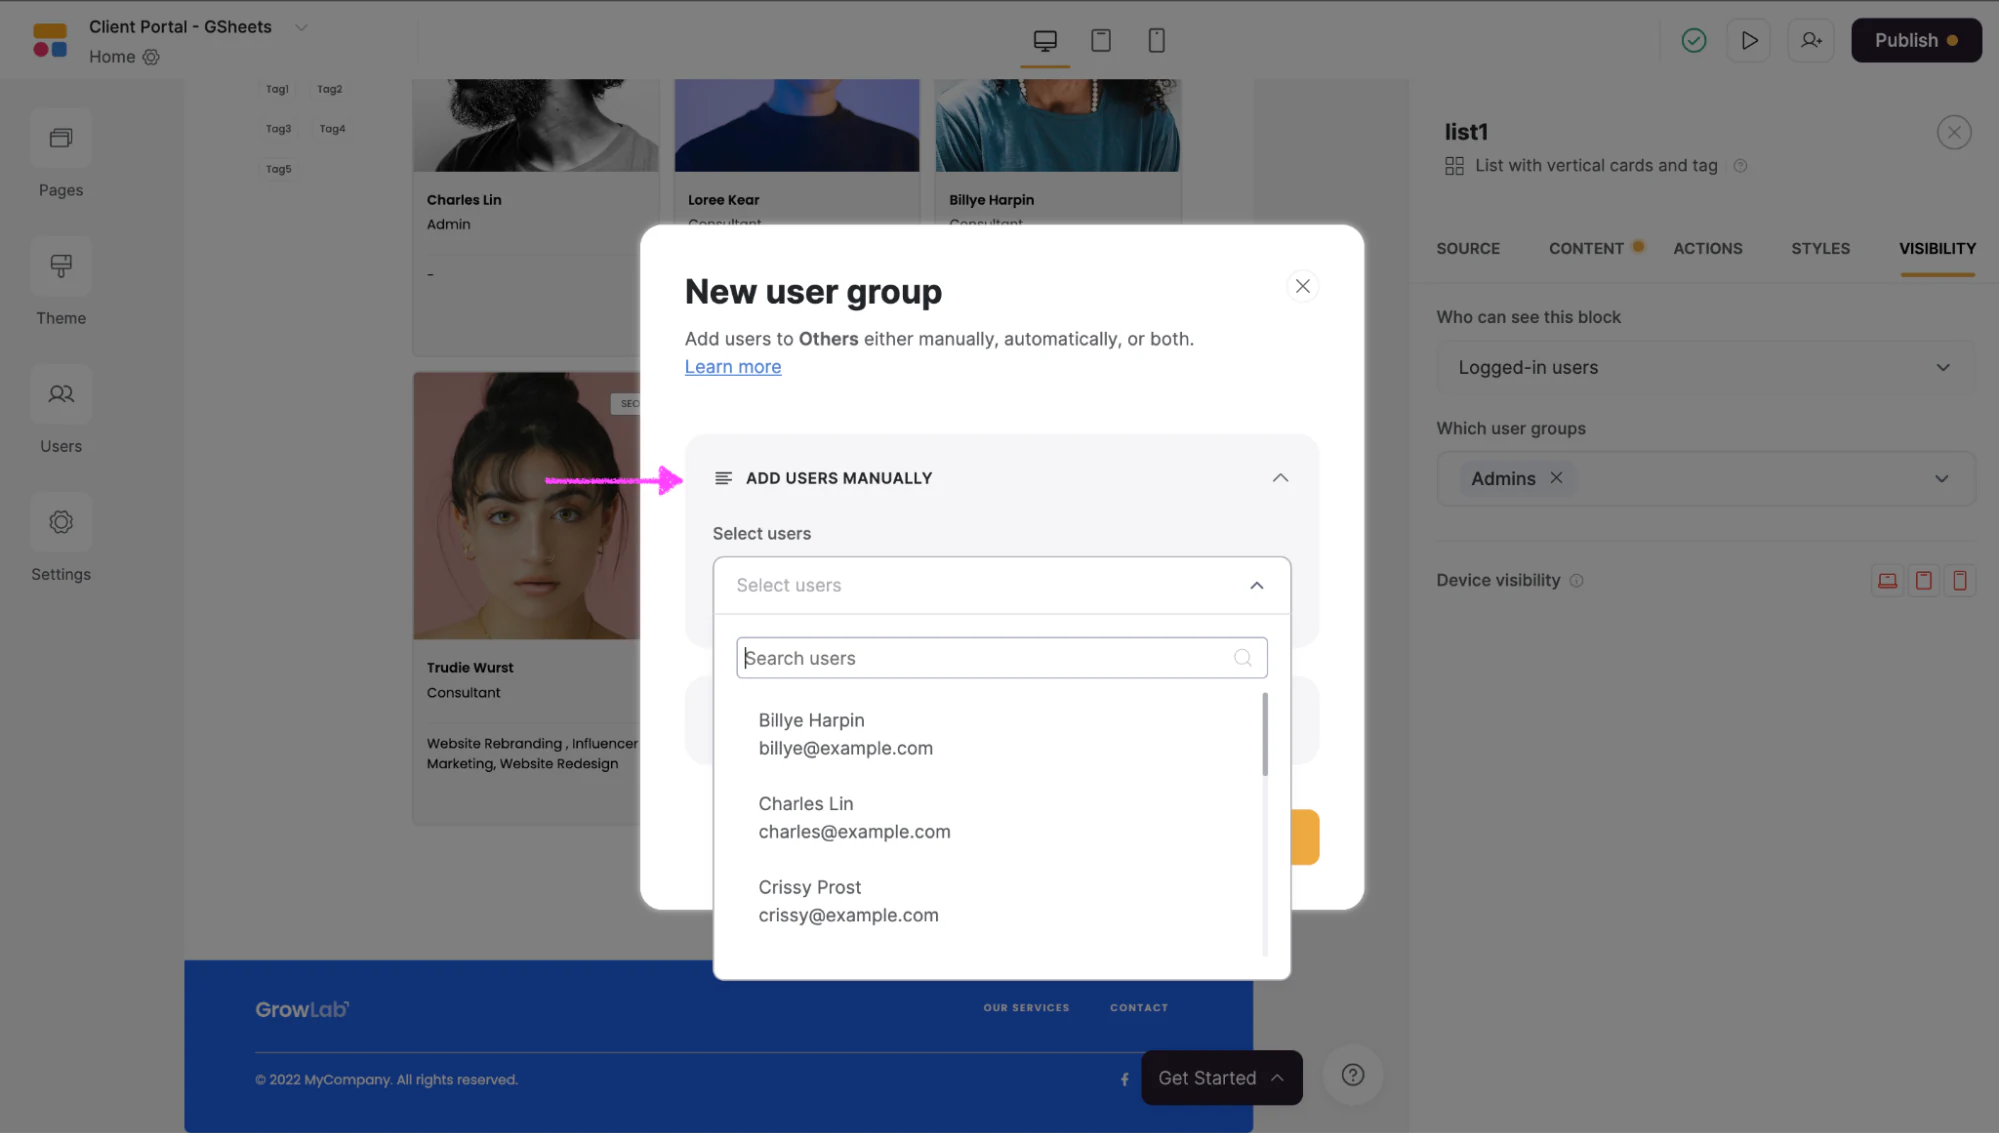
You can add users manually by clicking the “Add users manually” dropdown and clicking on the names you want to add to your new user group.
Step 6: Set page permissions
Block permissions control individual sections, but you'll often want to gate whole pages too (for example, an admin-only settings page). After you set block permissions, open the Pages menu at the top left corner of your screen. There, you will be able to update the permissions for individual pages.

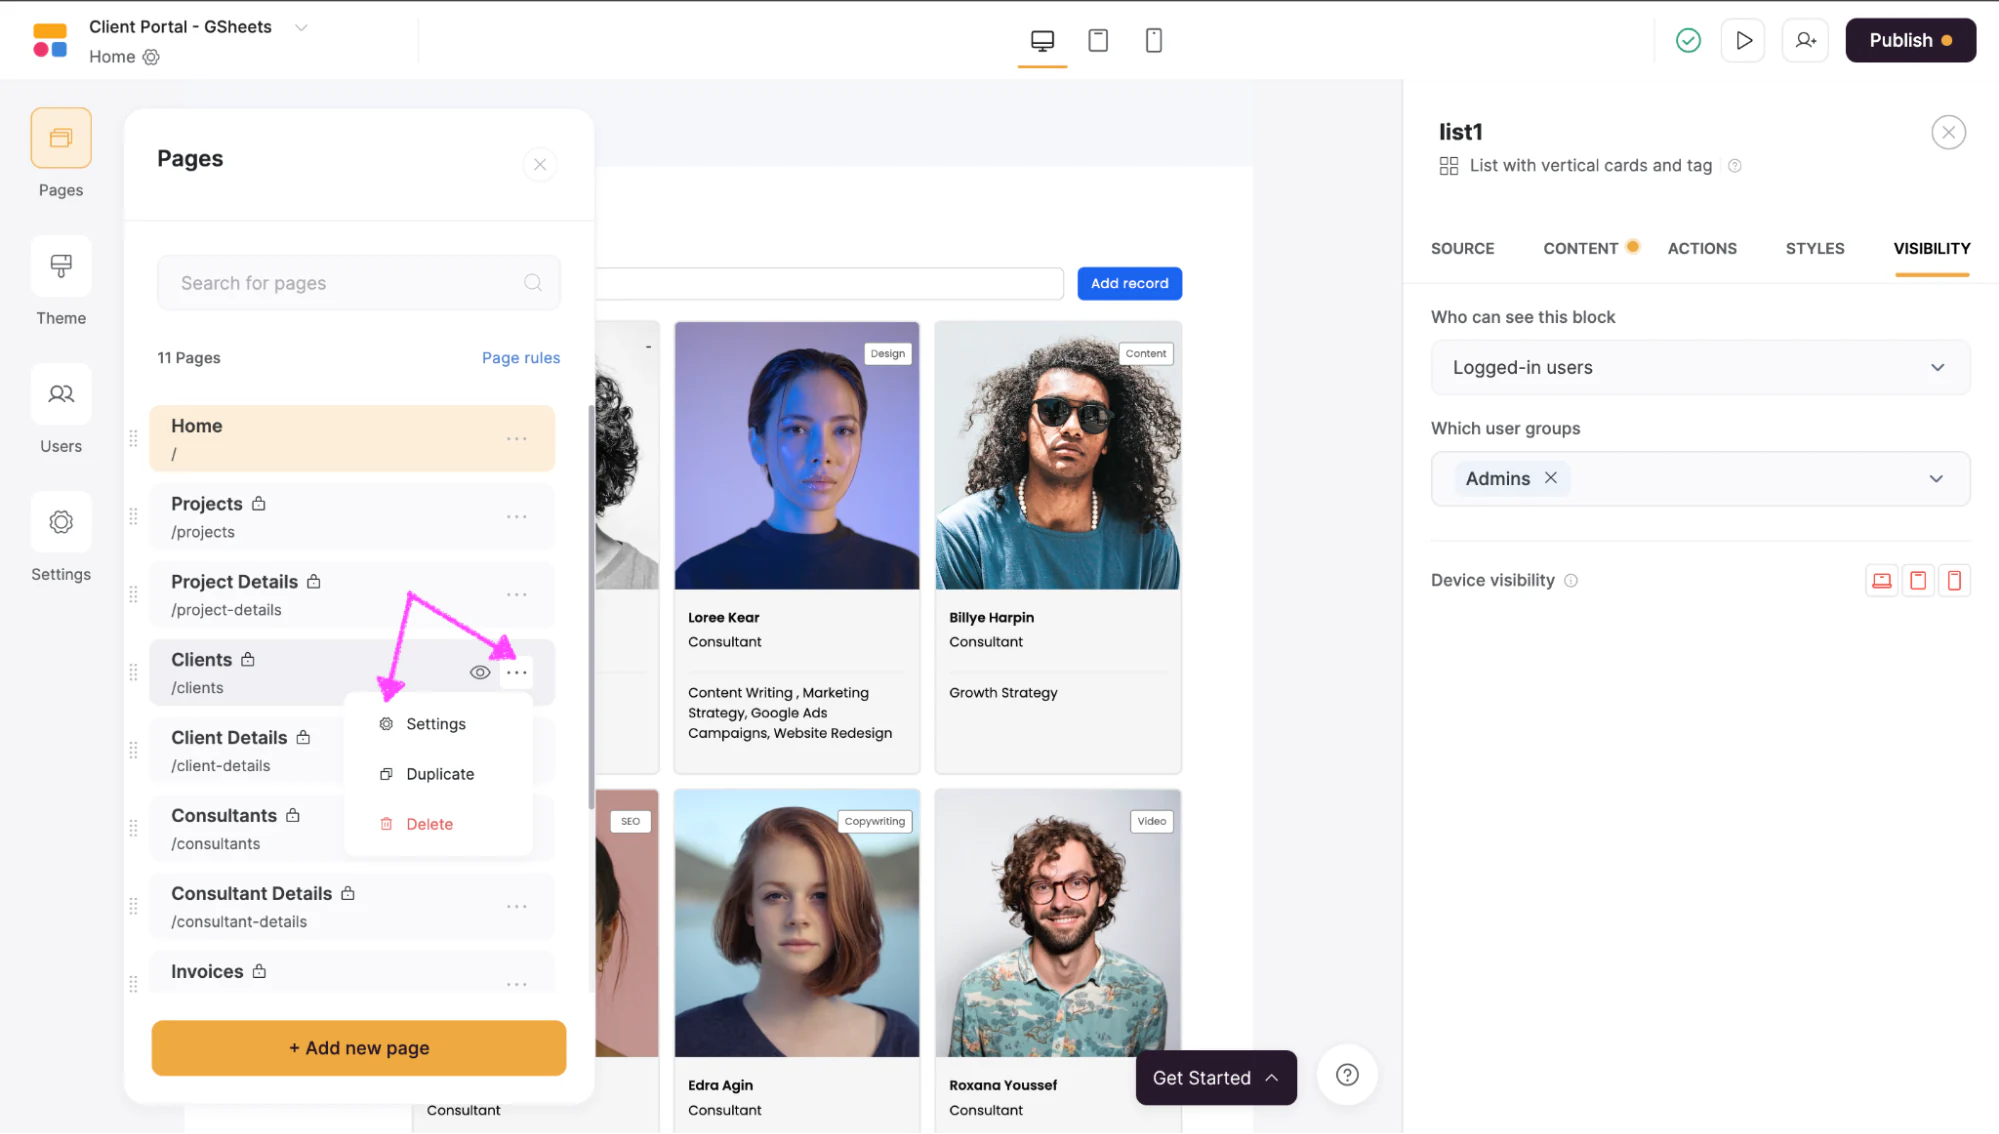
Step 6.1: Click on the three dots beside the page you want to edit
Choose the page you want to edit, click the three dots on the top right and select "Settings" to update permissions.
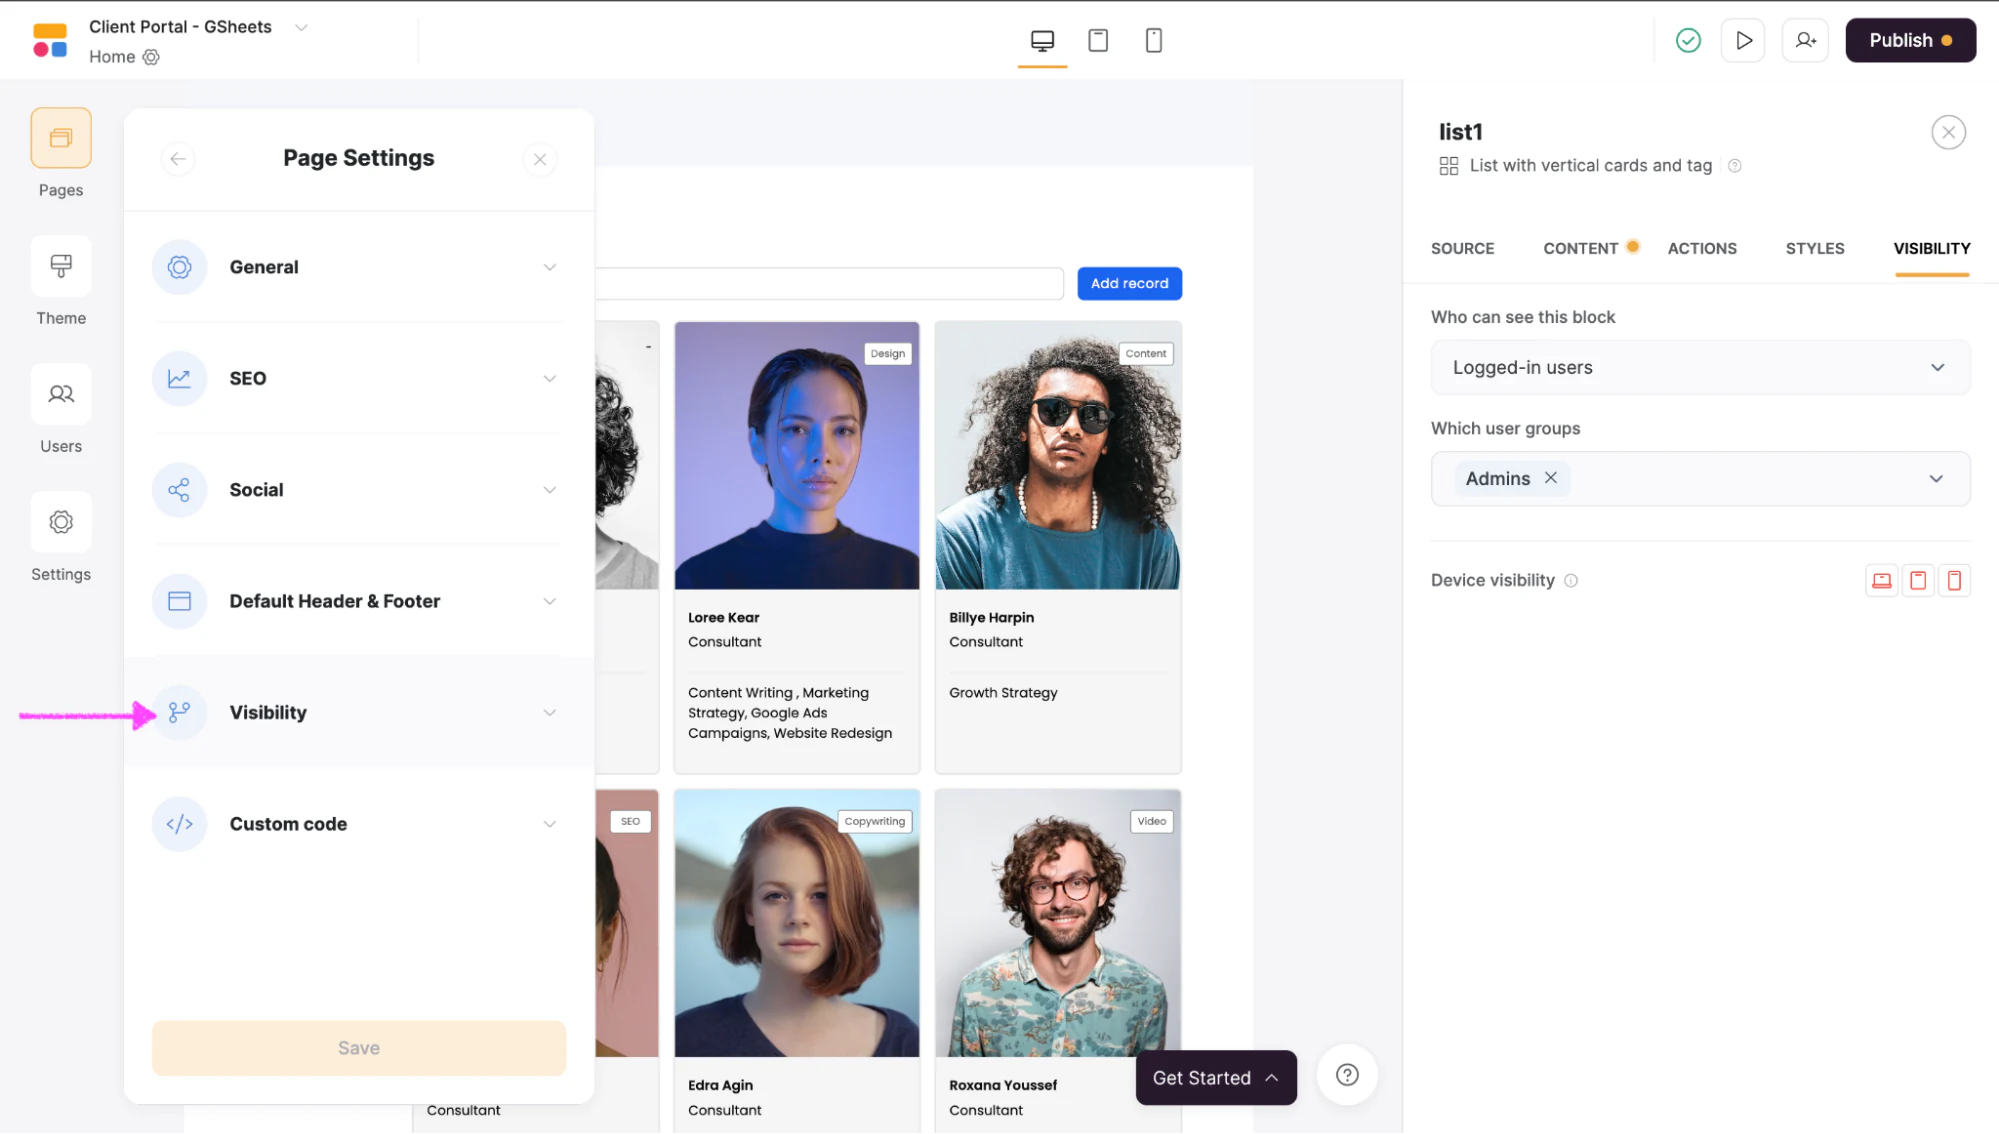
Step 6.2: Select “Visibility”
Click on the "visibility" dropdown in the settings to select who can edit the data on that page.
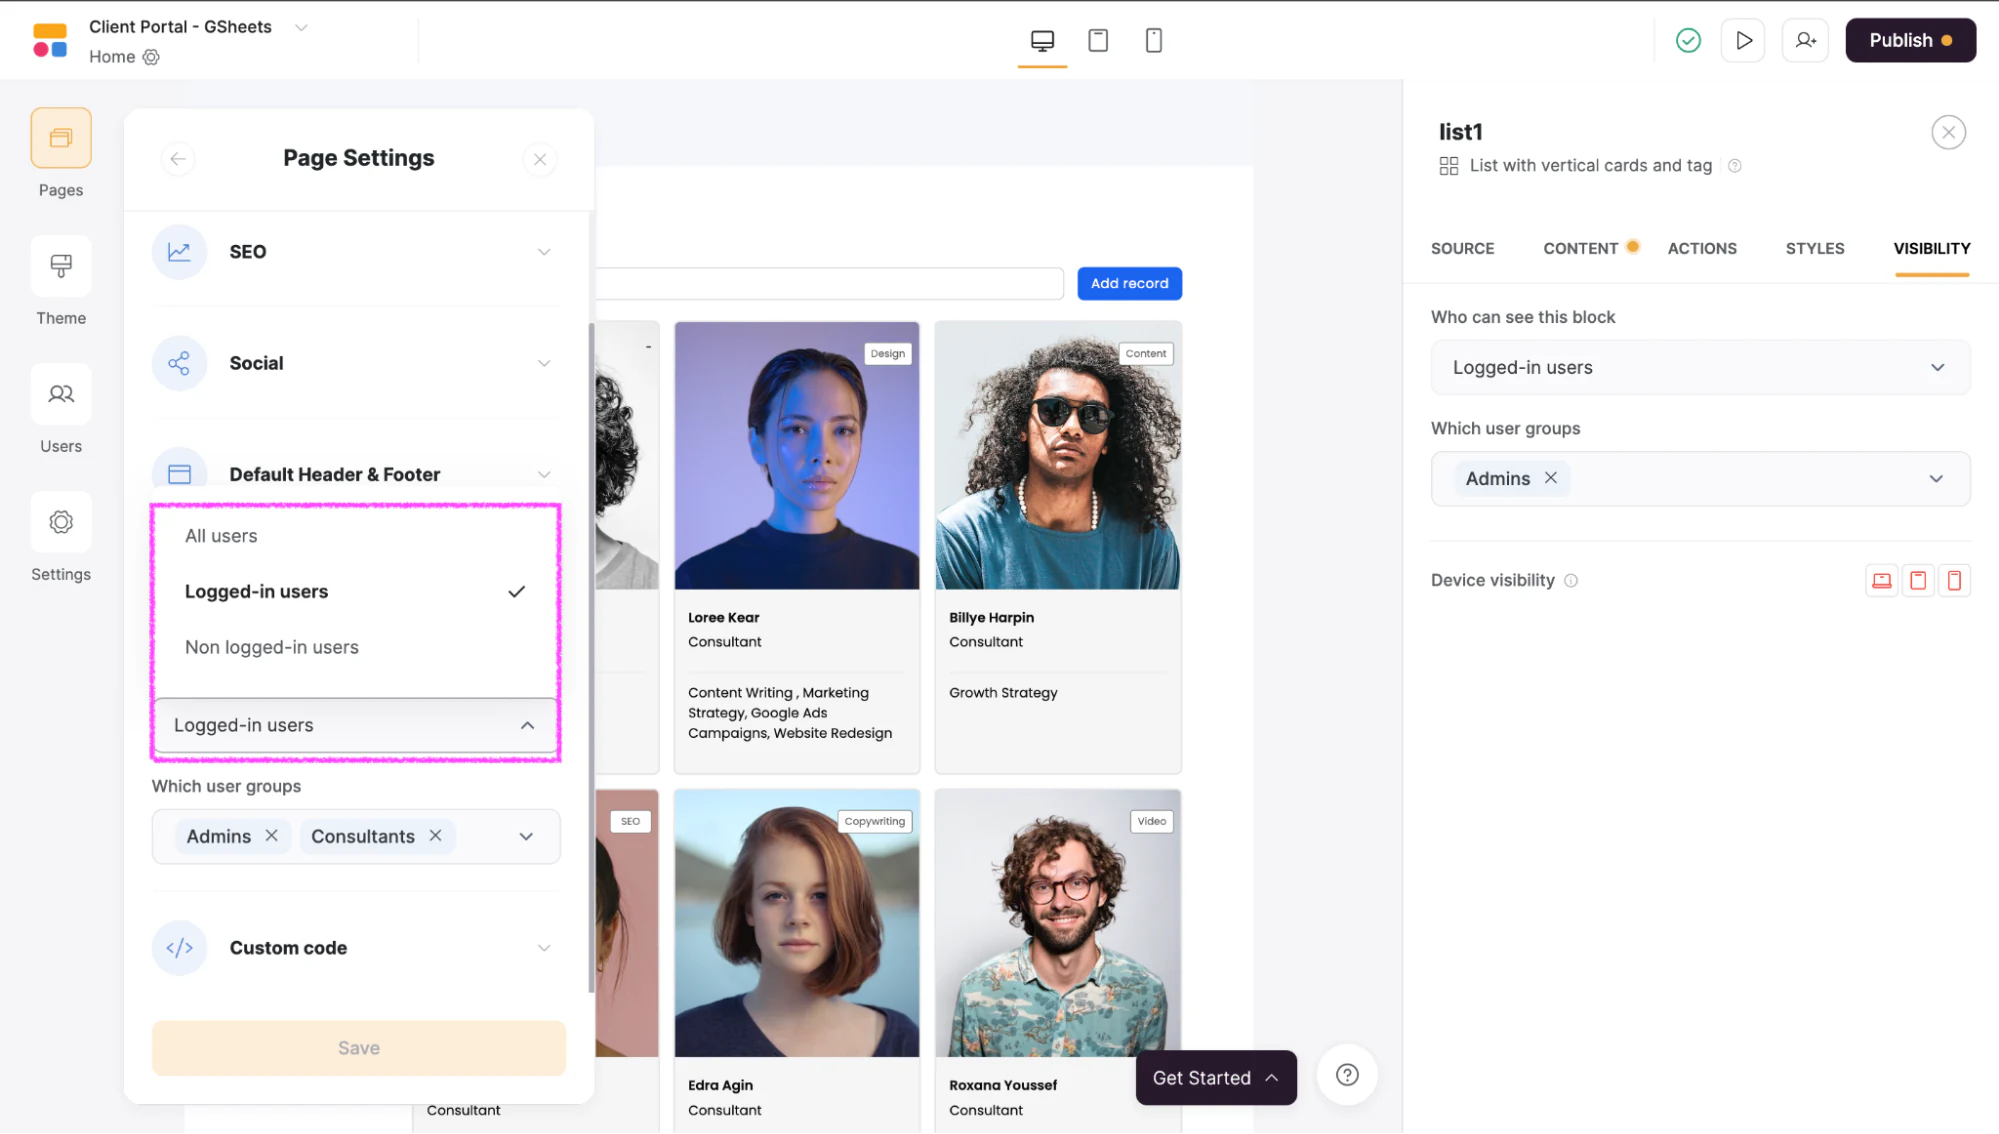
Step 6.3 Choose who you want to view the page
You have three options to choose from regarding page access:
- All users: both logged-in and non-logged-in can view the page.
- Logged-in users: only signed-in users can view the page.
- Non-logged-in users: only visitors who are not signed in can view the page.
Click on the option that works best for you. For instance, if you want to restrict access to the page only for logged-in users, you should select the second option.
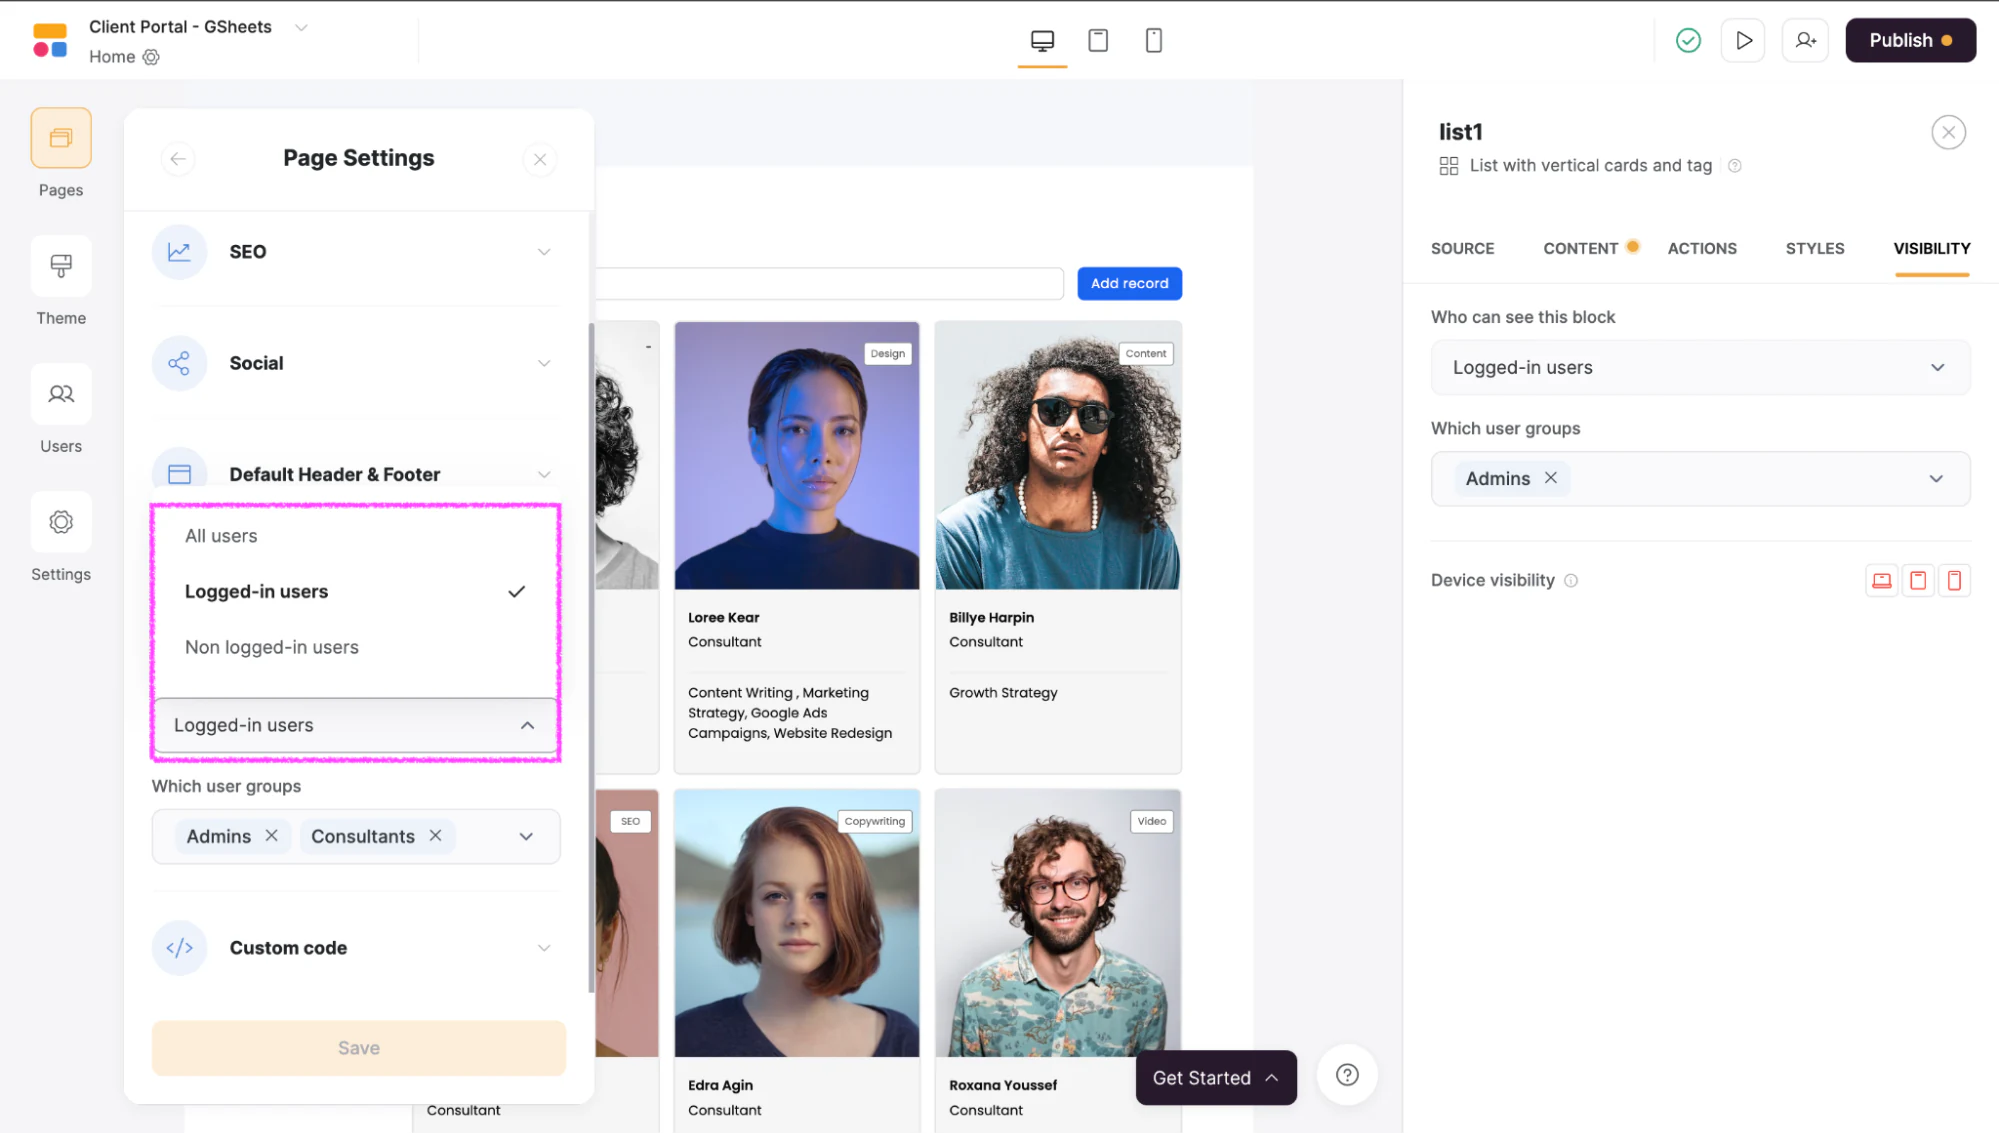
Step 6.4 Choose the specific group of people you want to view the document
As we mentioned earlier, you can further choose which logged-in users can edit the page. Select one or more options depending on your preference.
For instance, if you want to limit access to your campaign and content managers, simply select both options. Choose the option(s) that work best for you.
Step 7: Test your visibility settings
After setting the permissions for your client portal, test them before publishing and sharing. This is the step file-level sharing can never give you: you can preview the exact experience each role gets. To do so, click on the play icon at the top right corner of your screen to preview.
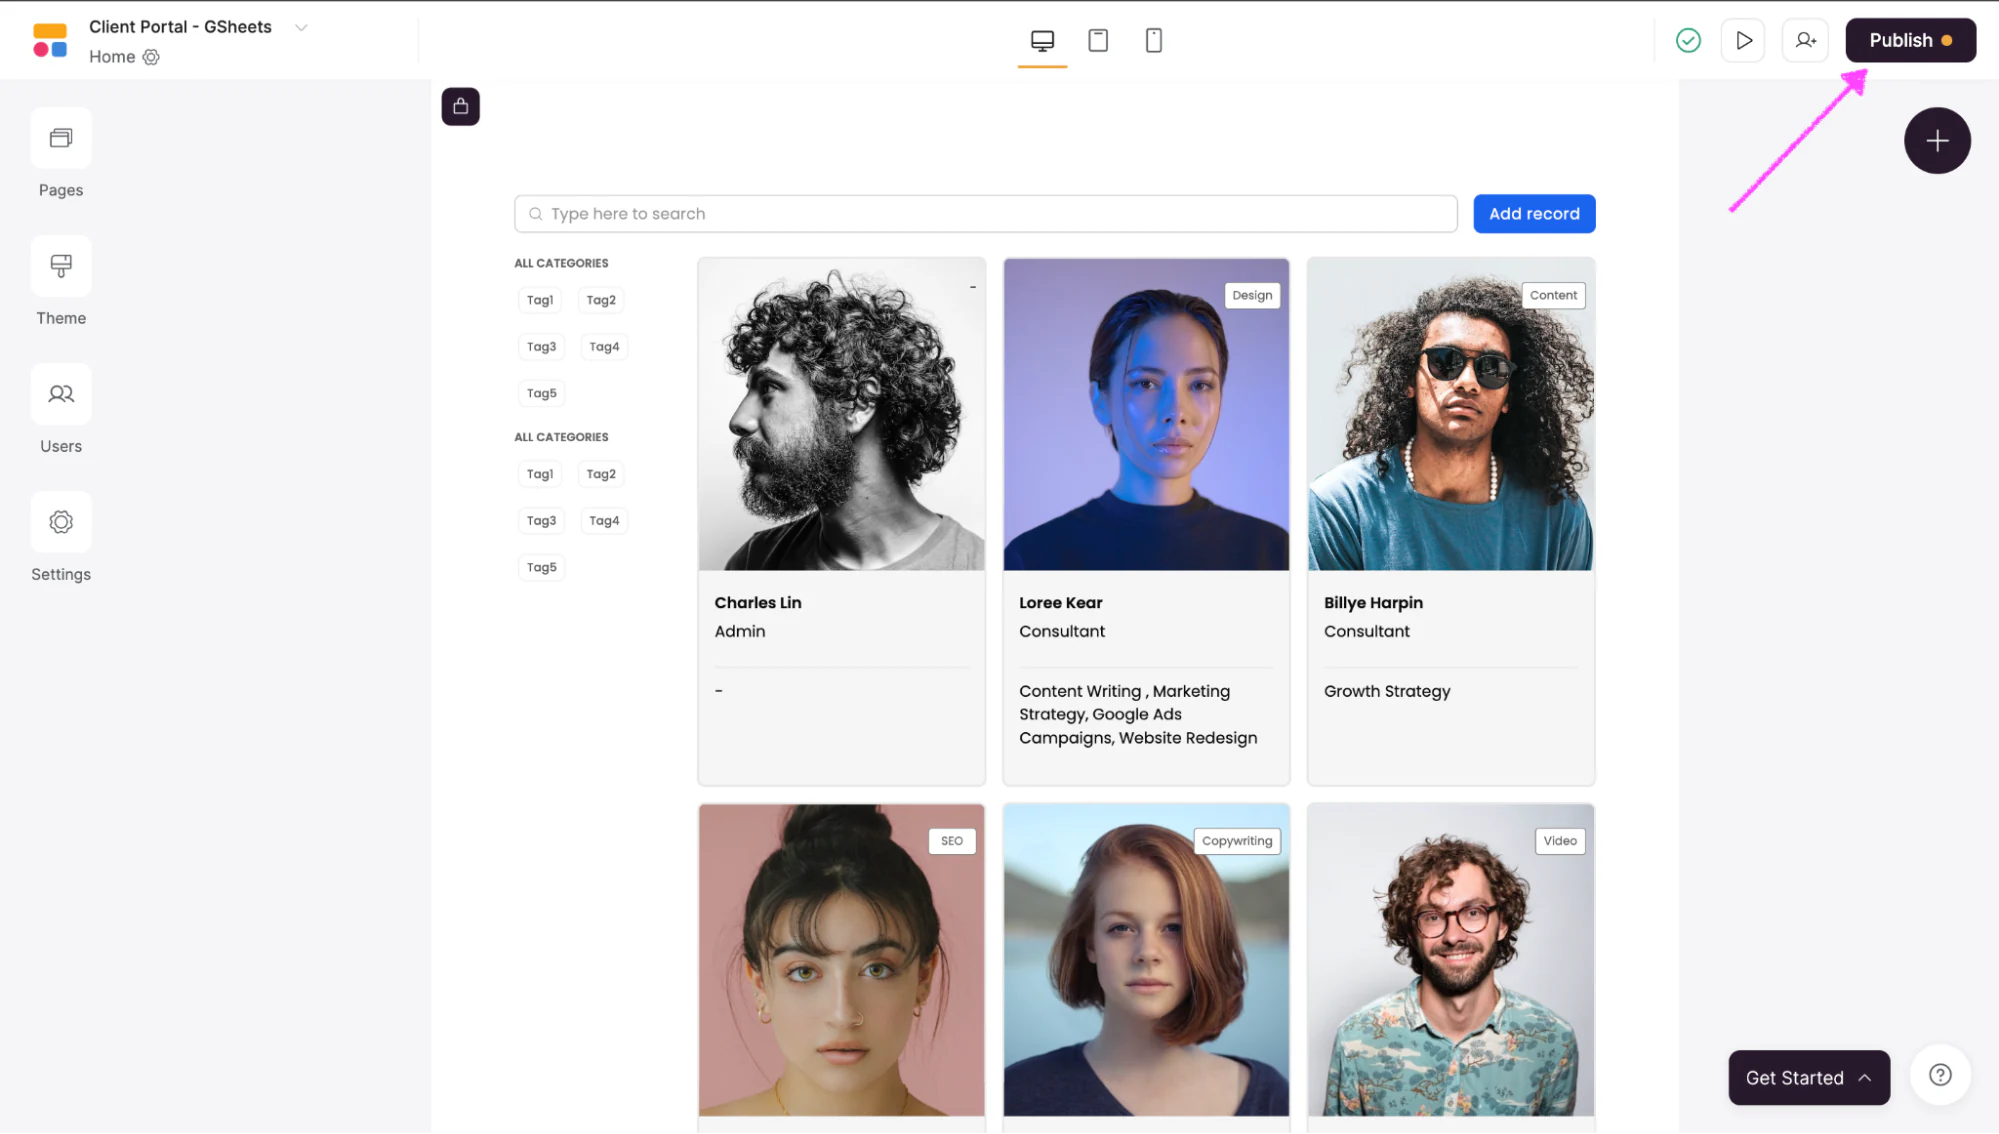
Once the preview page opens, test your visibility settings by clicking the dropdown at the top left corner of your screen to see what your page looks like as a non-logged-in user, logged-in user, and those in different user groups.
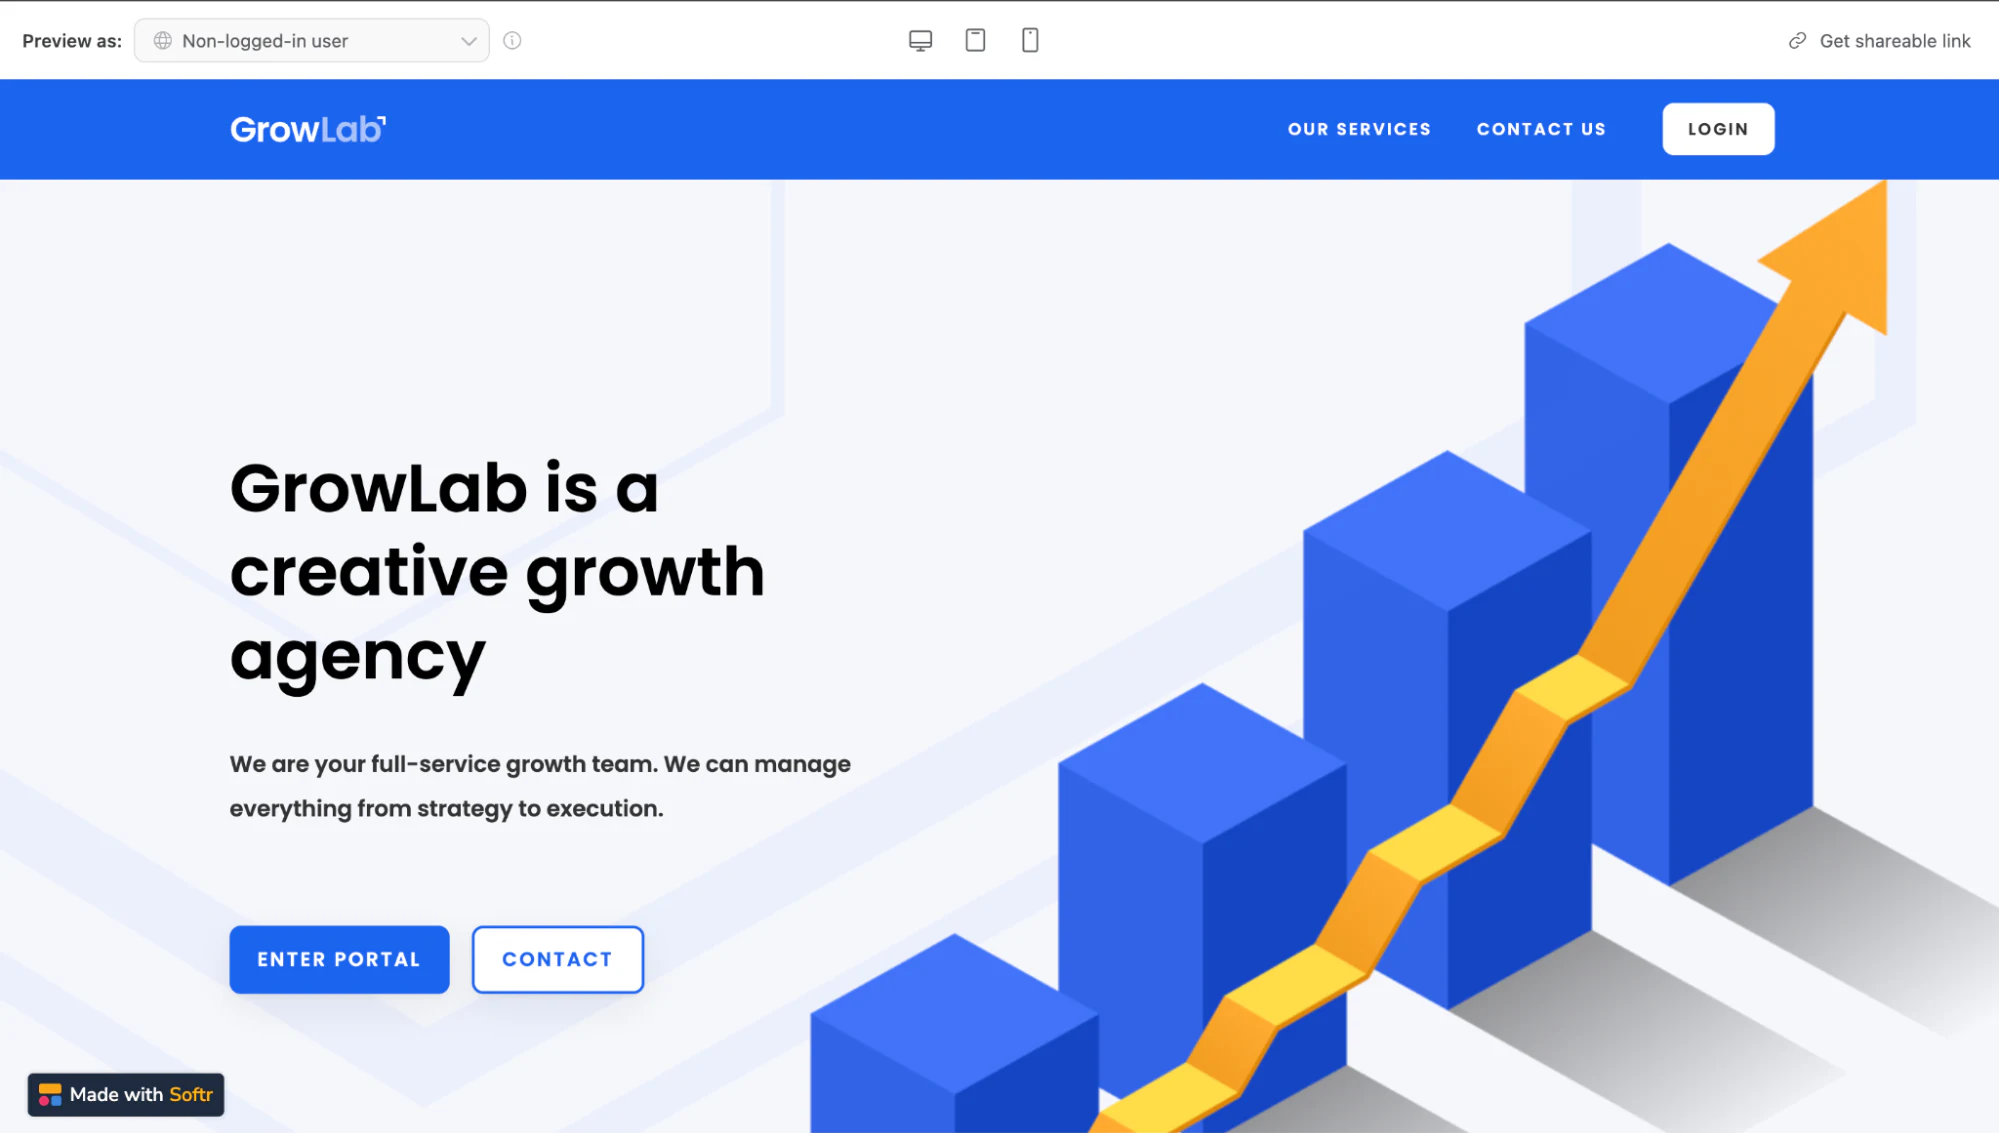
Here’s what our client portal looks like for a non-logged-in user:
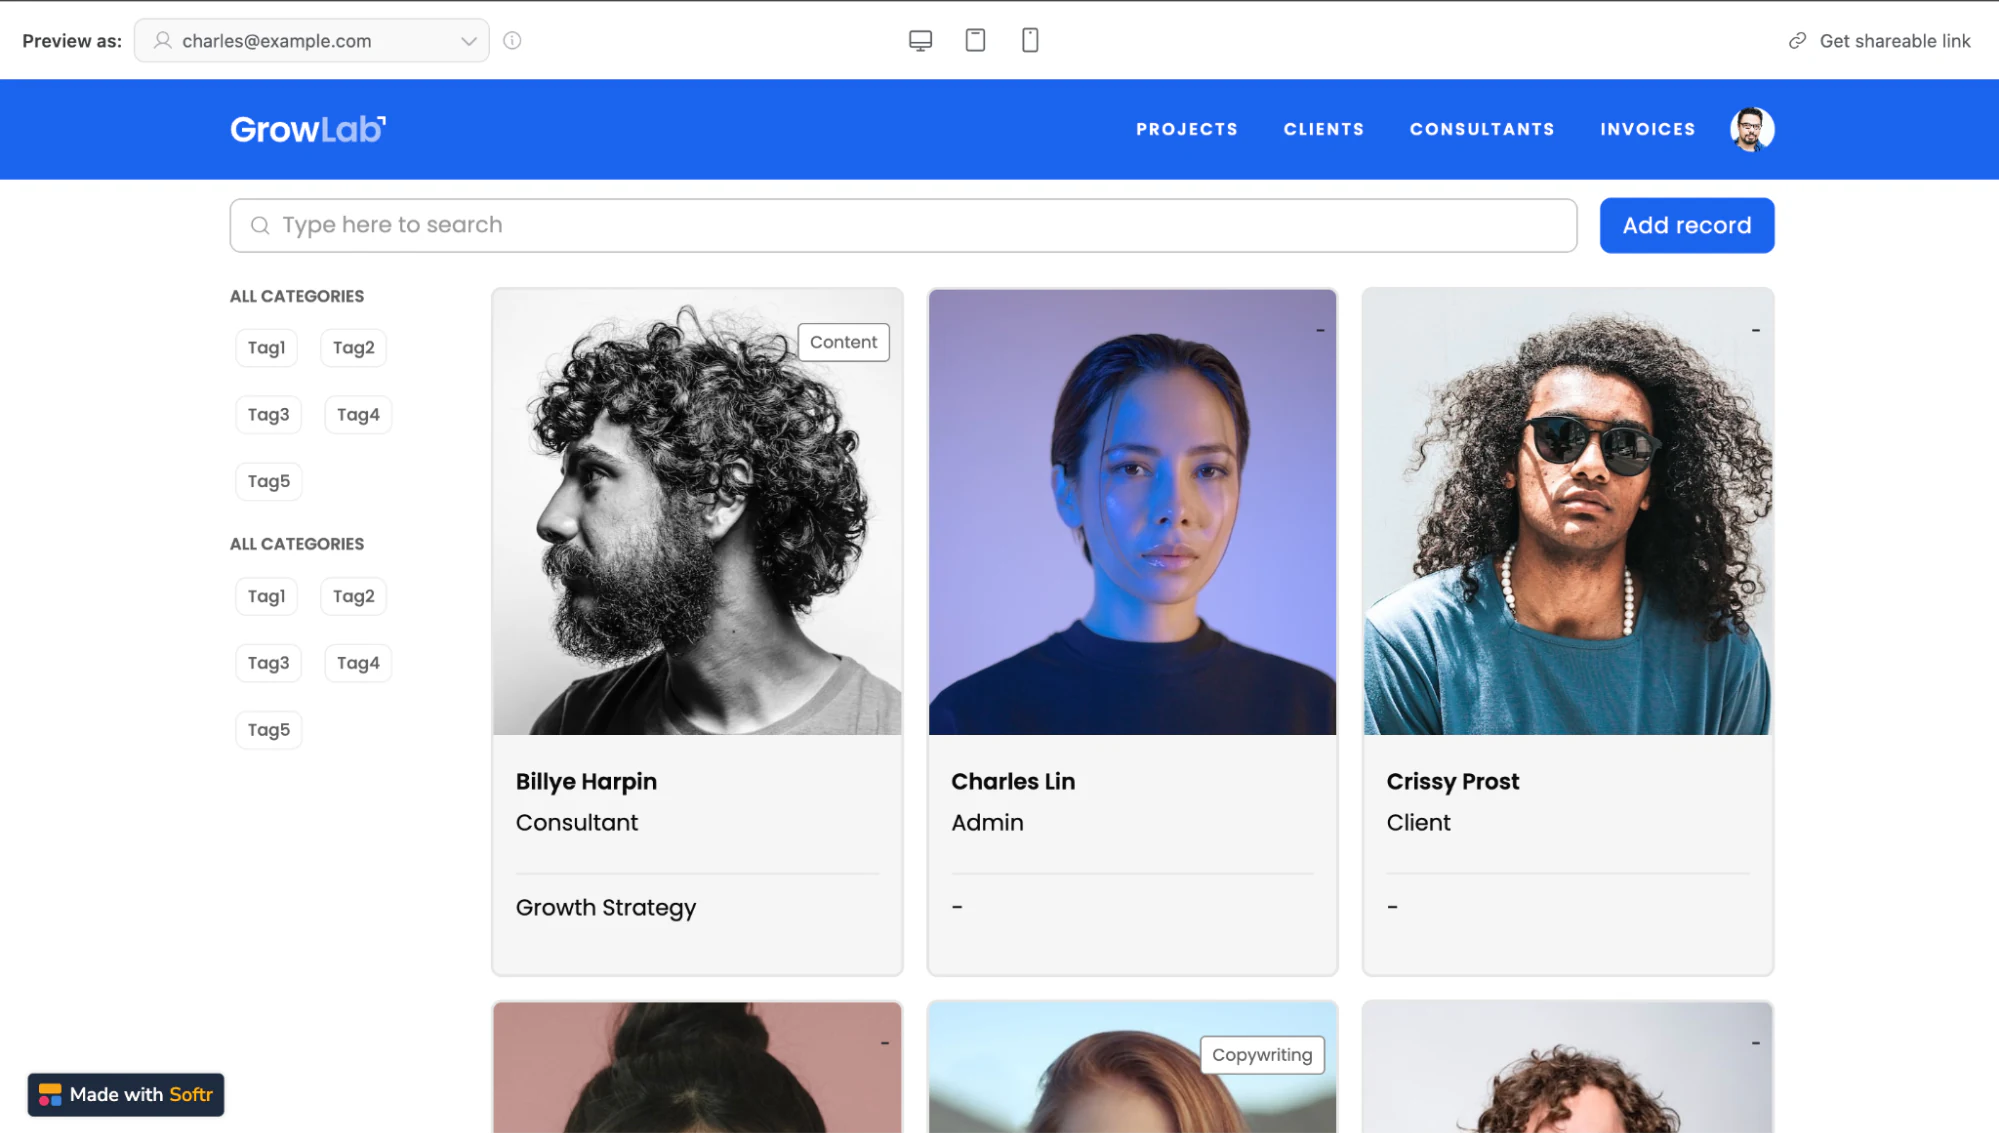
For admins (one of the user groups), your page will look like this:
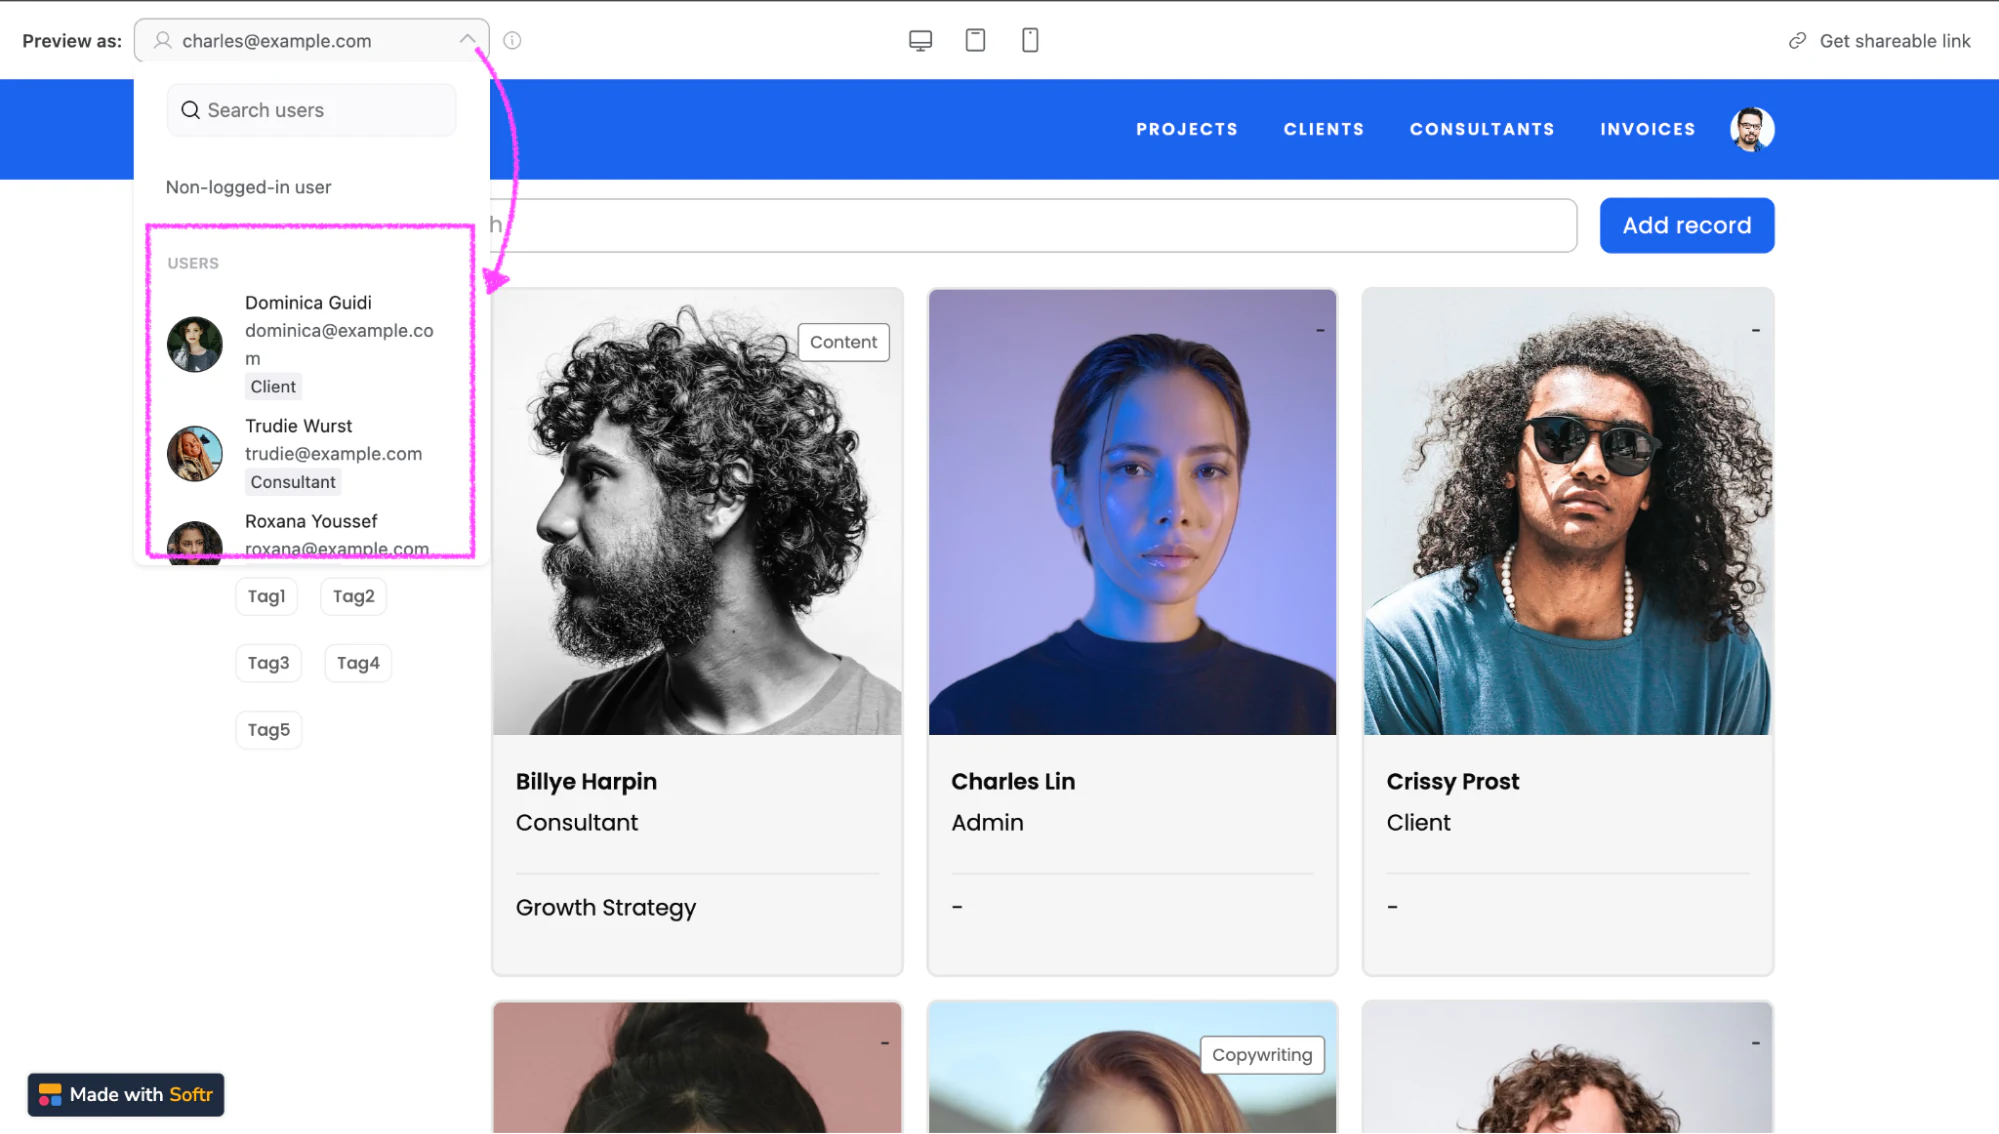
You can also explore what the client portal looks like based on your roles by clicking the dropdown at the top of the page.
Step 8: Publish and share your client portal
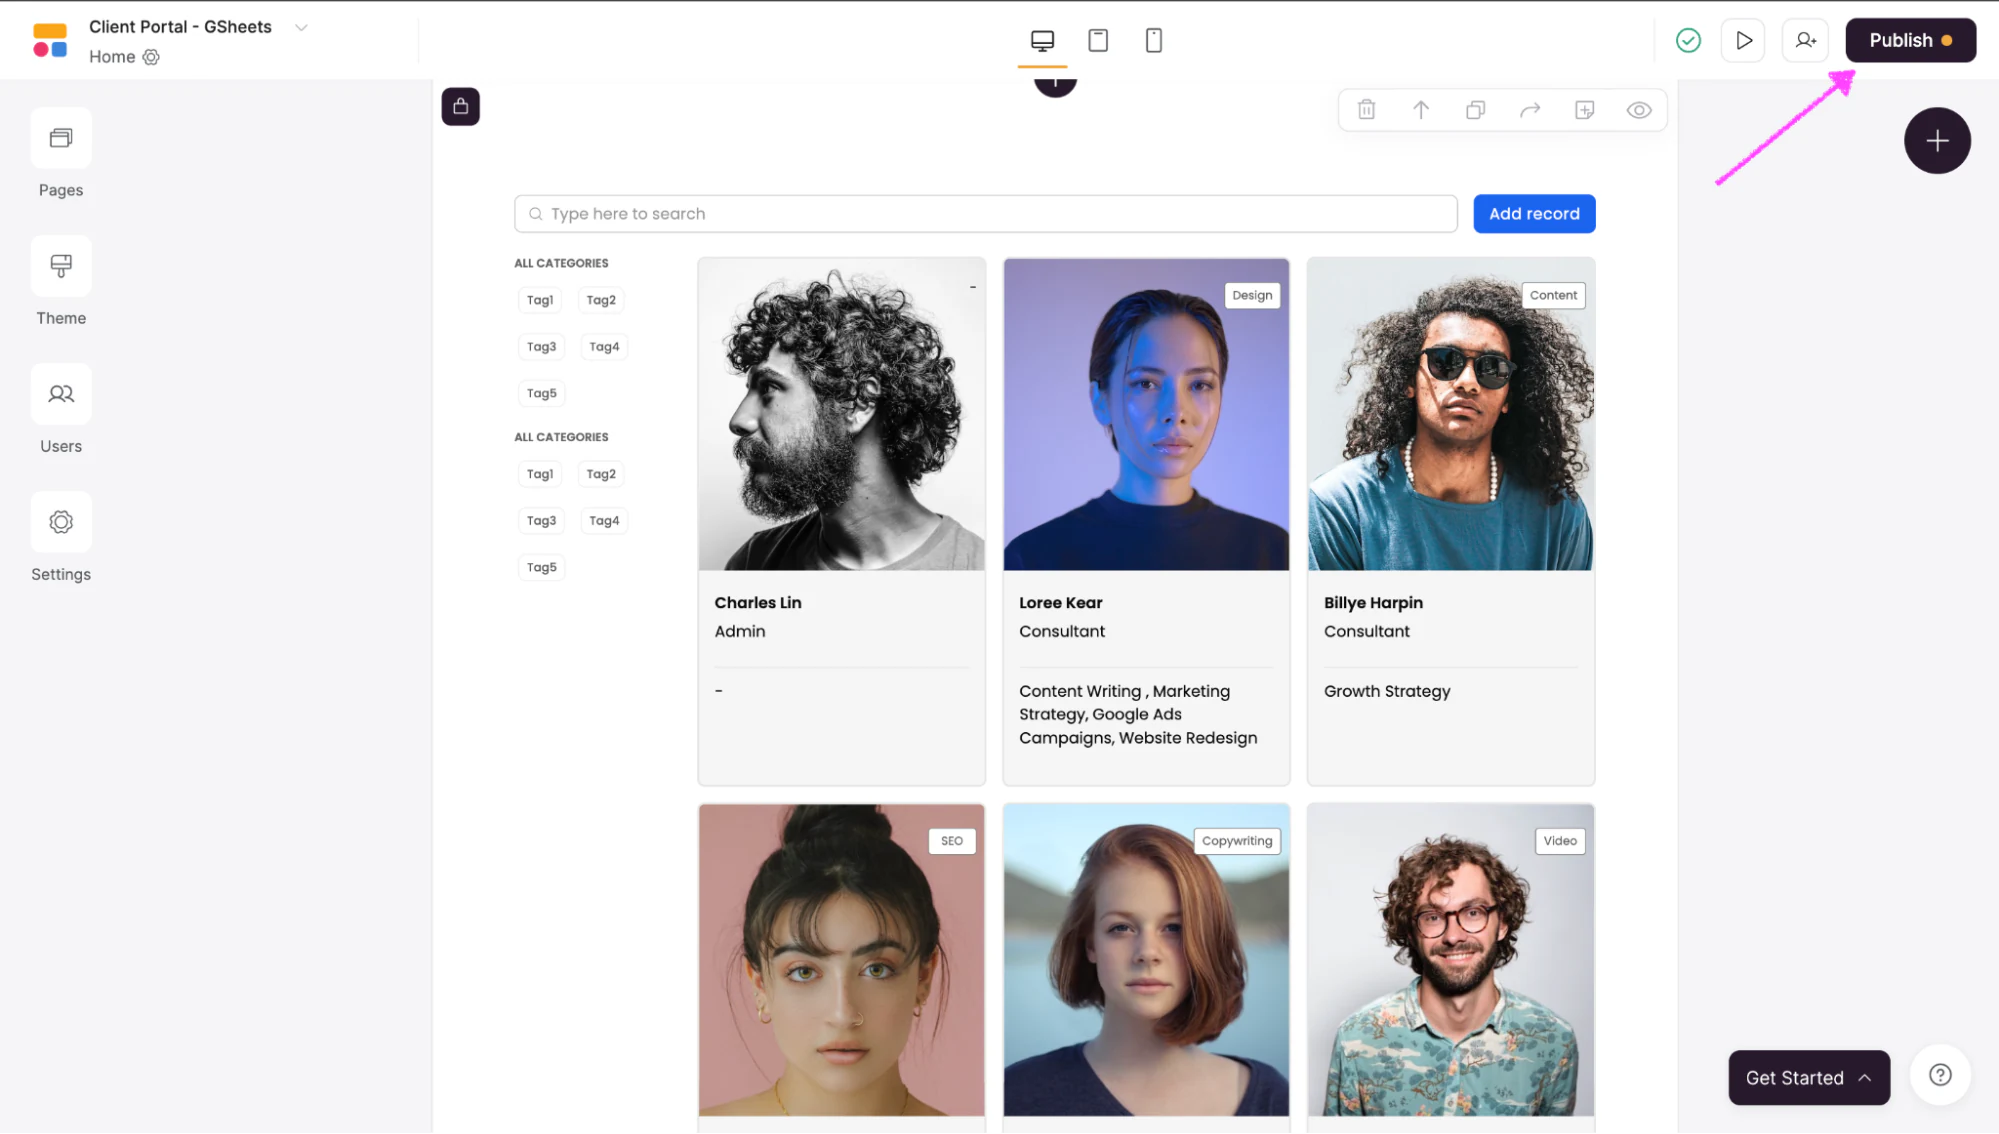
Once satisfied, click on “Publish” at the top right corner of your screen. From now on, you share a link to the app, not the raw spreadsheet, and everyone lands in the exact view their role allows.
Choosing the right approach
If you just need a few trusted teammates editing one shared sheet, the built-in Google Sheets sharing settings are the quickest path, and they're free. The moment access has to depend on who the person is, like clients who should only edit their own records or staff who should only see their department's data, file-level sharing runs out of road.
That's where building an app on top of your data pays off. You keep your Google Sheet (or move to Softr Databases when you outgrow it), and you control access page by page, block by block, and record by record. If you'd rather not build from a template by hand, describe the portal you need to the AI Co-Builder and refine the permissions visually from there.
Ready to give people real edit access without handing over your whole spreadsheet? Start building for free and grab the client portal template to skip straight to the setup.
Frequently asked questions
Can you give different people different edit access in Google Sheets?
Is it safe to share a Google Sheet with edit access?
How do I let people edit my data without giving them the spreadsheet?
What are user groups in Softr?
Do I need to know how to code to control access in Softr?