The complete guide to Airtable permissions: Possibilities, limitations and alternatives


[.blog-callout]
TL;DR
- Airtable has four permission levels (Owner/Creator, Editor, Commenter, Read-only), set at the workspace or base level.
- You can't scope Airtable permissions down to a specific table, field, or record. It's all or nothing at the base or workspace level.
- Softr adds a layer of granular, no-code access control on top of Airtable: custom user groups, page and block visibility, and global data restrictions down to individual records and fields.
- With Softr, you can even share salary data, client documents, or other sensitive records from the same base while keeping them hidden from unauthorized users. [.blog-callout]
Traditional spreadsheets and databases historically showed every collaborator the same view of the data. Airtable changed that by letting you control what each user can access, edit, or comment on, but its permissions still stop at the base and workspace level.
In this article, we'll go over how Airtable permissions work, what you can do with them, and where their limitations show up as your team and use cases grow.
Then, we'll cover how to get more granular control, down to specific tables, fields, and records, by pairing Airtable with Softr's users and permissions system.
Let's get started.
Airtable permission levels
Airtable permissions determine what collaborators can do within a workspace or a base.
Note that there are two ways for Airtable users to determine owner permissions:
- At the workspace level, giving collaborators that level of access and edit permission for every base in the workspace
- At the specific base level
In total, there are four different permission levels to choose from on Airtable:
- Owner/creator permissions
- Editor
- Commentor
- Read-only
Let's take a look at what each level can do:

{{cta-1}}
Owner/creator permission level
Owners/Creators are able to do everything in the base, from granting permissions to deleting, removing elements and everything in between. Owners/Creators can:
- Access everything in the entire base
- Invite people to be co-owners, editors, commenters or read-only users
- Create and remove share links, and rename the base
- Add, delete, and modify records, as well as comment on everything in the base
- Add, delete and modify views, download a CSV version of a view or lock it
- Add, delete and rename tables, or import a CSV as a new table
- Add, delete, rename and customize fields
- Create and manage automations, from deleting to duplicating, configuring and renaming. They're also able to edit their description, copy their URL and view their configuration.
- Manage syncing by either syncing a table manually, creating or deleting a synced table, as well as creating or removing syncable view share links.
- Create extensions, configure their settings, and handling them within dashboards
- Run the Interface Designer, in order to create an interface or an interface page, fully edit, preview and publish interfaces, adding and removing elements from it, as well as deleting, duplicating or renaming them.
Finally, Owners/Creators at the workspace level are able to access, add, rearrange and delete all bases within that workspace, rename it, adjust billing settings, and grant owner permissions to other users.
In short, Owners/Creators have full rights over everything in their workspaces and bases, and can manage it all from the actual content of the bases to the settings and user permissions.
Editor permission level
A step below Owners/Creators, Editors are able to change data within the base, add, delete or modify Airtable views, or download data, but they are limited in terms of "administrative" permissions (adding or deleting tables, creating automation, creating an interface, etc.). Editors are able to:
- Access everything in the entire base
- Invite people to be editors, commenters or read-only users
- Add, delete, and modify records, as well as comment on everything in the base
- Add, delete and modify views, or download a CSV version of it
- View an automation configuration, and copy its URL
- Manually sync the base, and create of remove a syncable view share link
- Configure an extension's settings
- Use the Interface designer to update records or view an interface
Finally, Editors at the workspace level are able to access all bases within that workspace, invite other users to be Editors, Commenters, or Read-only users, rename that workspace and manage bases within it.
Editors' capabilities are just a hair short of Owners/Creators. While they are especially limited when it comes to automations, the Interface Designer, and extensions, they can still get a lot done on Airtable.
Commenter permission level
Commenters are able to, well, comment, but are limited in every other aspect and cannot edit the base. This is the second-to-last powerful permission level. The actions commenters can take are limited to:
- Accessing/viewing the base and inviting others to comment and/or read-only
- Commenting on records
- Adding, deleting, and modifying views for their personal use only
- Viewing automation configuration and copying their URL
As far as workspace rights, Commenters are able to access all bases in that workspace that they have the right to, and invite others to be Commenters or Read-only users. As you can see, they are quite limited in their scope.
Read-only permission level
Finally, read-only users cannot do much except browsing the base, and some minor actions without impact on the content of the base/workspace:
- Accessing and viewing the base, and inviting others to be read-only users as well
- Viewing an automation configuration and copying its URL
At the workspace level, accessing bases set to "read-only" rights, and inviting others to be read-only users.
Airtable use case example
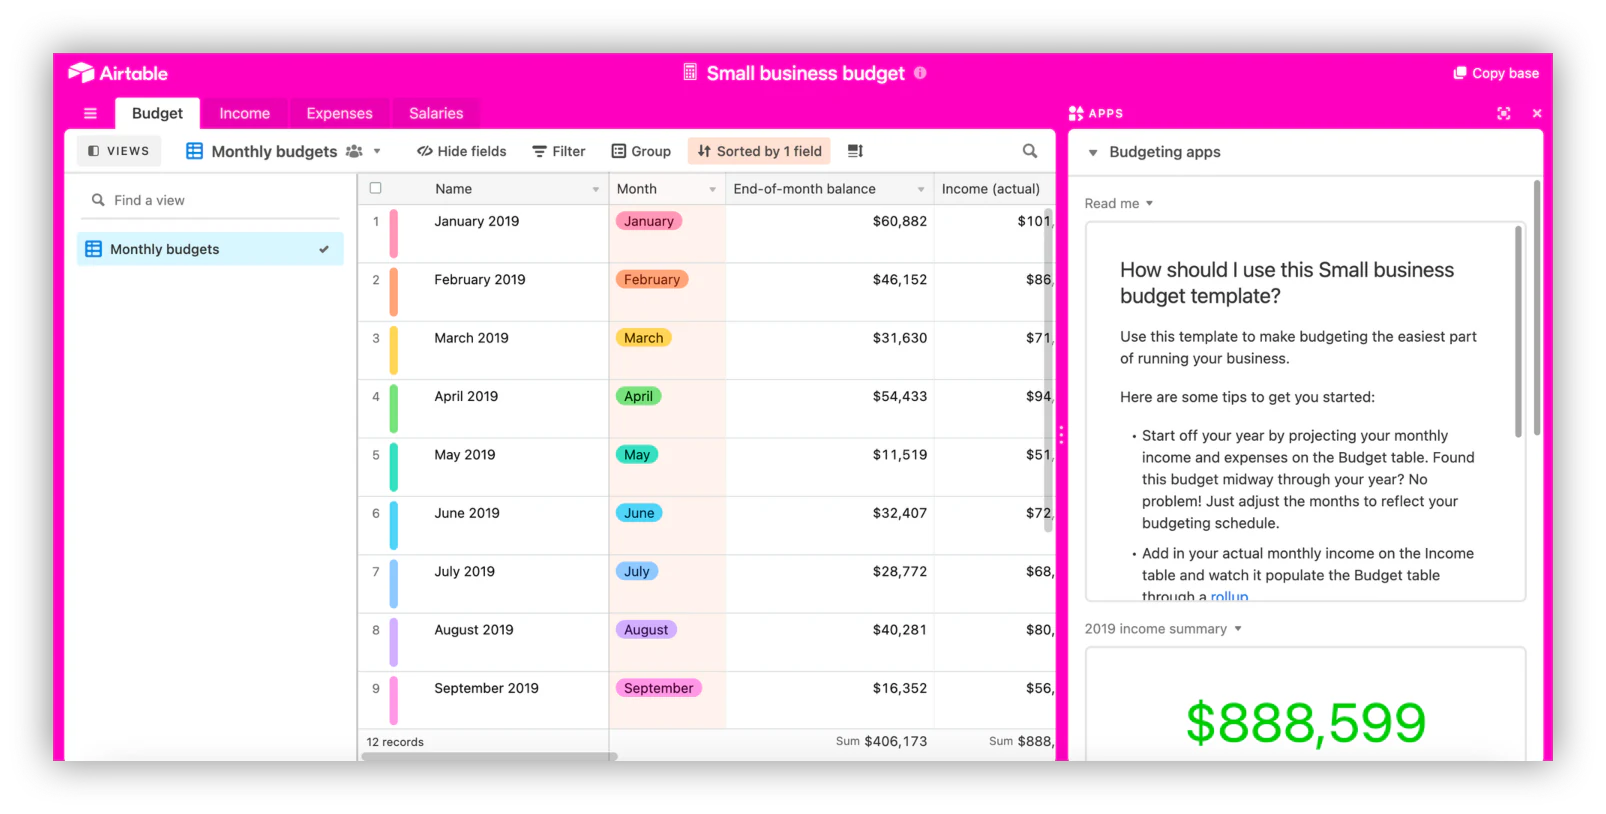
Why would anyone be interested in setting permissions for Airtable? Think of a Head of Marketing at a SaaS company. They might want to create a workspace to manage the budget for each team within their marketing department, in order to track spending and identify areas of improvement.
As the owner of the workspace, they can create a dedicated base for each team's manager to fill out, giving them editor permissions on their specific base, while setting other managers and team members as commenters to foster conversations.
Meanwhile, the Head of Marketing has owner rights, and a master base with the overall department budget for information purposes, with a unique private view, and where every team member is set as a read-only user.
Pros of Airtable permissions
Airtable permissions allow for a level of granular control and domain restrictions that were previously difficult to obtain with traditional spreadsheet solutions.
Granular field permissions enable an admin to ensure that all workspace collaborators have interface access to the right content, whether they require read-only permissions or full ownership.
They are:
- Great for generic, overall collaborator management with 4 main permission roles
- Granular control for basic projects with small teams
Cons of Airtable permissions
On the other hand, advanced users will quickly notice some limitations with Airtable end user permissions.
While workspace or base and field permissions are more advanced than traditional spreadsheet and table permissions, there are still limits.
The main drawbacks of Airtable creator permissions are:
- It's impossible to set permissions for a specific section of your base. You can only set permissions for an entire workspace and/or base.
- There's no way to create custom user groups beyond the four built-in roles.
Airtable permissions are useful for managing who can edit a base, but they weren't built for the kind of granular control that client portals, internal tools, or multi-role apps need.
As Artur Mkrtchyan, Softr's CTO and co-founder, put it while comparing purely AI-generated apps to platforms with built-in access control: an engineer friend who had built a custom admin panel couldn't say who had access to what without digging through the code for several minutes. Access control that isn't visible and auditable is a liability, whether you're working from Airtable's four roles or from generated code.
Make the most out of Airtable permissions with Softr
At Softr, we've built a way to take the granular control Airtable permissions can't offer and layer it on top of your base.
First, some context: Softr recommends starting with Softr Databases as your native, AI-ready data layer, but it connects just as easily to Airtable and 21+ other data sources. Either way, you can build a front end for your Airtable data using the interface builder.
This means you can create advanced front-end interfaces on top of Airtable, such as client portals or internal tools, while also supercharging the permissions available to you.
The main difference you'll see when setting permissions in Softr compared to Airtable is how much more granular the control gets. Instead of stopping at the workspace or base level, you can define exactly which tables, fields, and records each user can view, edit, or delete.
Softr also lets you configure custom user groups. This goes beyond the Owner/Editor/Commenter dichotomy: you can create specific groups tied to a set of permissions for particular blocks, pages, tables, and records, either by adding users manually or by defining a condition based on your data (like "Department = Sales" or "Role = Manager").
"I find Softr very intuitive and easy to navigate, which is great for someone who is not a programmer by nature. It integrates very nicely with Airtable and other databases we are already using... I also love the ability to control access globally, which is really important for data security and privacy." - Natalie S., Director of Operations, G2 review
Airtable permissions use case example
Let's get back to the example of the Head of Marketing from earlier.
This time, they want to build out their budget management further by including salary data. Displaying salaries for everyone to see isn't the best idea for most businesses, so using Airtable alone, they'd probably need to create an entirely separate base and grant Editor access to managers only.
That would work, but it complicates everything: salary data needs its own base, and calculations that combine it with the rest of the budget become cumbersome.
Using Softr, the Head of Marketing can keep a single shared base for all collaborators, while showing salary data only to the managers authorized to see it.
This level of granularity is useful well beyond budget tracking. It applies just as easily to client documents, vendor pricing, HR records, or any other data where different users need different views of the same base.
But how does it work exactly?
How to set advanced permissions in Softr
In Softr, there are several ways to create and configure permissions for your apps so users only see and have access to the right content for them. Here, we'll review three main aspects: user groups, page and block visibility, and global data restrictions.
Create and configure user groups
User groups are a great way to deliver a personalized experience to your users. By default, blocks and pages can be customized for logged-in and non-logged-in users in Softr, but you also have the option to create custom user groups in a few steps. You can also describe the groups you need to the AI Co-Builder and have it set them up for you, but here's how to do it manually:
1. Select "Users" in the left sidebar of your Softr interface
This section is where you'll find your users and set groups and restrictions for them.

2. Click on the "User Groups" tab
Depending on your template, you might already have some pre-set user groups.

3. Click on the "Add custom group" button
You can create a custom group of users for which to set permissions.

4. Name your new user group
Pick an easily identifiable name so other collaborators know what the group is for.

5. Select whether to assign users manually or based on a condition
Softr lets you add users to a group either manually from a list or based on a condition. Here, we want to create a group of managers, so we select "condition-based."

6. Configure your conditions
Softr lets you select from several options to create your condition-based user group. Here, we selected every user whose role is "Manager."

7. Save your new user group
Save your newly created group. It's now ready to use anywhere in your app.

Set page and block visibility
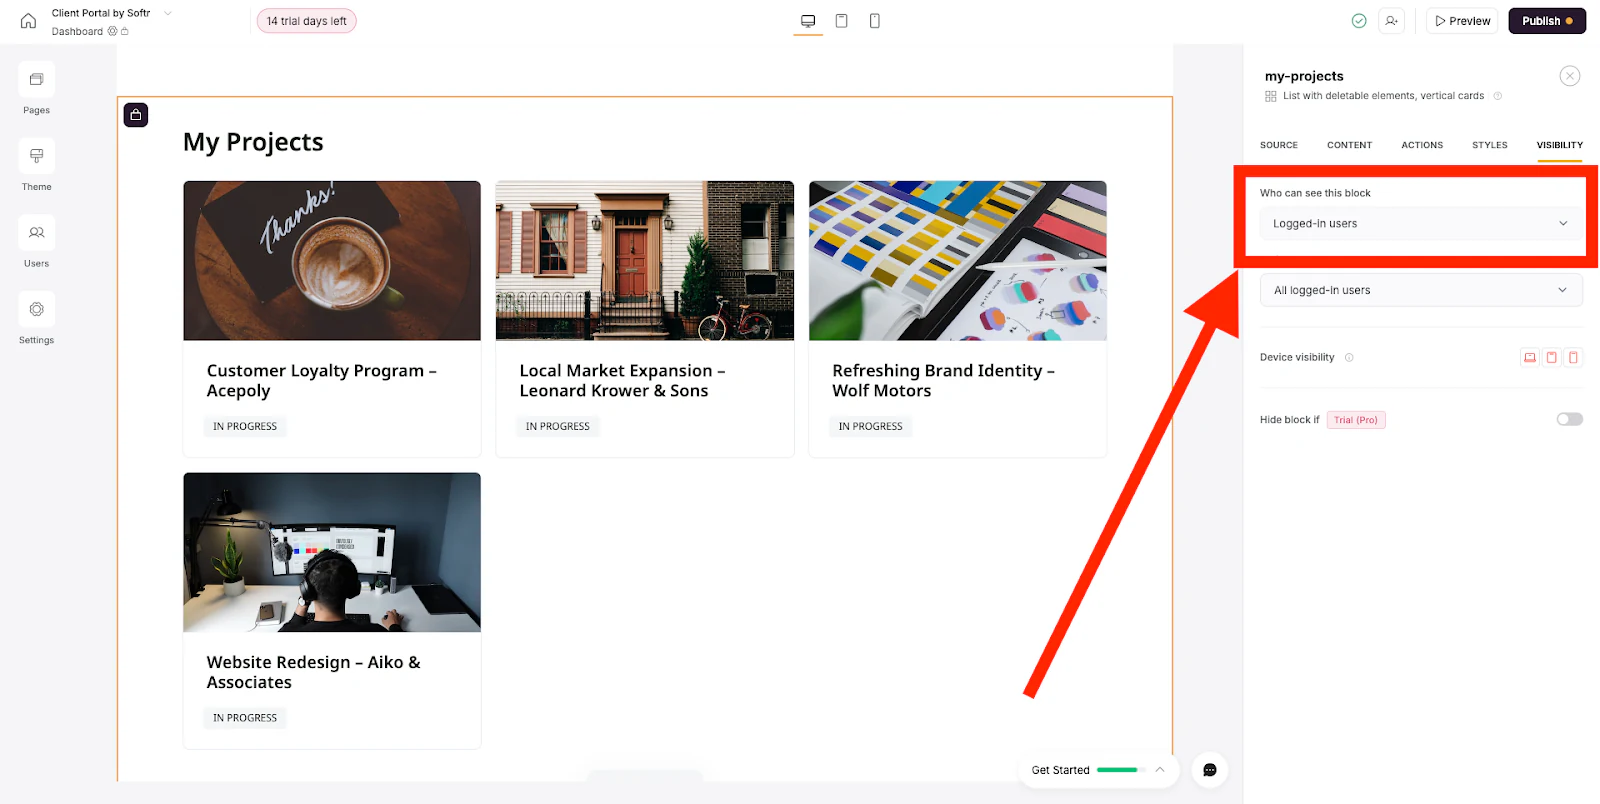
With your newly created user group, you can now set visibility for any block or page in your app. To do so, click on your block of choice and follow these steps, or ask the AI Co-Builder to configure the visibility rule for you by describing which group should see it.
1. Select the "Visibility" tab in the right panel
In any given block, you can set the visibility to a specific user group.
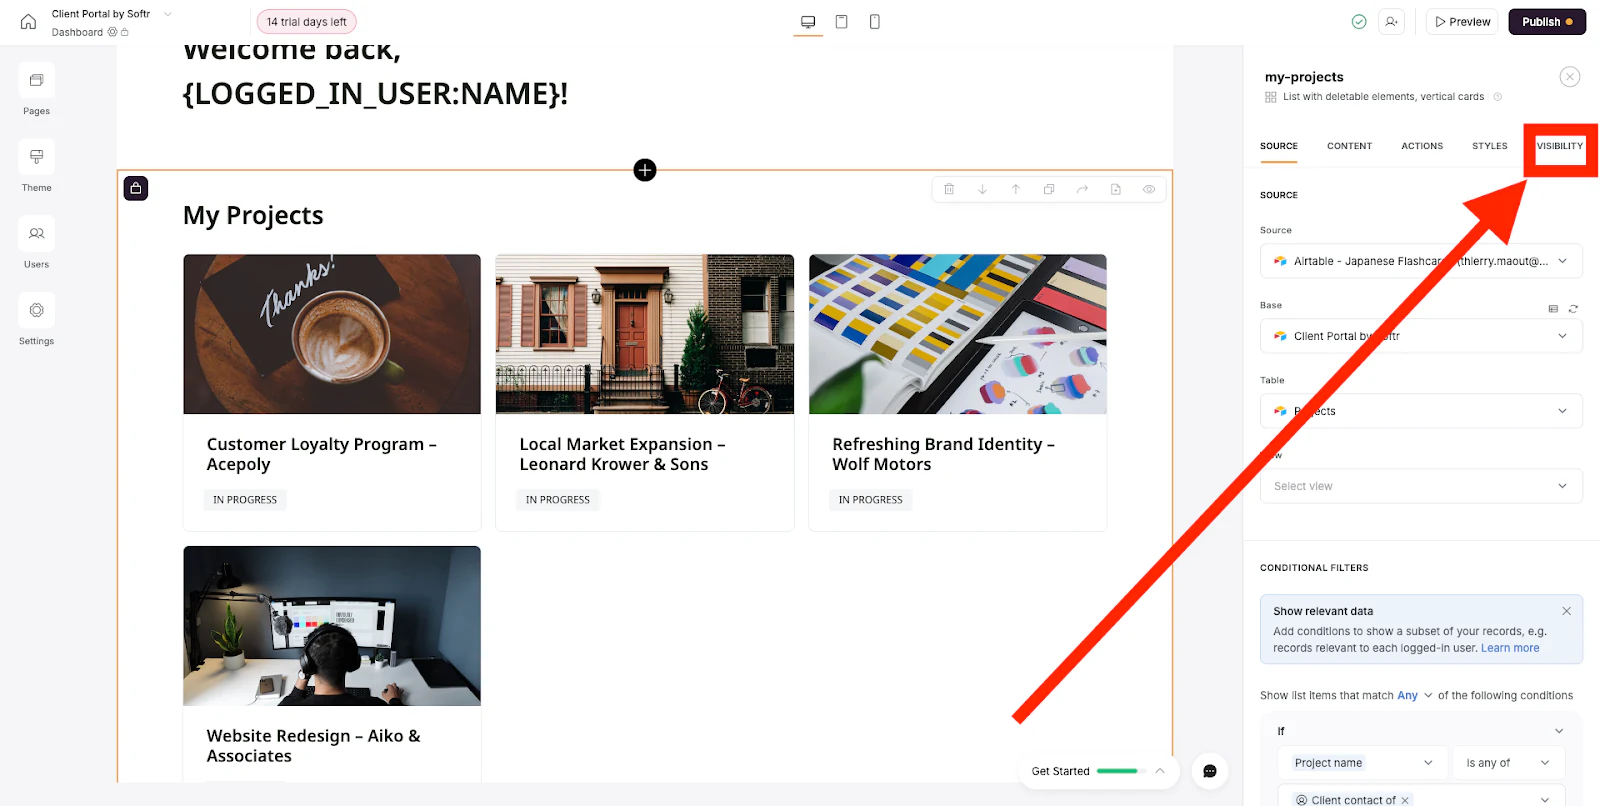
2. Choose who can see the block from the dropdown
Depending on the configuration of your user group, they likely need to be logged in to be selected in the next step.
3. Select your user group in the "Which user groups" dropdown
The group you previously created will appear in the list.
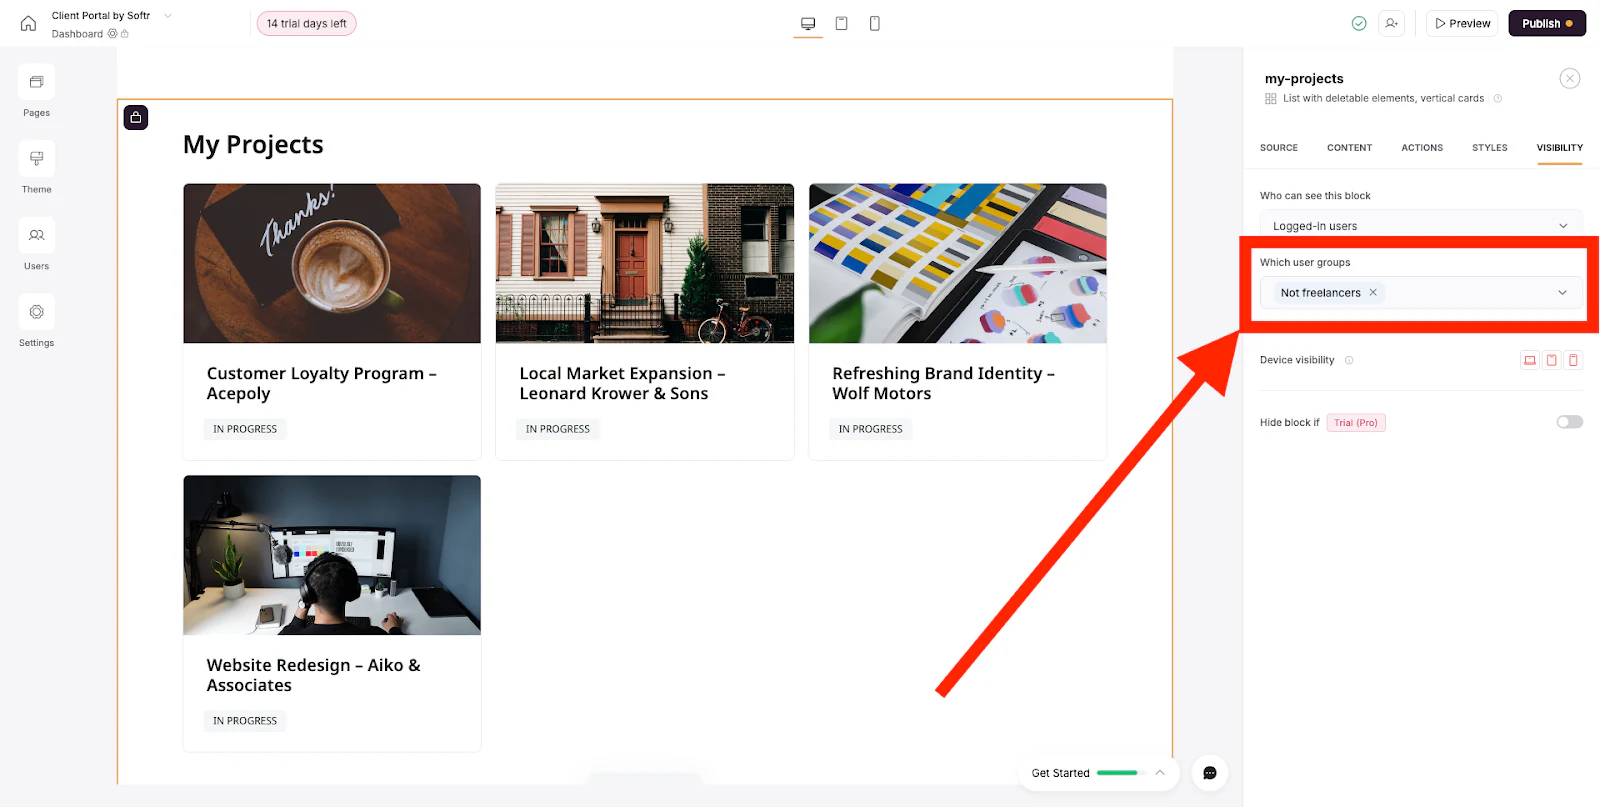
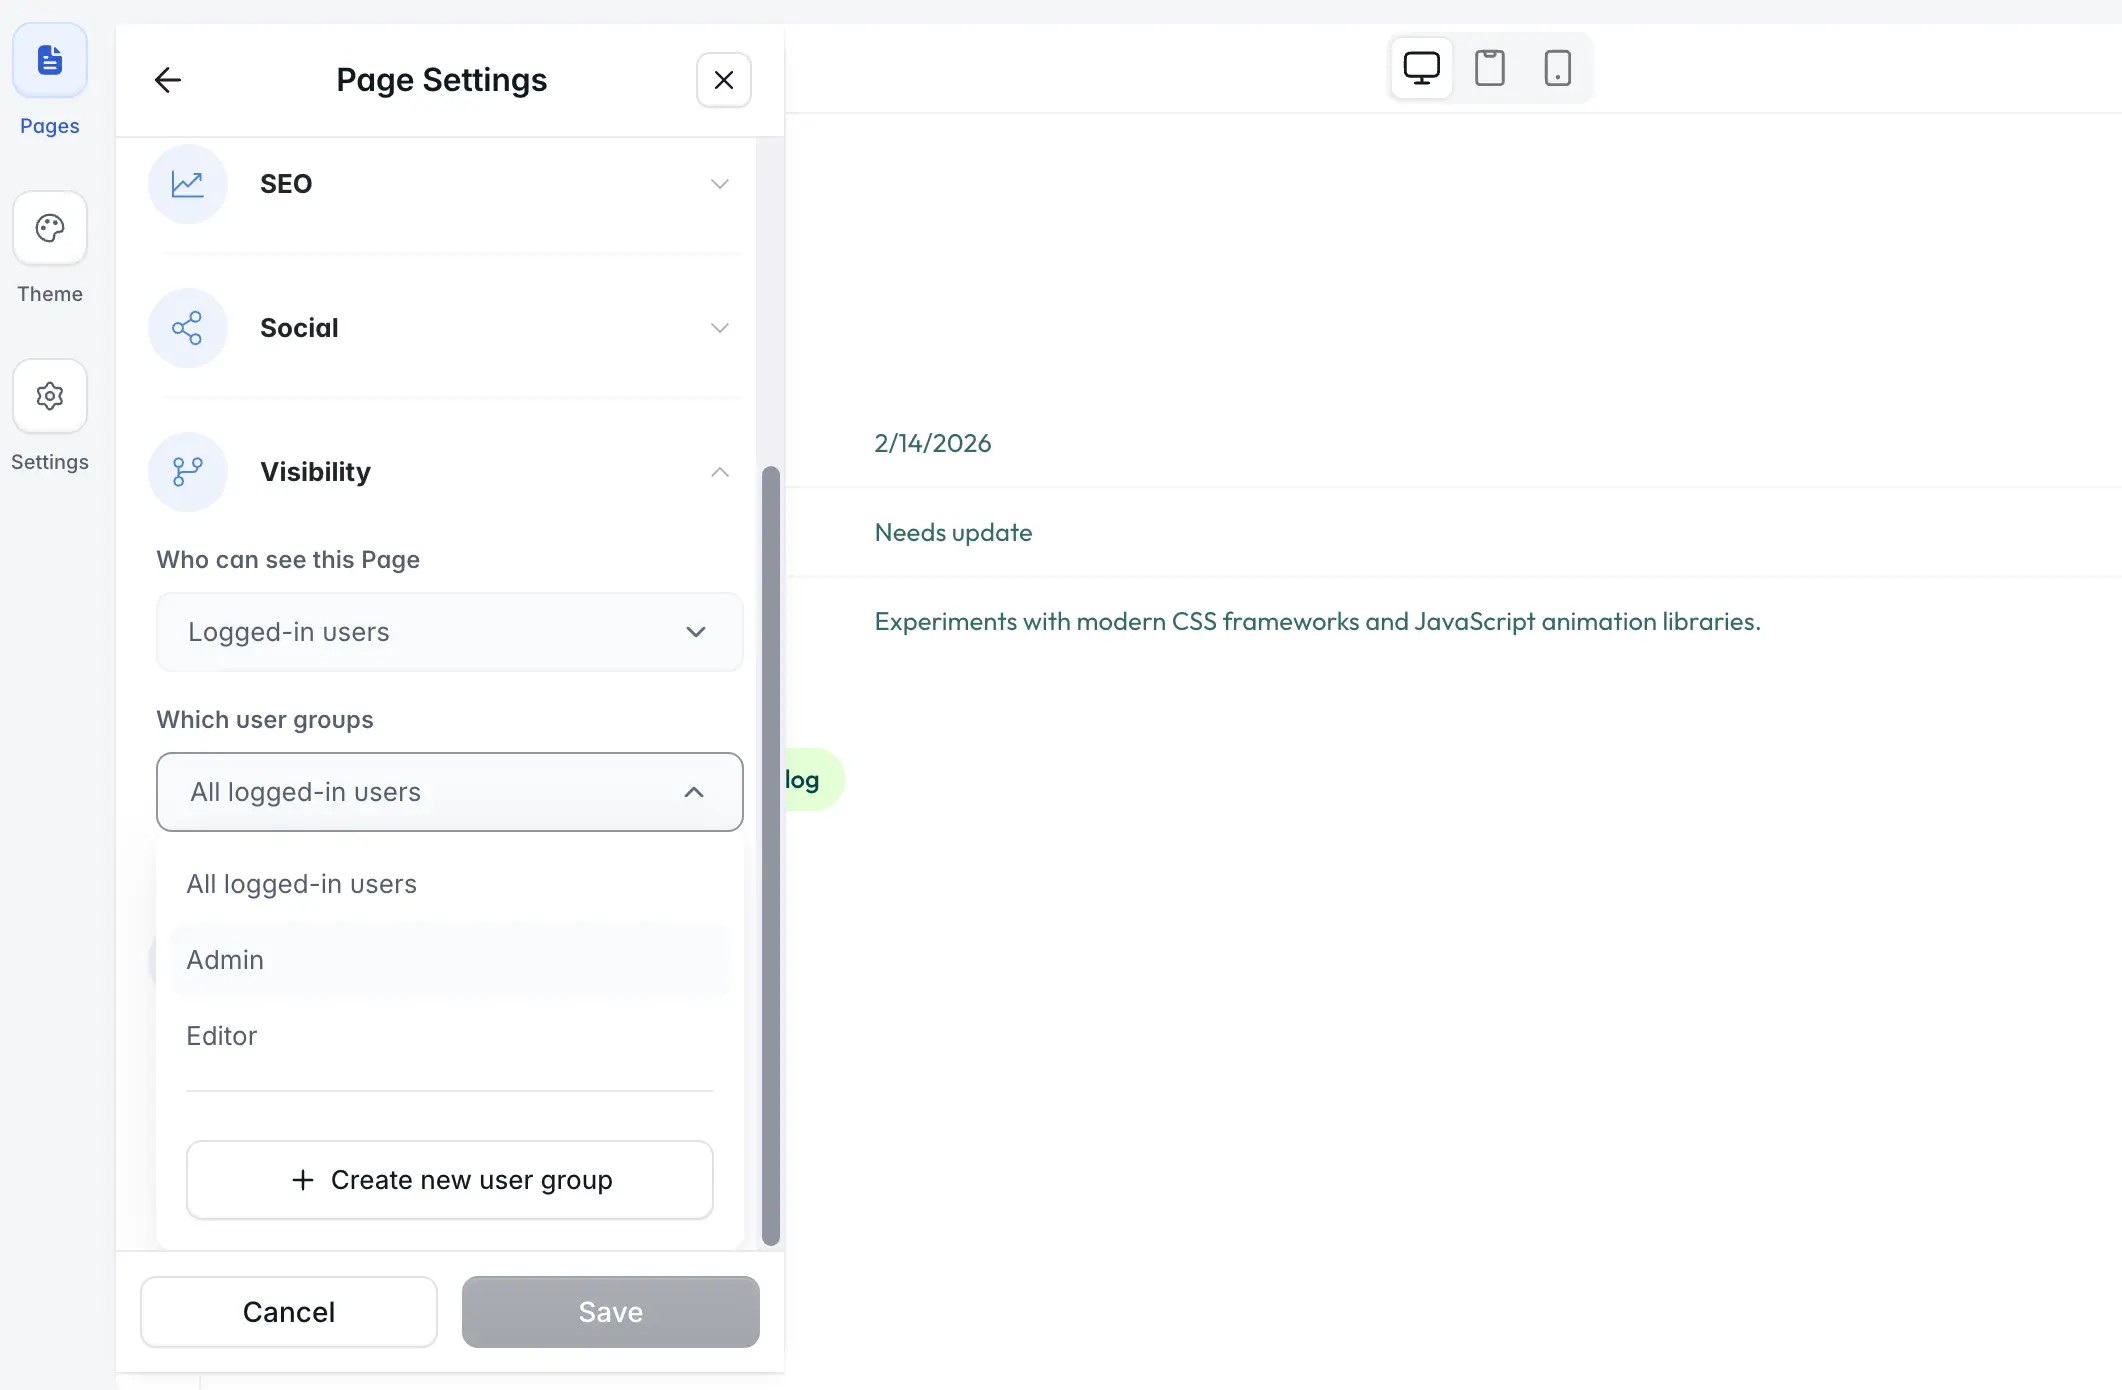
Going forward, only members of that specific user group can see the block (or page, if applied there instead).
Set up global data restrictions
Global data restrictions let you hide irrelevant or sensitive records from groups of users across your entire app, including dynamic blocks, dropdown options, and inline filters. Here's how to set them up:
1. Select "Users" from the left sidebar
We're now going to explore the third tab in that menu.

2. Select the "Data restrictions" tab
This is where you'll define which records different user groups can see.

3. Click on the "Add restriction" button
Let's get started.

4. Select a data source
The restriction will apply to a specific table within your chosen data source, whether that's a Softr Database or a connected source like Airtable.

5. Select the base and table the restriction will apply to
Click "Next" once you've selected the appropriate base and table.

6. Select the user group and restrictions
Choose the user group you want to restrict from a dropdown, then configure the restrictions you want to apply. Once done, click "Save."
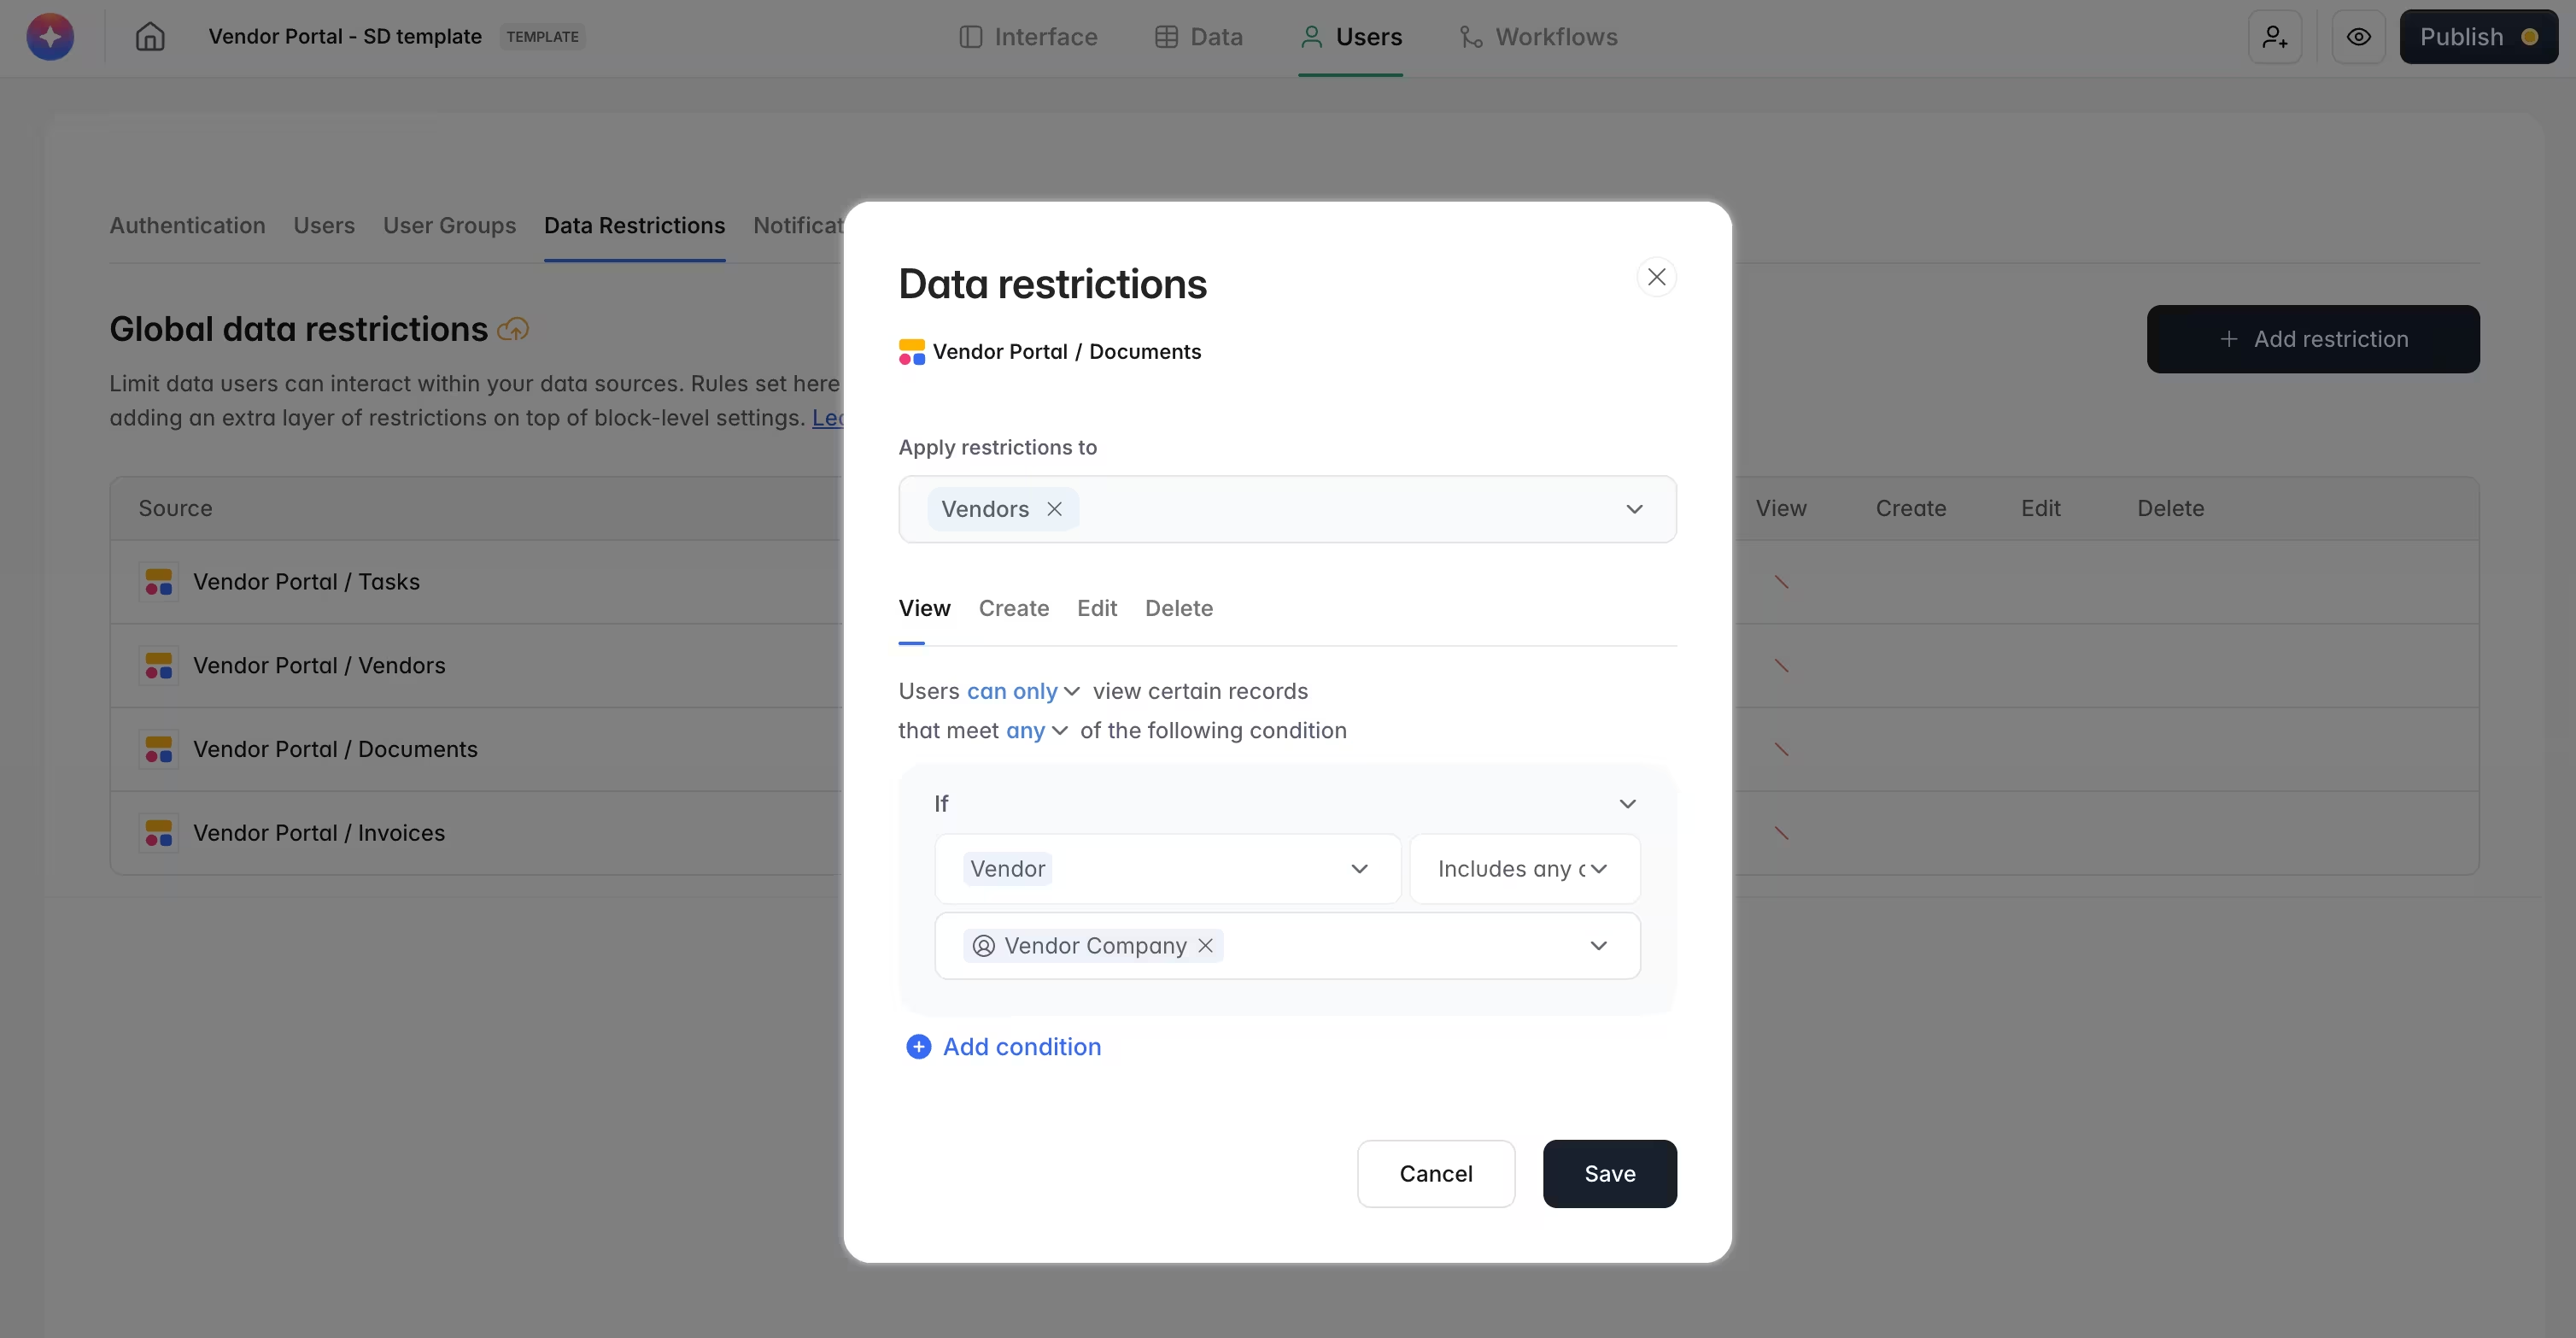
That's it. To learn more, check out our Help Docs article on global data restrictions on Softr.
Building this beyond permissions
Getting permissions right is usually just one piece of a larger project: replacing a spreadsheet-based process with a real internal tool or client portal. Once your user groups and data restrictions are in place, the same Softr Databases or connected Airtable base can power dashboards, database AI agents that enrich records automatically, and workflows that notify the right people when something changes, all respecting the same permission rules you've already set up.
If you're evaluating whether to keep building on Airtable's native permissions or add a layer like Softr on top, start with the use case that's causing friction today (a client asking for view-only access, a manager who shouldn't see other departments' data) rather than trying to solve every permission scenario upfront.
Frequently asked questions
Can you set Airtable permissions per table?
How do you set user permissions for a specific Airtable base?
What fields can you edit permissions for in Softr?
Does Softr support custom user groups beyond Airtable's four roles?
Can I hide specific records from certain users in Airtable?