How to move from Google Sheets to a database: A step-by-step guide


A client emails you complaining that their invoice is wrong. You open the Google Sheets finance file and find the problem: last Monday, someone pasted fixed prices on top of a column that used a formula to calculate totals. Your invoices have been wrong all week.
That's the spreadsheet's greatest strength showing up as its biggest liability: it accepts anything anyone enters into a cell without question. You could ban everyone from touching column K, but moving your Google Sheets to a database is a better option. It rejects anything that breaks the rules, so small mistakes don't snowball into client-facing incidents.
This guide covers the entire process of moving your data, from structuring and cleaning to importing and building apps on top of it. You can follow along with a sample sheet if you'd like to practice before touching real data.
When should you move from Google Sheets to a database?
You should move from Google Sheets to a database when the sheet has gone from being a simple list to being business infrastructure, something you rely on to keep everything running. More than just high row counts, look for these signals around data quality, collaboration difficulty, and using so many formulas that the setup is under strain.
Your data is scattered or duplicated. When sales, finance, and leadership each keep their own customer list, there's a high chance that most of the data won't match. This leads to a lot of searching, emailing your team, and manual work when closing projects and sending invoices.
Your data is unreliable. If nothing stops someone from typing text into a project price column or pasting over a formula, a simple distraction can turn into serious disruption, followed by a troubleshooting session. This kills momentum and reduces trust in the tools.
Multiple teams collaborate on the same sheet. As you grow, some teams have wider access to view and write certain types of data, while others should still be able to interact but not as freely. Google Sheets' three core access roles can't cover complex permissions, which can either create a setting where more mistakes happen, or teams get fenced out of the data they need to work.
You're "hacking" Google Sheets. Adding formulas to your sheets makes sense, but only up to a point. The risks increase with dozens of formulas in the same file, leading to slowdowns and data loss if one cell doesn't have the expected value.
If several of these sound familiar, it's time to plan a move. Google Sheets is still the right tool for simple lists, calculations, ad hoc analysis, smaller datasets, and one-off projects. For everything that's critical infrastructure, you're better served by a database.
What changes when you turn a spreadsheet into a database?
When you turn a Google Sheets spreadsheet into a database, two major changes happen. Your data is split into separate tables, with each record stored once and linked together, keeping it organized and easy to interact with. Beyond this, databases introduce rules for every field, rejecting values that don't fit, maintaining data integrity over time.
You'll be storing each thing only once. Tables hold one type of thing: the customers table only stores customers, and the projects table does the same for projects. Each row stores one instance of that table's type: a customer, a project, an invoice. You can create as many types as you need to cover everything that you need to store. Whenever you're looking for a specific customer, you know that there's only one record to find.
Since you'll have a table for each type of data, your data will be organized by default. Databases allow you to link records together, so updating your customer email on the customer table will instantly show on every connected record, such as in their projects and invoices. You can't forget to update other tables: it's already done for you.
When setting up your database, you determine rules on what each field will accept. Product prices won't accept text entries; due dates will error if someone just types "14." These rules also determine what the values can do: numbers can do math operations, images can be displayed, and URLs come pre-formatted to be clickable, for example.
How to move from Google Sheets to a database
Moving your spreadsheets from Google Sheets to a database starts with good planning: audit your data, pick a database platform, design a data structure, and prepare your records. Next, you'll run the actual export and import actions, followed by a data check and linking records together. Lastly, you'll use your new database to rebuild existing workflows and set up new apps.
Take your time with this process: each step builds on the previous one, so a small mistake earlier could lead into a frustrating loop of fixes later.
We'll use an example throughout this guide: migrating a Google Sheets file with three tables (Customers, Projects, Invoices) to a Softr Database. If you'd like to have a practice run before working on your own data, you can make a copy of this example file (File > Make a copy) and follow along.
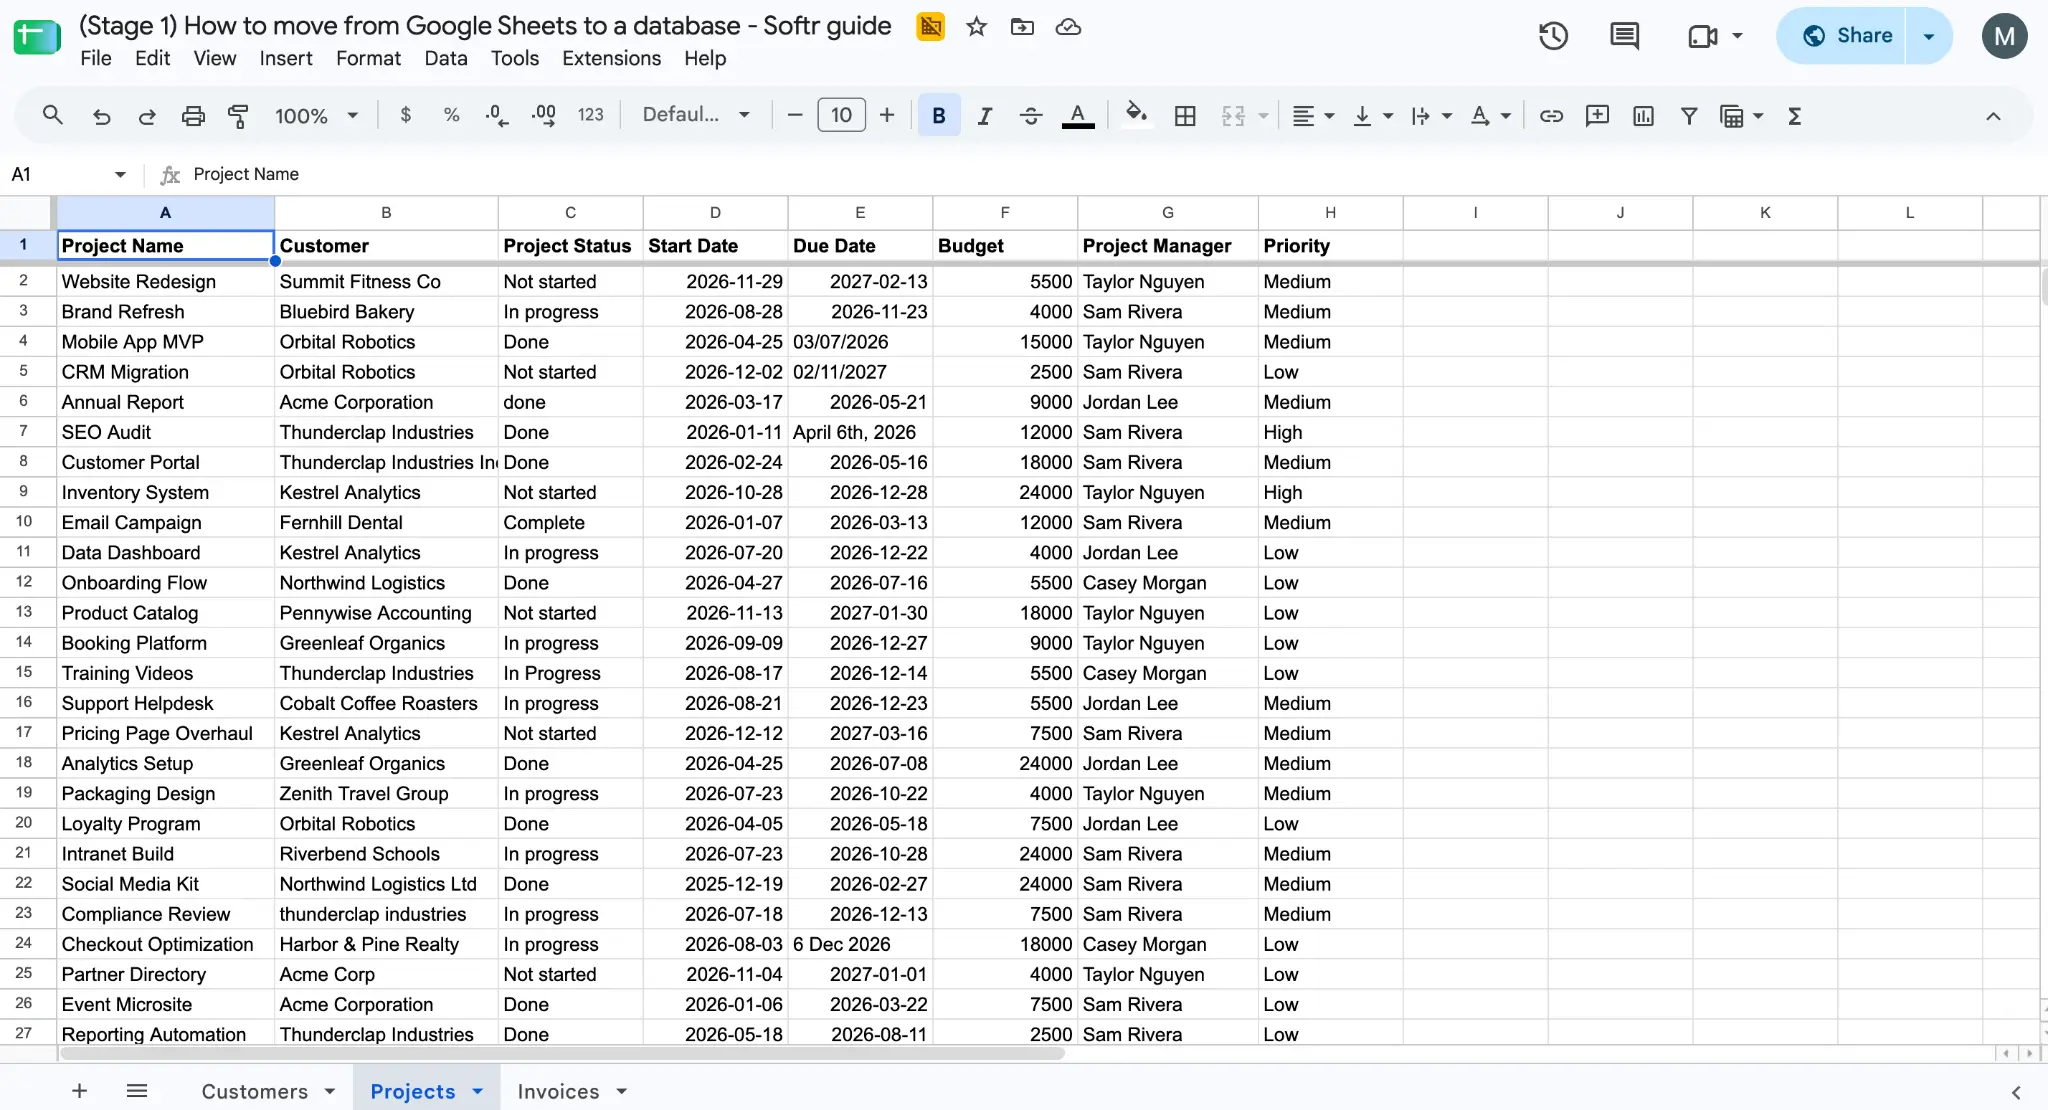
By the end of this guide, we'll also use Softr to build four tools on top of the three migrated tables: a client portal to help customers manage their own projects and invoices, a project tracker, an invoicing dashboard, and a simple CRM.
1. Audit your existing Google Sheet
Start by fully understanding the content of your Google Sheets file. This will help you build a good mental model of the data, so you make better decisions when setting up your new database.
1.1 Create your planning file and data model
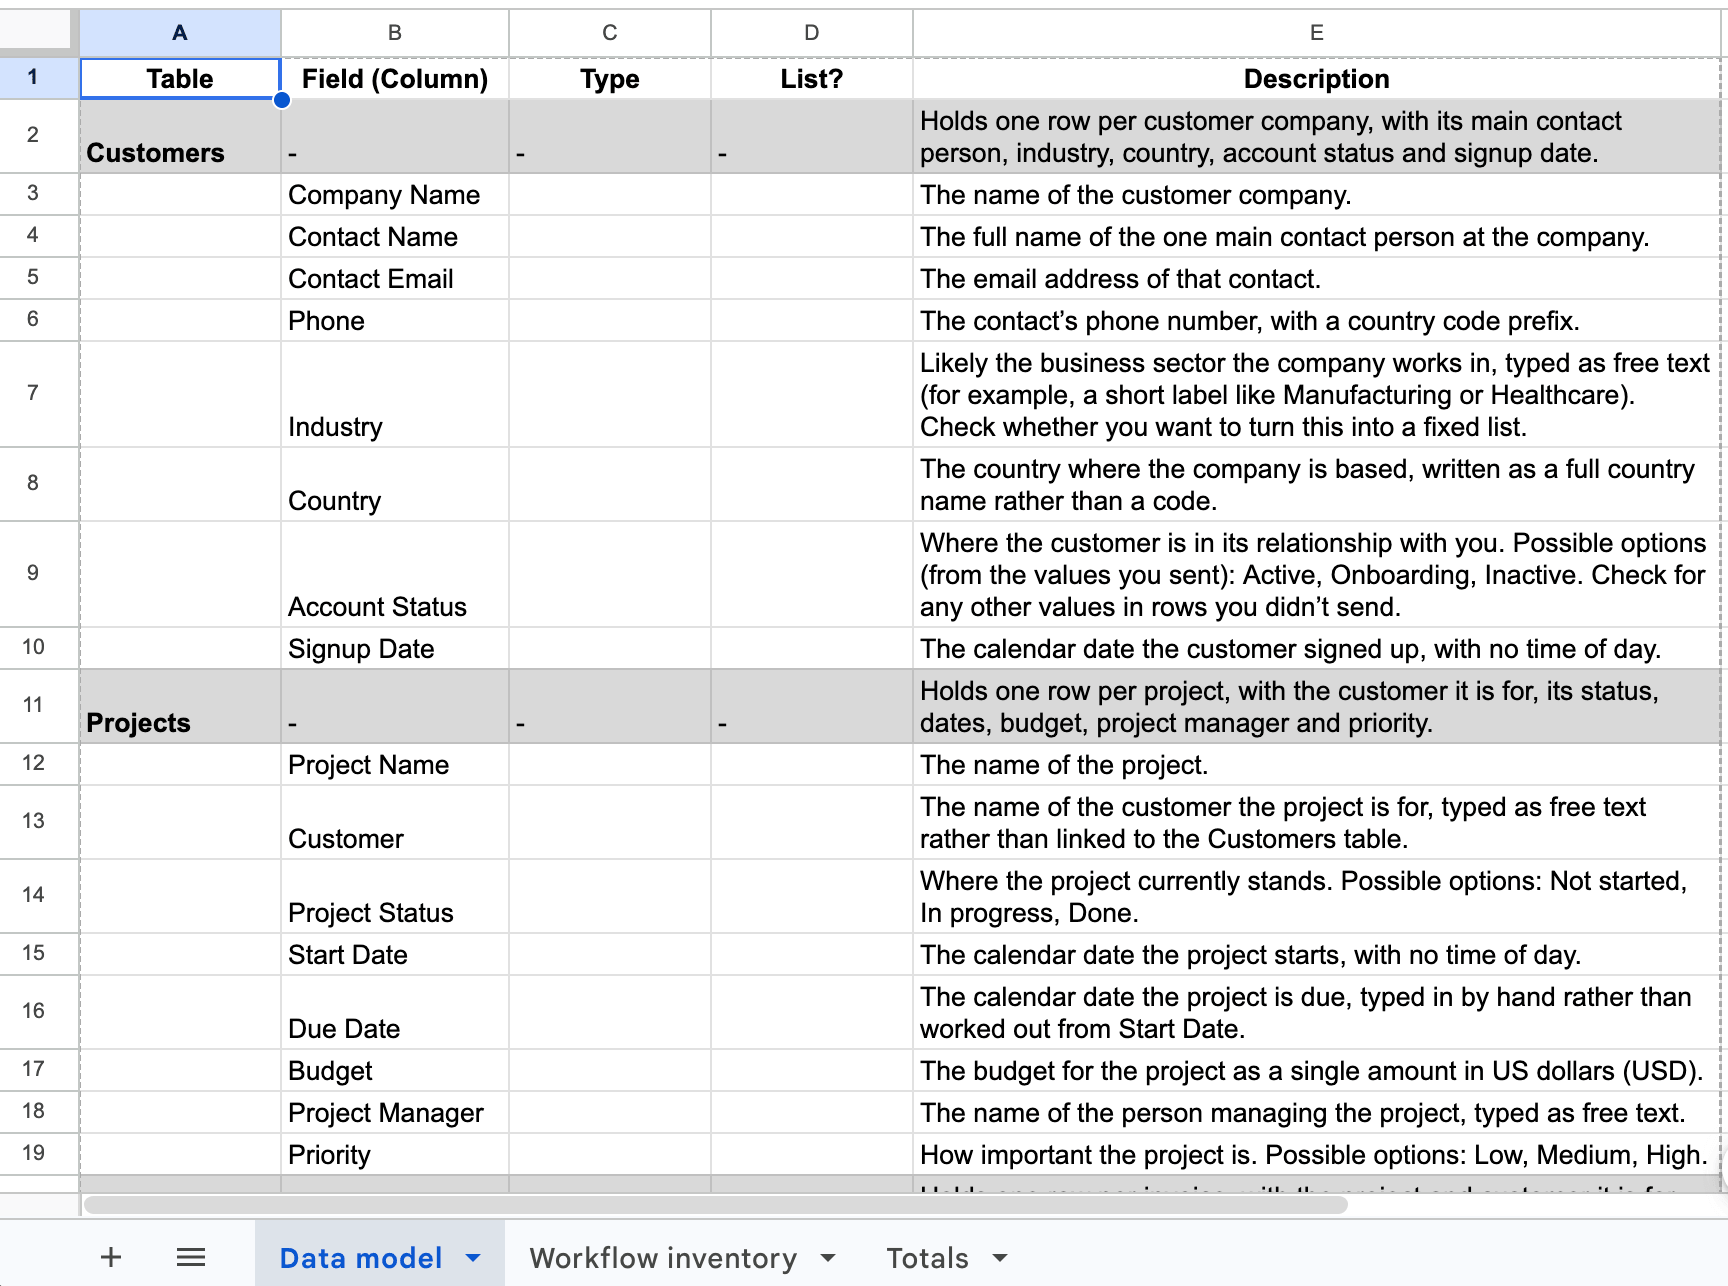
Create a planning file with a table outlining the structure of your tables, also known as a data model; you can use a Google Sheets file to do this. Copy the structure of the table below into your planning file. Ignore the Type and List? columns for now.
Tip: If you want to save time, copy this prompt and paste it into your favorite AI chatbot along with the header row of each of your tabs (do not paste actual data into the chatbot) and a short description of what each formula does. You'll get a pre-filled table you can paste in your planning file; remember to check the output to make sure it's accurate.
Here’s what a filled-out data model for our example project looks like. View the planning file here.
1.2 Make a copy of the live Google Sheets file
As a safety net, you should be working on a copy of the main Google Sheets file. Make a copy, name it accordingly (“database migration copy - do not use”), and move it to a folder in a different location. You'll migrate this copy first, and then update your database with any new records created or edited while you were working on this project.
1.3 List all workflows and integrations that touch the spreadsheet
Next, make a list of all forms, views, and workflows that touch this Google Sheets file, as well as a list of people or departments who have access and interact with it. This will give you a map of everything that you need to adapt so there's minimal transition friction.
You can also store this in your Google Sheets planning file in a separate tab, as we're doing here.
1.4 Record key totals
To make sure the data uploaded into the database was successful, record total numbers for rows and important values so you can compare them at the end. For our example, here are the important totals:
- Total customers: 17
- Total projects: 30
- Total invoices: 40
- Total invoice amount: $269,500
Save these to the planning file so everything is organized in one central place. Keep it close as you'll be checking and updating it frequently.
2. Choose your database platform
After the audit, you should choose your database platform, as that affects all the decisions you make from here on out. The available options vary greatly in terms of technical complexity.
The most complex are traditional SQL databases, such as MySQL. Despite being the most cost-effective option at a large scale, these require deep technical knowledge to set up, run, and integrate with your apps.
Cloud databases, such as Supabase, offer a faster setup and manage the hardware for you when compared with traditional SQL. While tech-savvy users can learn how to use this database type, non-technical users will struggle to understand the fundamentals and will have a harder time taking full advantage of the platform.
No-code databases, such as the one offered by Softr, are the most accessible option for non-technical users. The entire setup and management process happens in visual interfaces, with easy tools for importing and using your data.
If you're not sure which one to start with, a no-code database is the best option; if you need to move to a more complex platform later, the migration process is much simpler when compared with starting from Google Sheets.
3. Plan your database structure
You already built a data model in step 1 of this guide based on what your Google Sheets currently has. We'll now expand and fine-tune that initial model to adapt it to the way a database works, starting with forming relationships between data (hence the term "relational databases") and later linking records together.
3.1 Planning data relationships
In this guide's example, we have three tables in a single Google Sheets file: Customers, Projects, and Invoices. The relationships are:
- One customer can have many projects, and each project belongs to one customer.
- One project can have many invoices, and each invoice belongs to one project.
Sometimes a field on a table can have many relationships, such as people and the projects they work on (one person can be working on multiple projects; a project might have multiple people working on it). When that happens, add a relational field on both tables.
It's tempting to create a lot of relationships from the start, but I recommend you don't: they will add bloat to your table. If they end up not being used, they'll create confusion when building new features or apps on top of the data. It's best to add new relationships as needed when you're building new workflows, apps, or forms.
Update your planning file with the relationships that you want to create. Add new rows for each relationship you want to create and fill out the Type column with "Related to [table name]":
The List? column keeps track of whether a field points to one record or a list of records. In this example, it allows a customer record to have a list of projects associated to them. Fill out this column with yes or no depending on whether you want to relate multiple records in another table to a single record in this one.
3.2 Add unique IDs to your records
To point and link records to one another, they need to have a unique ID. Google Sheets has row numbers, but these aren't actually bound to the record itself, as these can shift if you sort your data, for example. The solution is, for every table that you have:
- Create a new column named "[table name] ID" (for example, Customer ID)
- Type 101 in the first row and 102 in the second row
- Select both rows and drag the fill handle all the way until the last record to continue the sequence
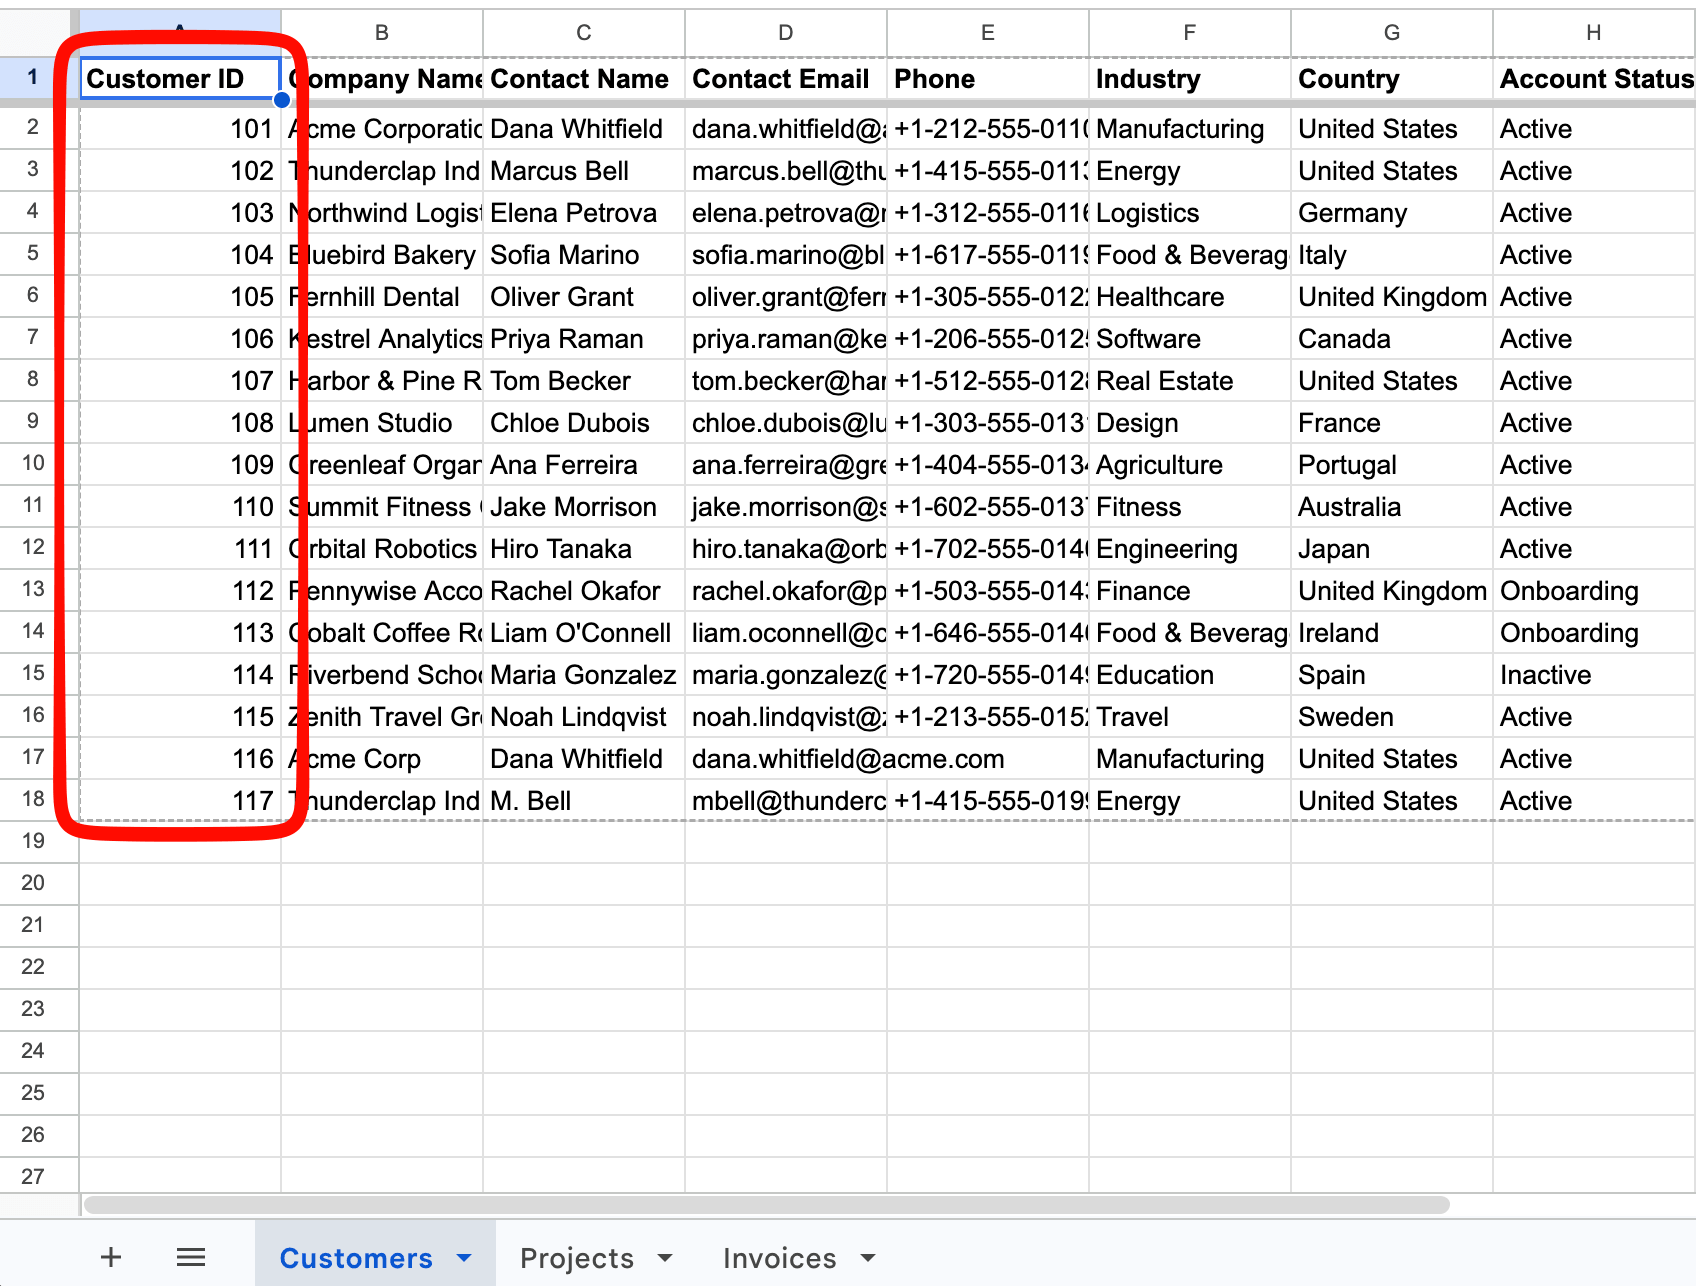
Use a different number format for each table, such as 2001/2002 for Projects, as this will help you tell apart quickly whether an ID refers to a customer, a project, or another type of data. The Invoices table already has a column that we can use as a unique ID (Invoice Number).
3.3 Create a matching key to link records later
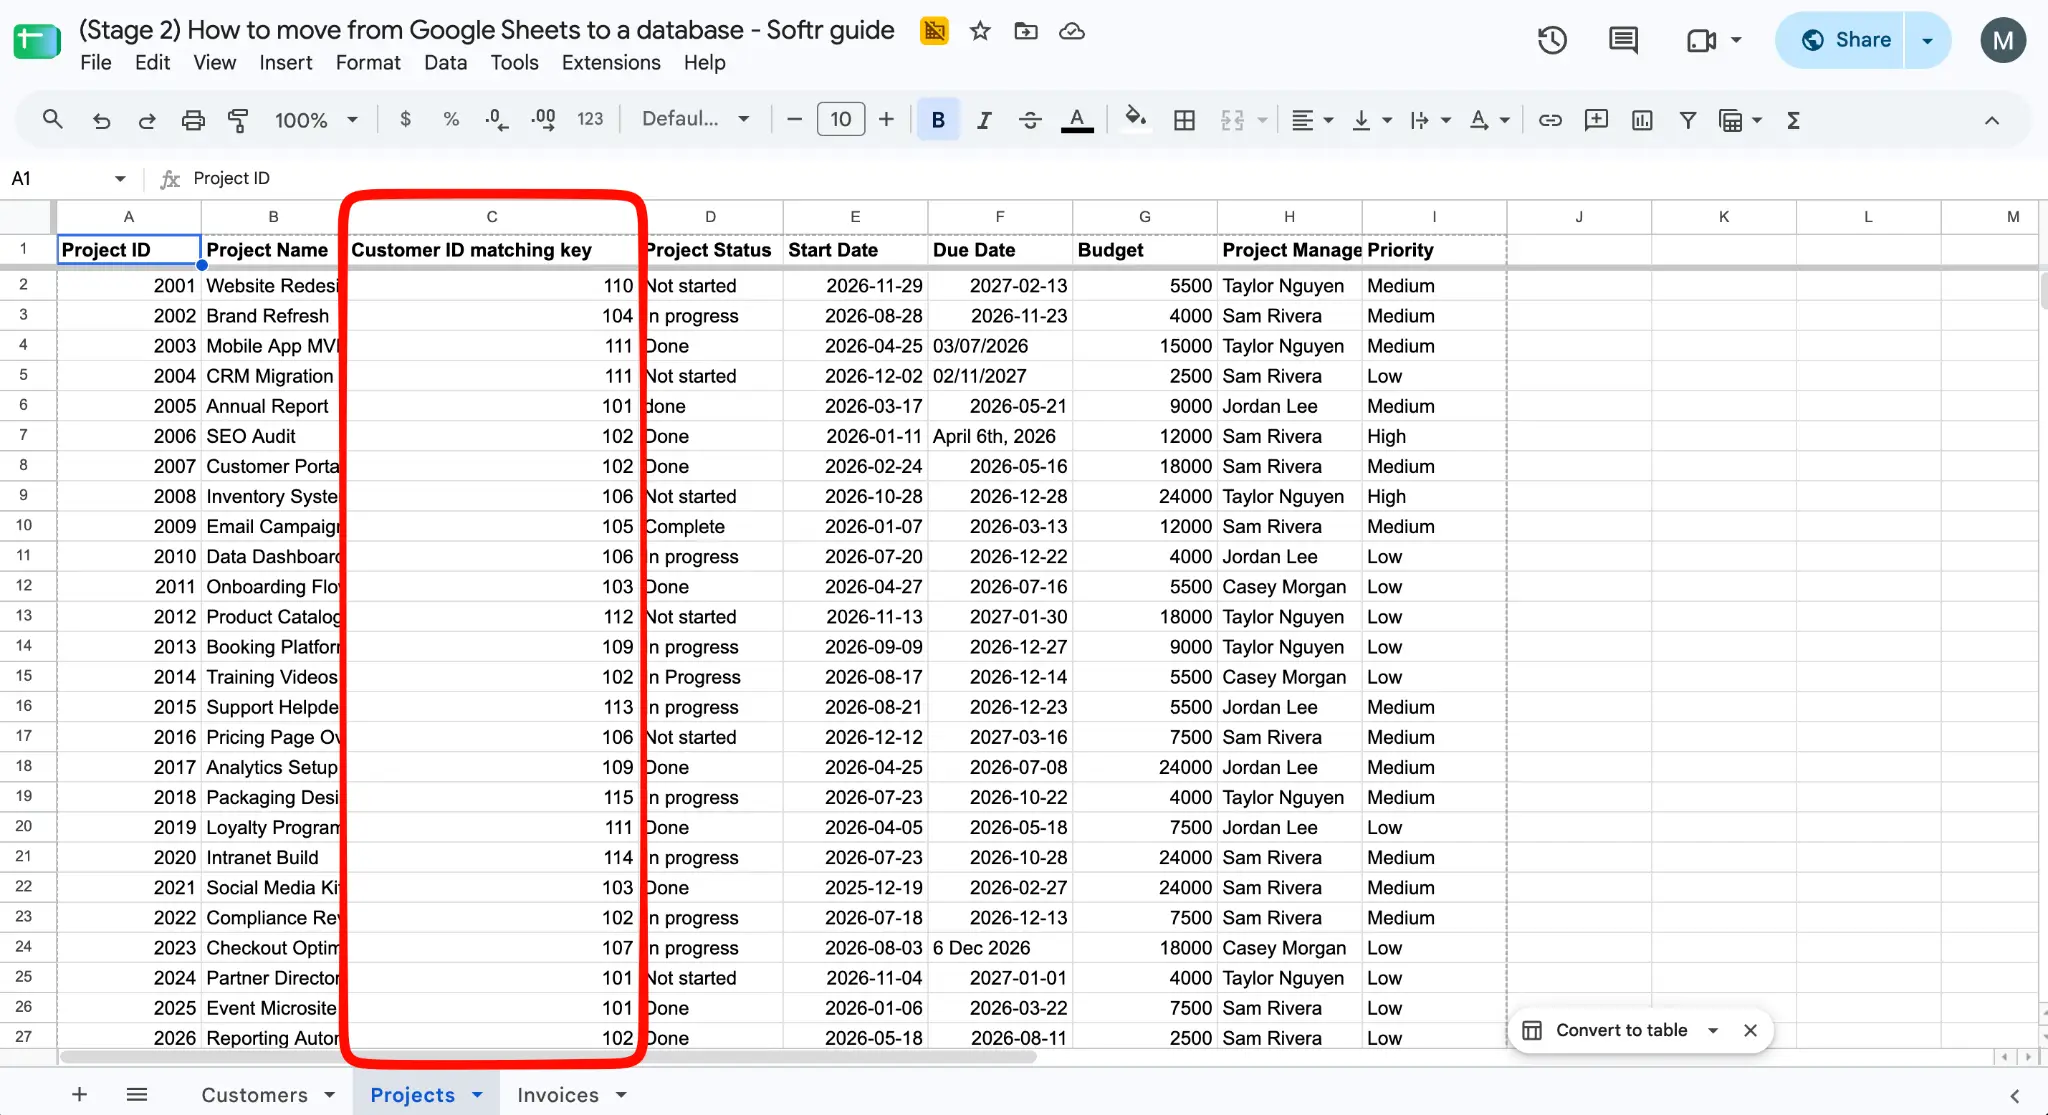
Now that each row has its unique ID, it's time to create the matching key columns. This will help when connecting related rows after you finish uploading your tables into the database. Since Projects will be connected to Customers:
- In the Projects table, create a "Customer ID matching key" column
- For every row in Projects, fill it with the ID of the customer that project is related to
- If multiple records in one table belong to a single record in another (for example, many projects belong to one customer), add all of them separated by commas
The example planning file shows how the final view once all the matching keys are filled out.
3.4 Set data types
With relationships and matching keys in place, the last step is to flesh out the data types. This determines what kind of content the database will or won't accept for each field. Data types vary depending on the database technology that you pick. Common data types include:
- text, for storing any kind of text such as customer names or descriptions
- number, which can store inventory counts or times called
- date, which stores date and time information for due dates or start time
If you're migrating your data into Softr Databases, refer to the documentation to find all the available field types. Fill out your planning file's Type column with the data types that best match each field, as we did in the example file.
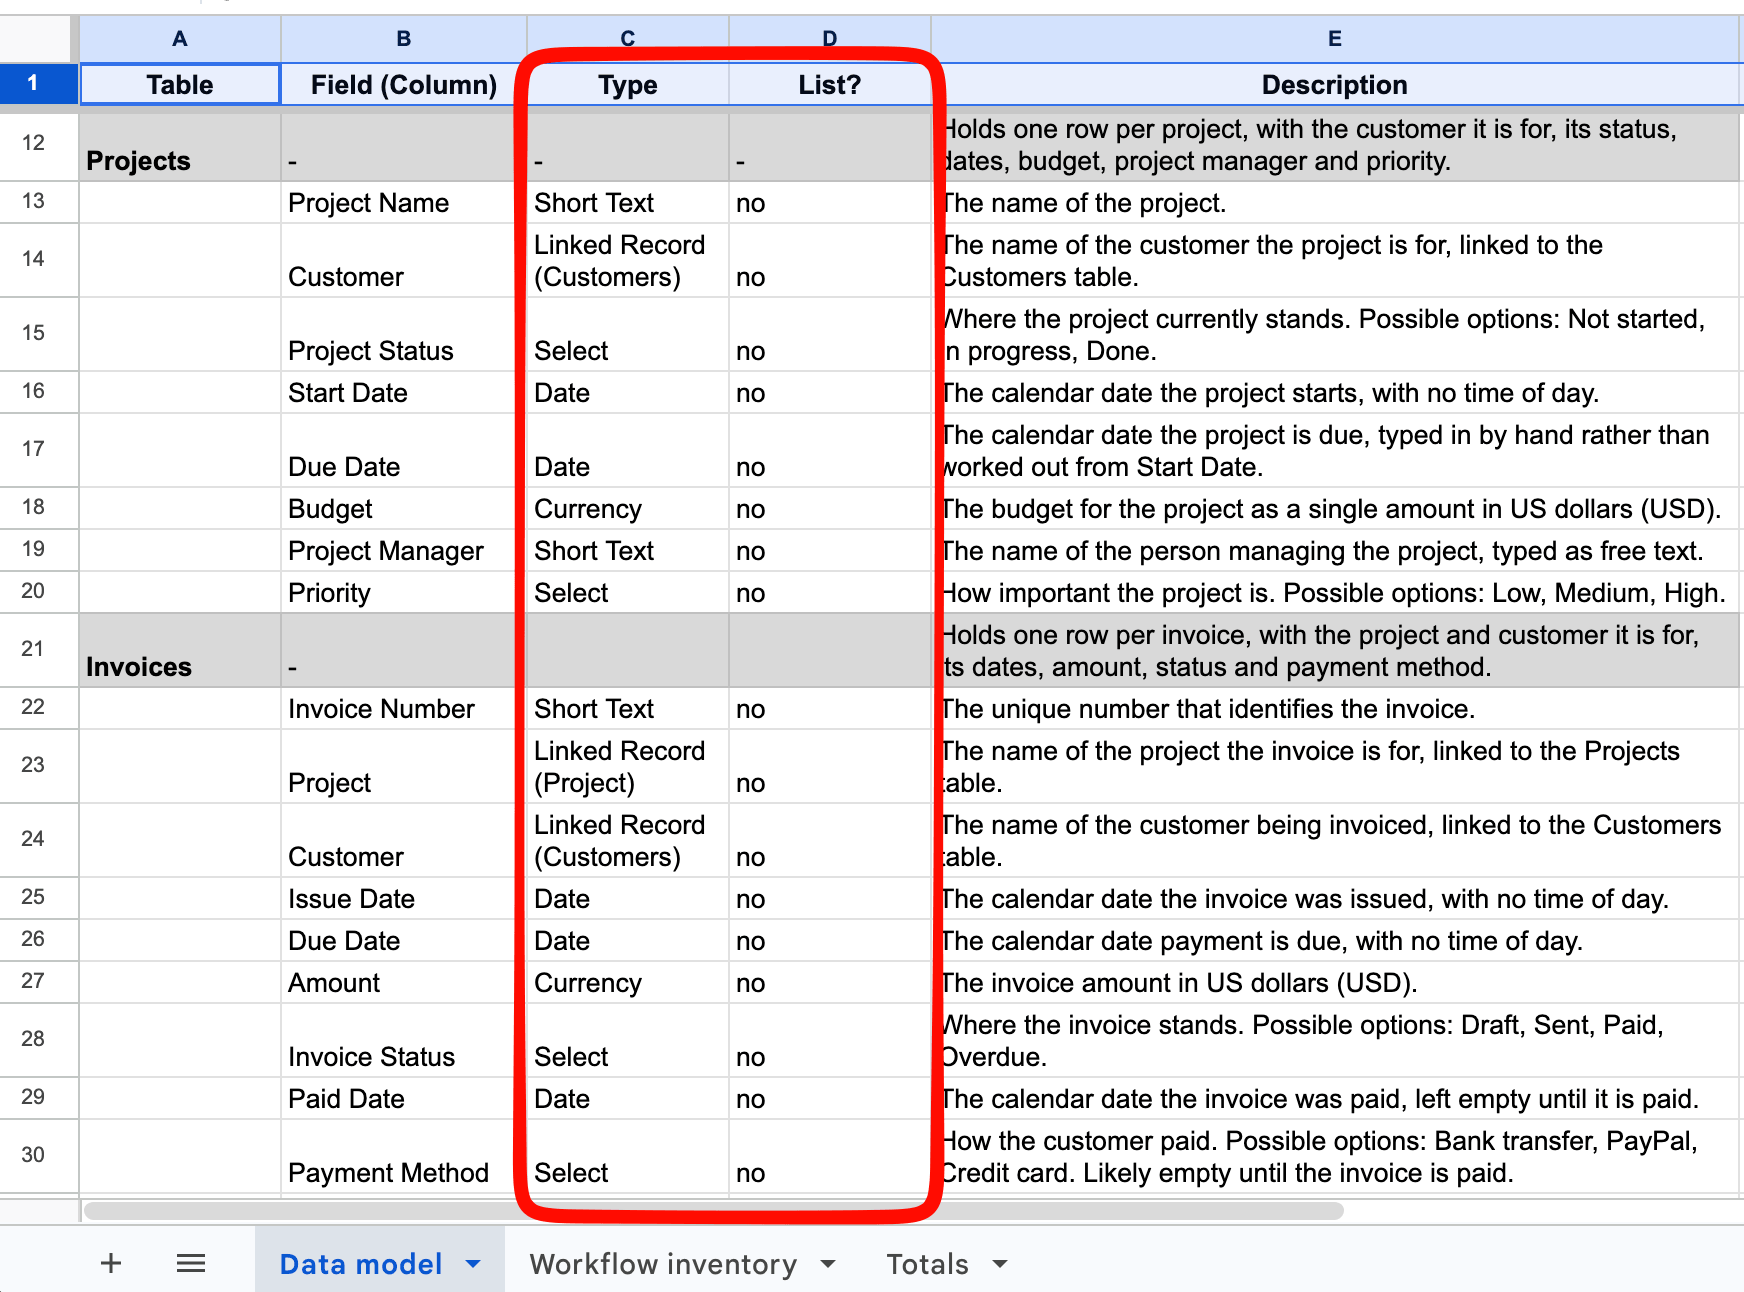
Note that the field name in Softr is "Linked Record [table name]" instead of "Related to [table name]", but the meaning is the same.
4. Clean, standardize, and restructure your data
With data types set, the next step is cleaning and standardizing your original data to prevent import errors.
- Merge duplicated records. This can be customers that were previously saved with multiple names, such as "Acme", "Acme Inc", "Acme Incorporated" in three separate records. Decide on one name and delete all duplicated records.
- Standardize dates and other fields with structured data. If you weren't using a formatted field in Google Sheets, people might have been saving "May 4th", "4th of May", or "04/05". Read your database's documentation to see if it expects a specific format; if it doesn't, pick one and make it consistent across all records.
- Decide what happens with blank or missing fields. Some fields are meant to be blank, such as a payment date for a payment that hasn't actually come through. Others, like no contact details for a customer, may require you to look for that information and update it on the table.
- Separate combined information. For example, if your customer names included the company name and the name of their point of contact (like "Acme/John Doe"), create a new column to separate the data (company name would hold "Acme" and contact name would hold "John Doe")
- Run checks on IDs and relationships as you go: every table has an ID column that identifies each unique row; tables with data relationships have the ID of the record that's linked to it; no records are pointing to IDs that don't exist.
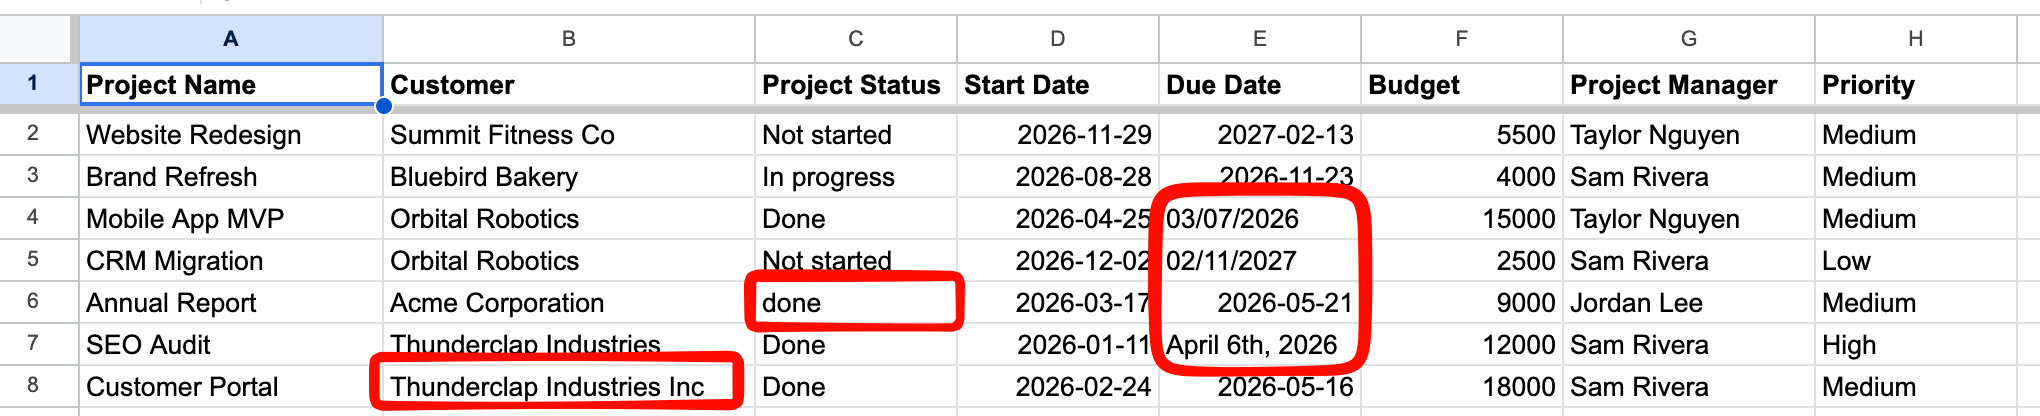
Depending on how many records you have, this can take anywhere from an hour to a week. For large datasets, you can do something as easy as marking your process by painting the row with a bright color between sessions. If you're working with others, create a new column labeled "processed" and set the options to "not processed" and "ready", and mark each row as you go. That's a slightly more robust option to prevent duplicate work.
Since you did deduplication during this step and some records might be gone, you need to check your totals again. In our example, merging the duplicate customers brings Customers down from 17 to 15, while the other tables and the invoice total stay the same:
- Customers: 15
- Projects: 30
- Invoices: 40
- Total invoices: $269,500
Update these values in your planning file and keep moving forward.
5. Export your data
Your data is clean and structured. If you're importing your Google Sheets file into Softr, you can skip to the next step. If you're importing into another platform, refer to the documentation of the database to see what's the file type that it expects. Most work well with CSVs, so we'll cover that method.
For each one of your tables (Google Sheets tabs), click File > Download > Comma Separated Values (.csv). Open each CSV file and give it a quick check: anything that's calculated or part of a formula is usually either missing or turned into a static value. Go back to Google Sheets and make any fixes to these values so they show up in the export, if needed.
6. Import your Google Sheets data
6.1 Option 1: Import Google Sheets into Softr Databases
If you're moving your data from Google Sheets to a Softr Database, Softr has a dedicated import tool for Google Sheets files that makes the import process easy and quick.
1. In the Softr dashboard, click Database
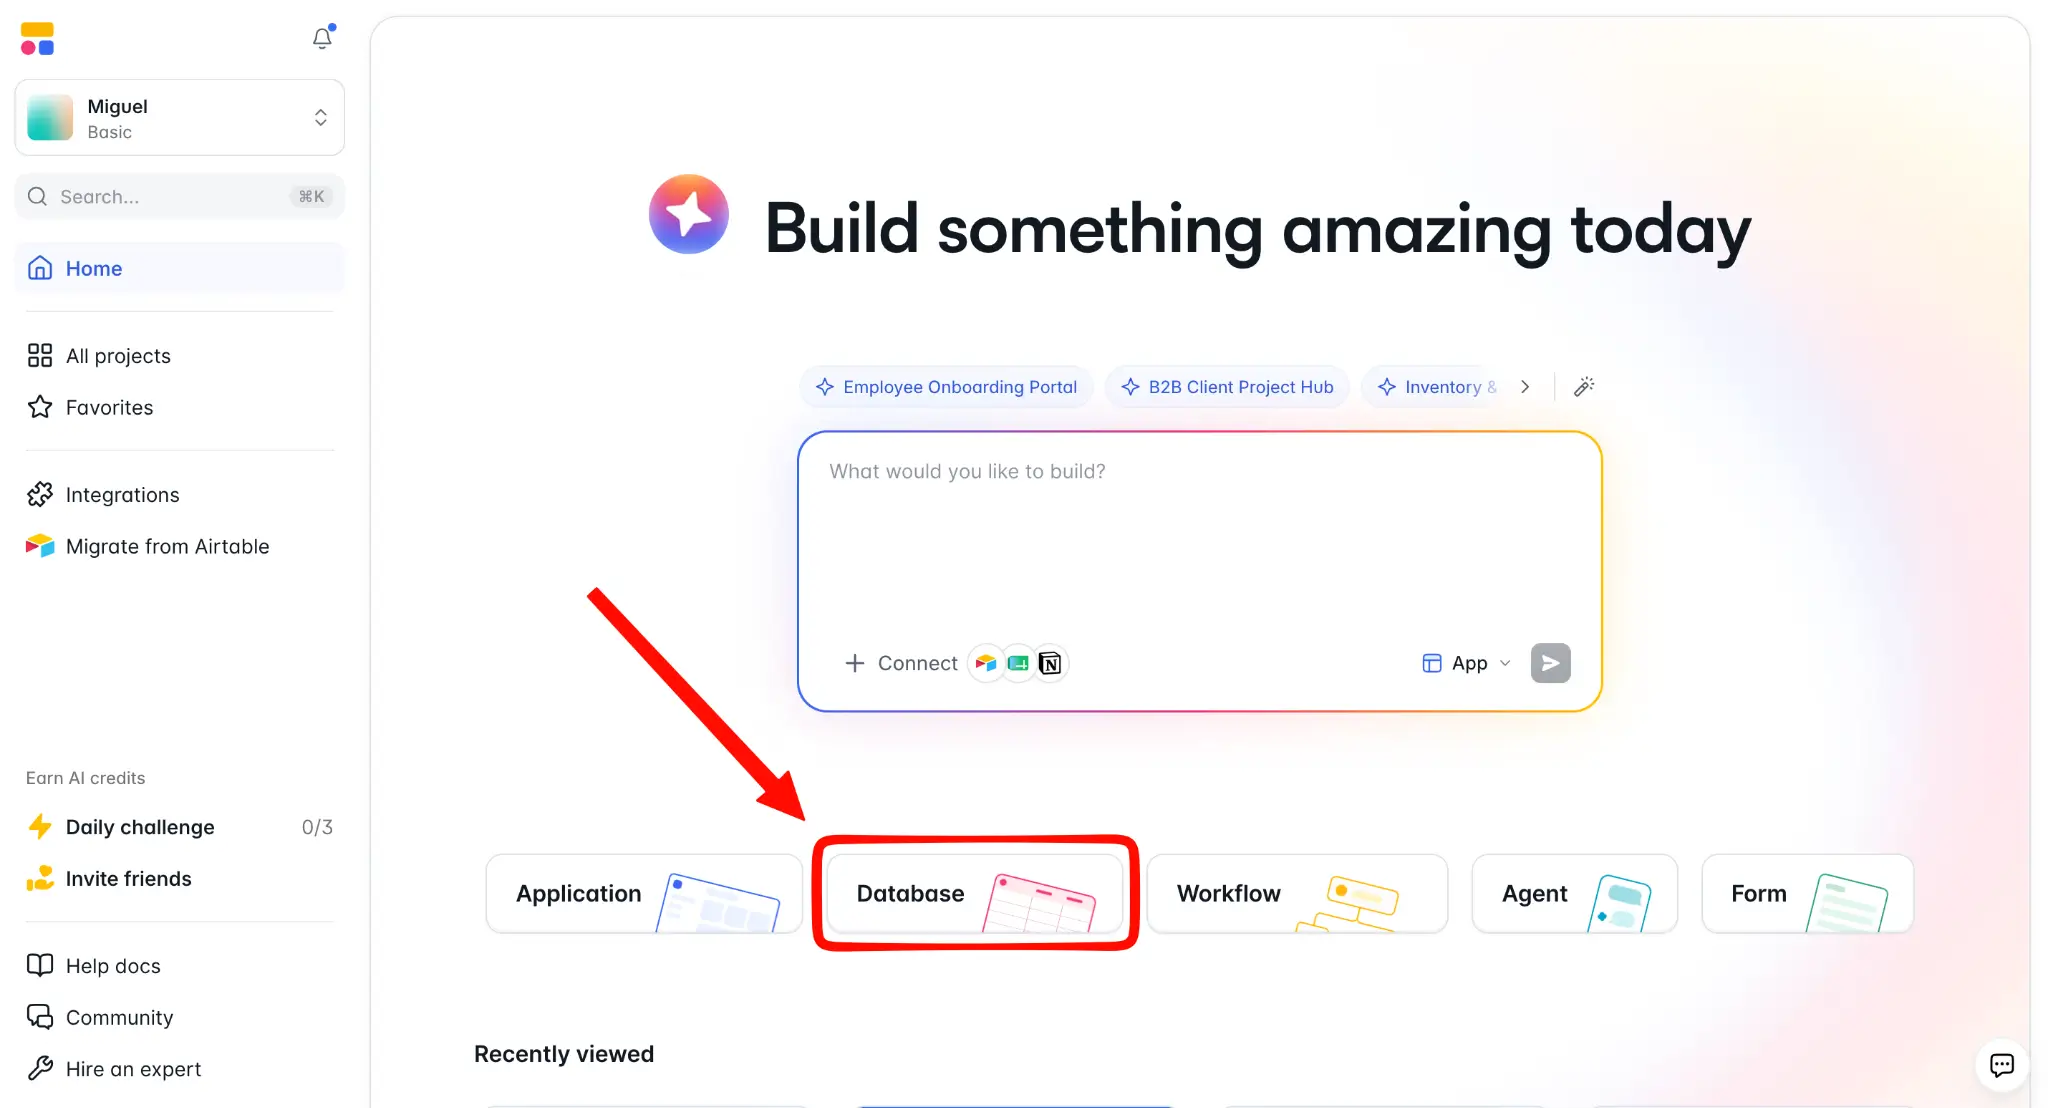
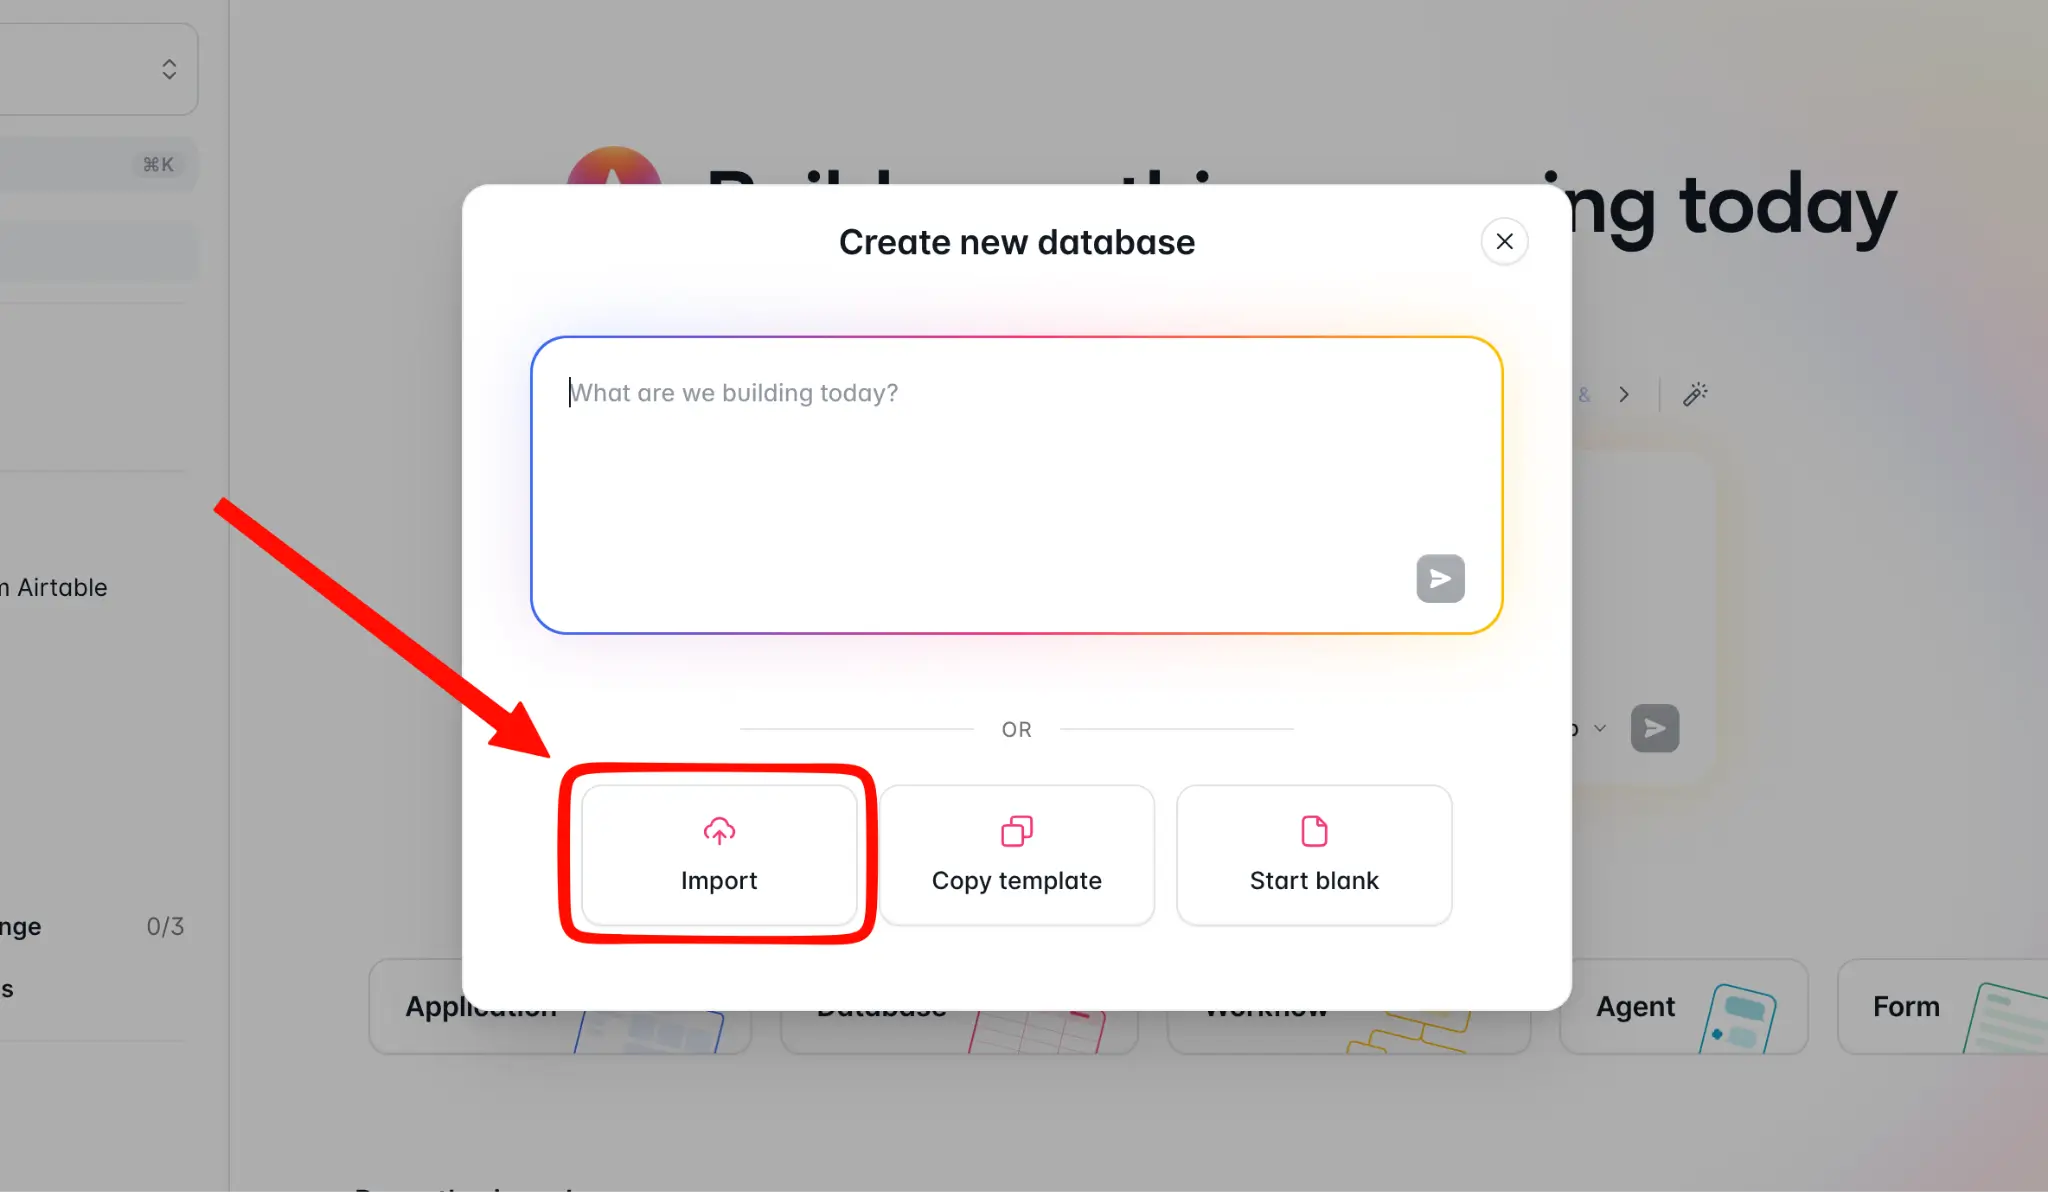
2. Click the Import buttoSelect Google Sheets
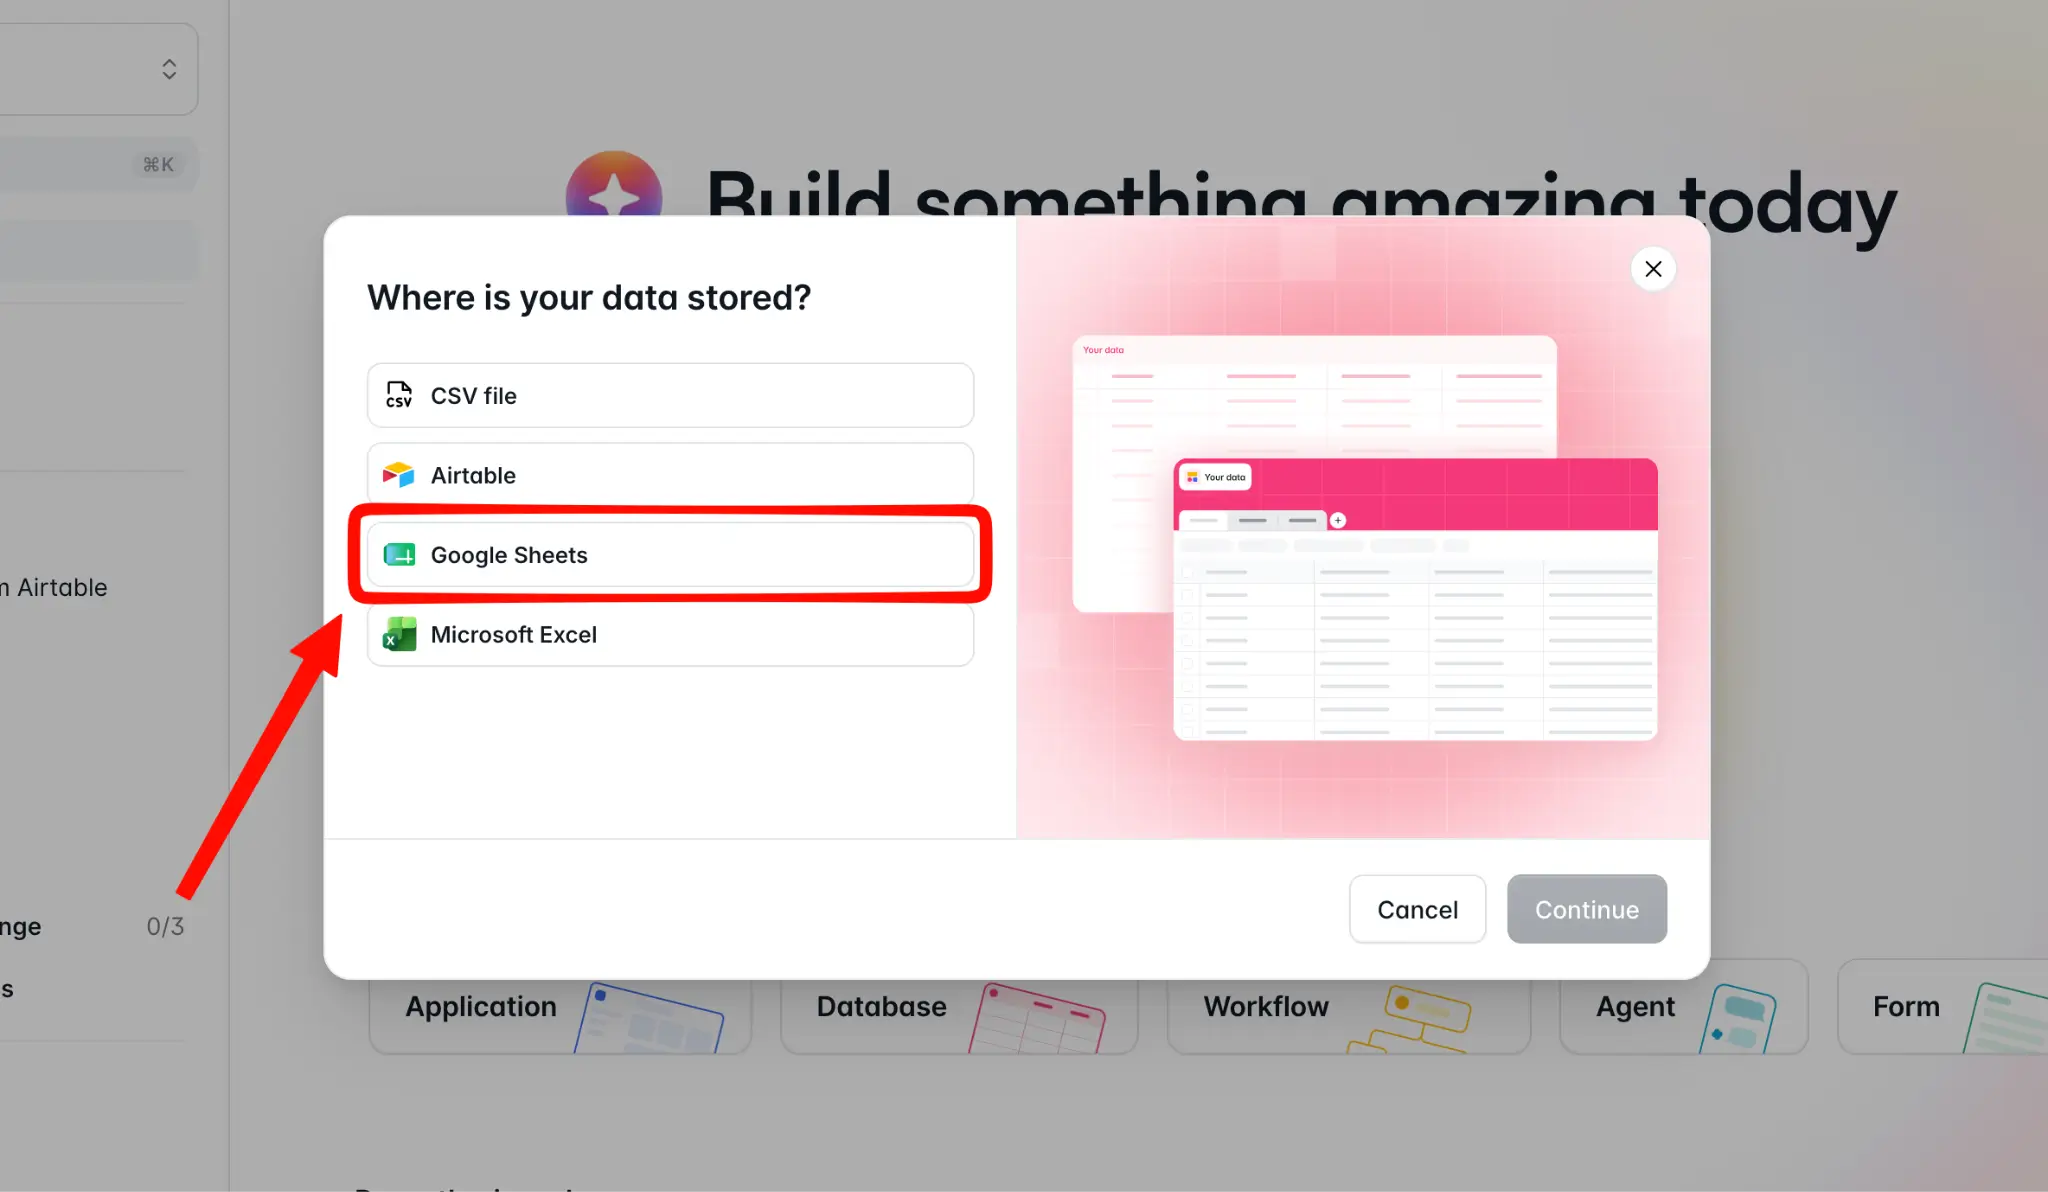
3. Select Google Sheets.
4. Connect your Google account to Softr.
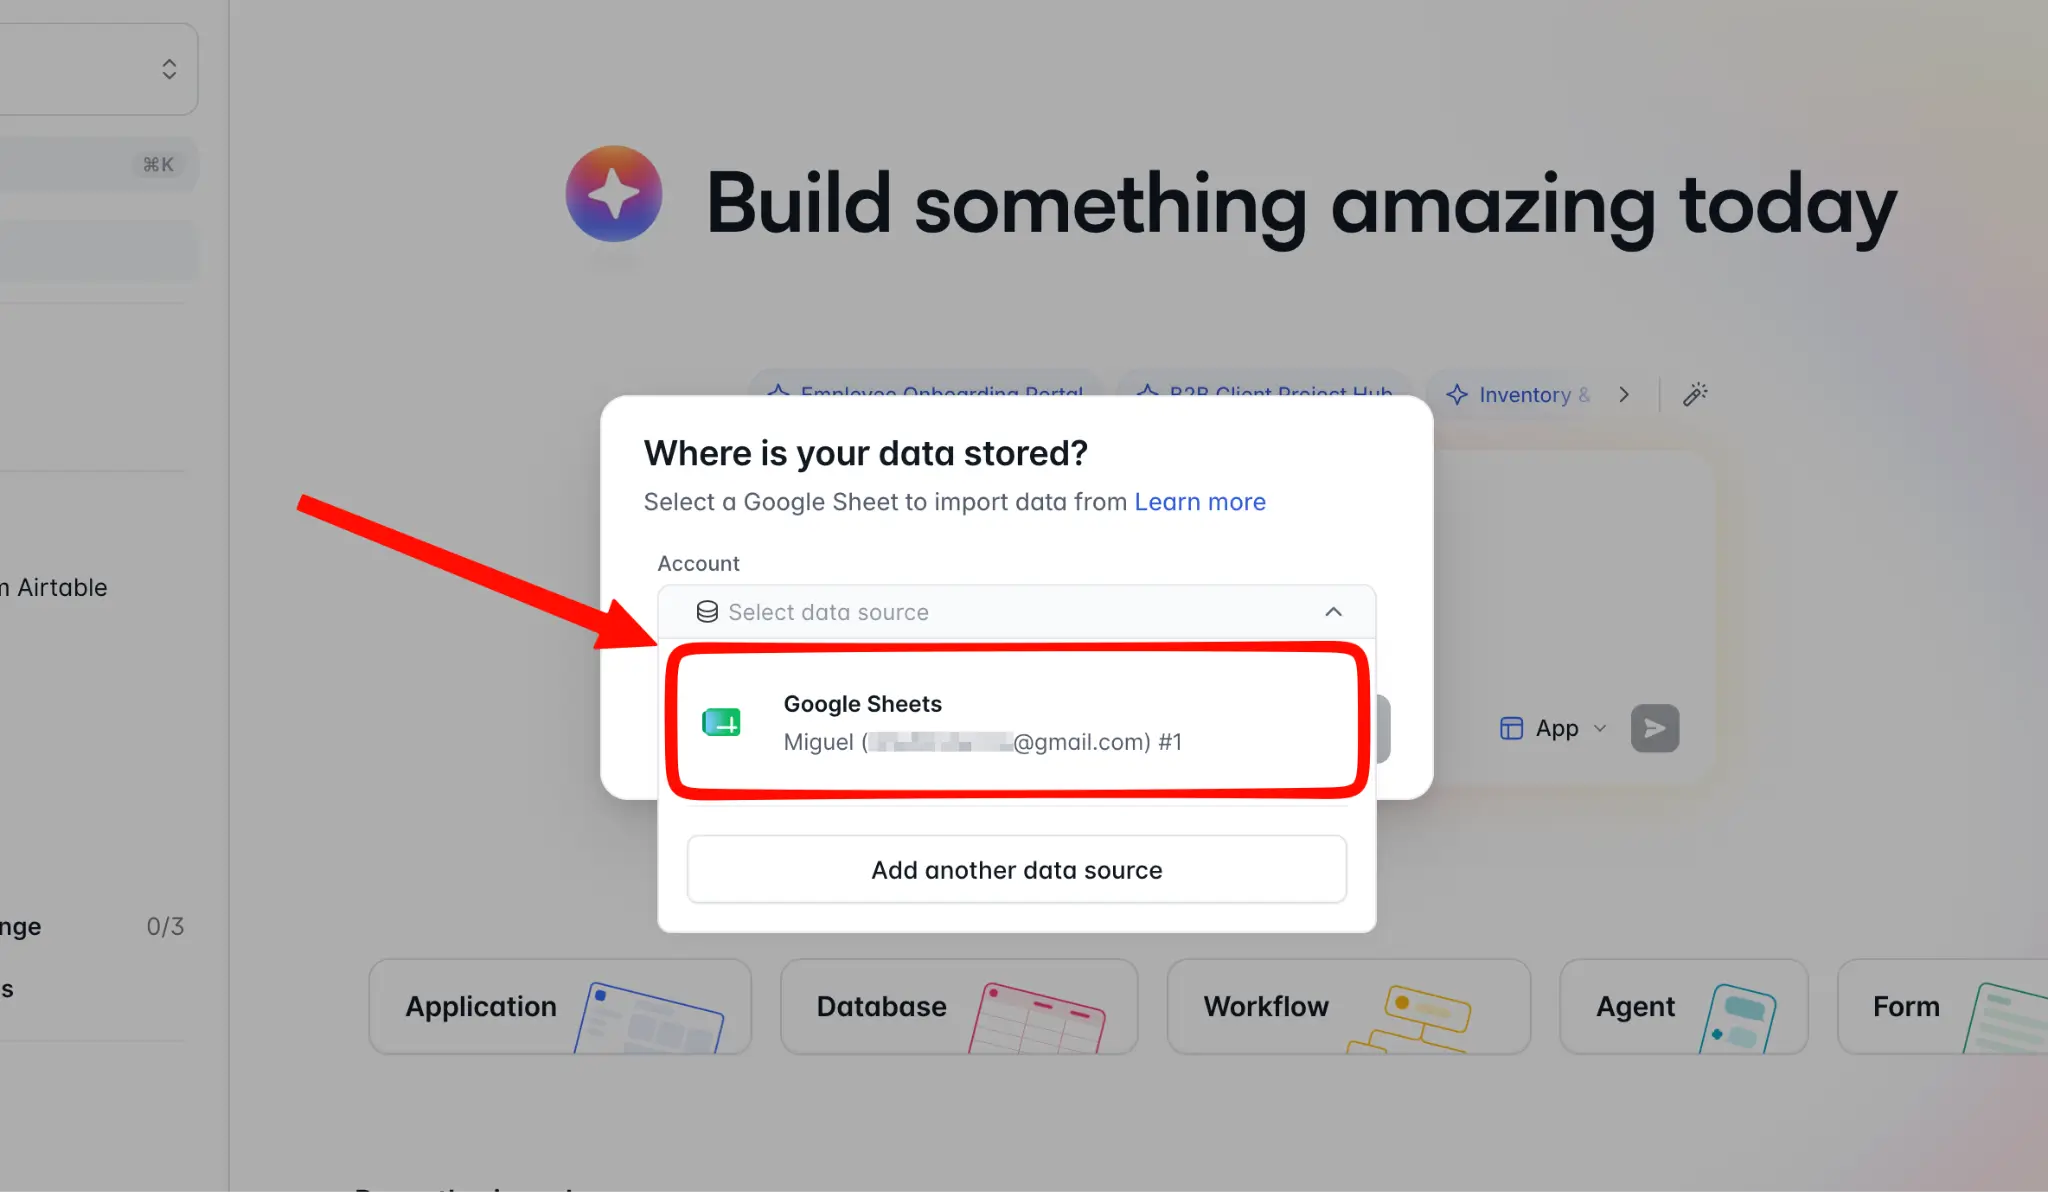
5. Click the Document dropdown and select your Google Sheets file. If it's not immediately showing, click the Add a new file option to open the Google Workspace file browser.
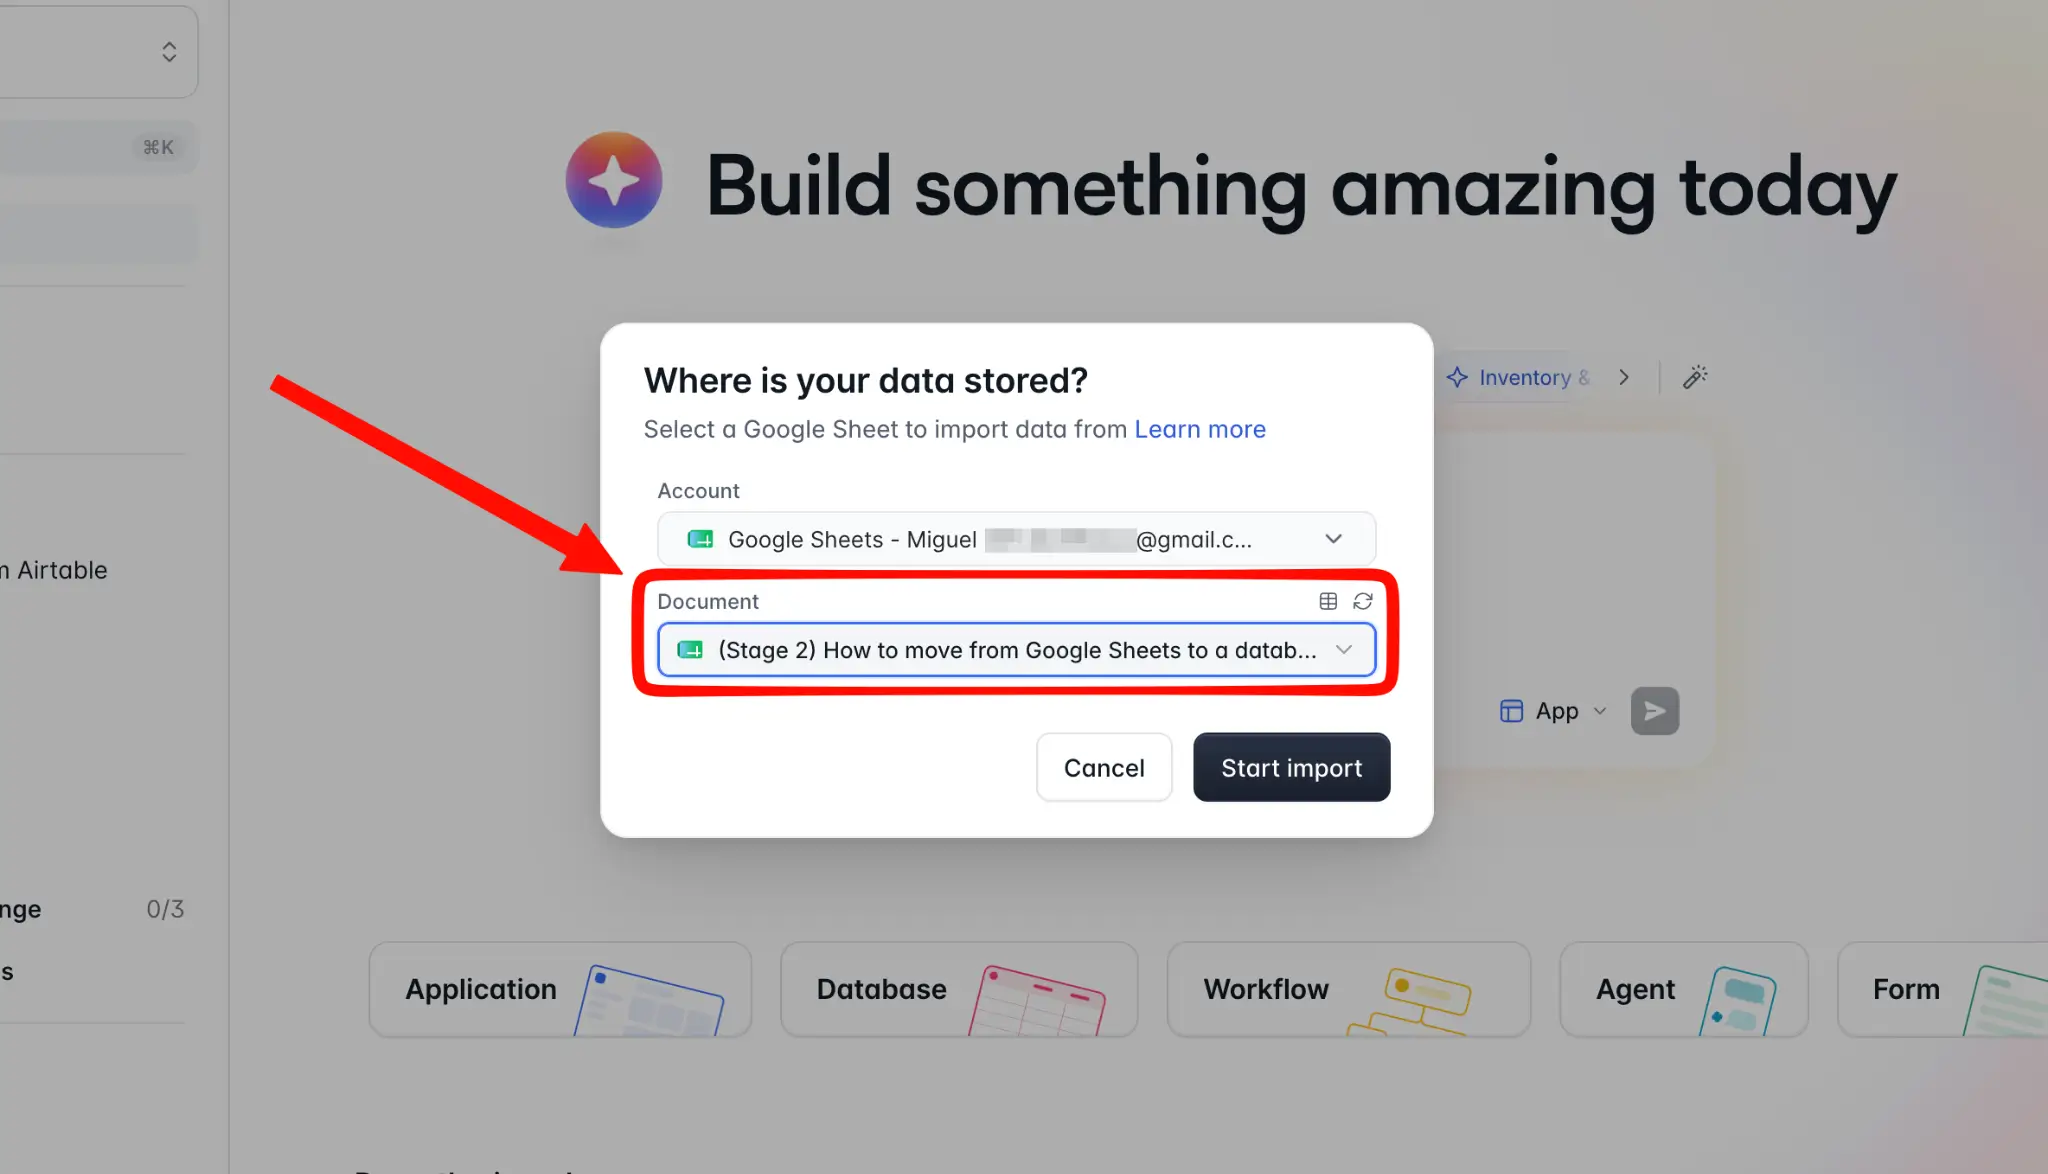
6. Click Start import.
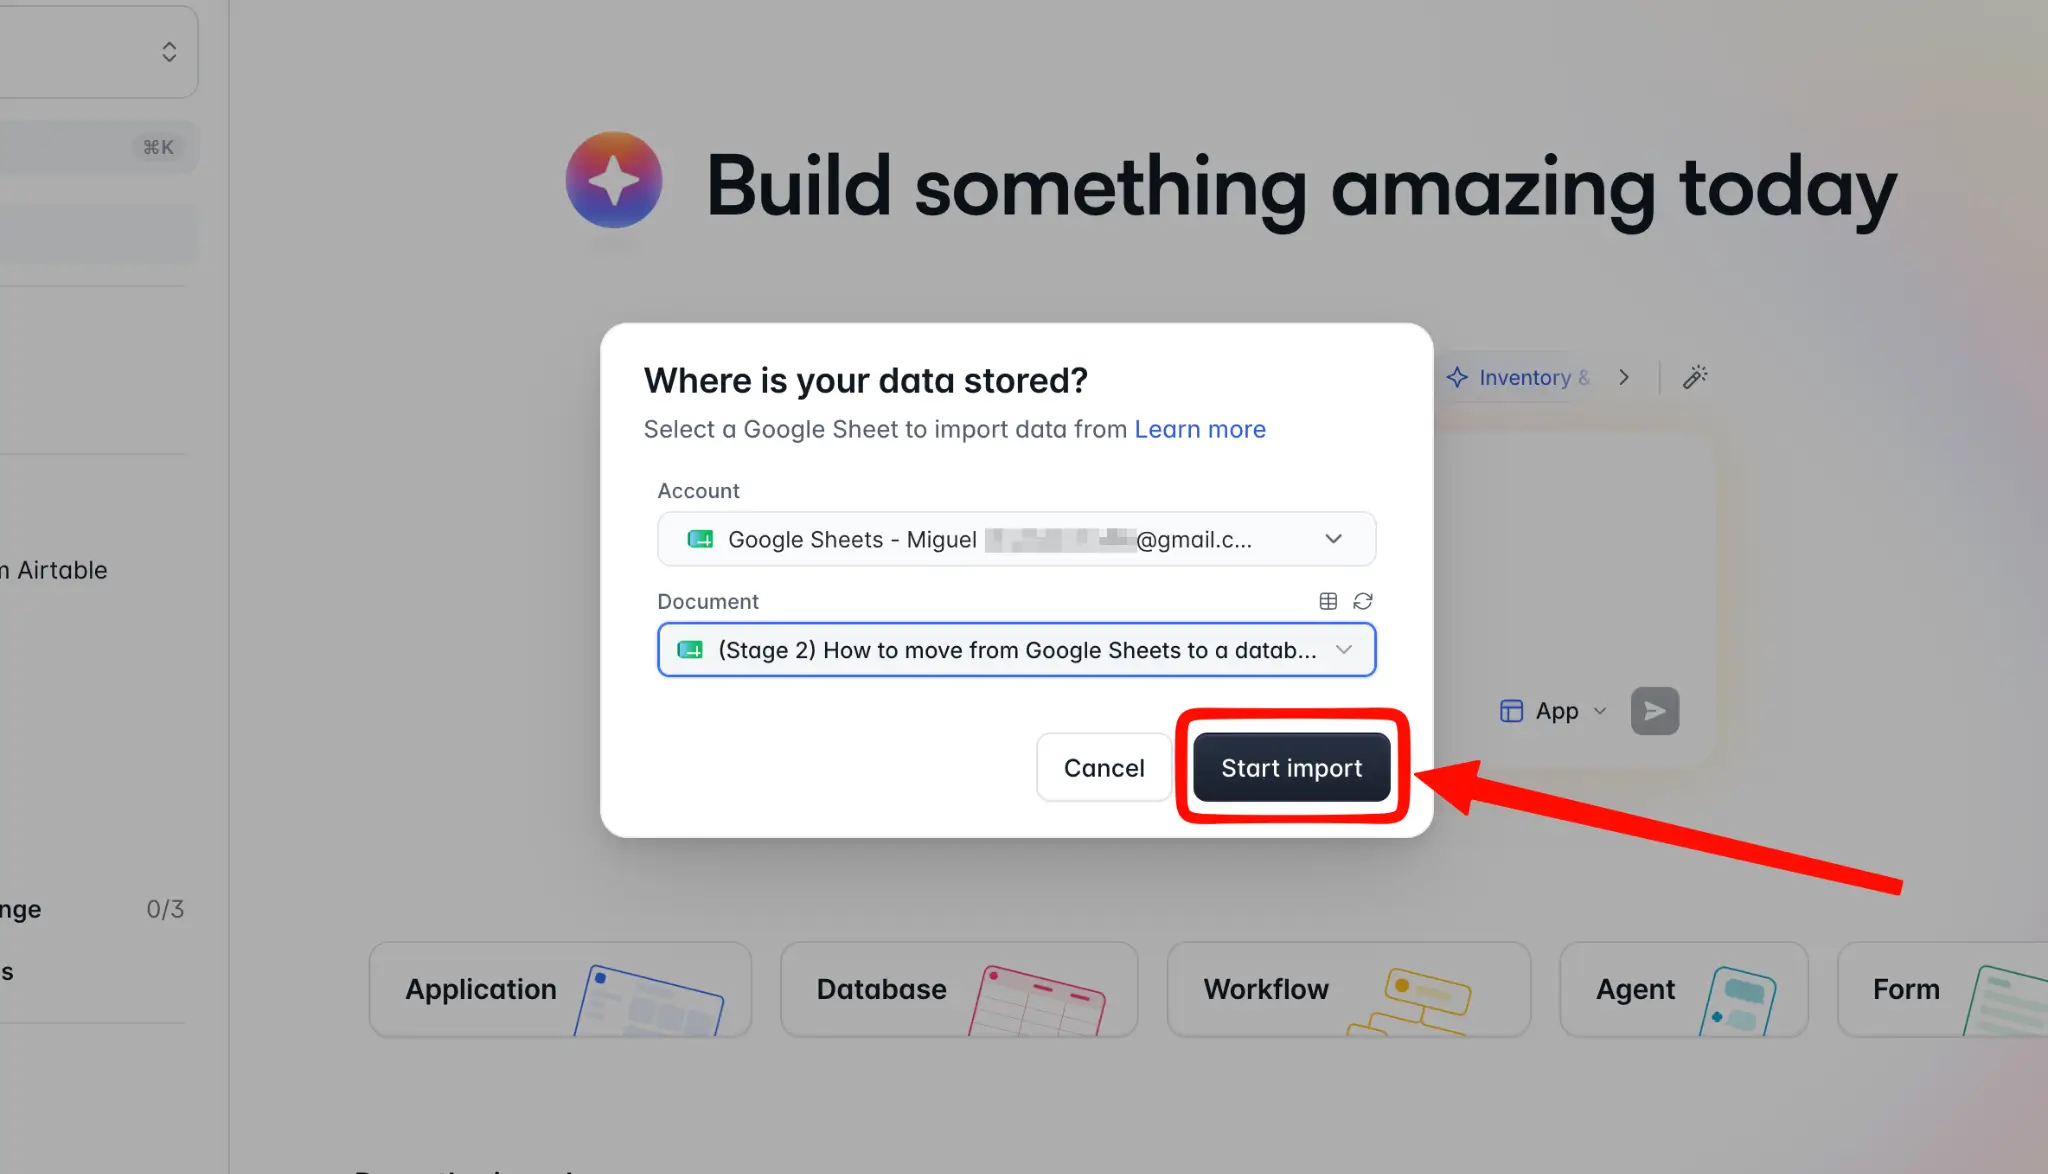
Your data is imported directly into Softr databases. Some fields are automatically mapped, such as the emails column landing as the email data type. Others, such as Phone, can sometimes land as text: right-click the header of that column, then Edit field, and select the appropriate data type.
6.2 Option 2: Import CSV into other platforms
Softr also supports importing from CSV, and the import flow is similar to many other database platforms. We'll use it as an example, but please refer to the data import or migration documentation of the database platform you’re using.
- In the Softr dashboard, click Database.
2. Click the Import button.
3. Select CSV.
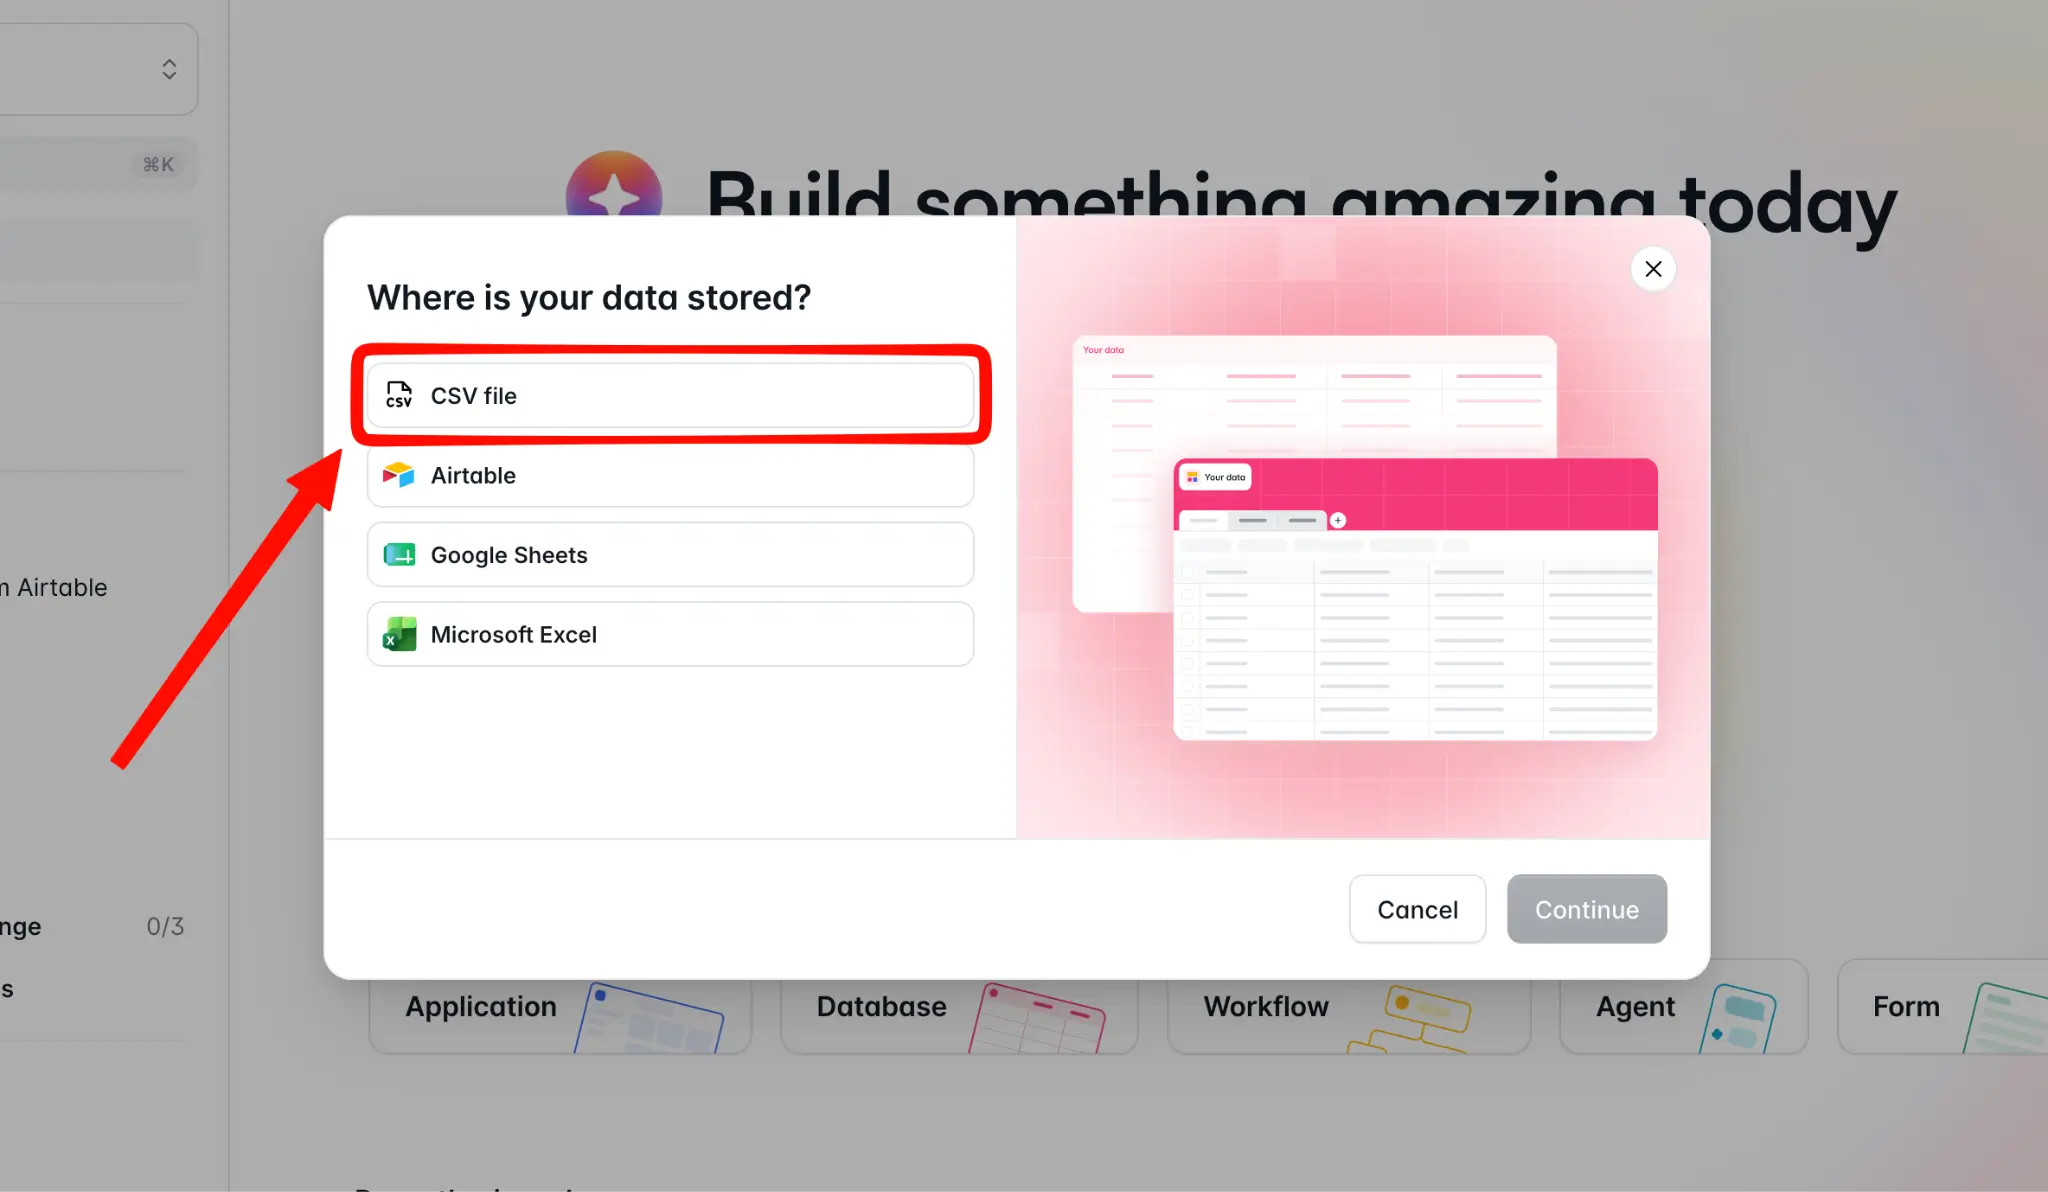
4. Select all the CSV files you want to upload.
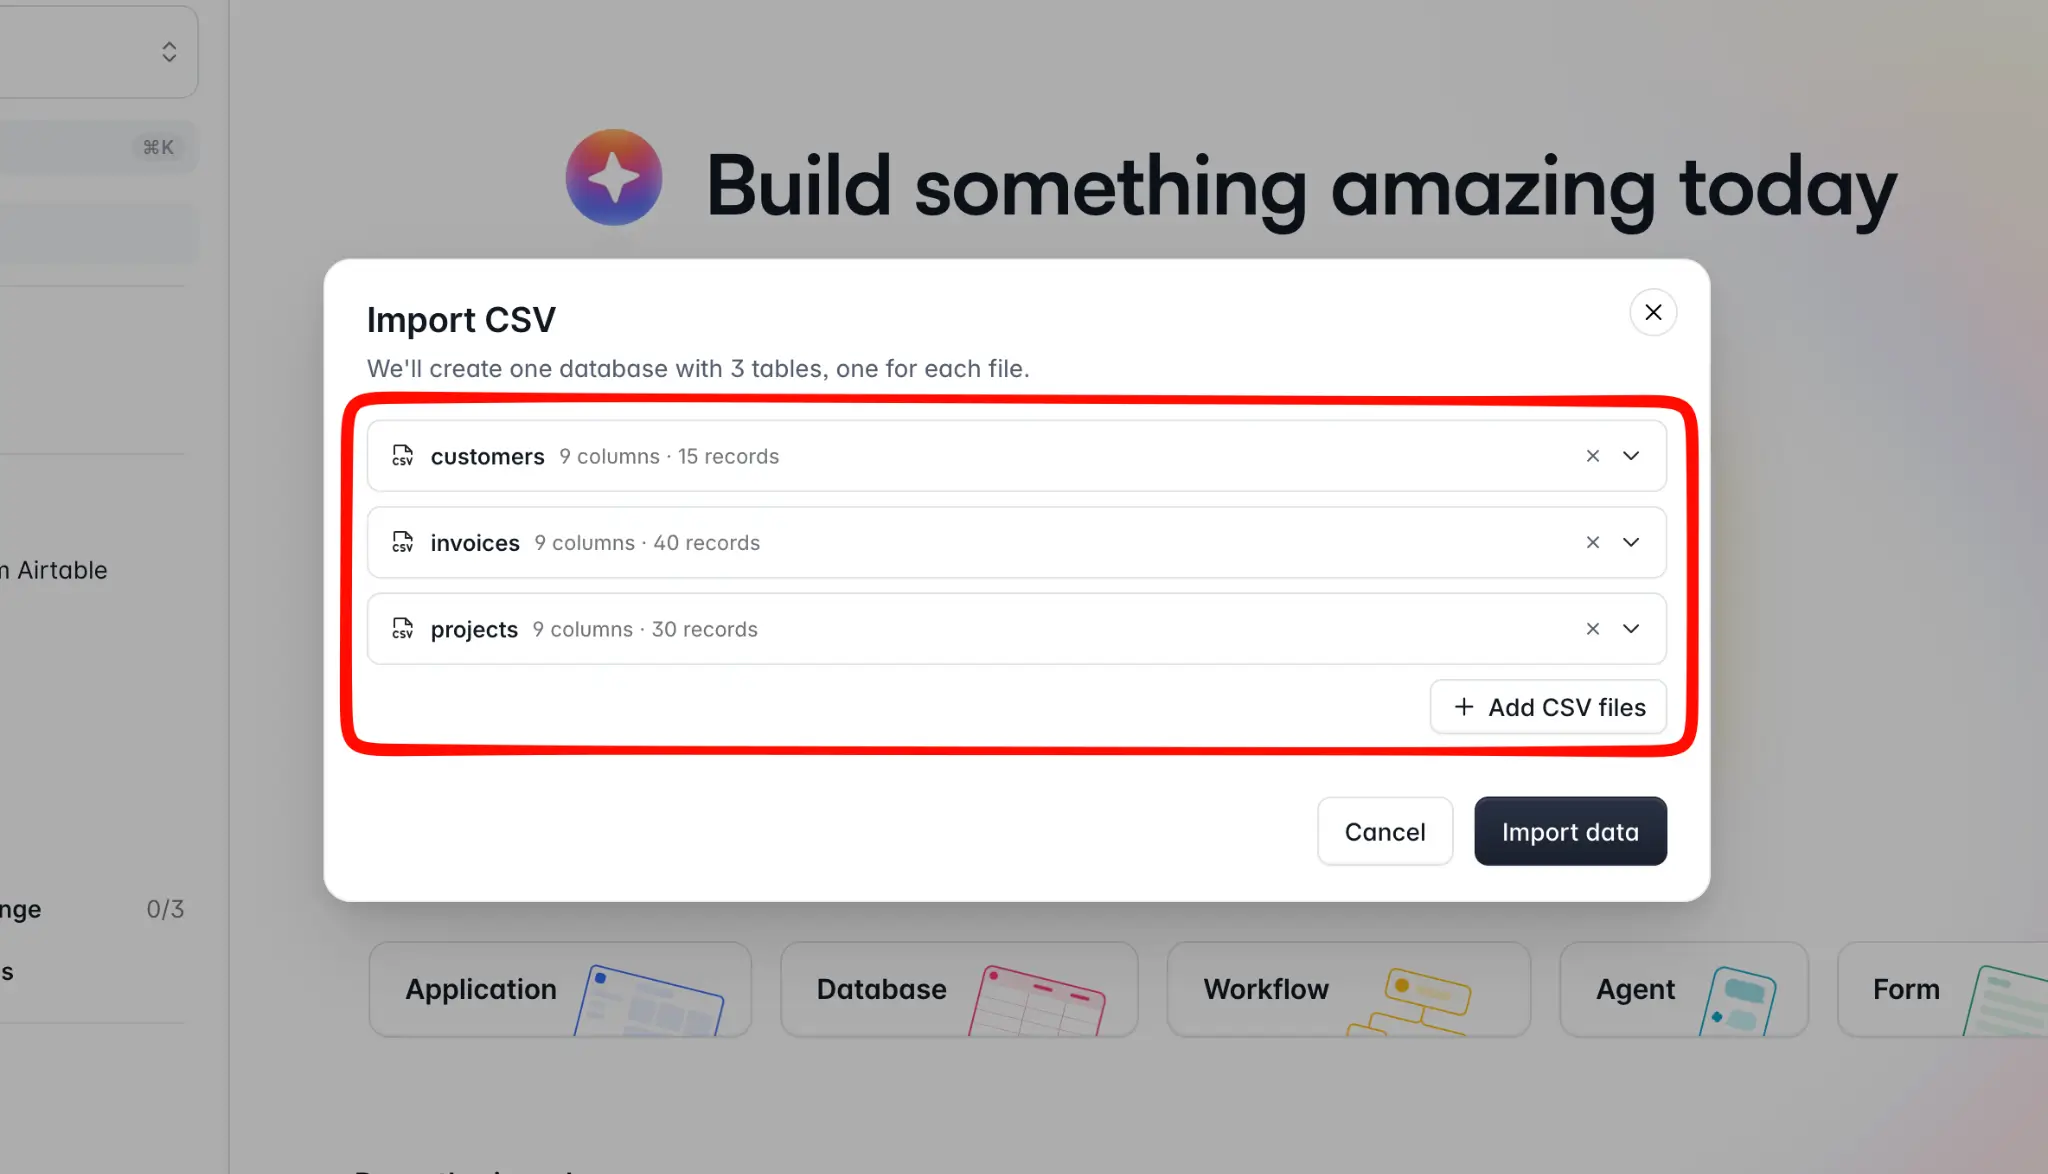
5. Click Import data
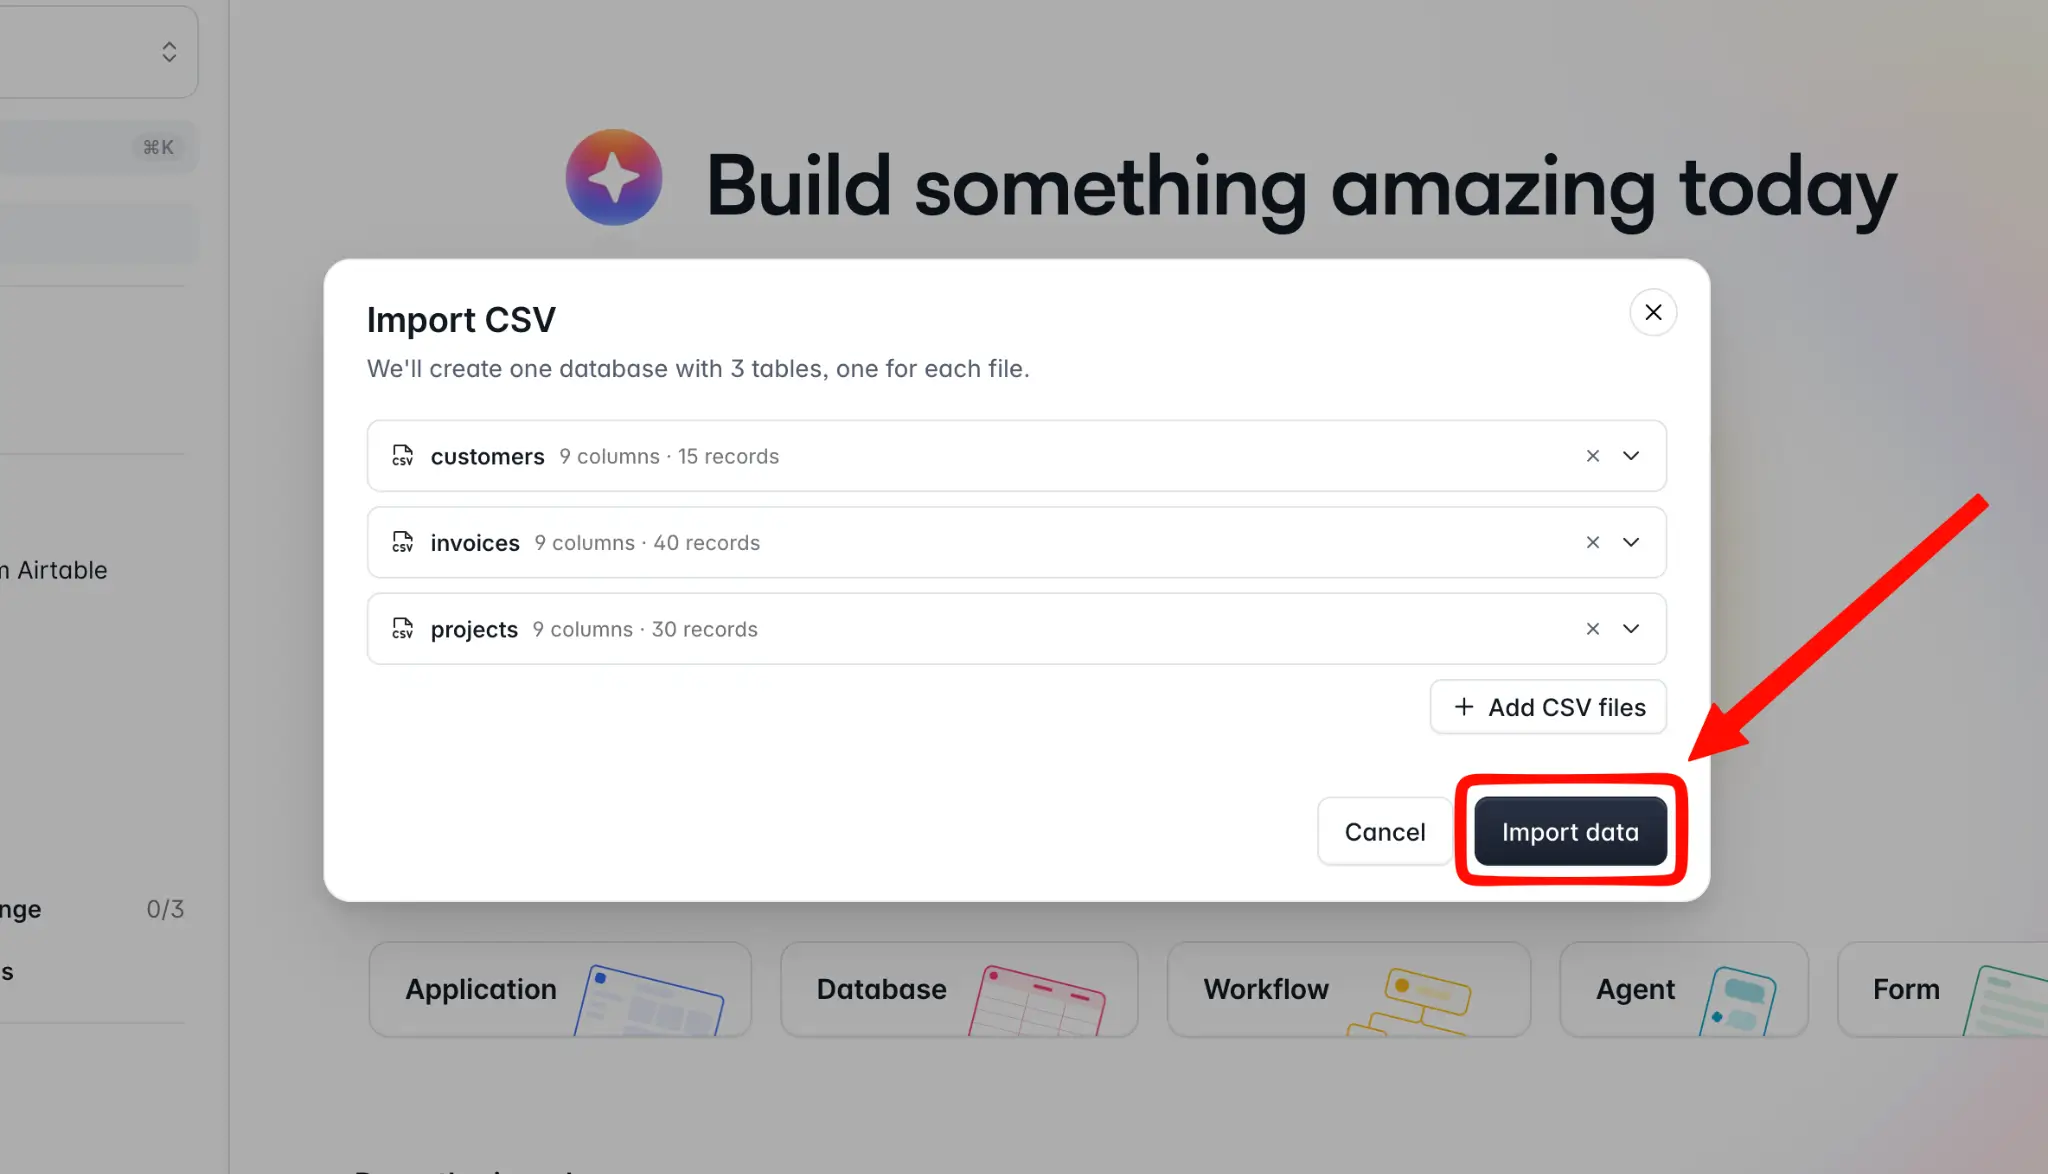
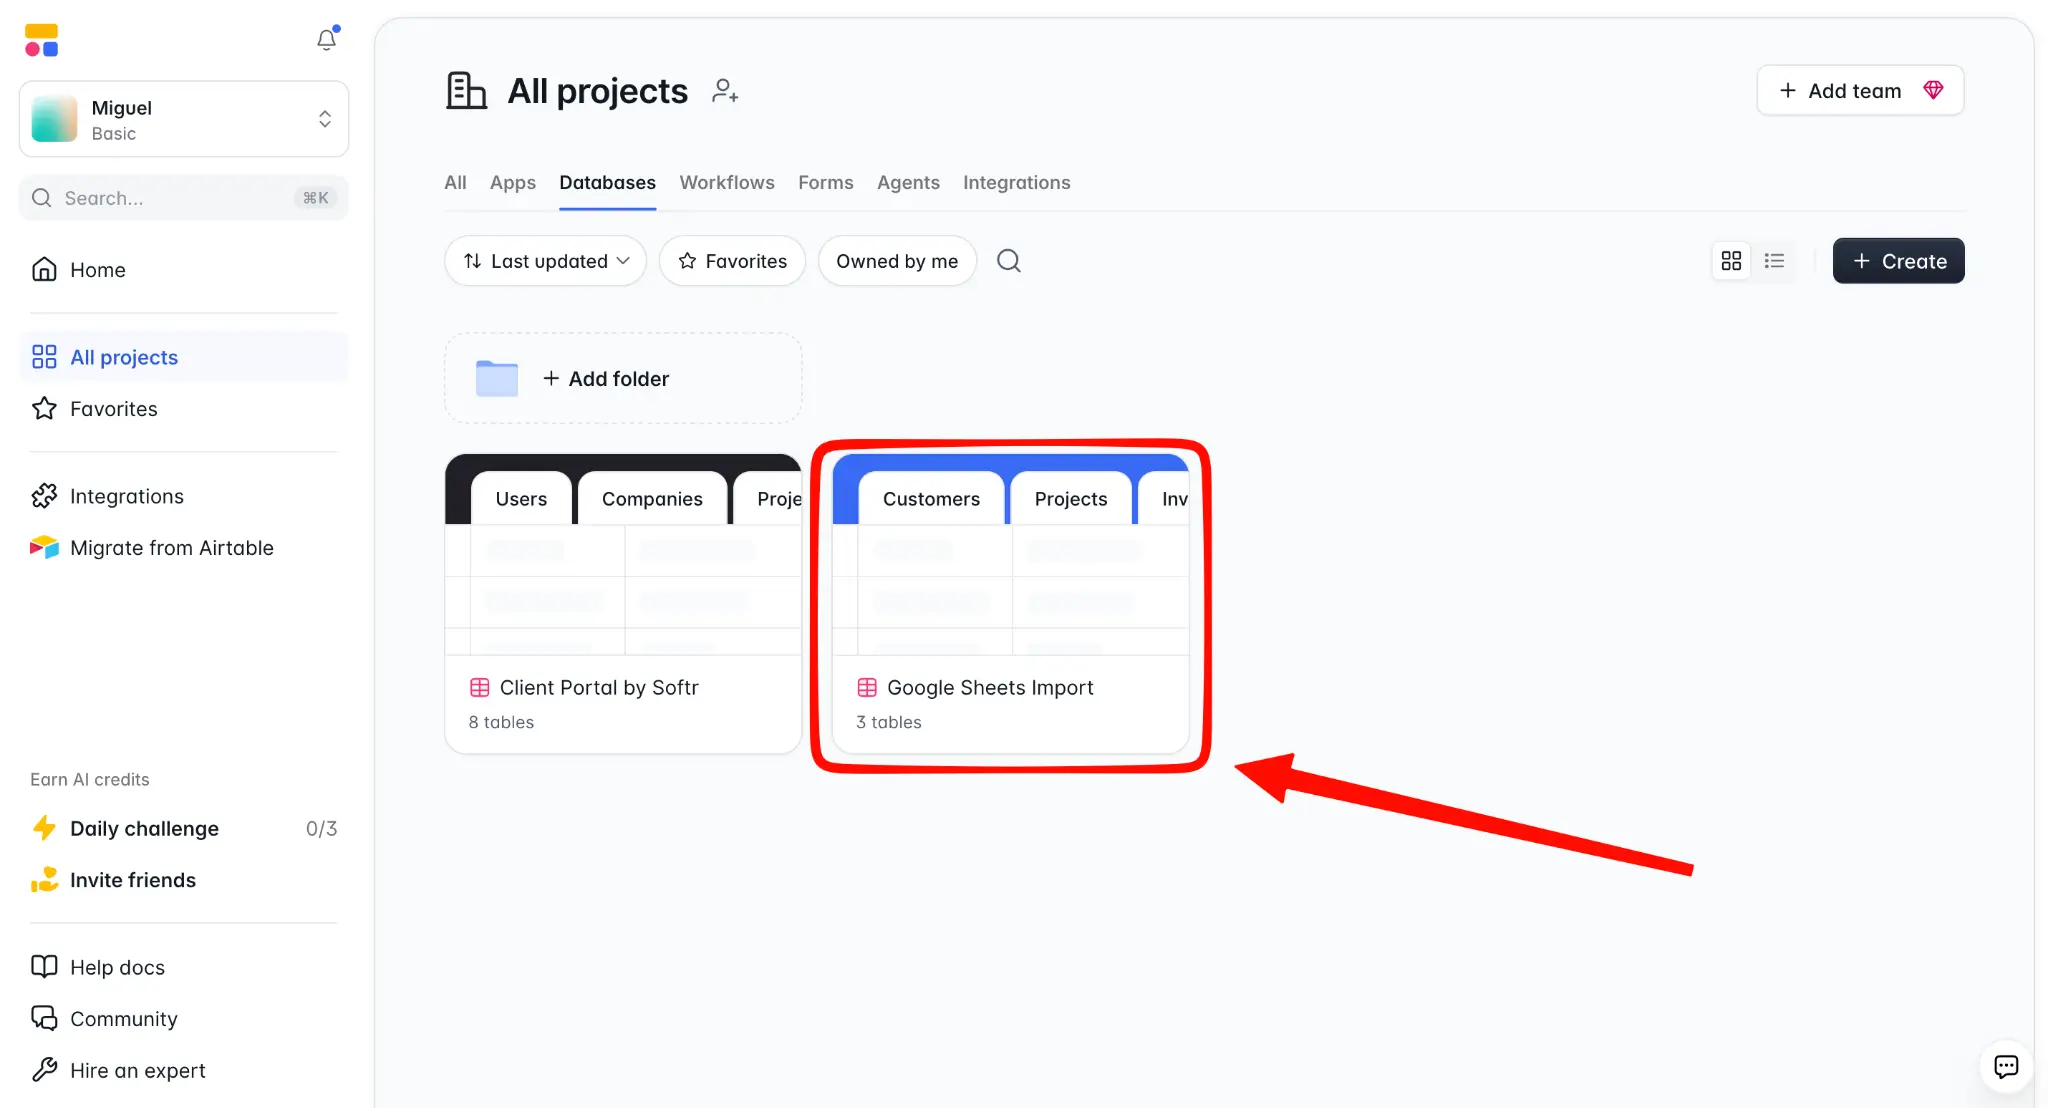
The data is imported directly with automatic field mapping. Check that every type was set correctly before continuing.
7. Check the import
Before moving forward, verify the data import completed successfully by comparing against the totals recorded in step 1 and updated in step 4 in your planning file:
- Check if the record counts per table are the same
- Check that the key totals match, such as the total amount invoiced
- Scroll through the data to see if there are missing fields
- Spot-check a few records against the original sheet
This step can take some time to complete depending on how much data you migrated, but it's essential that you finish it. If the data hasn't been imported correctly, that could make apps break and create more problems down the line. Do this before linking records: a bad import found now is a quick re-import, while one found after linking means redoing the links.
8. Create relationships and link records
The data was imported but there are no relationships yet, so it's time to create the relational fields and link related records together. We'll again use the guide's main example to show you how to do this in Softr:
1. Open your database in Softr
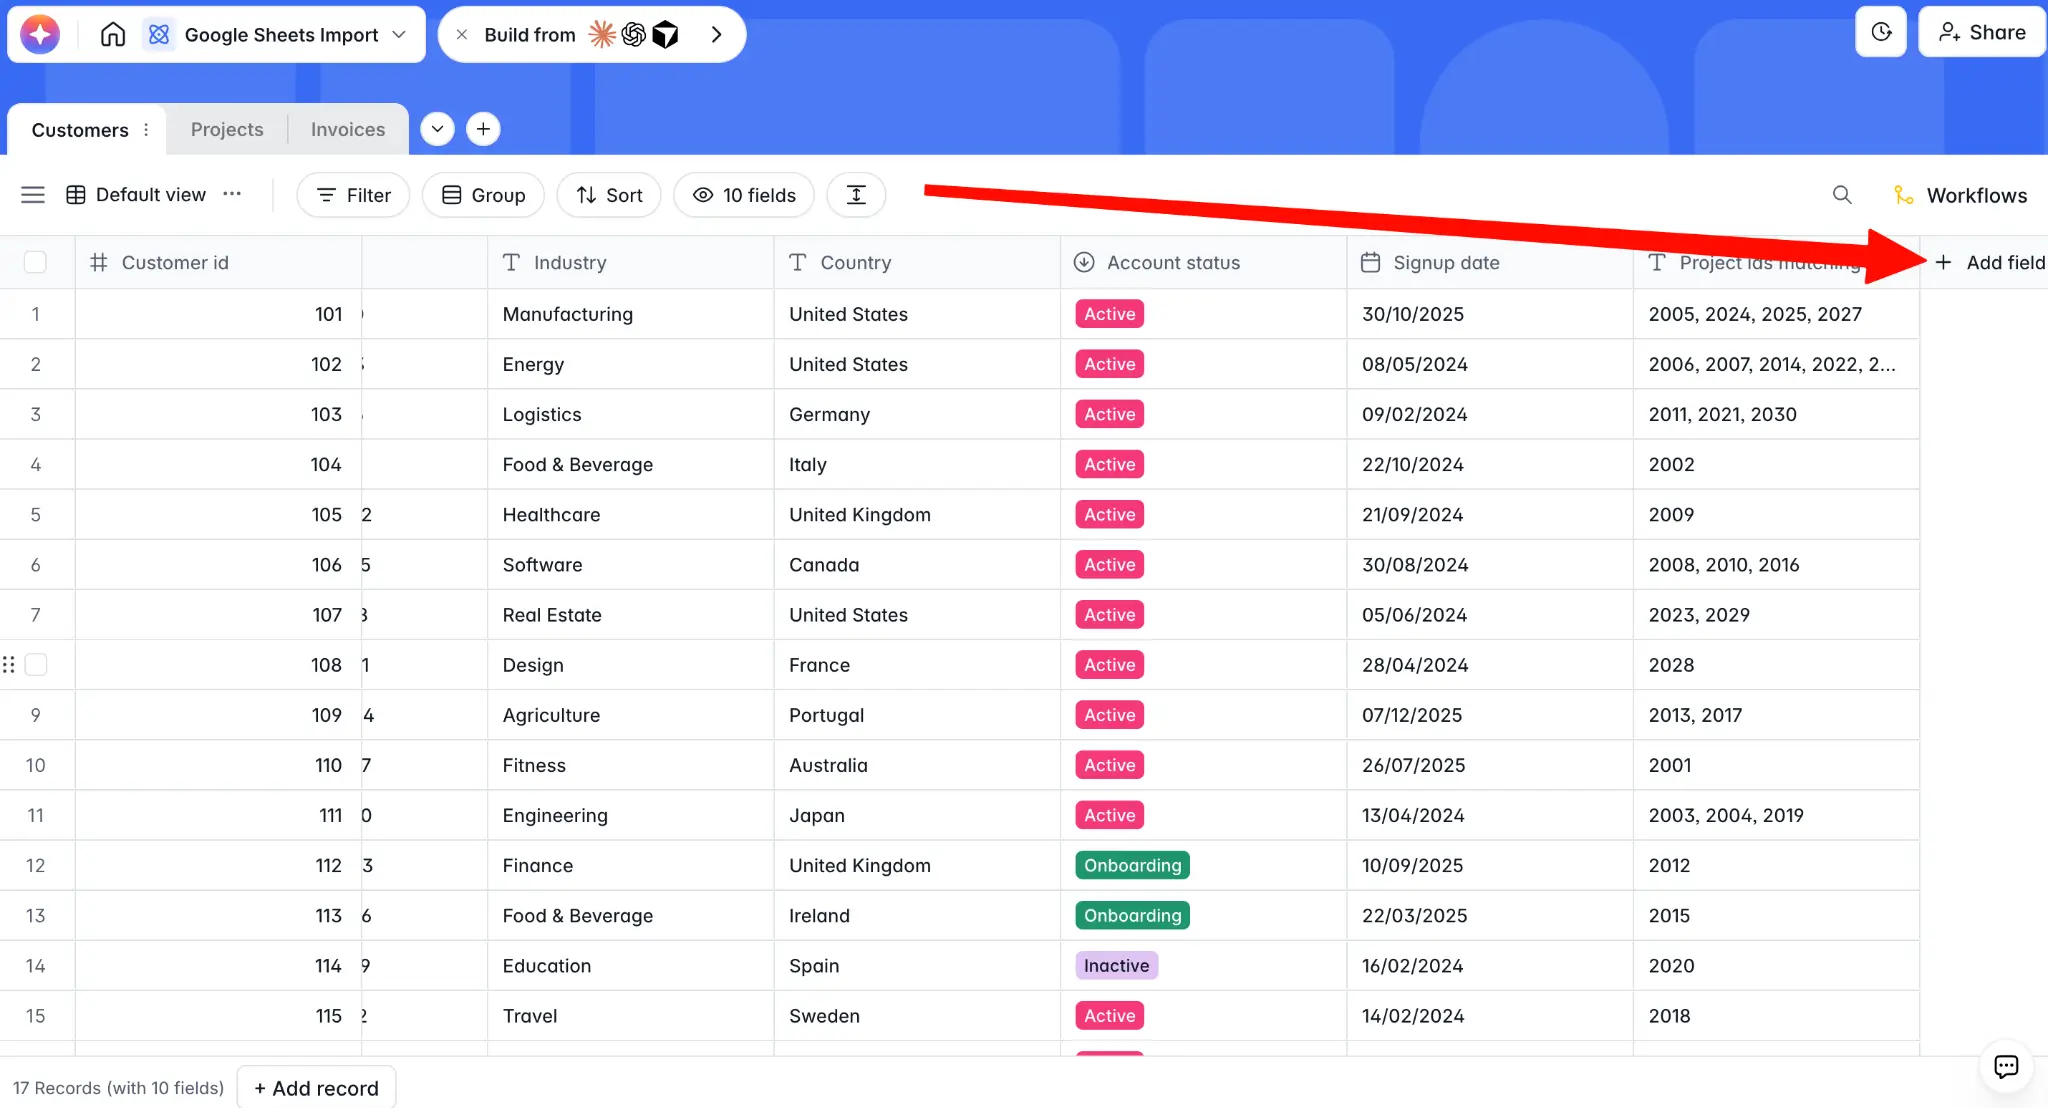
2. In the Customers table, scroll horizontally to the right, and click Add field on the right side of the table.
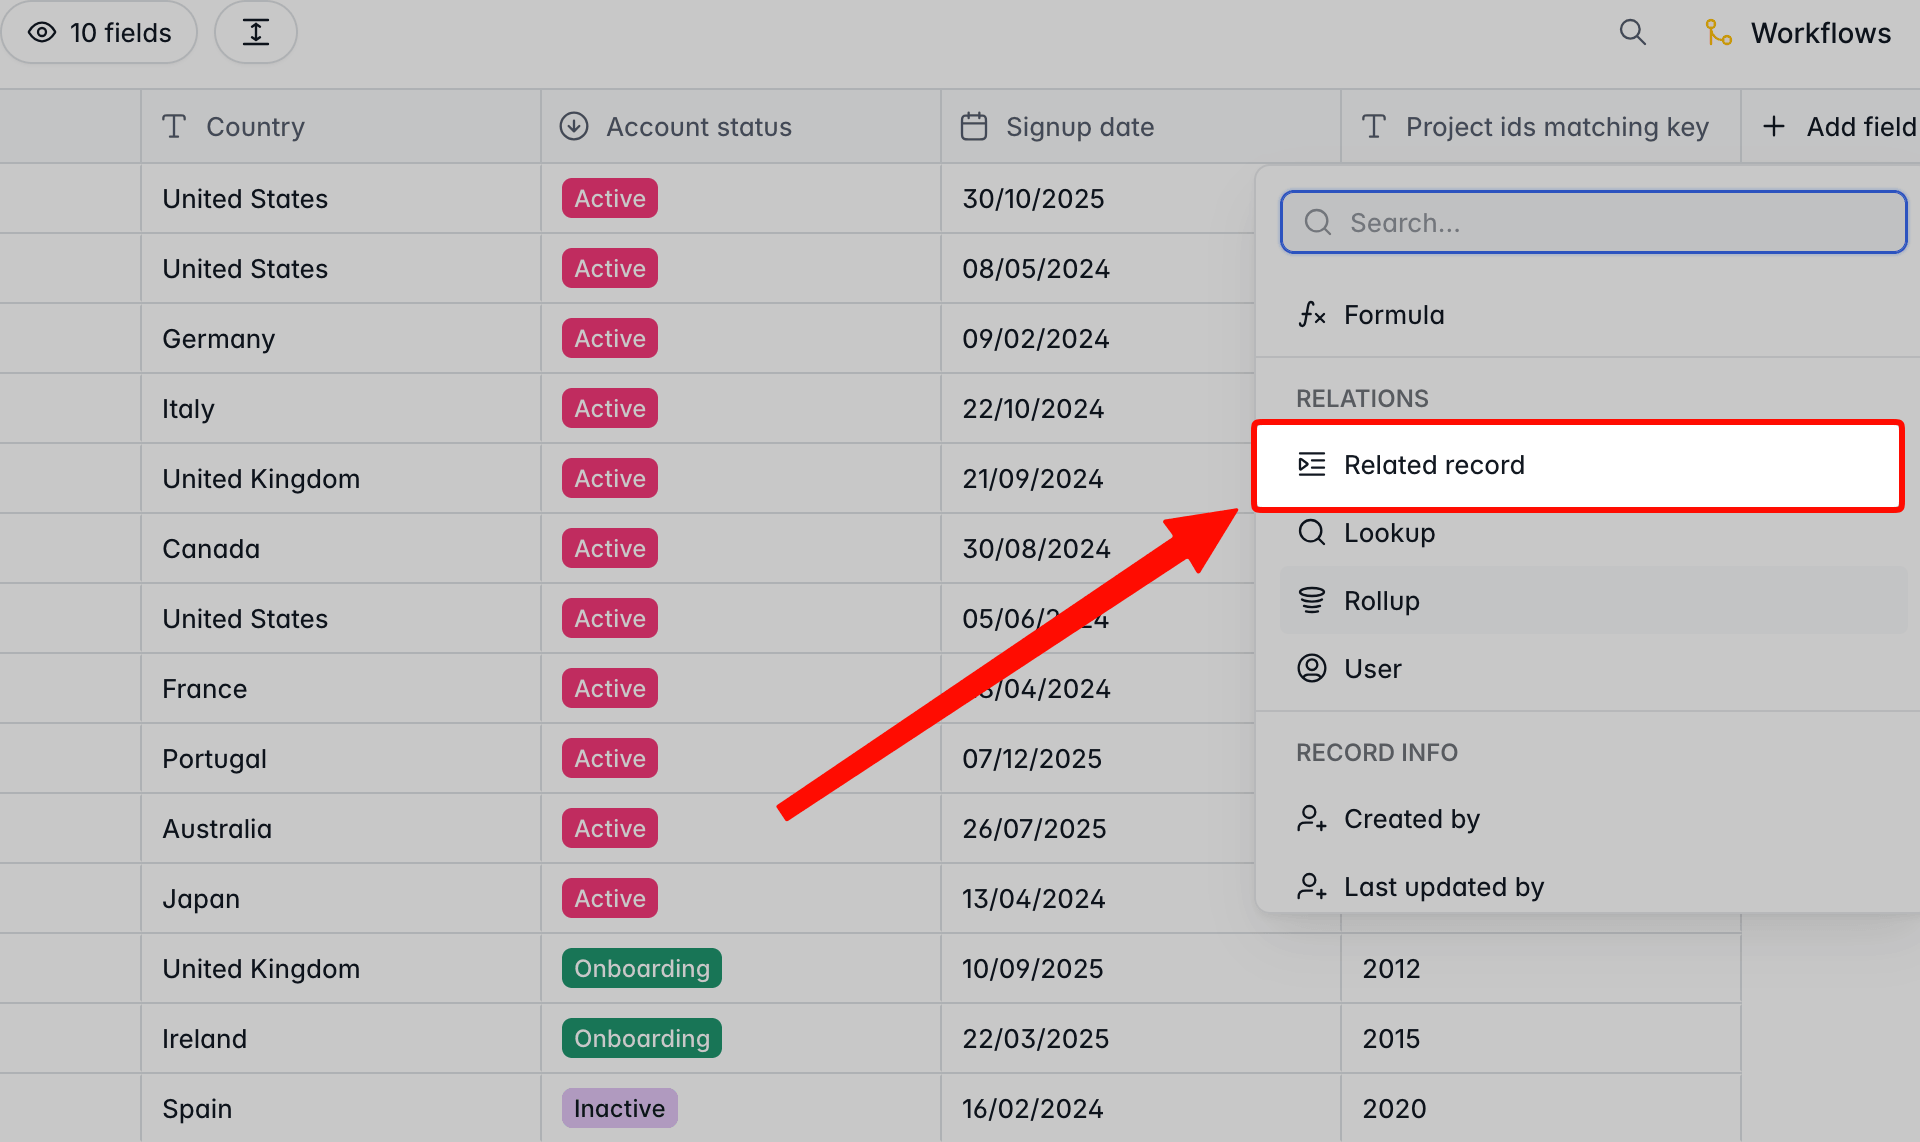
3. Select Related record.
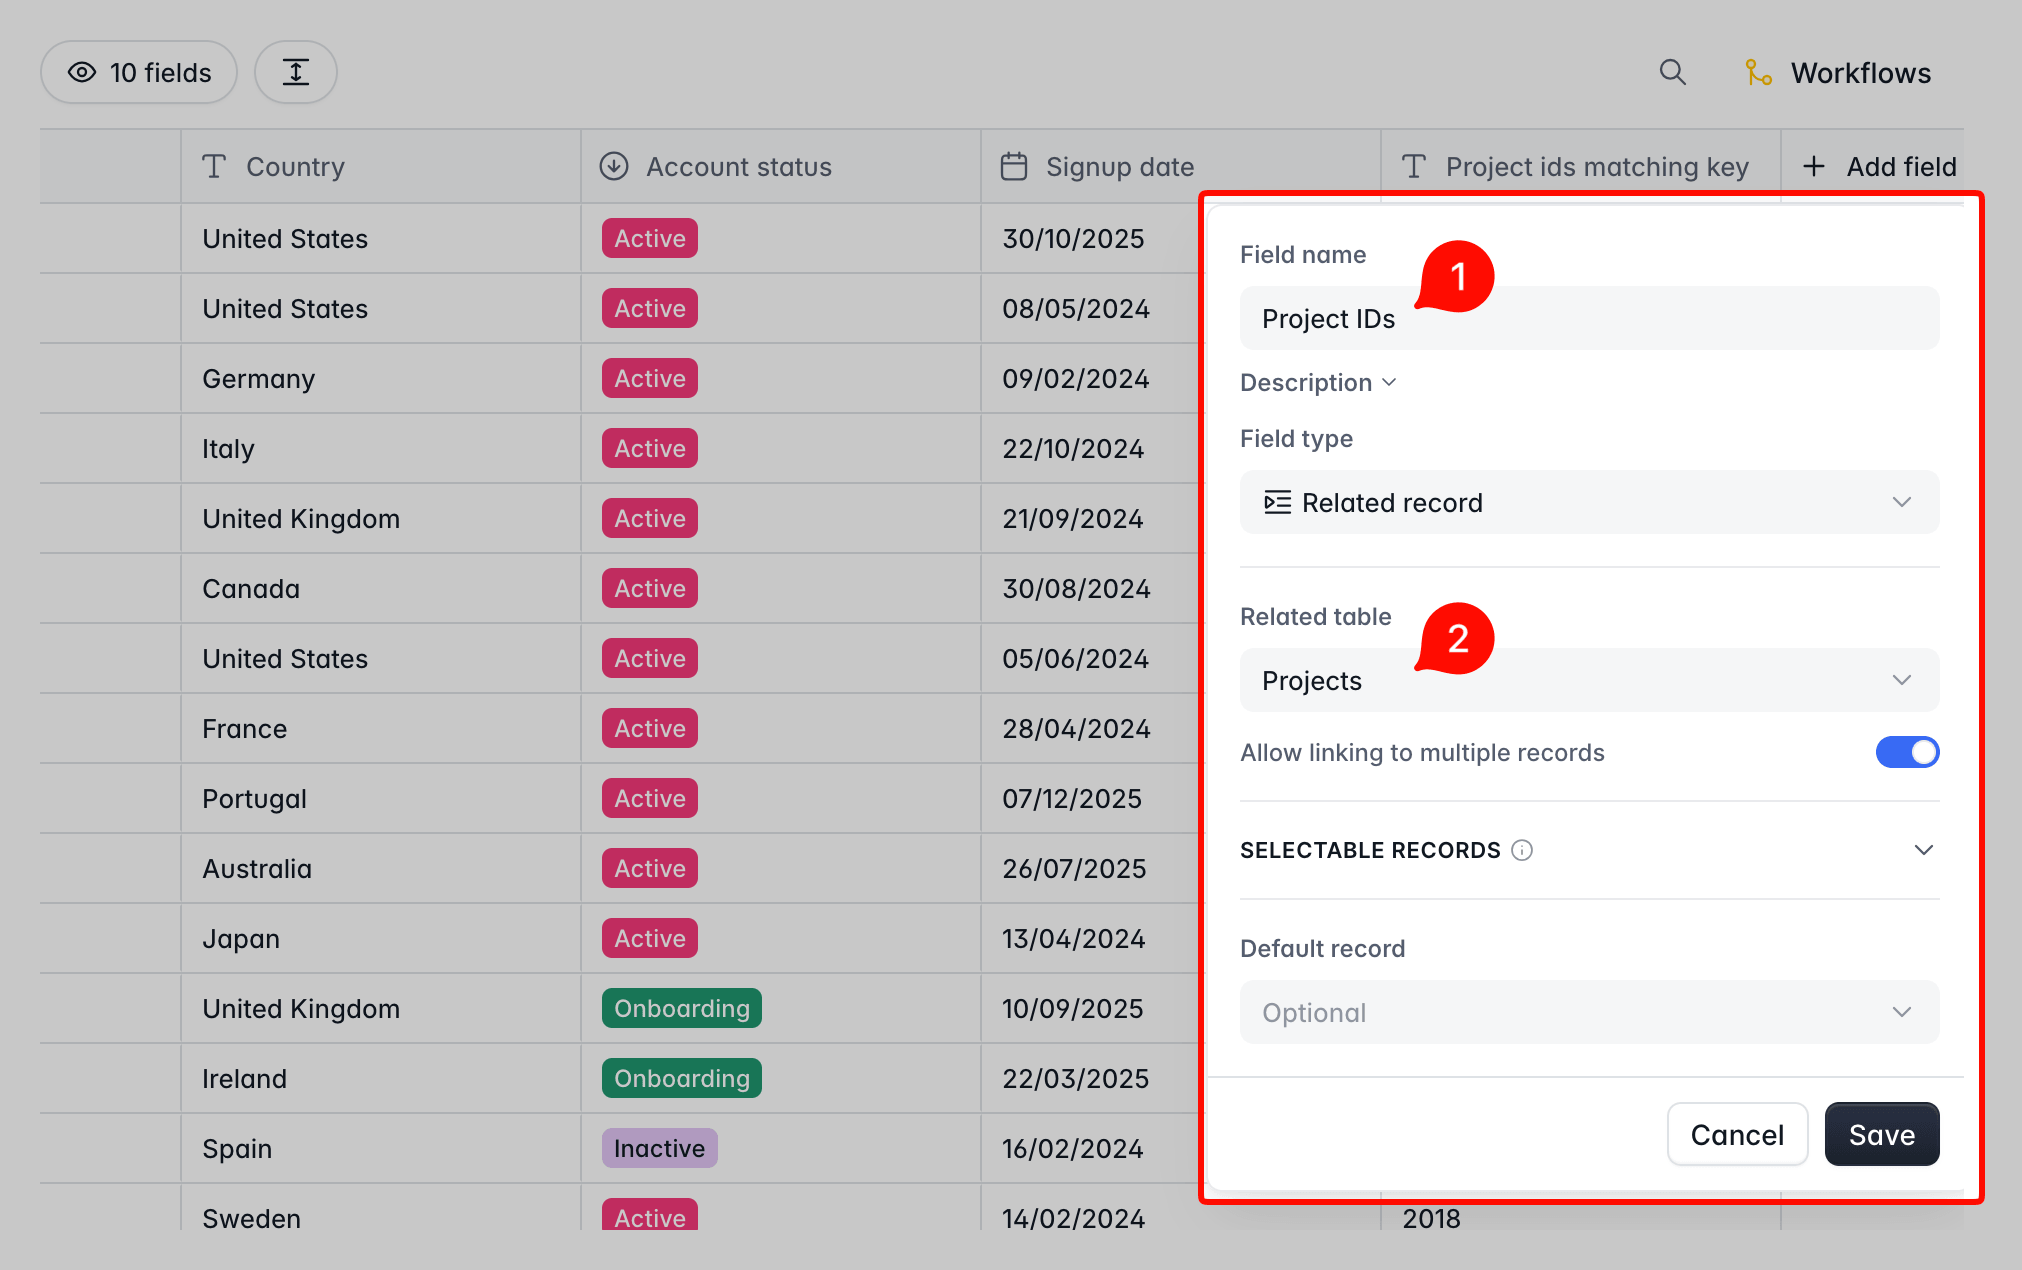
4. Set the Field name to Project IDs and the Related table to Projects. Leave Allow linking to multiple records ticked on (it should always be so whenever you set the List? field in your data model to “yes”). Click Save when done.
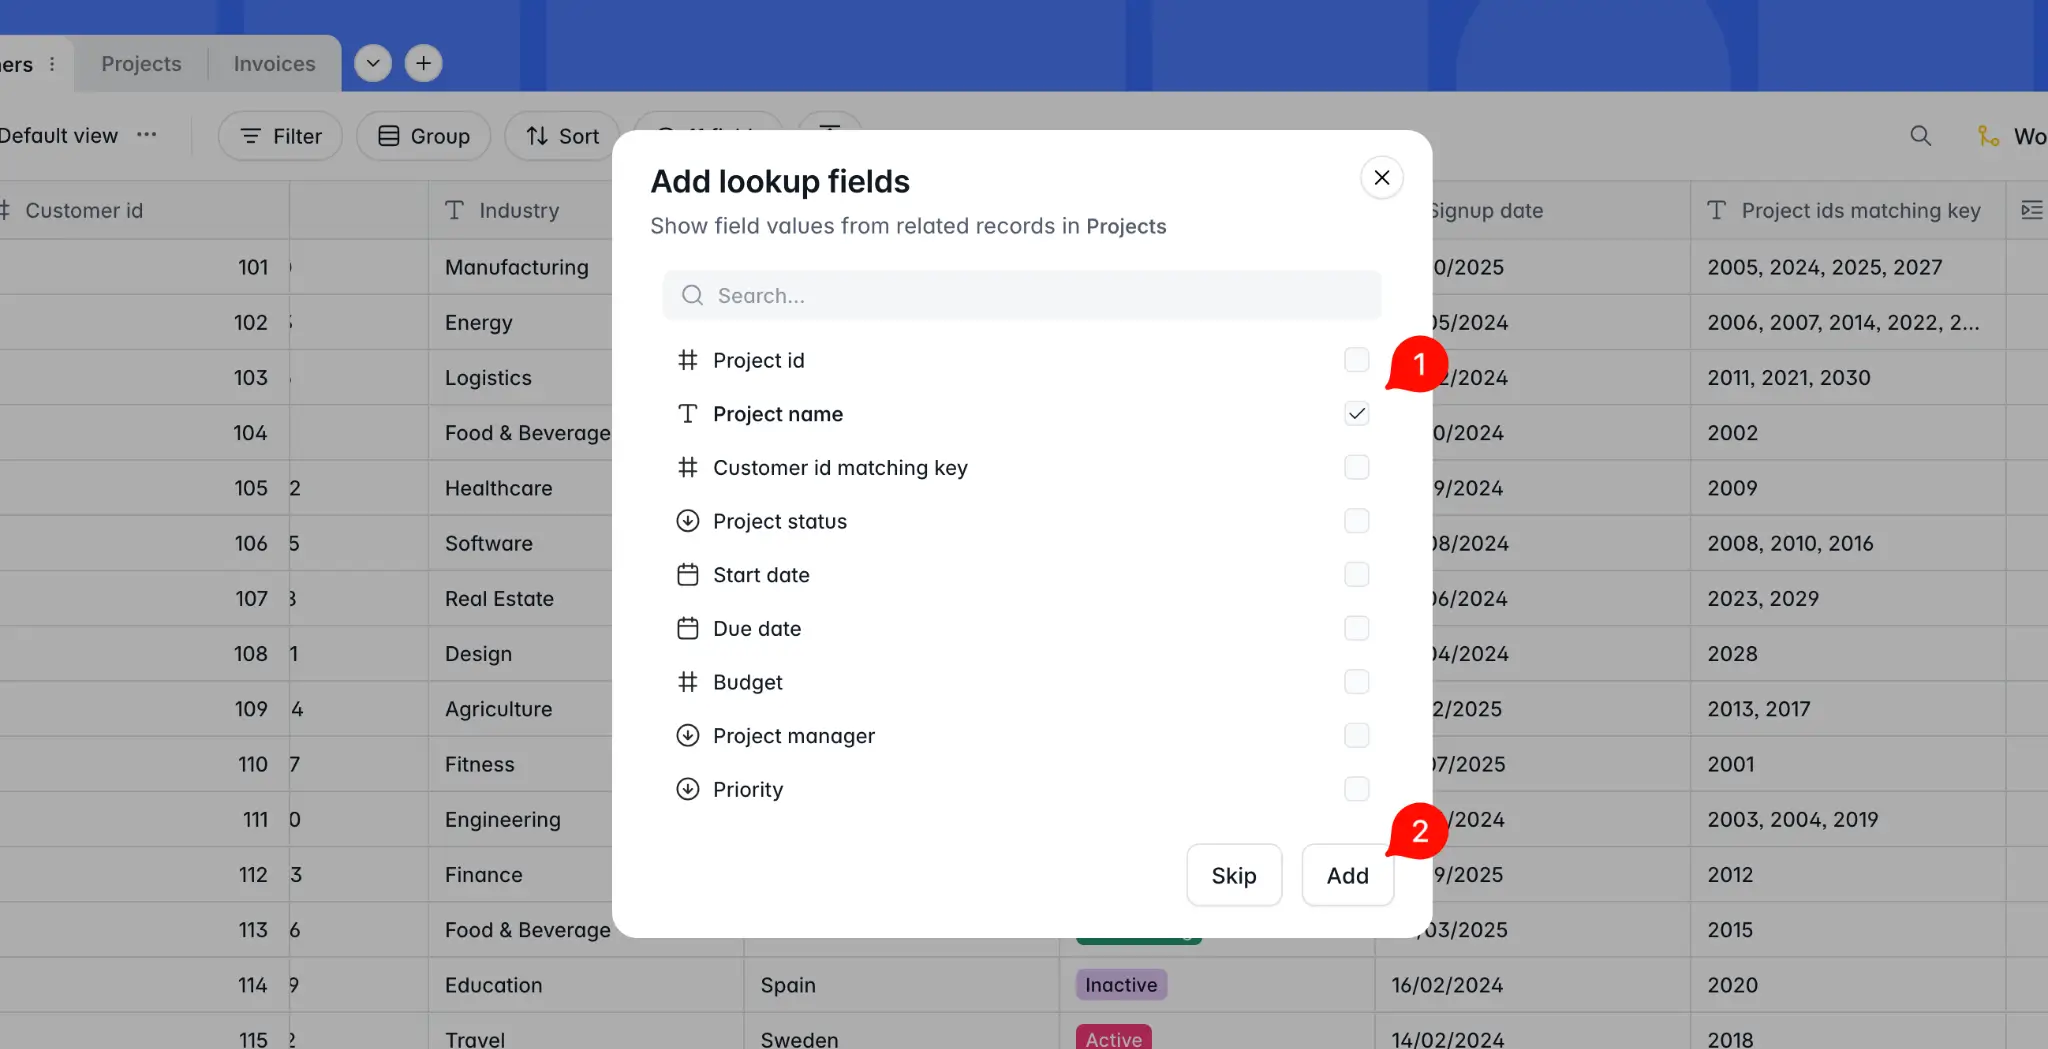
5. In the next step, select the lookup fields, determining what fields from the Projects table should appear in the Customers table for quick reference. The best field for this is Project name, but you can select multiple depending on your needs. Click Add after making your choices.
6. Double-click the first row of Project IDs column. Search for and select all the records that are showing in the Project IDs matching key column. Click anywhere outside of the cell when done.
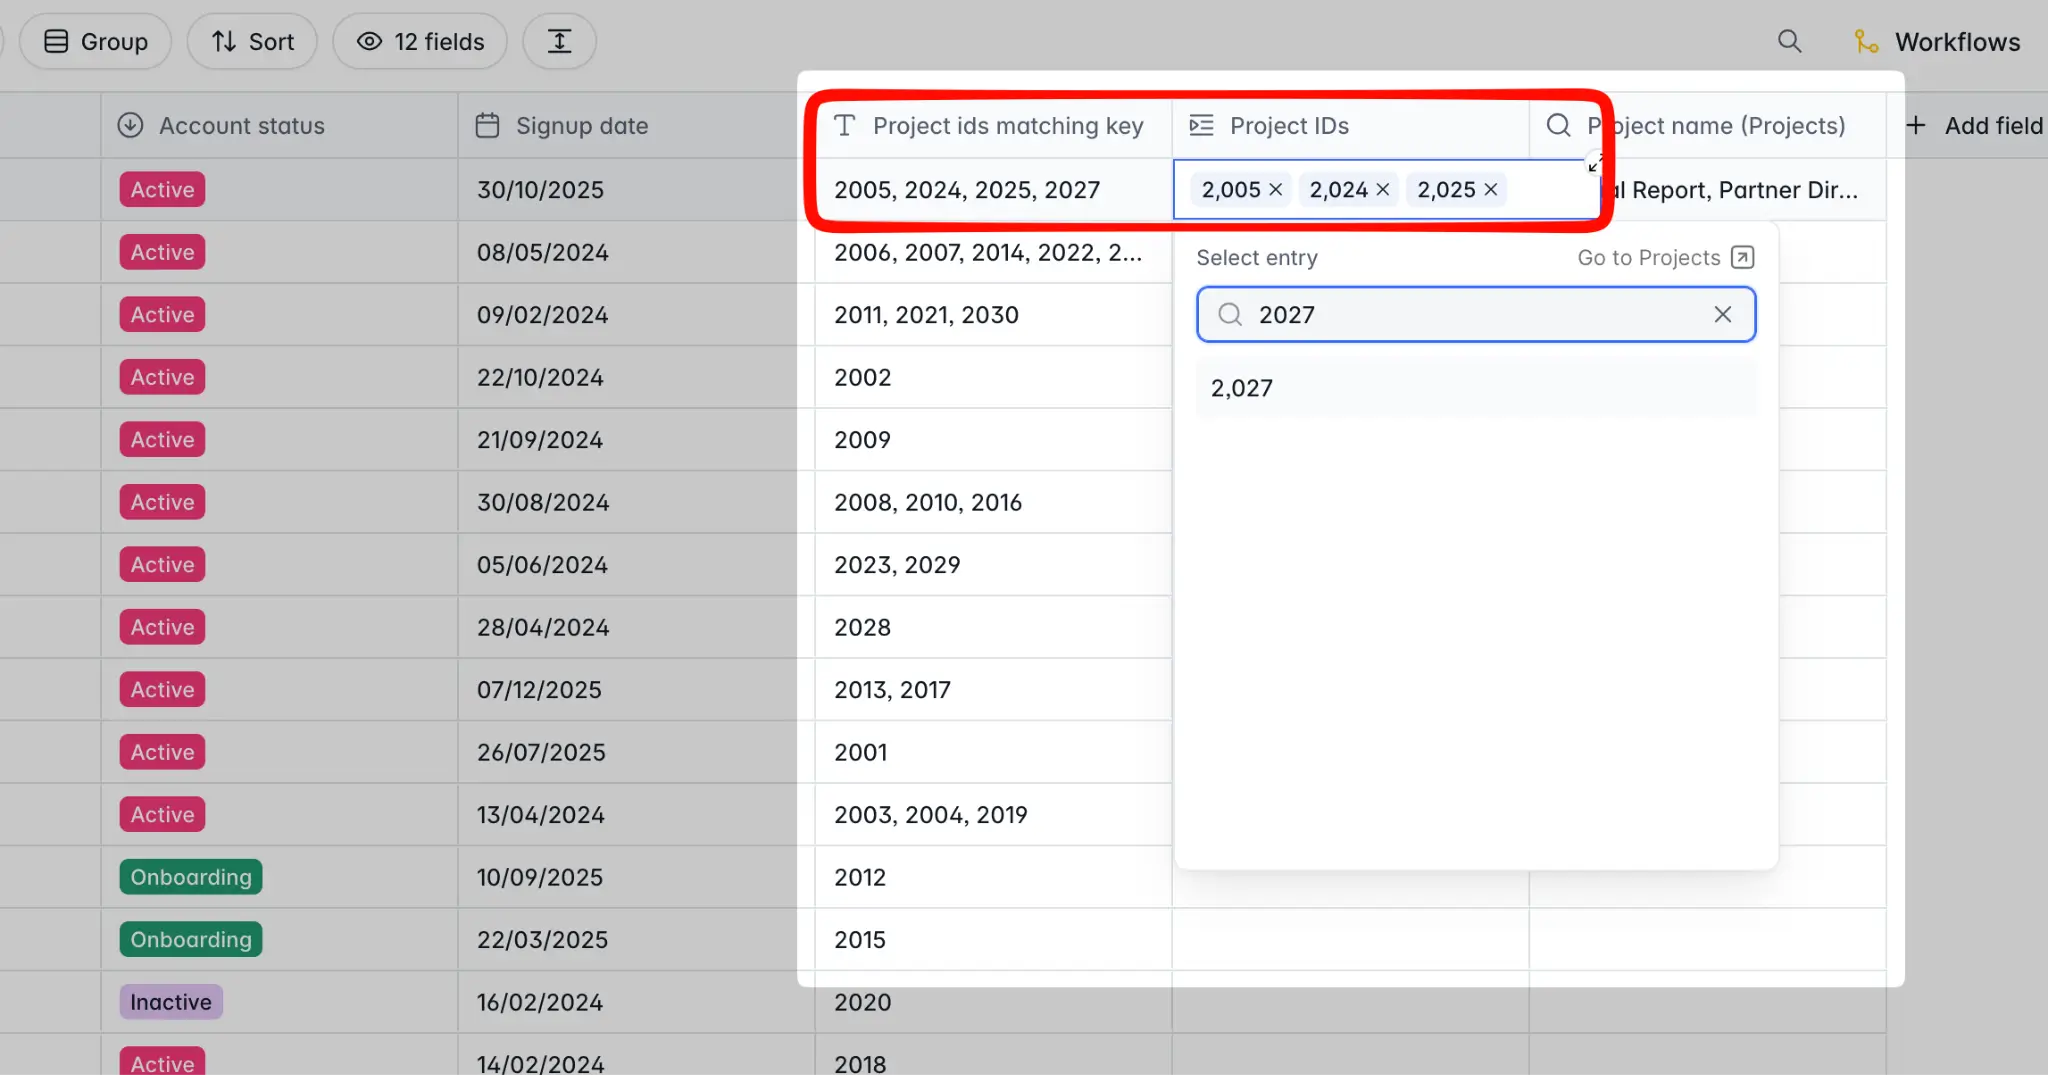
7. The projects are now linked to their respective customer. Repeat the process until all records are connected.
This is the slower linking method for records that are related to many others. There’s a faster process for records that are related to one other. For example, in the Projects table, each project is connected to only one customer. To link multiple projects to the same customer faster:
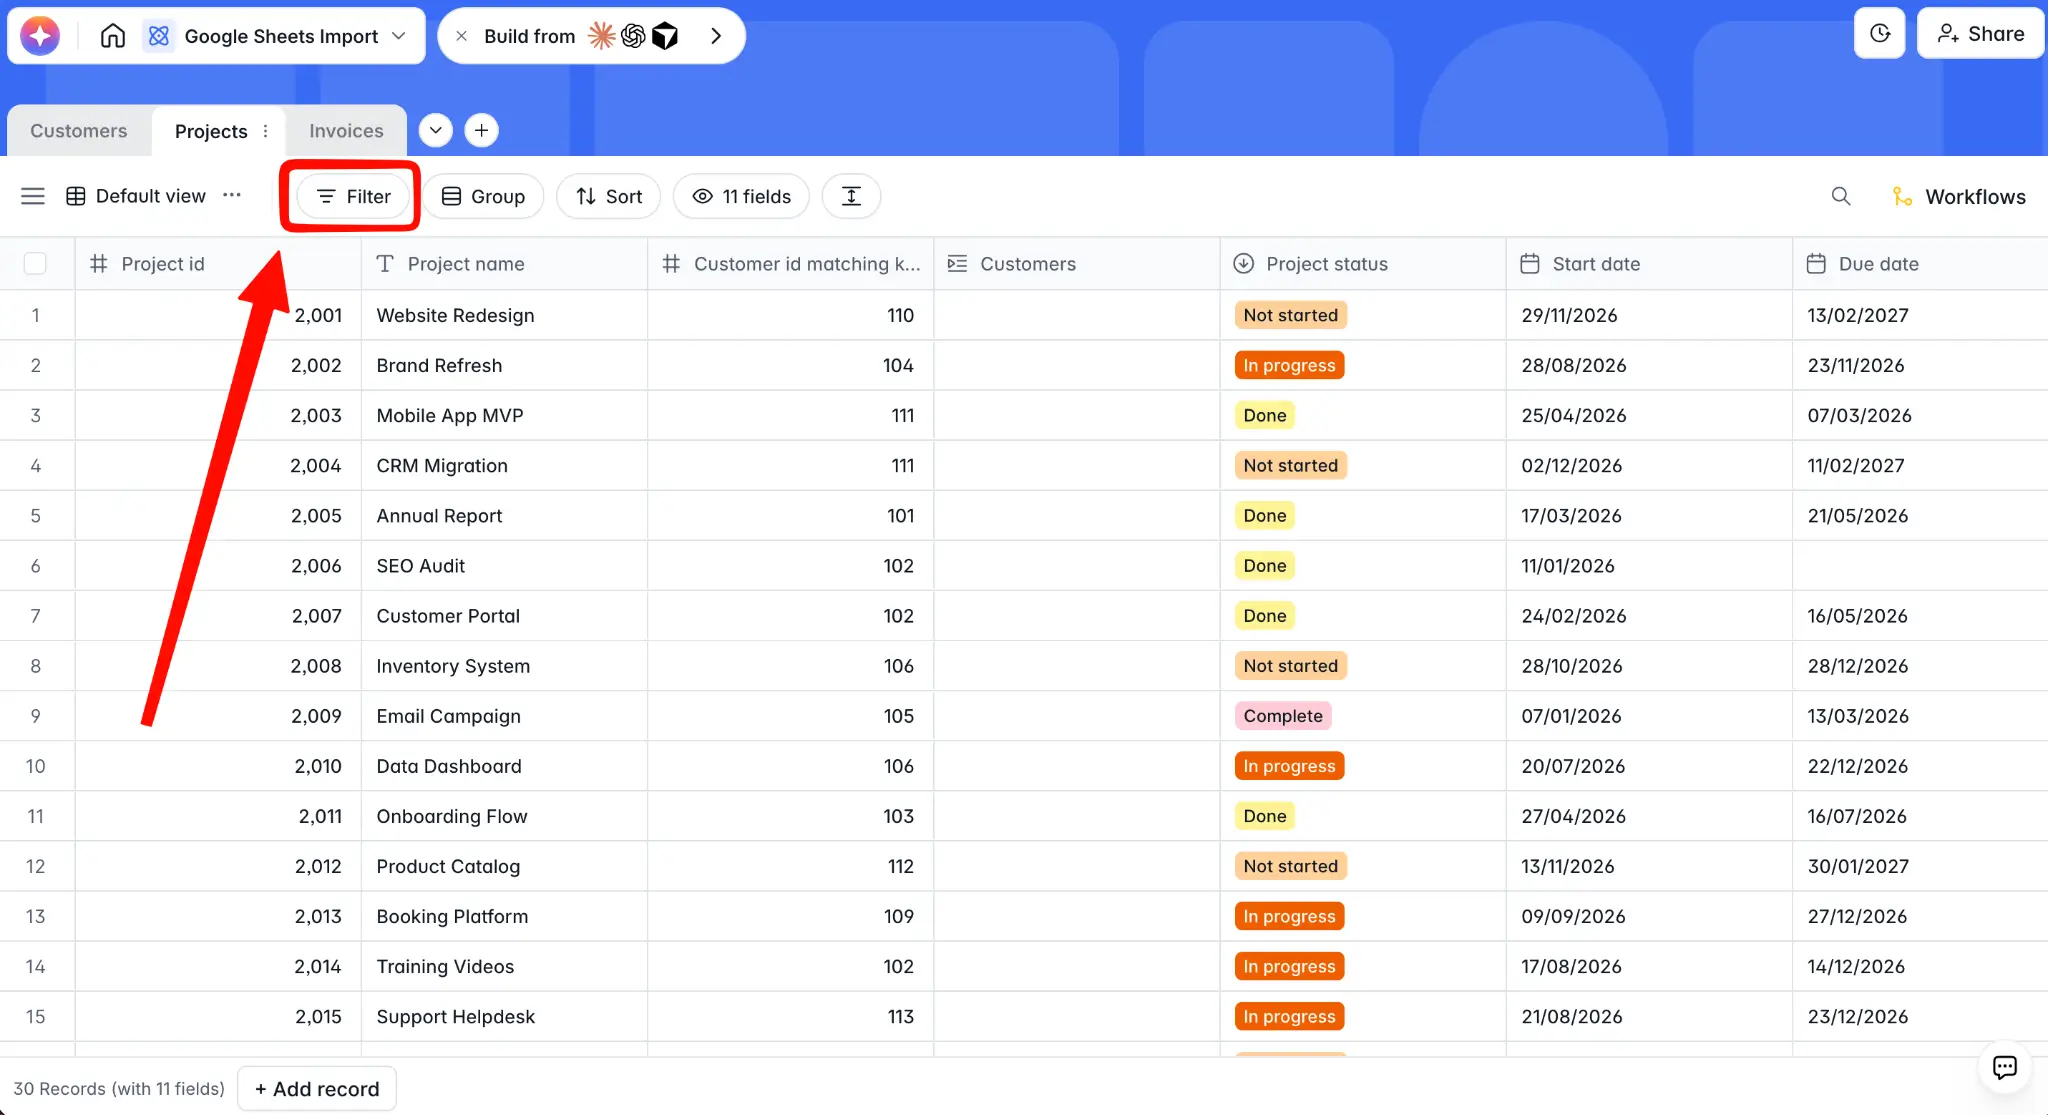
1. Go to the Projects table and click Filt
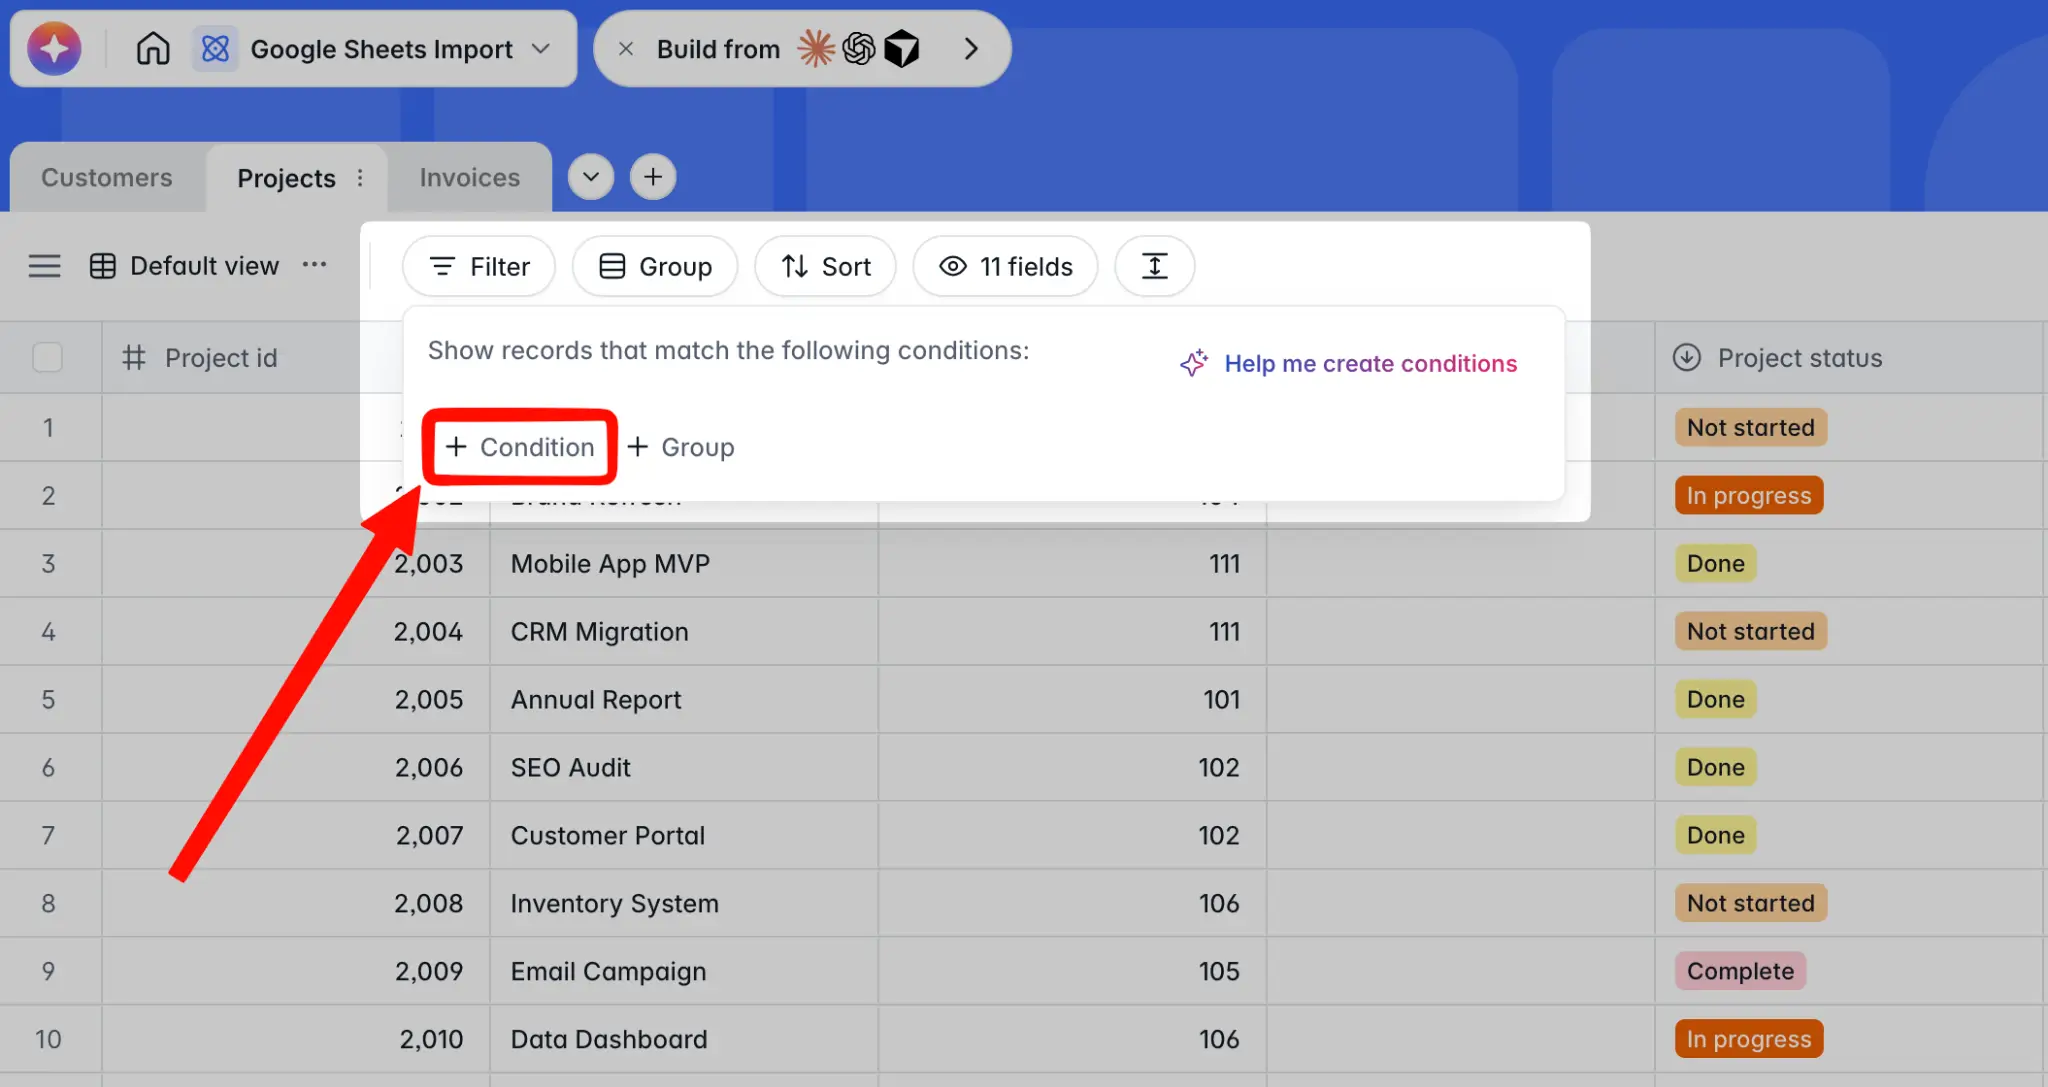
2. Click to add a Condition.
3. The condition is the Customer ID matching key being equal to 101.
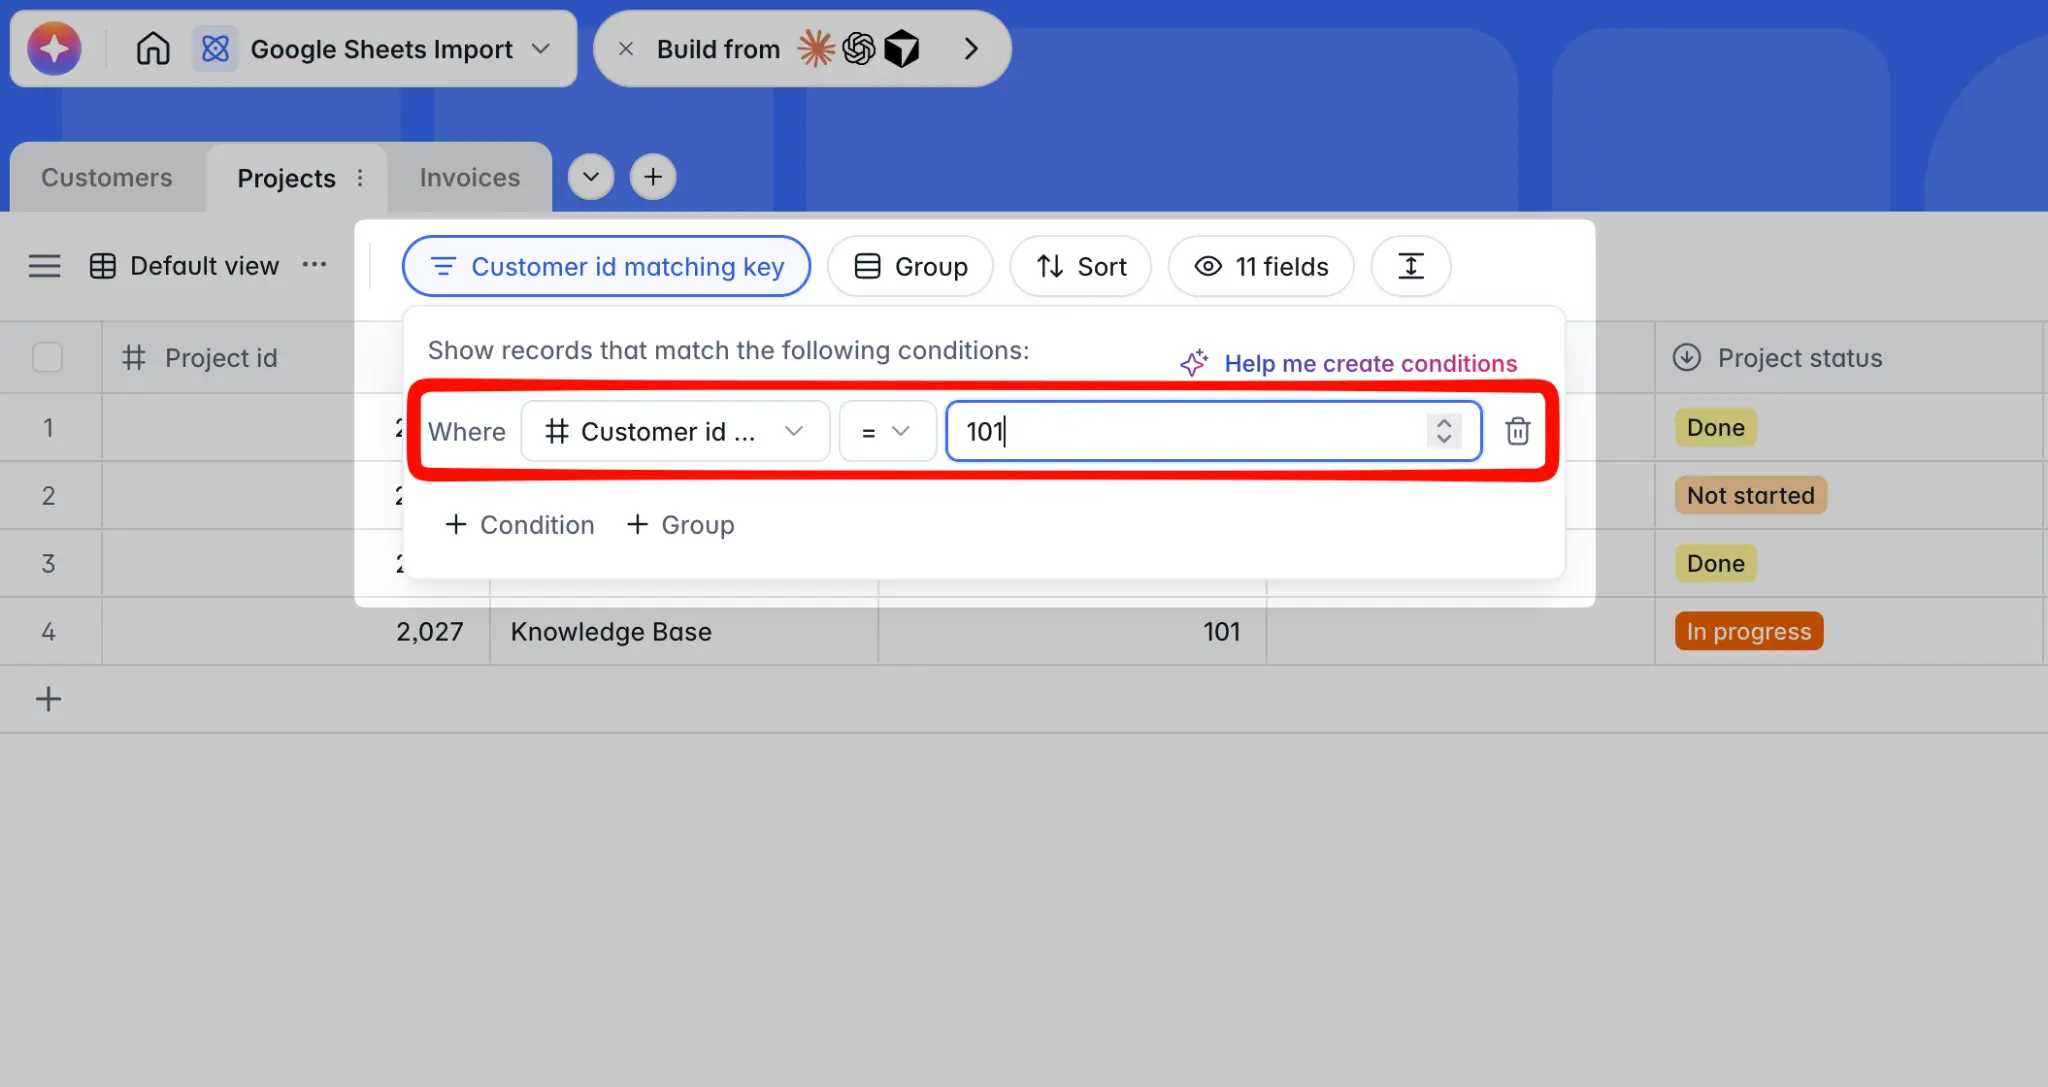
4. You’ll notice that the view is filtered as soon as you write 101. Click outside of the filter to view the records. Double-click the first cell of the Customers relational field, search for record 101, and click to link it to this project.
5. Drag-to-copy works in Softr the same way it works in Google Sheets. With the first row selected, click and drag the blue handle in the cell all the way down.
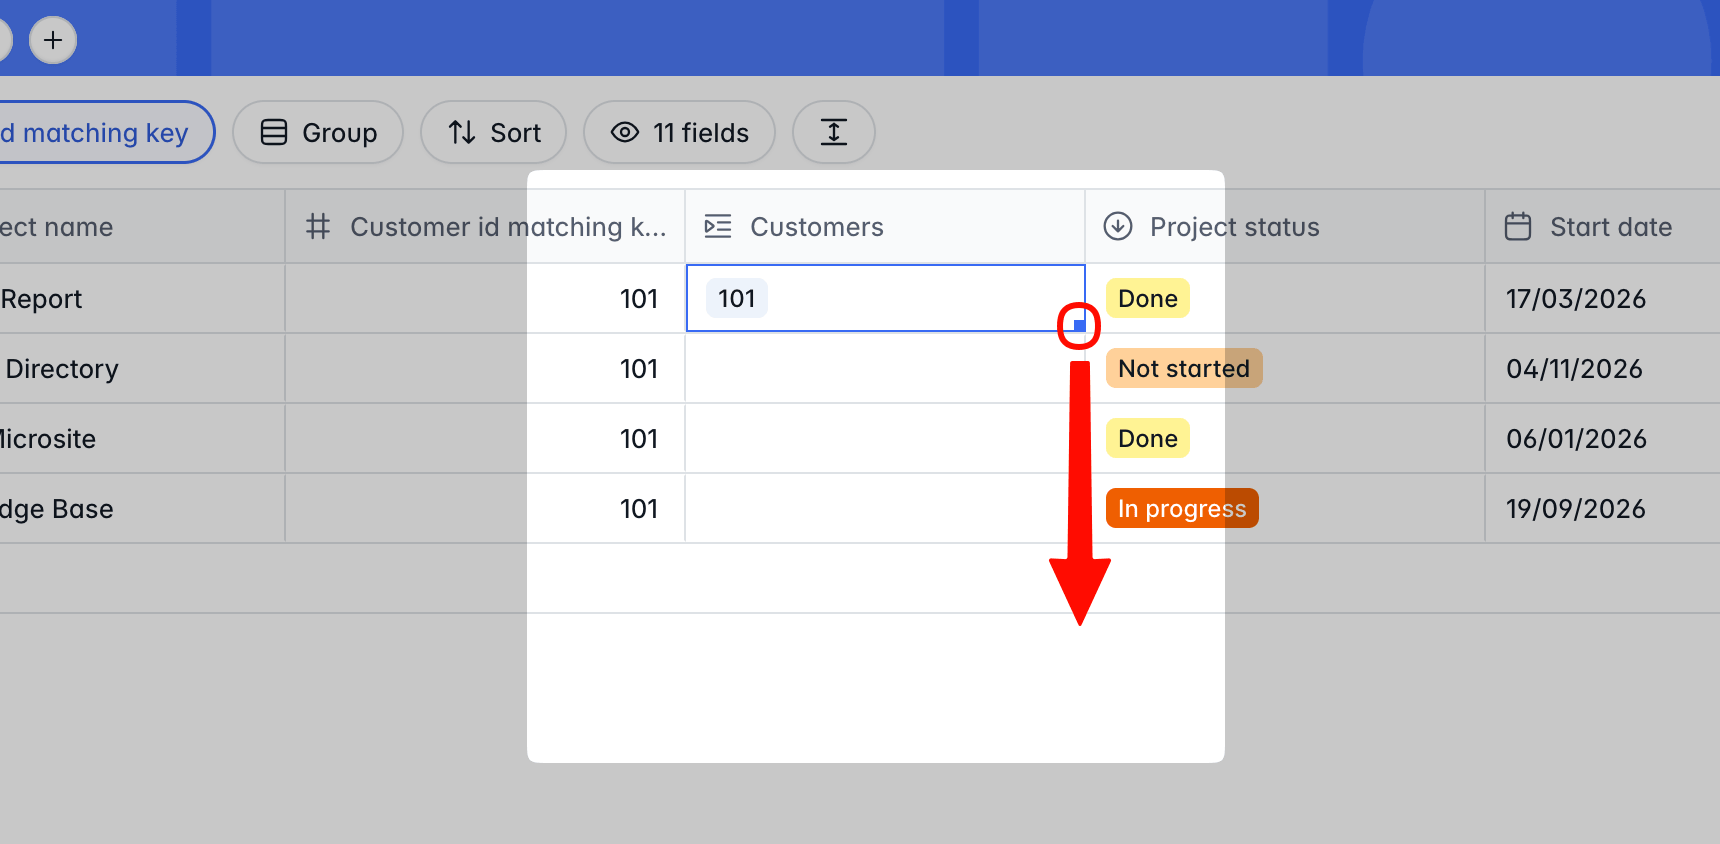
6. All projects that belong to customer 101 are now linked. You can now move to customer 102, 103, and so on, and repeat the linking operation. Remember to remove the filter when you’re done so you can see the entire table again.
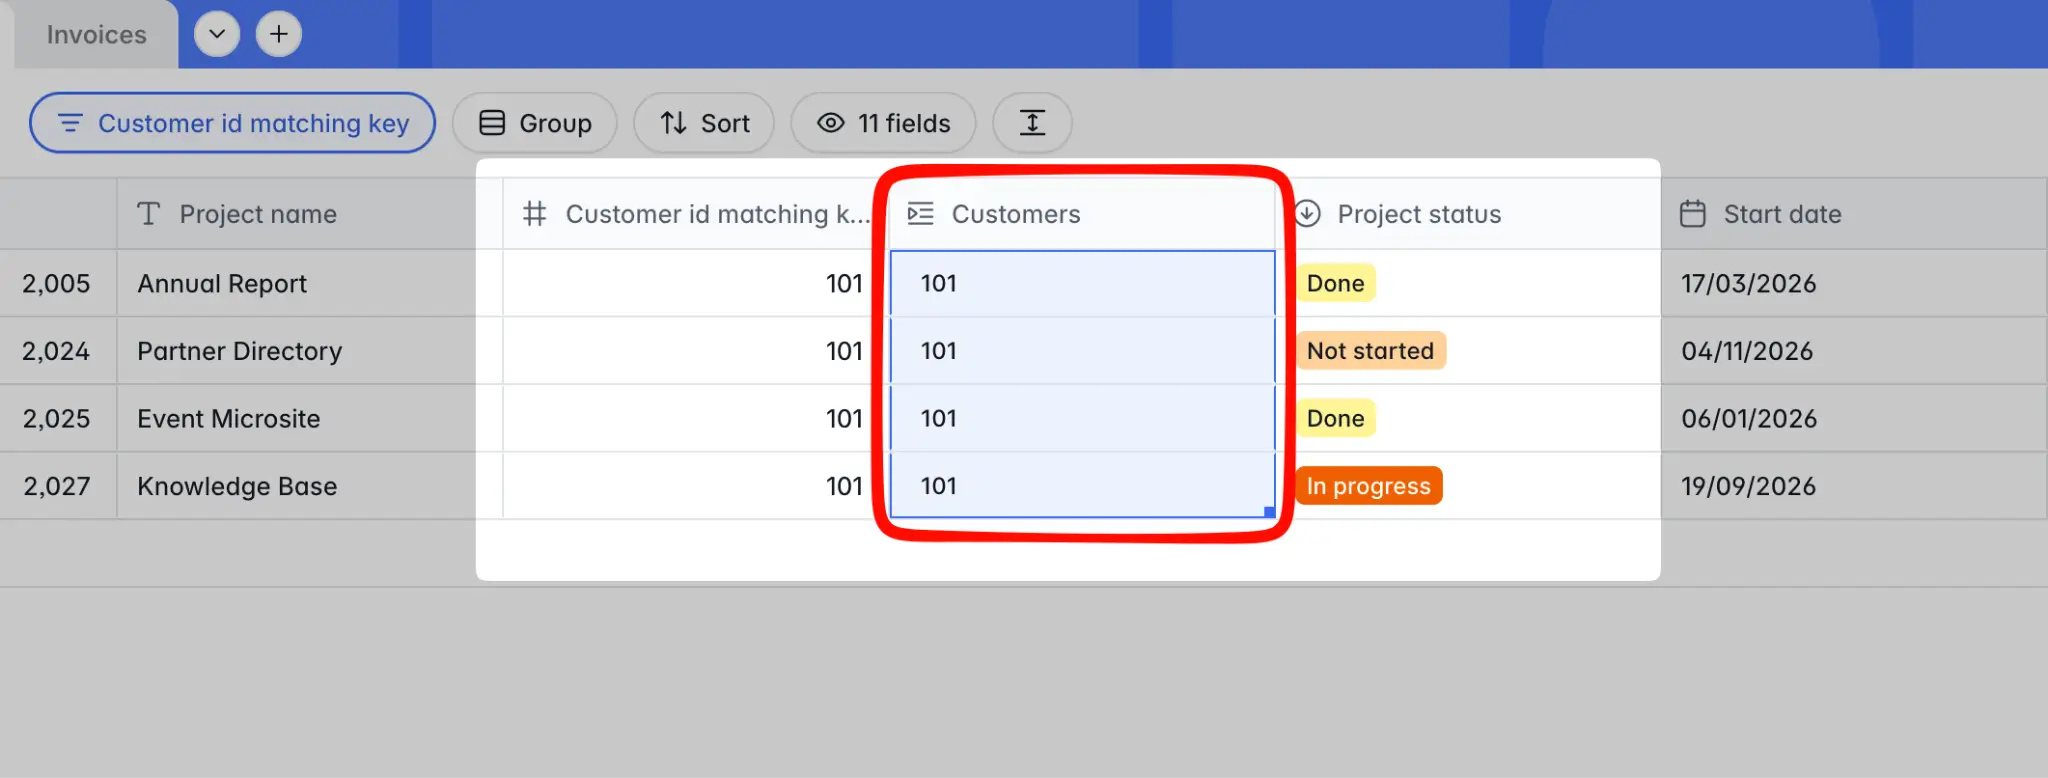
Repeat this process until all records in all tables are properly linked. Once you finish, it's safe to delete the matching key columns.
Build apps and workflows on top of your database
You moved your data to the new platform: it's clean, well-structured, the perfect foundation for building apps that will improve productivity and make your work easier. Instead of squinting at database tables, you can give everyone on your team a set of polished tools that are easier to use and that also prevent introducing messy or wrong data.
Use AI to turn your data into an app
Softr AI collapsed the time needed to build a new, fully-functional app. If the existing templates don't cover your needs, you can build apps on top of your data using a starting prompt, and then edit them either by prompting or using the visual interface.
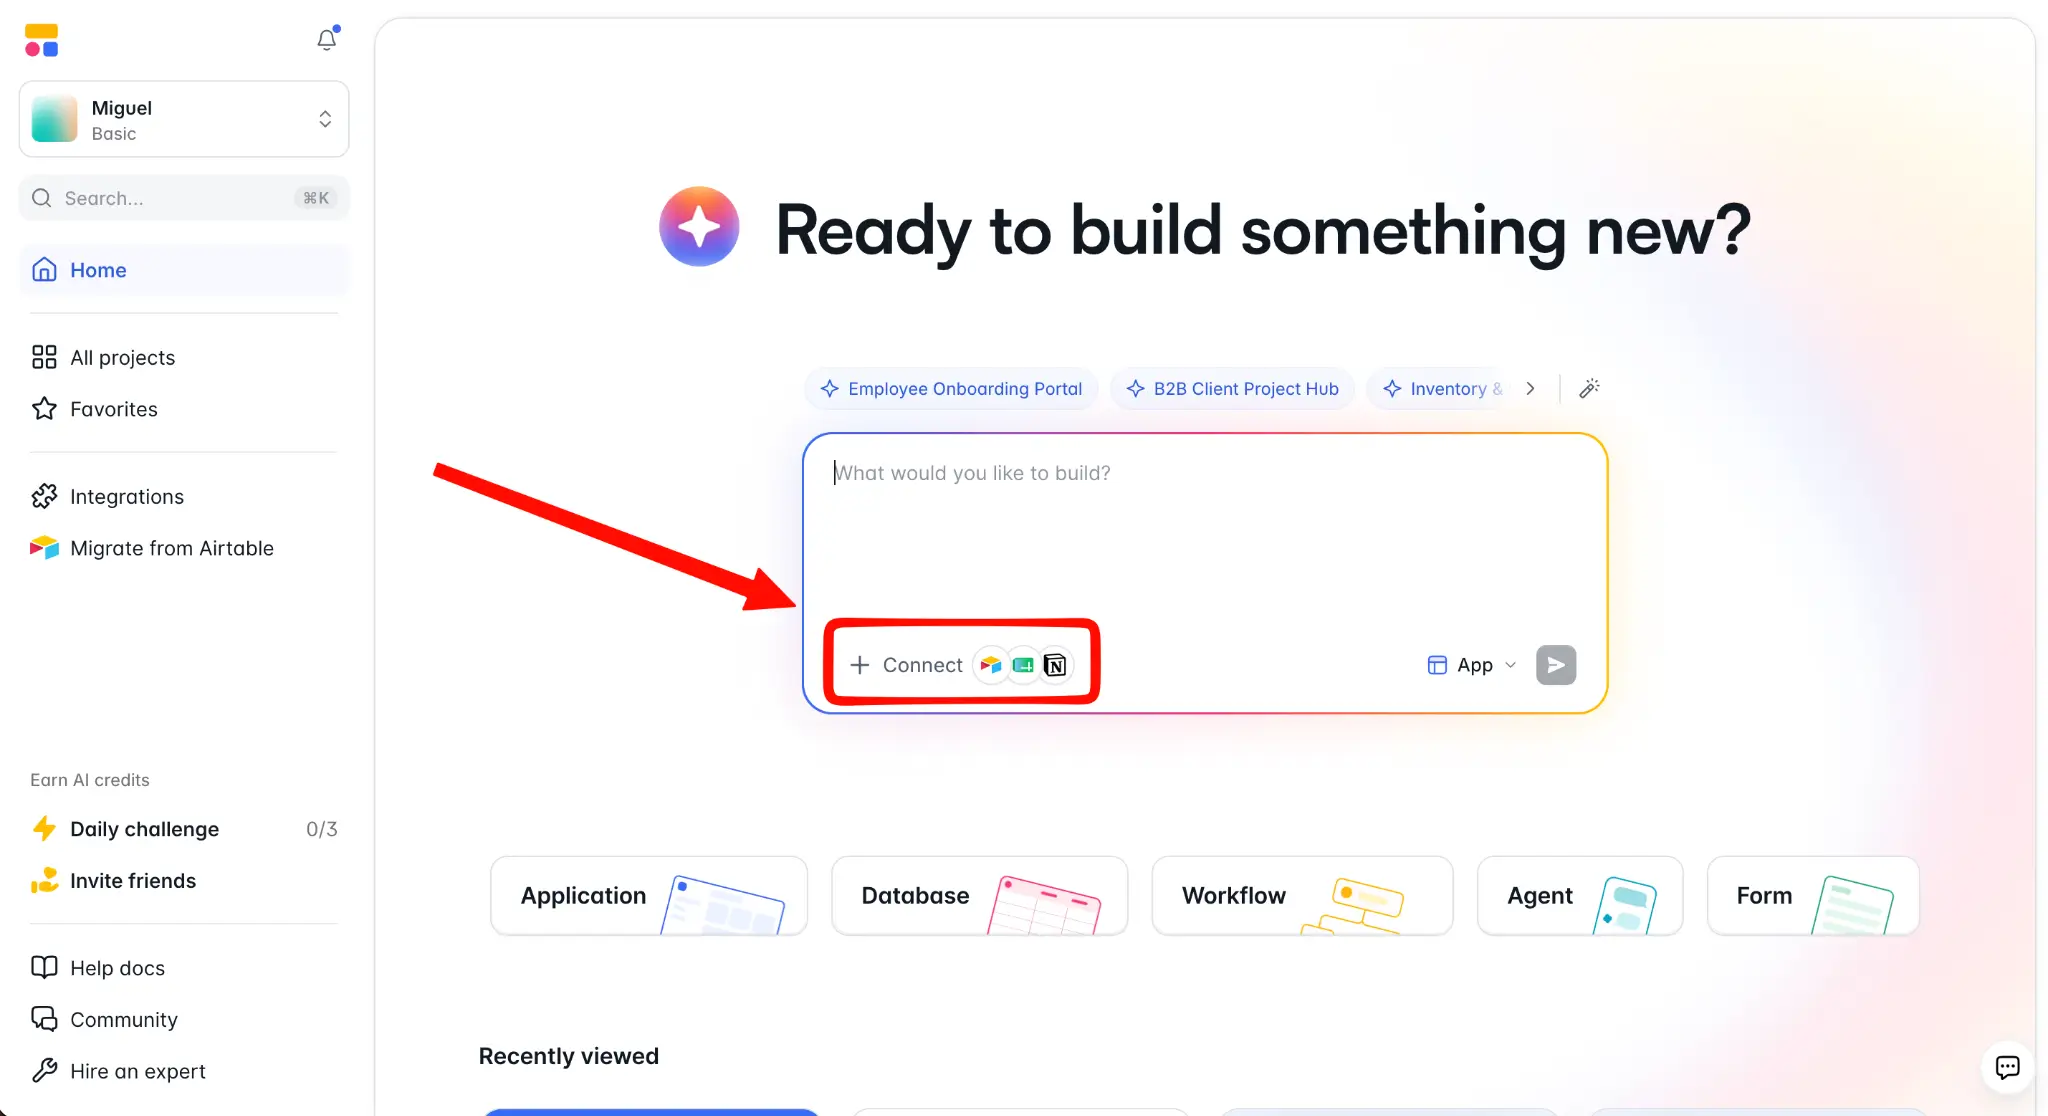
1. Go to the Softr dashboard and click the Connect button inside the prompt box
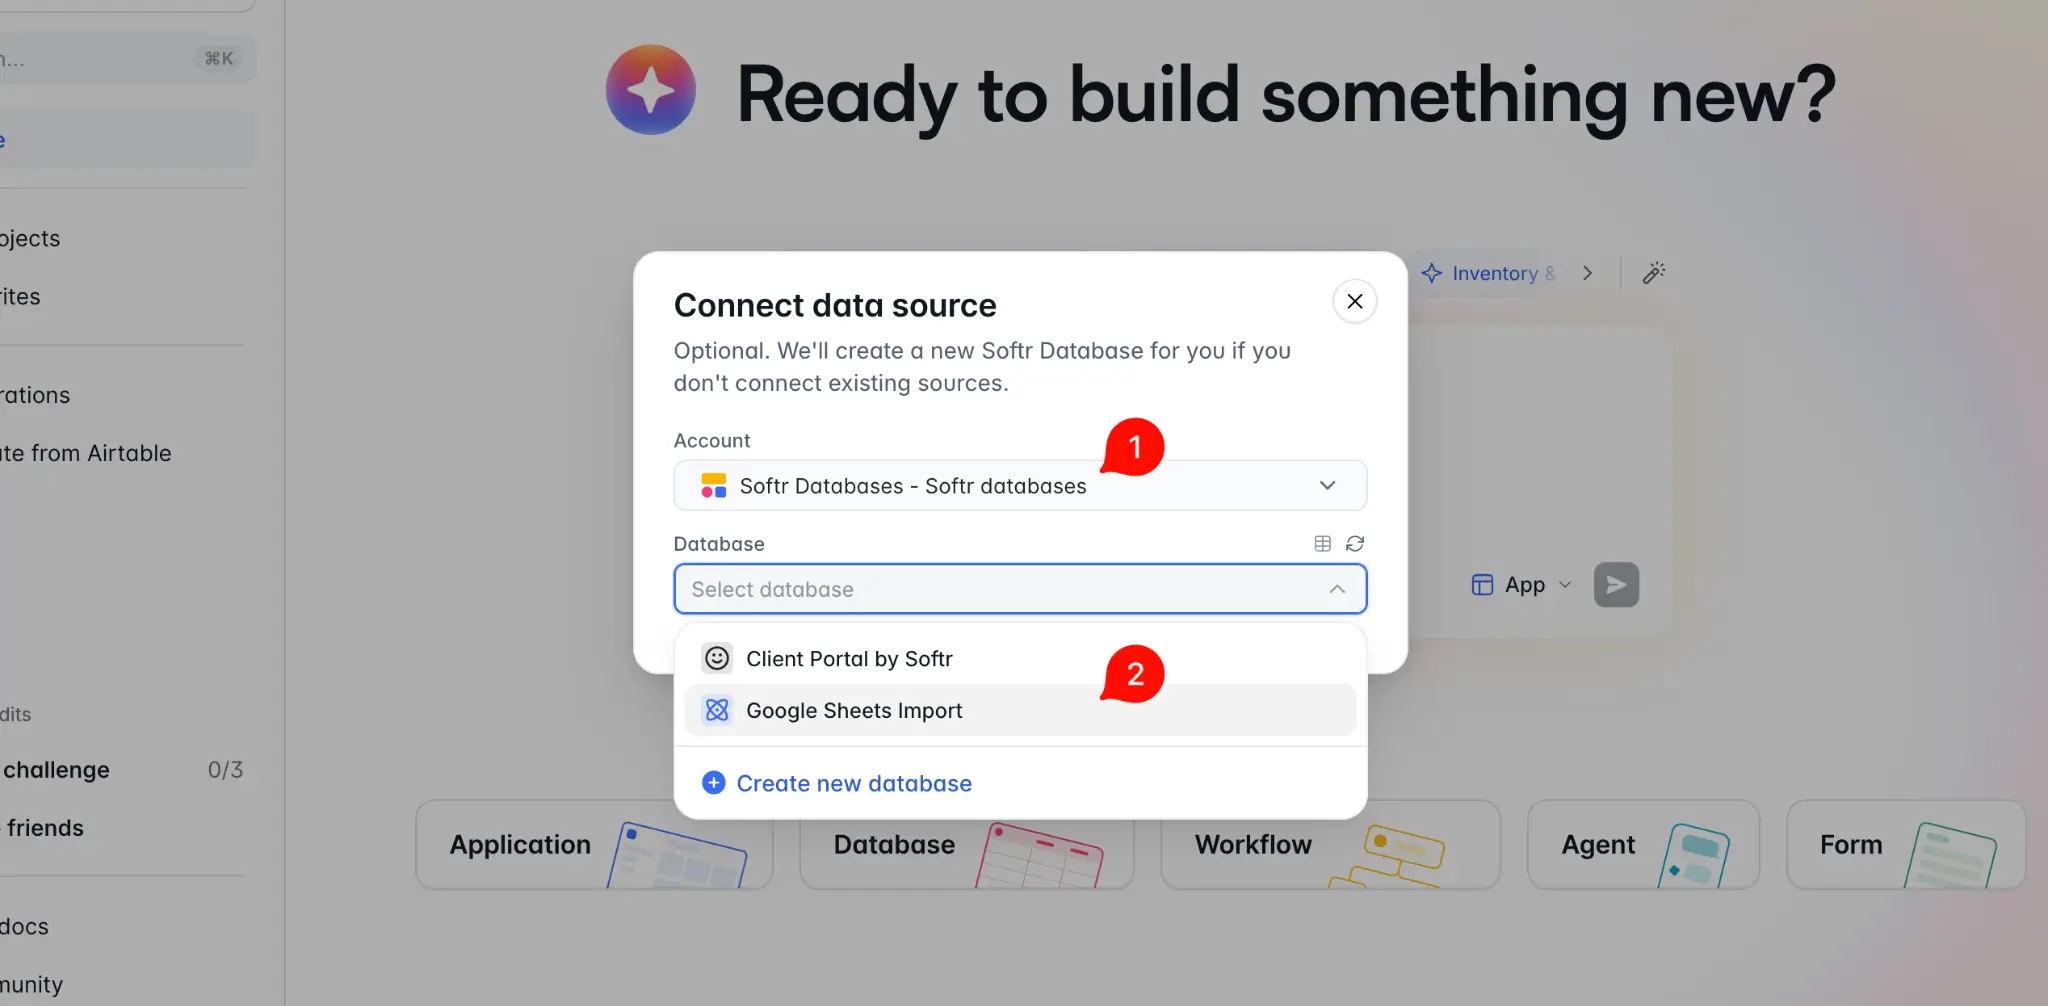
2. Select Softr Databases and then your newly imported database.
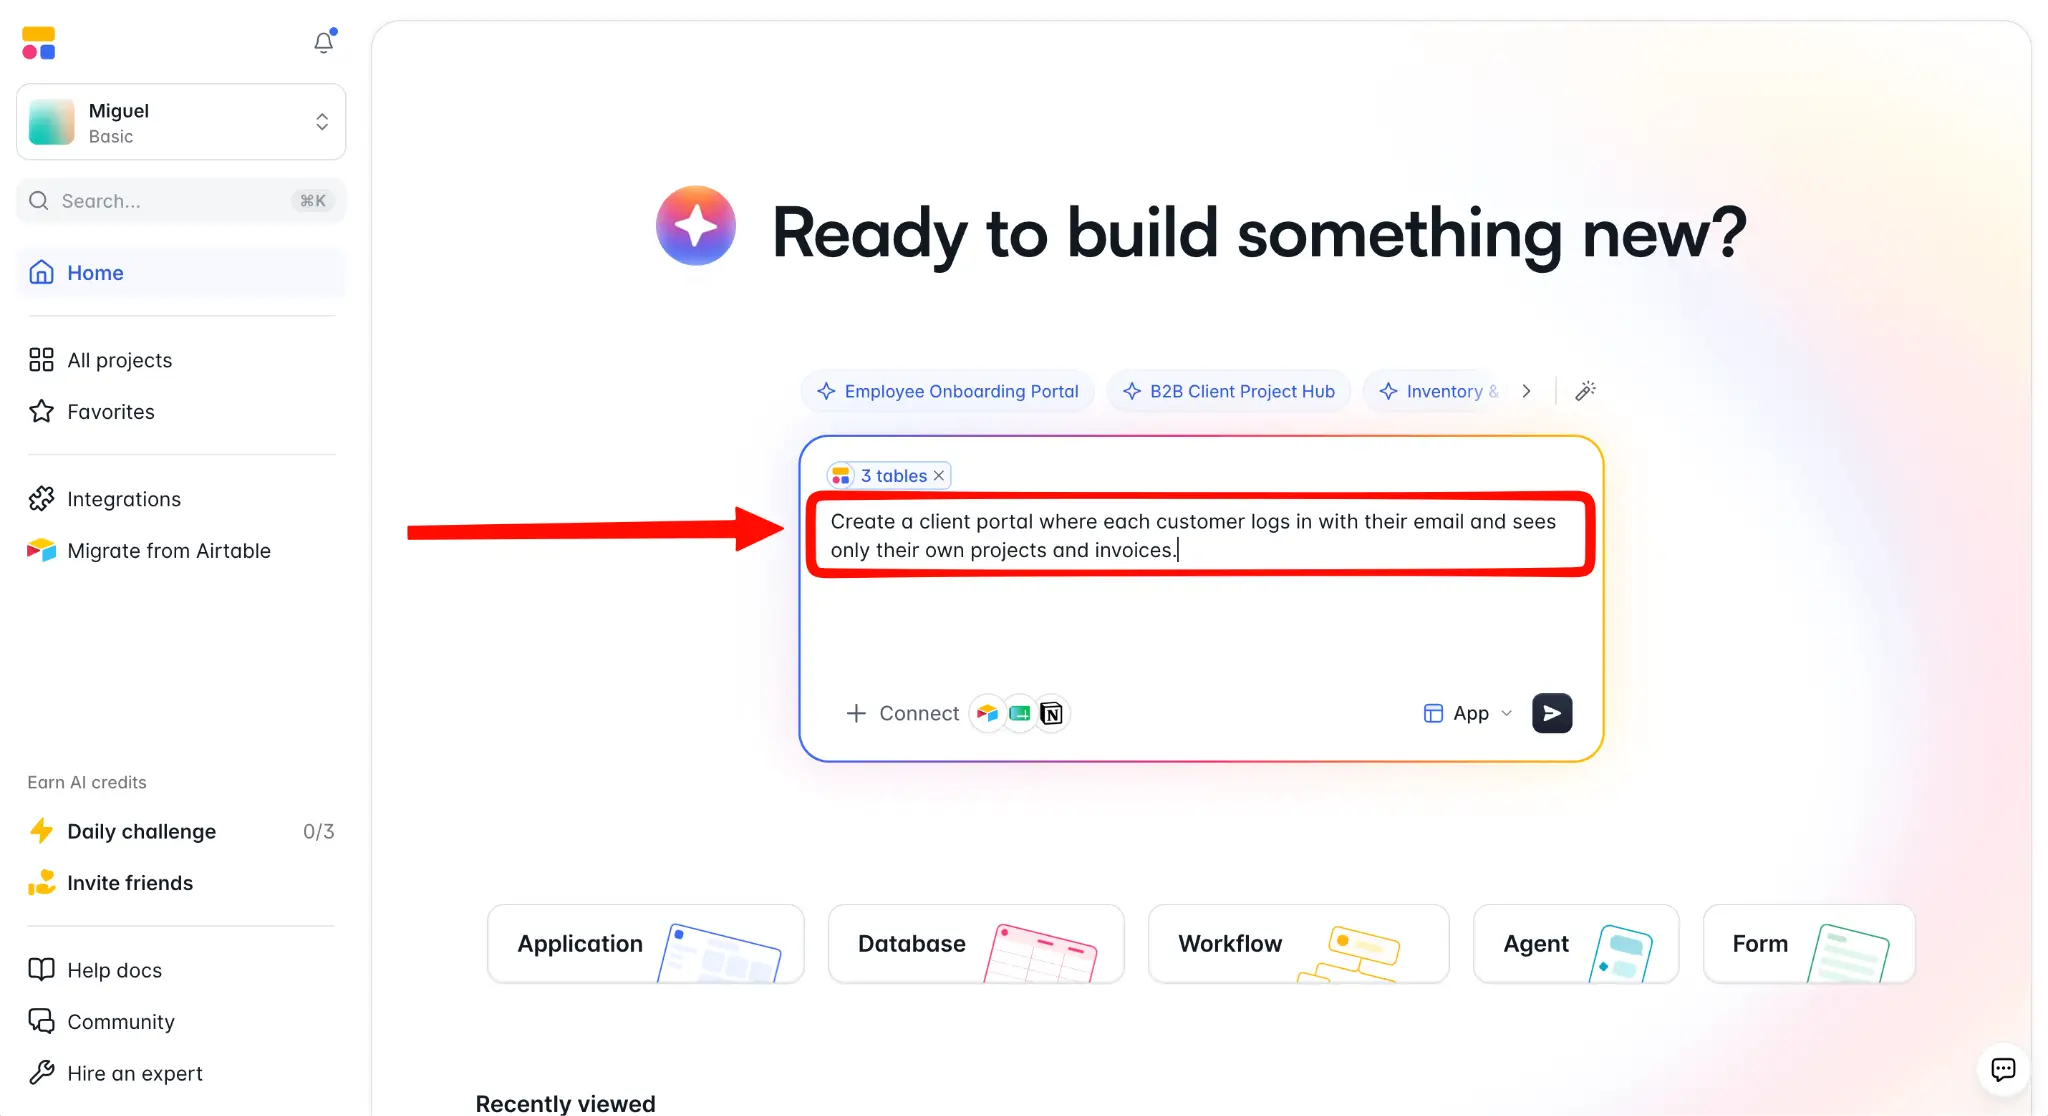
3. Paste the following prompt in the input field: "Create a client portal where each customer logs in with their email and sees only their own projects and invoices." Click the Send button when done.
Softr AI will interview you to customize your app before it starts building. Answer the questions in any way you like. It can take up to 5 minutes to build your app and you'll receive a popup notification once it's complete. Click Preview on the top right to test how your app works; if you'd like to extend it with more capabilities, you can keep chatting with Softr AI or use the visual editor to build it yourself.
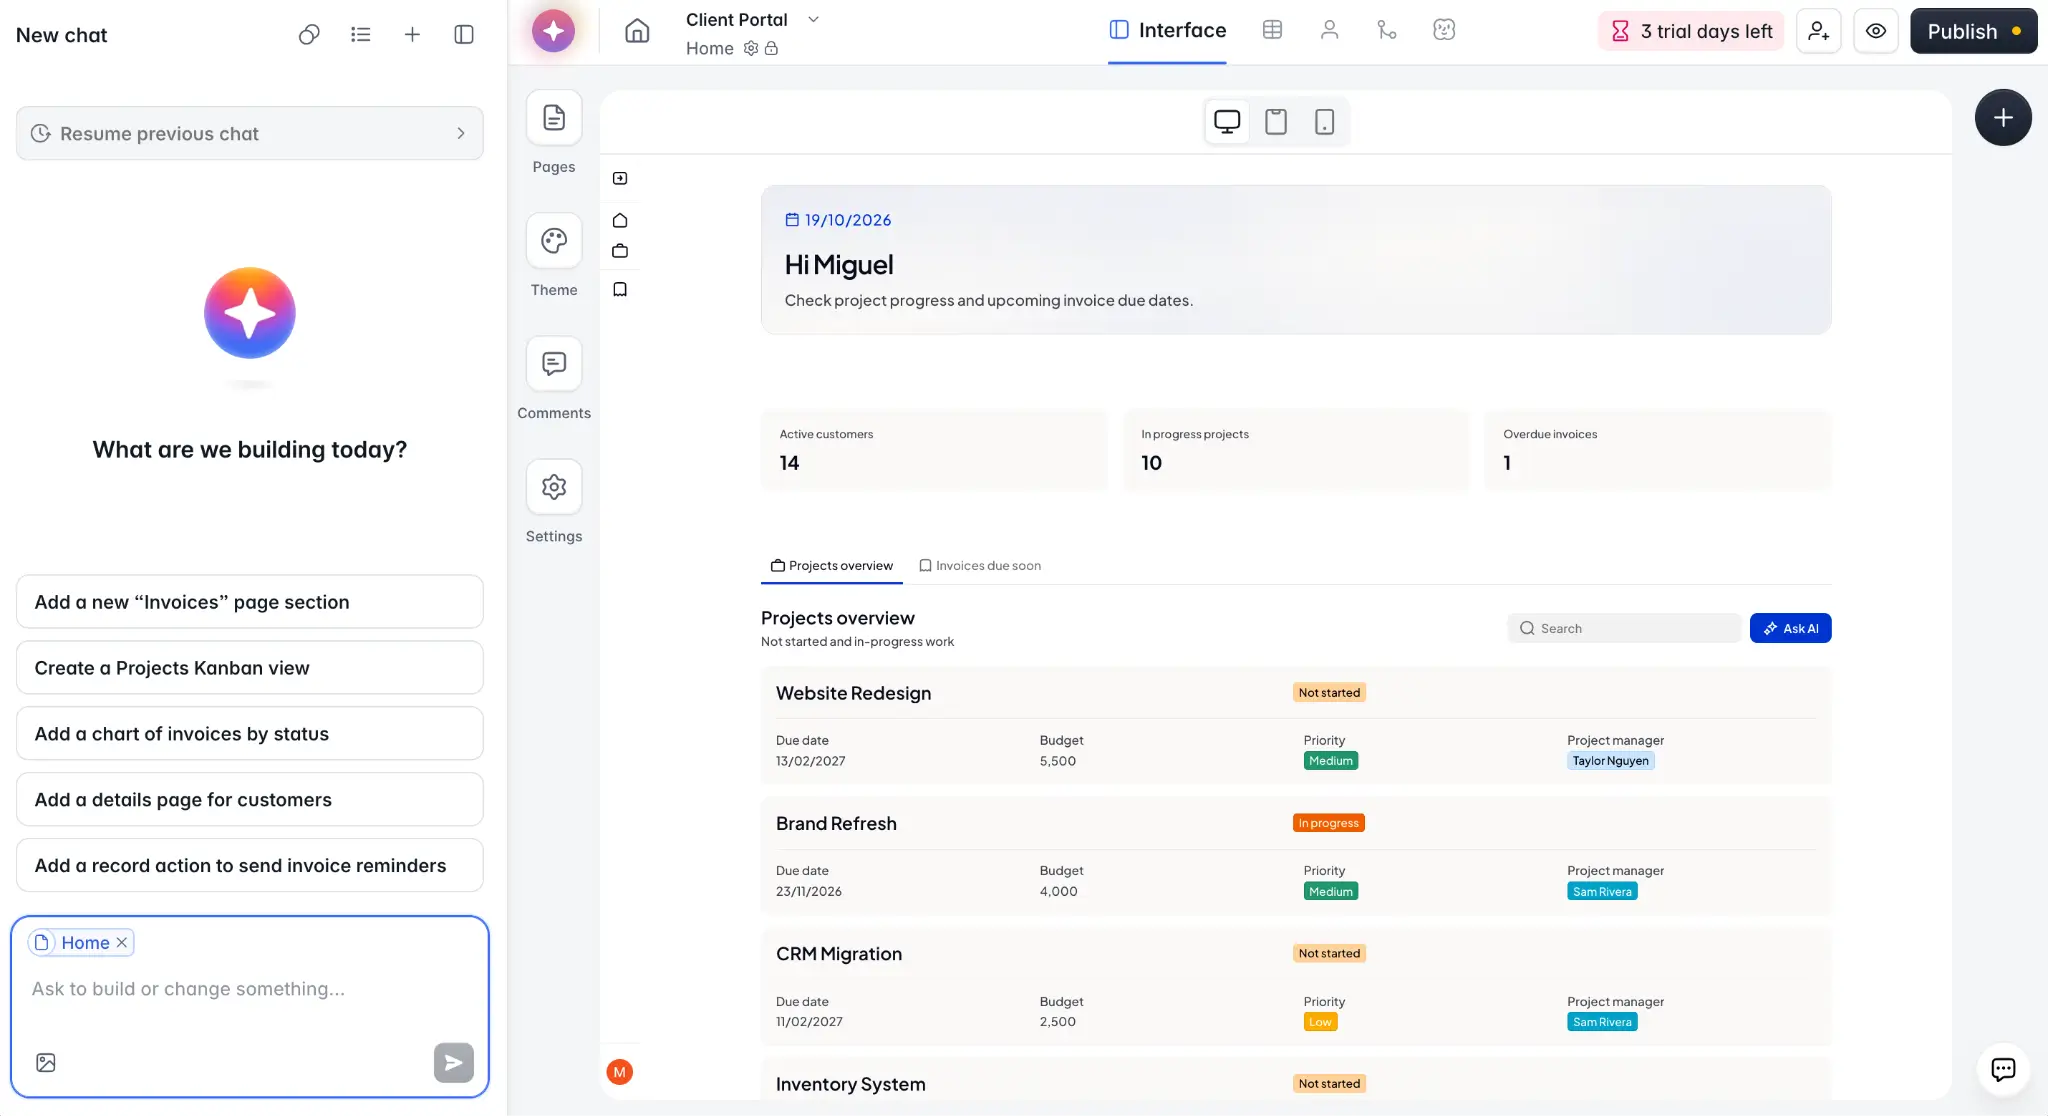
You can now build other tools on top of the same data by going back to the Softr dashboard and sending the following prompts to Softr AI one at a time:
- Project tracker: "Create a project tracker for my team with a board of projects grouped by project status, filters for project manager and priority, and the customer shown on each project."
- Invoicing dashboard: "Create an invoicing dashboard that shows invoices by status, highlights overdue invoices, and totals the amount invoiced per customer."
- Simple CRM: "Create a simple CRM with a customer directory showing account status, industry and contact details, where each customer's page lists their projects and invoices."
Once you connect or import all your data into Softr, those sources are ready to connect to your apps without extra configuration, so you can start testing and using your app with real data.
Rebuild the workflows around your spreadsheet
Remember the list we made mapping the workflows in step 1? This is the moment to rebuild these and connect them to the new data source. Open the planning file and start building the forms, interfaces, or automations until you've covered them all. You can get a head start with Softr AI, as it can build nearly all the solutions you need on top of your data, generating a usable first version that you can adjust to the way you and your team work.
Rebuilding workflows is also a good opportunity to think about user management. Softr Databases is a big upgrade from Google Sheets' viewer/commenter/editor roles. Each one of your tools can have custom permissions that dictate who has access to what pages and resources, making it a robust solution for anything customer-facing or apps used across different teams. Get started with adding your team into Softr and managing permissions in user groups & permissions.
Final tests and launch
Migration complete. Workflows rebuilt and apps ready. It's time to transition from the old system to the new one: set a specific transition date and let everyone know about the switch. On that day, make your Google Sheets view-only to prevent anyone from using them by mistake, and provide links to every app and workflow entry point to everyone.
If your migration took a couple of days or more, it's likely that the old Google Sheets got updated with new records. If that's the case, find the changes and update your database using these strategies:
- Check for new rows at the end or the top of each table, as that's usually where new data is added
- Look at the Google Sheets version history to see what changed since you copied the file (File > Version history > See version history)
- For big tables or those where edits could have happened inside individual cells in the middle, use a tool like Diffchecker to see the differences
Finally, keep an ear out for feedback or fixes needed on both the data or any of the apps and workflows that you built. Over time, you can train other members of your team to be responsible for individual tools, so they can maintain and expand them as their needs evolve.
Common mistakes when migrating from Google Sheets to a database
Migrating data requires patience and attention to detail. It's easy to rush ahead and skip important steps, and then realize that you have to go back and fix things. These are the common mistakes that people face when going through the process. Keep an eye out for them as you move forward.
Starting the migration without a plan. People who usually skip planning don't use relational features, one of the main advantages of a database. It can also lead to forgetting to move important tables and to rebuild workflows and apps, creating friction for everyone and pushing them to go back to the old tools.
Setting up the migration on top of a live Google Sheets file. This can lead to accidental data loss, test data treated as real data, and make your team confused by new columns containing values they don't understand.
Migrating the Google Sheets as-is. Copying and pasting the tables from Google Sheets straight into a database usually means skipping relationships and not cleaning data, which affects future data searches and workflow automation.
Importing data that wasn't clean or structured for a database. This can lead to low data quality, failed imports, and records that end up being skipped during the process.
Relying on names instead of unique IDs. Names aren't always unique or permanent: two customers can share a name, and a company can rebrand halfway through your migration. Without a unique ID on every record, linking projects to the right customer turns into guesswork, and a single typo can attach an invoice to the wrong company.
Giving everyone the same access permissions. Moving to a database makes it possible to control who sees and edits what, so don't copy the "everyone is an editor" setup from Google Sheets. Decide which teams, and which customers if you're building a portal, need access to which data, and set up permissions while you rebuild your workflows rather than after something goes wrong.
Abandoning the original sheet right away. The new system hasn't been tested with real day-to-day use yet. Keep the original Google Sheets file as a view-only backup until your team has used the database and apps for a while and you've confirmed that nothing is missing or broken.
Move from Google Sheets to a database with Softr
Google Sheets is a powerful tool on its own, but it's still too manual when you want to prevent avoidable mistakes and scale your productivity. Moving your spreadsheet into Softr lets you turn it into a business app: Structure your spreadsheet data into a database, and build the forms, dashboards, permissions, and workflows your team needs, without code.
This process can take time if you have a lot of data, but you don't have to do everything in one go. Pick the Google Sheets file that's creating more problems and start there, build a few internal tools on top of it, and then keep migrating after you've got the first wins.
Frequently asked questions
Can you turn a Google Sheet into a database?
Can you use Google Sheets as a database?
Will you lose your data when moving from Google Sheets to a database?