How to automatically share invoices with customers


[.blog-callout]
TL;DR
- Invoice automation removes repetitive manual steps: copying deal details, exporting PDFs, sending emails, and logging follow-ups.
- There are three main routes: your accounting software's built-in recurring invoice feature, a dedicated automation platform (Make, Zapier), or a client portal built with a tool like Softr.
- A portal approach gives you the most control over who sees which invoice, and it can generate invoices automatically from data already in your database.
- Database AI agents can even extract invoice numbers and totals straight from an uploaded PDF, cutting out manual data entry entirely. [.blog-callout]
Generating and sharing invoices with customers is a repetitive activity for business owners, entrepreneurs, and accountants alike. Automating it frees up your team's time for work that actually needs their judgment.
This article looks at three ways to automatically share invoices with customers: billing software, automation tools, and Softr.
What is invoice automation?
Invoice automation refers to using digital tools and software to facilitate creating, managing, and sharing invoices.
By nature, processing invoices is a relatively repetitive process, consisting of the same tasks teams repeat over and over again:
- Copying and pasting the details of a deal into a document before exporting it as a PDF to create an invoice
- Sending new invoices to the appropriate recipient
- Storing invoices in a specific folder in the company drive
- Copying invoice details in an accounting software
- Taking note of an invoice follow-up date in case payment hasn’t been received by the due date
The list goes on, but you get the idea: These steps are generally the same for every invoice within your organization and don’t require much human touch. On the contrary, they might get in the way of your team's other, more important work.
That’s where invoice automation steps in by introducing software solutions that can automatically proceed with some of these steps after a bit of initial setup. Let’s look at some of the benefits of such an approach.
Benefits of invoice automation
Automating is excellent for your team to stop spending time on repetitive tasks instead of focusing on things that can actually benefit from their expertise. But that’s not all. Here are some of the benefits of invoice automation:
Reducing errors
One of the most overlooked benefits of automation is accuracy. When humans perform repetitive actions over and over again, errors are bound to happen. That's normal, but software doesn't have this issue. Let automation take care of the repetitive steps so your team can spend their time and energy where their expertise actually matters.
Enabling scalability
Humans can only do so much, but automation introduces scalability capabilities that guarantee accurate output regardless of volumes, whether you’re trying to process 10, 100, or 1000 invoices.
Ensuring security
If done properly through platforms with enterprise-grade security, invoice automation will benefit from secure portals and encrypted workflows, ensuring the protection of sensitive financial data.
Saving time and money
The time saved by your team benefits not only their workload and productivity but also your business as a whole: faster invoice processing and delivery, for example, will lead to quicker payment processing, which has a positive impact on your cash flow and financial management.
These are just scratching the surface, and once you start automating processes, you’ll quickly realize the many benefits it presents. But it also doesn’t come with risks. Remember some best practices to ensure you stay on the right track.
Best practices of invoice automation
Before we get into the nitty-gritty of how you can automatically share invoices with your customers, here are some things to keep in mind when considering automating:
1. Choose the right tools
From automation options to database features, experiment with various options and software to find the best fit for you and your organization. The rest of the article provides examples of how to get started.
2. Think scalability
Consider tools and processes that can grow with your business when implementing invoice automation. Start with customizable templates that will ensure consistency.
3. Involve your team
Be prepared for some of your collaborators to be worried about introducing automation. It’s a normal reaction and a reason why you should involve your team in the process so they can appreciate the full value and potential of automation. Additionally, they know better than anyone where your current processes are failing (and succeeding), and they will be your best resources for identifying automation opportunities.
4. Keep security in mind
An invoice can contain sensitive information, such as customer details and financial data. Ensure your processes are safe by assessing the security credentials of the tools you use. For reference, check out our security page here.
5. Run regular audits
Lastly, automation is not a one-and-done process. Even the best thought-out automation requires periodic review and audit. Make sure to assess the accuracy of your invoice regularly, the timeliness of your payments, and your team's satisfaction.
Now that we’ve covered our bases let’s look at how to automate sharing invoices with customers in practice, starting with Softr.
How to automatically share invoices with customers using Softr
It's time to build an app to share invoices with your customers. We'll use Softr to set up a client portal where invoices are shared automatically, and only with the clients they belong to.
You have three ways to start: describe your portal to Softr's AI Co-Builder and let it generate the database, pages, and permissions for you, start from the "Client portal" template (what we'll walk through below), or build the whole thing manually from a blank canvas. The template route below is manageable for free on Softr's free plan and takes about 5 minutes to set up.
The idea is simple: create a client portal where an admin can add invoices that only the relevant client can see. Let's get started.
Log in to Softr
If you don’t already have an account, it's time to create one!

Select “Client portal”
Pick the “Client portal” template from the list of recommended templates.

Click on “Use template”
After checking out the preview, let’s get started.

Select your preferred data source and click on “Continue”
Choose a data source for your invoices. Softr Databases is the native option and the one we'd recommend by default: it's built for speed and comes with row-level permissions out of the box. Softr also connects to 21+ external sources, including Airtable, Google Sheets, HubSpot, BigQuery, monday.com, and Notion. Check out the data sources available on Softr. For this example, we go with Airtable.

Click on “Copy template data”
Softr will create a templated database using the data source of your choice.

Create the database in your data source
Accept the creation of your database using the data source of your choice. For Airtable, Softr will create a pre-filled base. Then, go back to your Softr tab.

Click on “Go to application”
Your Client Portal is ready for you to explore.

In “Pages”, click on “Invoices”
This template features a fully functional invoice-sharing system. Let’s take a closer look.

Check the “Invoices” page
This template allows admin users (you) to add invoices and share them automatically on the portal, but it makes them only accessible to the relevant clients. It works by matching the database with the invoice's name and the client's name to ensure only the right clients can see their invoices.

Click on “Preview” to see the portal from different user roles
In “Preview” mode, you can experience the portal from the perspective of different user roles, from admins to clients and freelancers, and even non-logged-in users. This will help you understand the power of Softr and how you can easily share invoices with specific customers with little effort.

Personalize your data source data
Now that you understand the logic behind the various roles in this Client Portal, it’s time to make it your own. Head to Airtable (or the data source of your choice) and feed it with your own data, which will be reflected on Softr. Adjust the logic of the invoice page based on your specific requirements, or describe the change you want to Softr's AI Co-Builder and let it update the block or permission rule for you.
If you're separating invoices from other records (like contracts or quotes), keep them in their own table. As Guillaume Duvernay, a Softr builder who has built 50+ business apps, puts it: "We separate documents and invoices because invoices require numerical properties like currency and amount. This allows us to run calculations and sum up costs, which a standard contract does not need."

Automating your invoices further with Softr
This is only a starting point in your invoice automation journey with Softr. The next step could be to automate the creation of invoices so they are generated automatically, and to remove manual data entry entirely.
There are a few ways to go further:
- Generate invoice documents automatically: our integration with Documint, a document generation engine, can create branded, professional invoices from your data. You can see how by watching our webinar on the topic:

- Extract invoice data from PDFs automatically: if clients or vendors send you invoices as PDFs, a database AI agent can read the uploaded file and pull out the invoice number, vendor name, due date, and total amount directly into your table, no manual retyping needed.
- Trigger reminders and notifications: use Softr Workflows to automatically notify clients when a new invoice is shared, or nudge them when a payment is overdue.
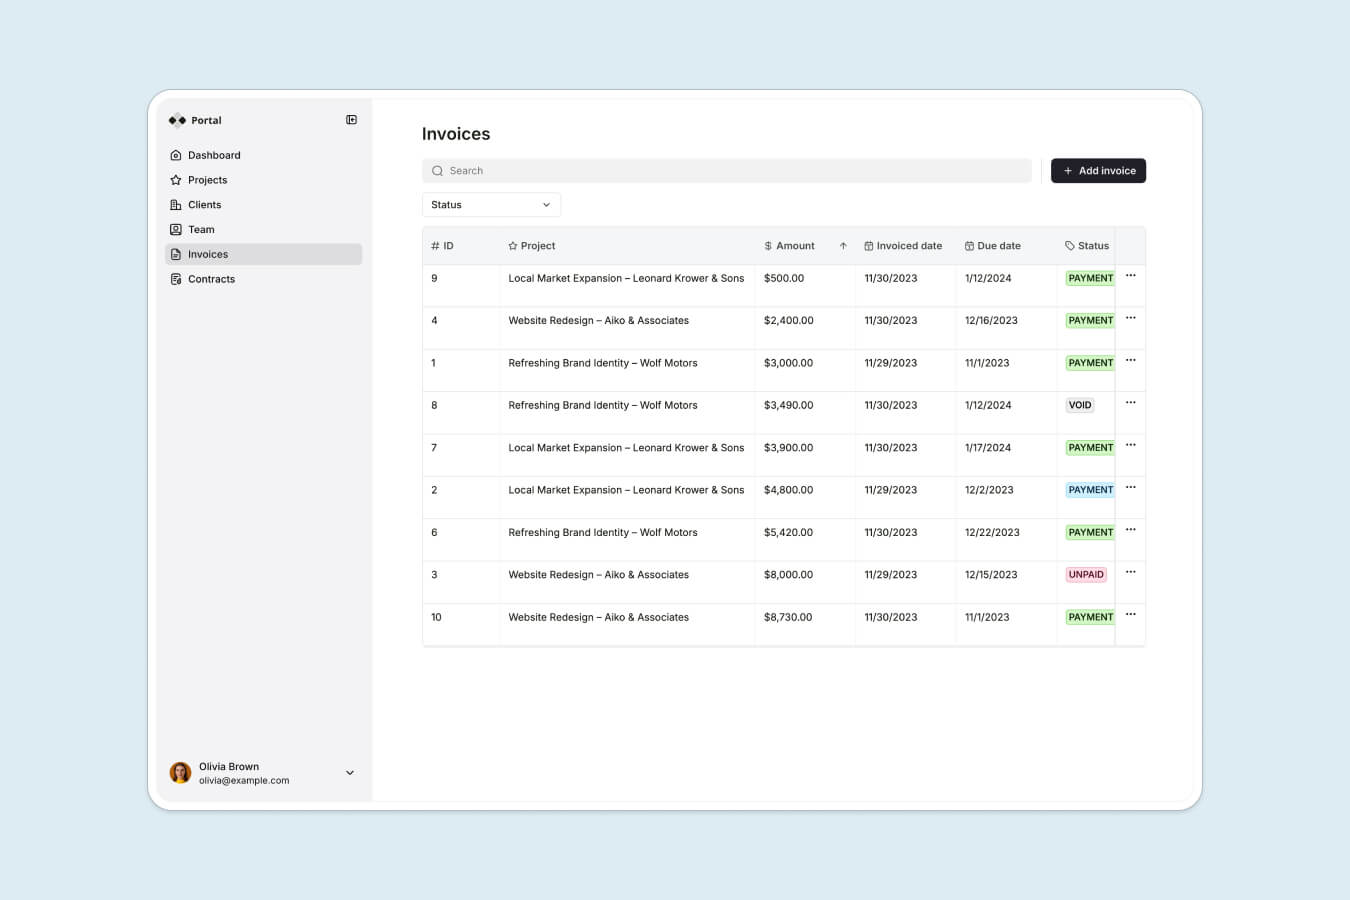
Teams already run this kind of setup at scale. Accounting firm Officeheads built a client portal on Softr that now serves more than 50 SMB clients, replacing repetitive email threads with self-serve access to reports, documents, and schedules.
This is only one of the ways you can explore automating your invoicing process more deeply. Hundreds of no-code and automation enthusiasts regularly share their ideas, projects, and topics in the Softr community. Will we see you there to share your own?
One of the easiest ways to create and share invoices with customers is to do it using the accounting software implemented at your company. Depending on the solution you’re using, you might already have access to automation features, making the process fast and easy.
In this example, we use Quickbooks to automatically share invoices with customers. This can be set up in under 5 minutes, and is included in Quickbooks' "Essentials" plan (check their current pricing page for the latest rate).
Follow the steps below.
Sign in to your Quickbook account
Head to your Quickbooks account and sign in to access your dashboard.

Click on the gear icon
Select the settings in order to access options.

Select “Recurring transactions”
In the list of options, click on “Recurring transactions”.

Click on “New”
Let’s create a new recurring transaction.

Select “Invoice” as your transaction type
There are many transaction types to choose from. For this example, let’s go with an invoice, then press “OK”.

Enter all the invoice details and press “Save template”
On top of the normal invoice details (client name, address, amount), you are able to configure which data every month the invoice will go out, and how long the automation should go on. Once you’re done, click on the “Save template” button at the bottom right corner of the screen.

Your recurring invoice has been created!
Congratulations, now the invoice will go out as configured, automatically.

How to automatically share invoices with customers using automation tools
Lastly, you can use a dedicated automation platform that will help you connect various tools you’re already using and configure automated processes that will run in the background.
Create a new Google Form
First, let’s head to Google Forms and create a new form. Alternatively, you can use one of the templates available.

Build your form
The form will gather all the information about invoices you need, and that data will be forwarded to a stylized template. Make sure to include a separate question for each field. In this example, we used:
- Name
- Address
- Invoice number
- Invoice amount
- Description
- Date

In the “Responses” tab, click on “Link to Sheets”
Every answer you receive will be forwarded to Google Sheets, which we will use to build the automation.

Click “Create”
Create the file, and let’s head to Google Docs.

In Google Docs, create a new document
Let’s create your invoice template.

Create your invoice template
This is the document that will be automatically duplicated with the data received from your Google Form. Make sure to create placeholders matching the values from the Google Form, using “{{“ and “}}” as markers around them. In this example, we’ve included:
- {{NAME}}
- {{ADDRESS}}
- {{EMAIL}}
- {{NUMBER}}
- {{DATE}}
- {{DESCRIPTION}}
- {{AMOUNT}}

Login to your Make account
Let’s go to Make to create the automation. Log in using your credentials or create a new account.

Create a new scenario
Depending on the tools you want to use, the scenario will be very different. In this example, we are using Google Sheets, Google Docs, and your email client. Feel free to use the scenario as is, or to leverage it as a baseline to create your own.

Click the “+” button and select Google Sheets
Pick Google Sheets from the list of apps available in Make.

Select “Watch New Rows” as the trigger
Your scenario will be triggered every time a new row will be added to your Google Sheets.

Connect your Google Sheets to Make
Connect your Google account and select the spreadsheet we created earlier in the “Spreadsheet ID” field. Select the Sheet name, and click “OK”.
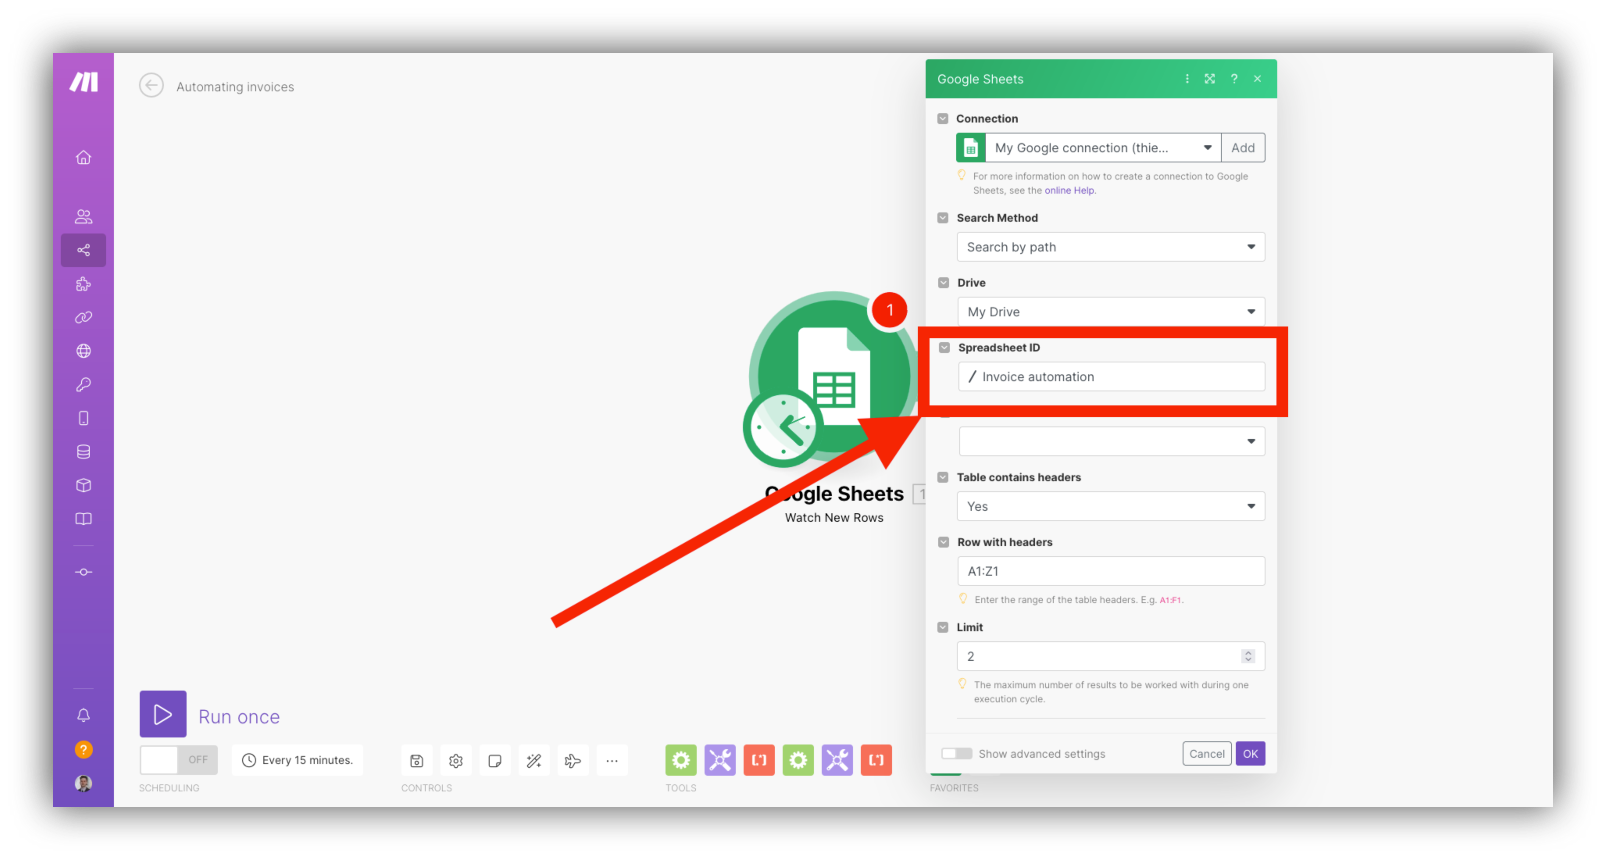
Click on “Add another module” and select Google Docs.
Now, we will add Google Docs into the mix.

Select “Create a Document from a Template”
In the list of actions, select “Create a Document from a Template", so we can create a new document every time a new answer comes in from the Google Form.

Select your Invoice template and match the values
In “Document ID”, select your document, and match each value that comes up with the corresponding value from the Google Form. In our example:
- {{NAME}} ->Name
- {{ADDRESS}} -> Address
- {{EMAIL}} -> Email
- {{NUMBER}} -> Invoice number
- {{DATE}} -> date
- {{DESCRIPTION}} -> Description
- {{AMOUNT}} -> Invoice amount

Give the document a title and select the drive location
Ideally, try to use the smart tags to give the document a cohesive name, for example “{{Name}} - {{Invoice Number}}” like in our example. Then, select where the file should go on your Google Drive. Then, press “OK”.

Test your automation
Make sure the automation works by replying to your Google Form, clicking “Run once” and verifying that a new file was created in your destination folder.

Share your new invoice automatically
Now that your automation is running, you have different options to share it automatically with clients and partners:
- Sharing the Google Doc link to the email in the invoice
- Sending an email with the newly created invoice attached
- Sharing the Google Drive with your client so they can receive every new invoice
The choice is up to you.
To automatically send invoices through Make, you need to add another module connected to your email account. Click on “Add another module” and select an email service such as Gmail. Next, select the “Send an email” action.”

Then, you need to connect the module to your Gmail account if it’s not connected yet. Under To, add the Email field from the invoice. You can use Name as Invoice Number as an email Subject. Lastly, add a link to the invoice under Content (it’s Web View Link in our example).
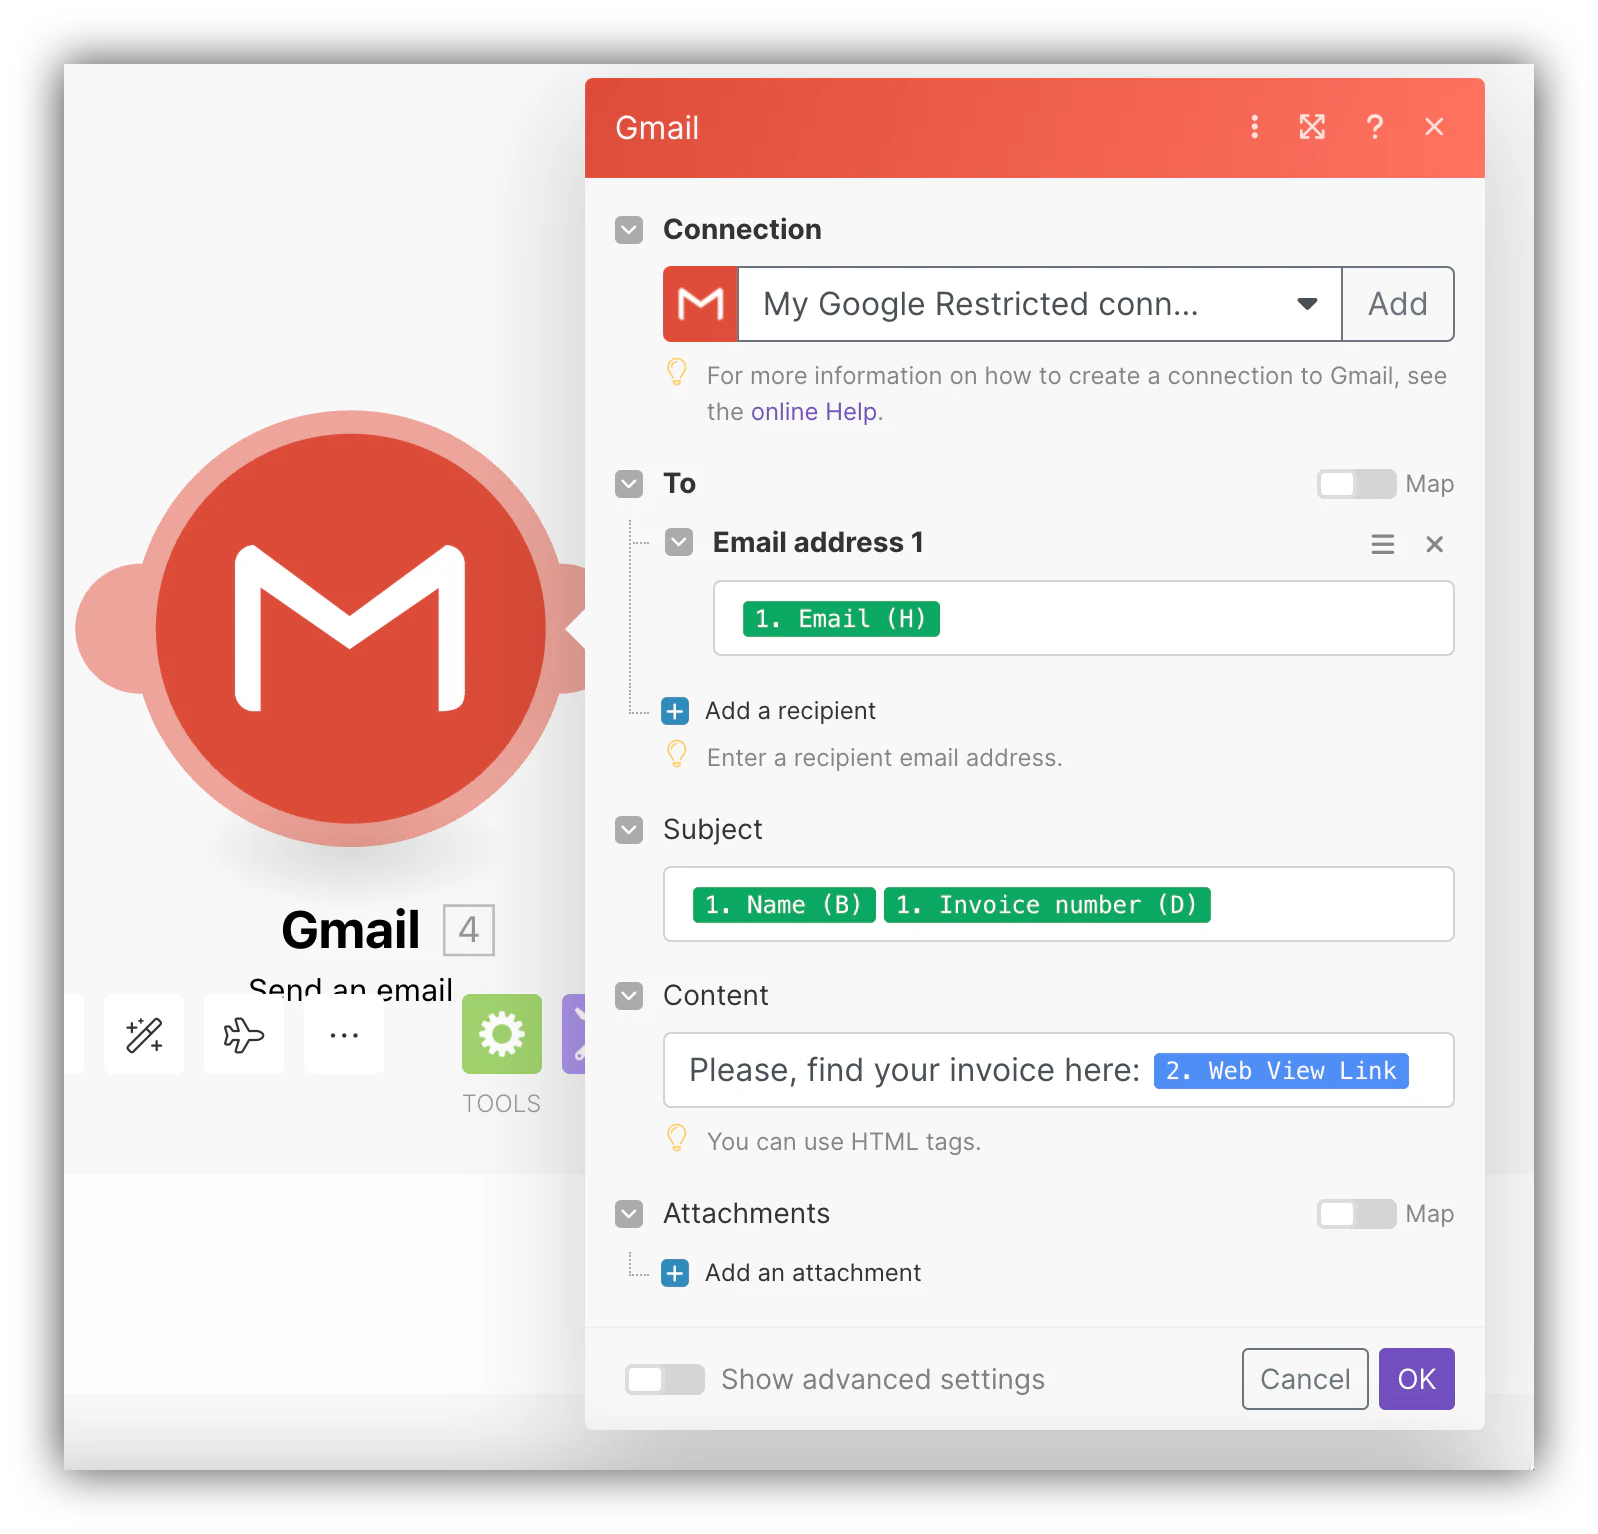
Click OK, and you’re done. As soon as you launch the automation, all the newly generated invoices will be automatically sent to the invoice recipient via email.
Click to turn your scenario on
That's it, your scenario is now running, and invoices will be created automatically going forward! For more information on how to automatically create and share invoices with customers, check out this great article and video by Marvin Aziz.

Pick the method that fits your stack today
There's no one-size-fits-all answer here. The right method depends on your requirements, your team's technical comfort, and what's already in your tech stack.
If you're already using dedicated accounting software with automation features, start there; it's the fastest win. If you want a client-facing portal, tighter control over who sees what, or room to layer in AI-driven data extraction, build it with Softr. And if you need to stitch several existing tools together, an automation platform like Make can bridge the gap.
Whichever route you pick, start building for free on Softr to see how quickly you can get a working client portal live.
Frequently asked questions
What is invoice automation, and how does it work?
What is the easiest way to get started with invoice automation?
Can I automate invoicing without technical knowledge?
How customizable are automated invoices?
Can I extract invoice data automatically from a PDF or scanned document?