How to Password Protect a Google Sheets spreadsheet


[.blog-callout]
TL;DR
- Google Sheets has no built-in password feature. You can restrict access with Google's share settings, but it's all-or-nothing: anyone with edit or view rights sees the whole file.
- Softr connects to your Google Sheets data and lets you gate access with user groups, so only logged-in users with the right permissions can see it, down to specific pages, blocks, or rows.
- The setup takes about 10 minutes: connect Google Sheets, add a block, create a user group, and set visibility to "Logged-in users." [.blog-callout]
Password protection lets you control who can view or edit your Google Sheet. By restricting access, you can prevent people from altering or deleting critical data, and you can share credentials only with the people who should actually see it.
Google Sheets doesn't have a built-in feature to password-protect a spreadsheet. You can restrict access using Google's native share settings, or you can use Softr to control access at a more granular level, down to specific pages, blocks, or even rows of data. Let's look at both options.
Password protecting a Google Sheet using Softr
Cost: $0
Time: 10 minutes
Softr is an AI app builder that connects to Google Sheets, Softr Databases, Airtable, and 17+ other data sources to build real business apps. It doesn't add a password directly onto your spreadsheet file, but it lets you control exactly who can see the data that comes from it, using user groups and permissions instead of Google's all-or-nothing sharing model.
Step 1: Log in to Softr or create an account
First, log in to Softr. If you don't have an account, sign up to Softr for free.

Step 2: Choose how you want to start
From your Softr dashboard, you have three ways to start: describe your app to the AI Co-Builder and let it generate the database, pages, and permissions for you, start from a template, or build from scratch. For this guide, we'll pick a template to keep things simple.

Step 2.1: Select a template
You'll land on the template gallery, where you can browse by use case. For example, to password-protect a project timeline, click the Internal Tools tab, scroll to the Project Management Template, and click on it.

Step 2.2: Click on "Use Template"
You'll see an overview of the template. Once you're ready, click Use Template in the bottom right corner.

Step 3: Connect Softr and Google Sheets
To password-protect your data, first connect Softr to the Google Sheets file that holds it.
Step 3.1: Choose Google Sheets as the data source
Grant Softr access to your Google Sheets data by clicking Google Sheets, then Continue.

Step 3.2: Log in to your Google account
You'll be redirected to the Google login screen. Select the account where the spreadsheet is saved.

Step 3.3: Authorize Softr
Authorize Softr to access your Google Drive files, including your Google Sheets spreadsheets, by checking the two boxes shown below. Then click Continue.

Step 4: Go to your application
Once Softr and your Google account are connected, you'll return to the onboarding page. Click Go to application to continue.

Step 5: Add a block
Now add one of Softr's pre-built blocks to pull in your Google Sheets data. Click the + icon in the top right corner, and when the block menu slides in, choose the block that fits your data.
In this example, since we're working with project management data, we searched "timeline" and selected List with timeline to visualize our projects. If you'd rather not configure this manually, you can also ask the AI Co-Builder to add the block for you by describing what you need.

Step 6: Choose your Google account
Click Connect data source under the Source tab, then choose your connected Google account.

Step 7: Select your spreadsheet and sheet
Select the spreadsheet you want to use, then select the specific sheet that contains the data you want to protect.

Step 8: Access the visibility settings
In Softr Studio, click Pages in the top left corner and select the page connected to your Google Sheets data. Click the three dots next to it, then Settings to open the visibility options for that page.

Step 9: Restrict access with a password gate
In Settings, open the Visibility dropdown to choose who can see this page's data. There are three options:
- All users: anyone can see it, logged in or not.
- Logged-in users: only people who log in with valid credentials can see it.
- Non-logged-in users: only people who are not logged in can see it.
Since you want to restrict access to people with credentials, select Logged-in users.

Step 10: Define who can view your data
Softr lets you narrow this down further using user groups, so different people see different parts of your data instead of an all-or-nothing view.
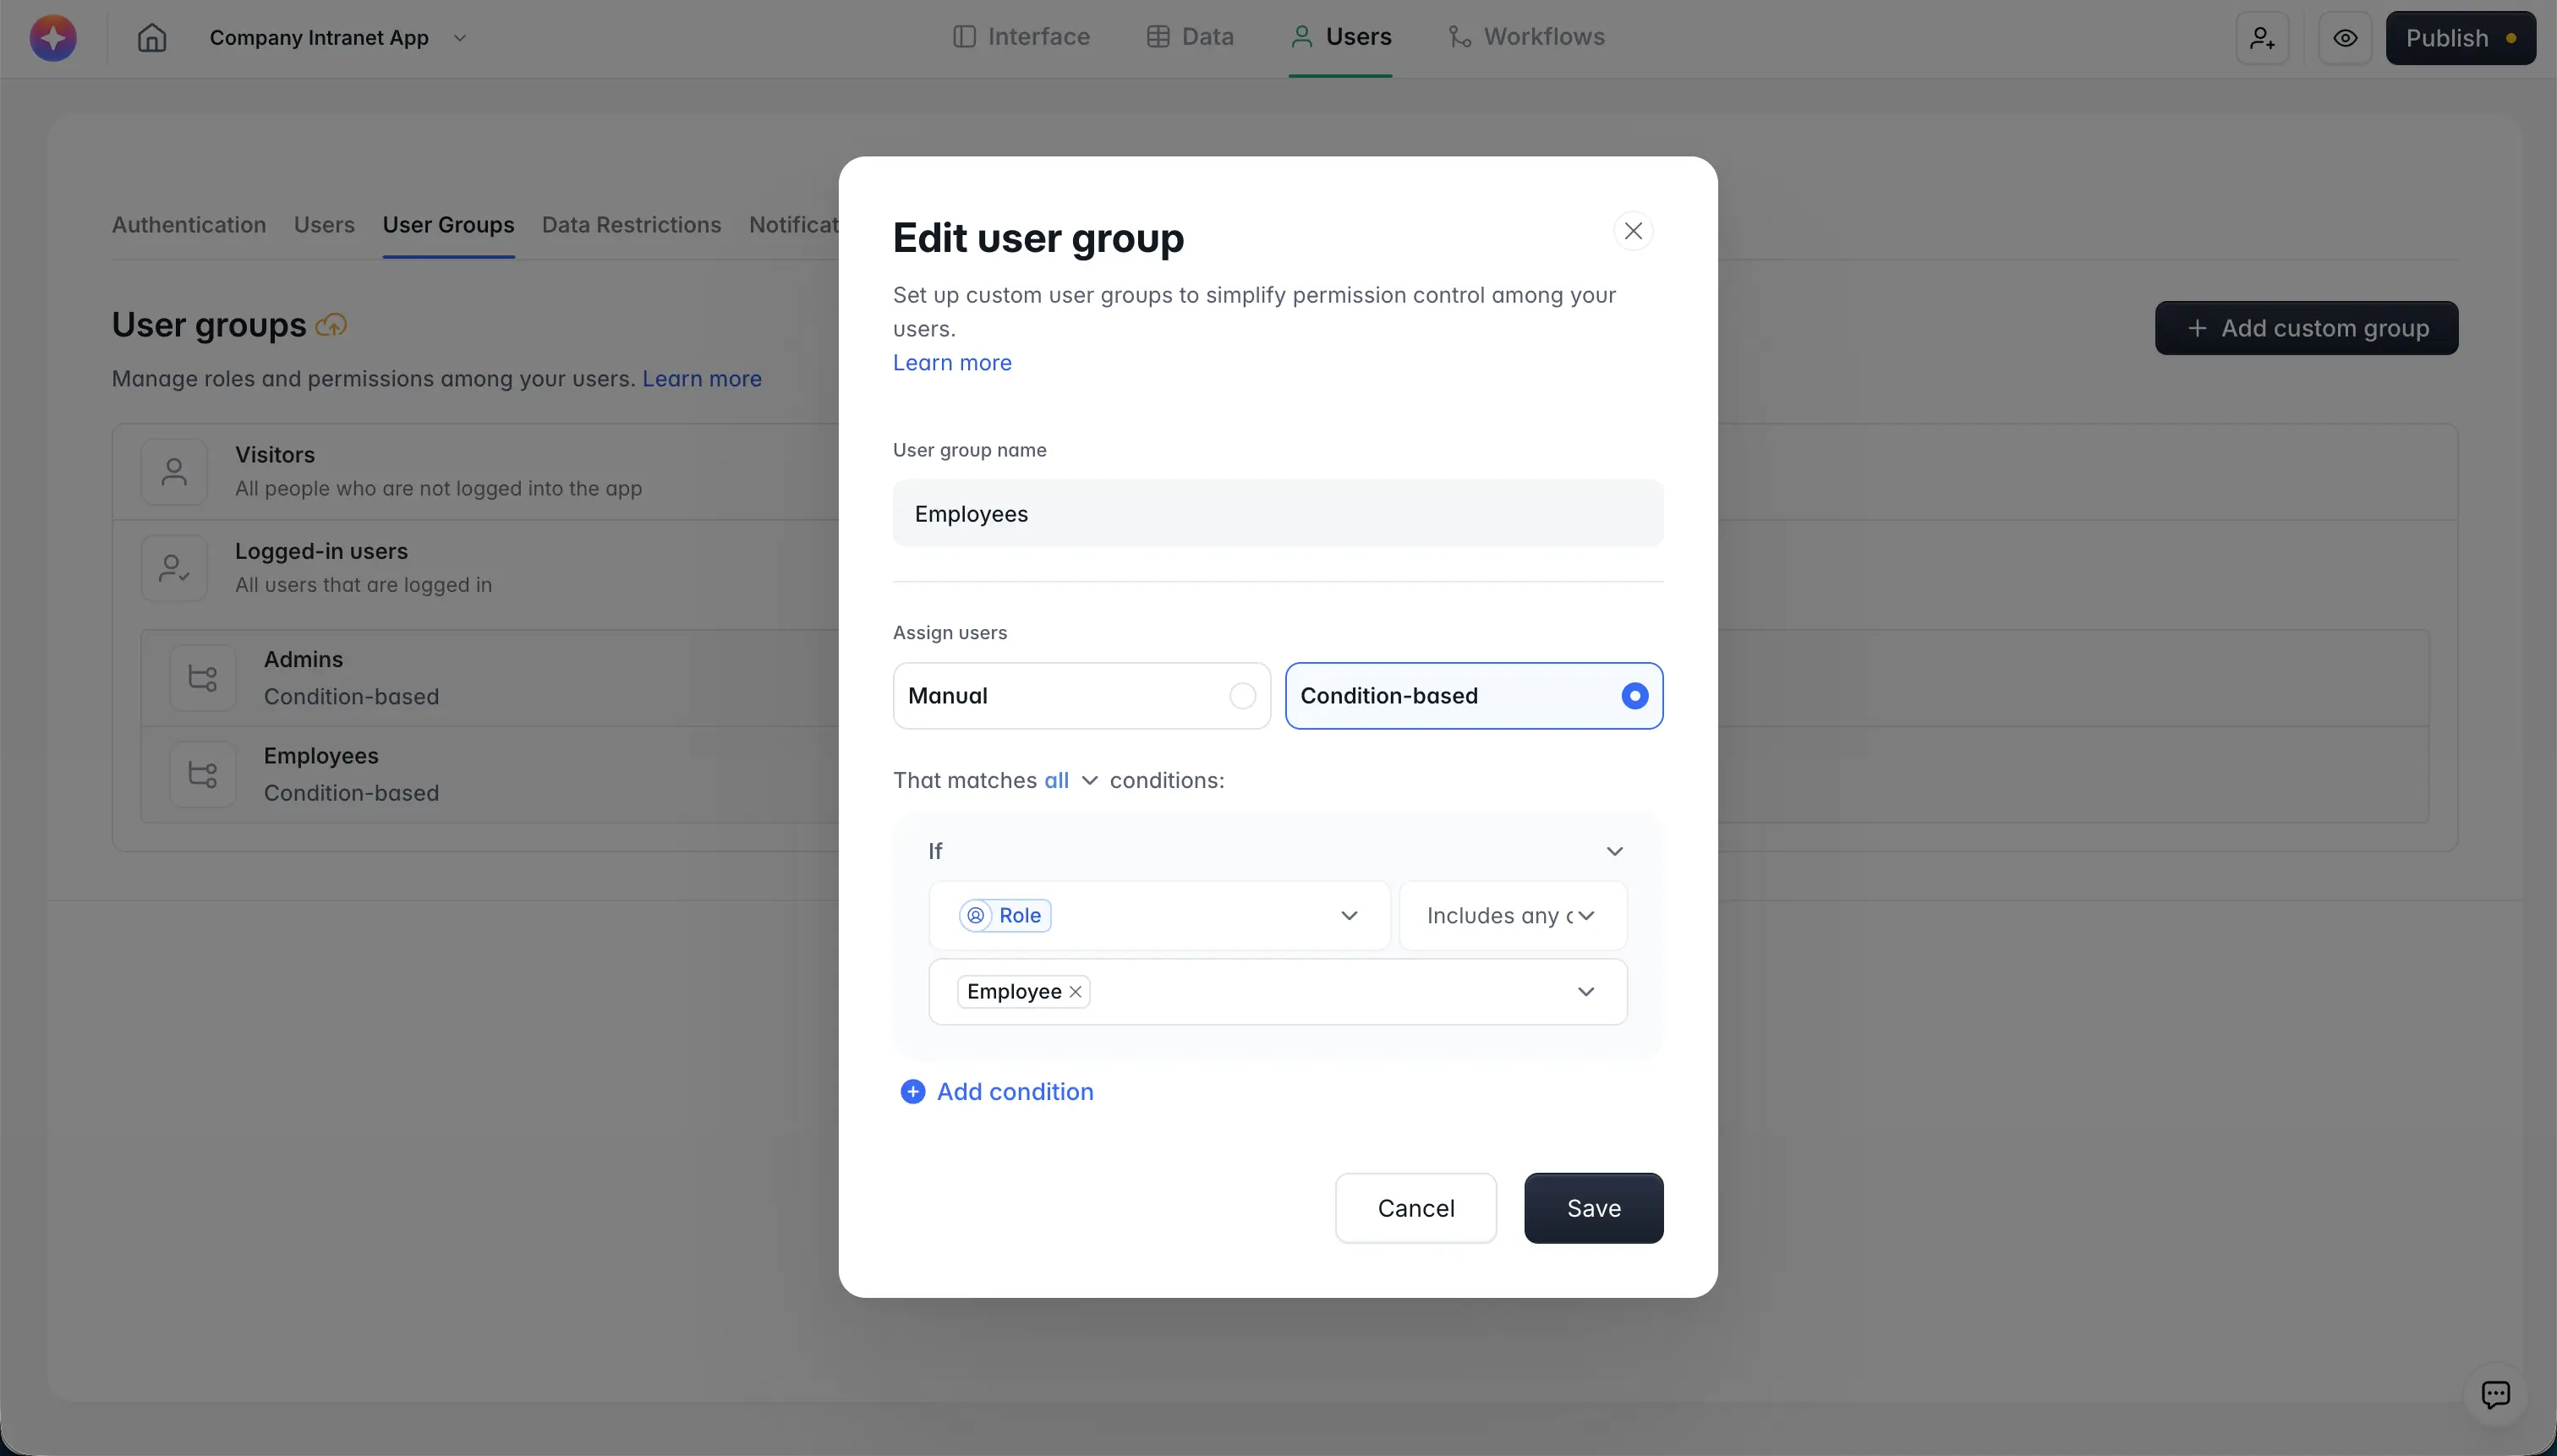
Step 10.1: Create a user group
Click Users on the left side of the screen and select the User Groups tab. Click Add user group.

Step 10.2: Name your user group
A text box will prompt you to name the group. Use a name that identifies who belongs to it, such as "Employees" or "Clients," then click Next.

Step 10.3: Add users to your new group
Add users manually, or automatically assign them based on attributes and conditions, such as a "Role" field in your connected data. Once created, you can use this group to control who can see a specific block or page.

Step 11: Set block visibility for logged-in users
Return to the page where you added your block. Click the block to open its settings on the right, then open the Visibility tab to choose which user groups can see this specific block under "Which user groups."
Softr enforces this restriction on the backend, not just by hiding the button or block in the interface. That means a restricted user can't access the data even by inspecting network requests, which matters if you're protecting anything sensitive like financial or client records.

Step 12: Test and publish
Click the preview button to test the settings and confirm they work as expected for each user group. Then publish and share the app with the people you want to have access to your Google Sheets data.

Restricting access using Google Sheets' native share settings
If you don't need granular, role-based access and just want a quick way to limit who can open or edit a file, Google's built-in sharing controls are the fastest option, even though they're not true password protection.
- Open your Google Sheets file and click Share in the top right corner.
- Under "General access," choose Restricted so only people you explicitly add can open the file.
- Add the email addresses of people who should have access, and set their permission level to Viewer, Commenter, or Editor.
- To prevent edits to specific cells without removing viewing access, go to Data > Protect sheets and ranges and select the range you want to lock down.
This works for small teams sharing a single file, but it has real limits: access is all-or-nothing at the file level, permissions rely on Google accounts rather than a password anyone can share, and there's no way to show different people different rows or columns of the same sheet. If you need that level of control, or want to build an actual application on top of your data (a client portal, an internal dashboard, a project tracker), Softr is the better fit.
Start building on secure data, not just a locked file
A password on a spreadsheet only solves half the problem. The moment you need different people to see different things, spreadsheets run out of options. Connecting your Google Sheets data to Softr gives you that control today, and gives you a foundation to build a real internal tool or portal on top of the same data later, without starting over.
If you want to go further than access control, check out our guide on how to set up user groups and permissions for a full breakdown of Softr's permission system.
Frequently asked questions
- Can you actually put a password on a Google Sheets file?
- What's the difference between Google Sheets' share settings and using Softr?
- Is it free to protect Google Sheets data with Softr?
- Can I password-protect just one tab or a range of cells in Google Sheets?
- Do I need to know how to code to set this up?