How to build role-based dashboards: Step-by-step guide


In this tutorial, I'll walk you through how to build role-based (RBAC) dashboards in Softr. The example is a Sales & Delivery app with one Home dashboard where Sales sees deals and Operations sees projects. Each user sees only the records their role allows.
If you want to follow along with the guide, start by pasting this prompt into the AI Co-Builder:
Build a Sales and Delivery app using Softr Databases. Tables: Users (email, full name, team: Sales or Operations, role: Member, Lead, or Leadership), Deals (name, owner, team, amount, stage, close date), and Projects (name, deal, owner, account manager, team, status, due date). Owner and account manager link to Users. Add 10 sample users with a team and role, plus sample deals and projects they own. Create user groups for each role and each team. Start with a Home dashboard showing deal KPIs and a kanban of deals by stage.
You can make changes to the prompt to align with your use case, or make adjustments after the Co-Builder finishes its first draft. Either way, the steps below will get you to a finished dashboard.
What is an RBAC dashboard?
RBAC (role-based access control) dashboards show each user the metrics and records that match their role. For example, a sales rep sees their owned pipeline, a sales lead sees their whole team's pipeline, and leadership sees every team. Access is set by role, so no one gets access to the wrong data.
Step 1: Generate the dashboard app
Paste the prompt above into the AI Co-Builder. Before it builds, it asks a few setup questions about login method, sign-up, navigation layout, and theme.
The Co-Builder then creates the database, the user groups, and the core pages: a Home dashboard with deal KPIs and a pipeline kanban, plus Deals, Projects, and Analytics pages.
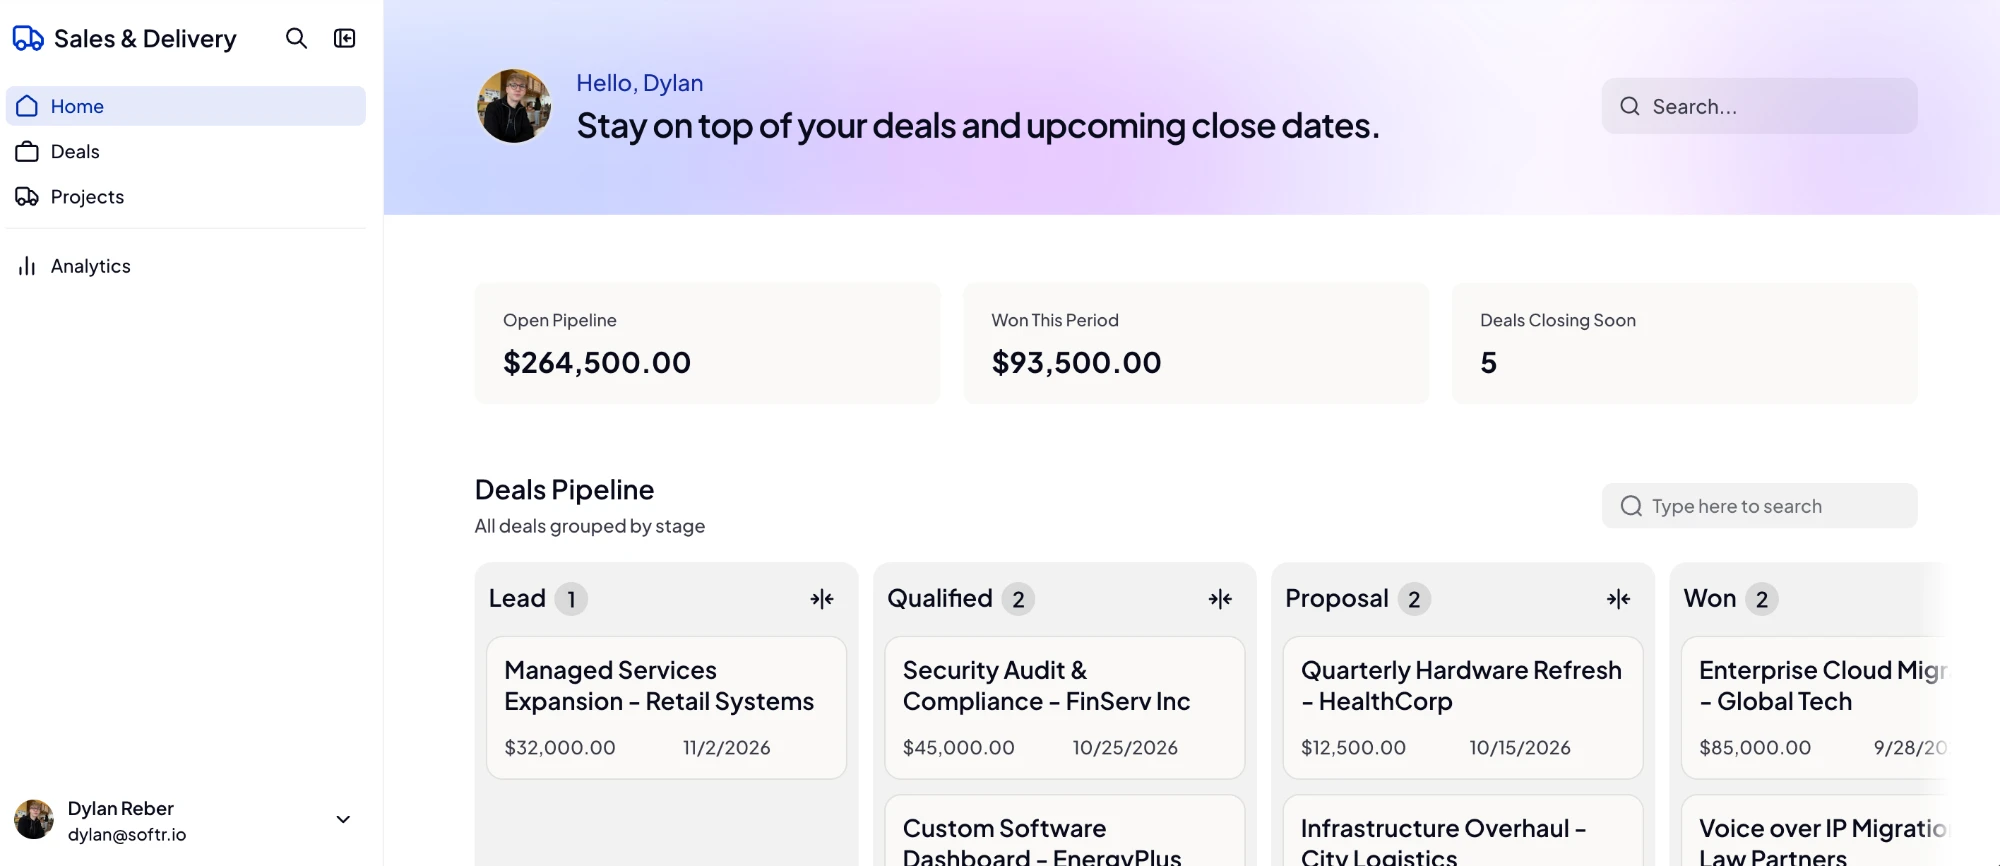
Rather than creating separate database tables for different user types, keep all your users in a single Users table. Each user group is defined by a condition on a field (for example, Team is Sales or Role is Lead), so if you change a user's team or role in the database, their app permissions update instantly.
💡 For a deeper walkthrough, see our guide on setting up user groups and permissions.
Step 2: Give each team its own section
Sales focuses on deals and Operations focuses on project delivery. To reflect this split, the Home dashboard gets one section per team. Each section is visible only to its team (plus Leadership).
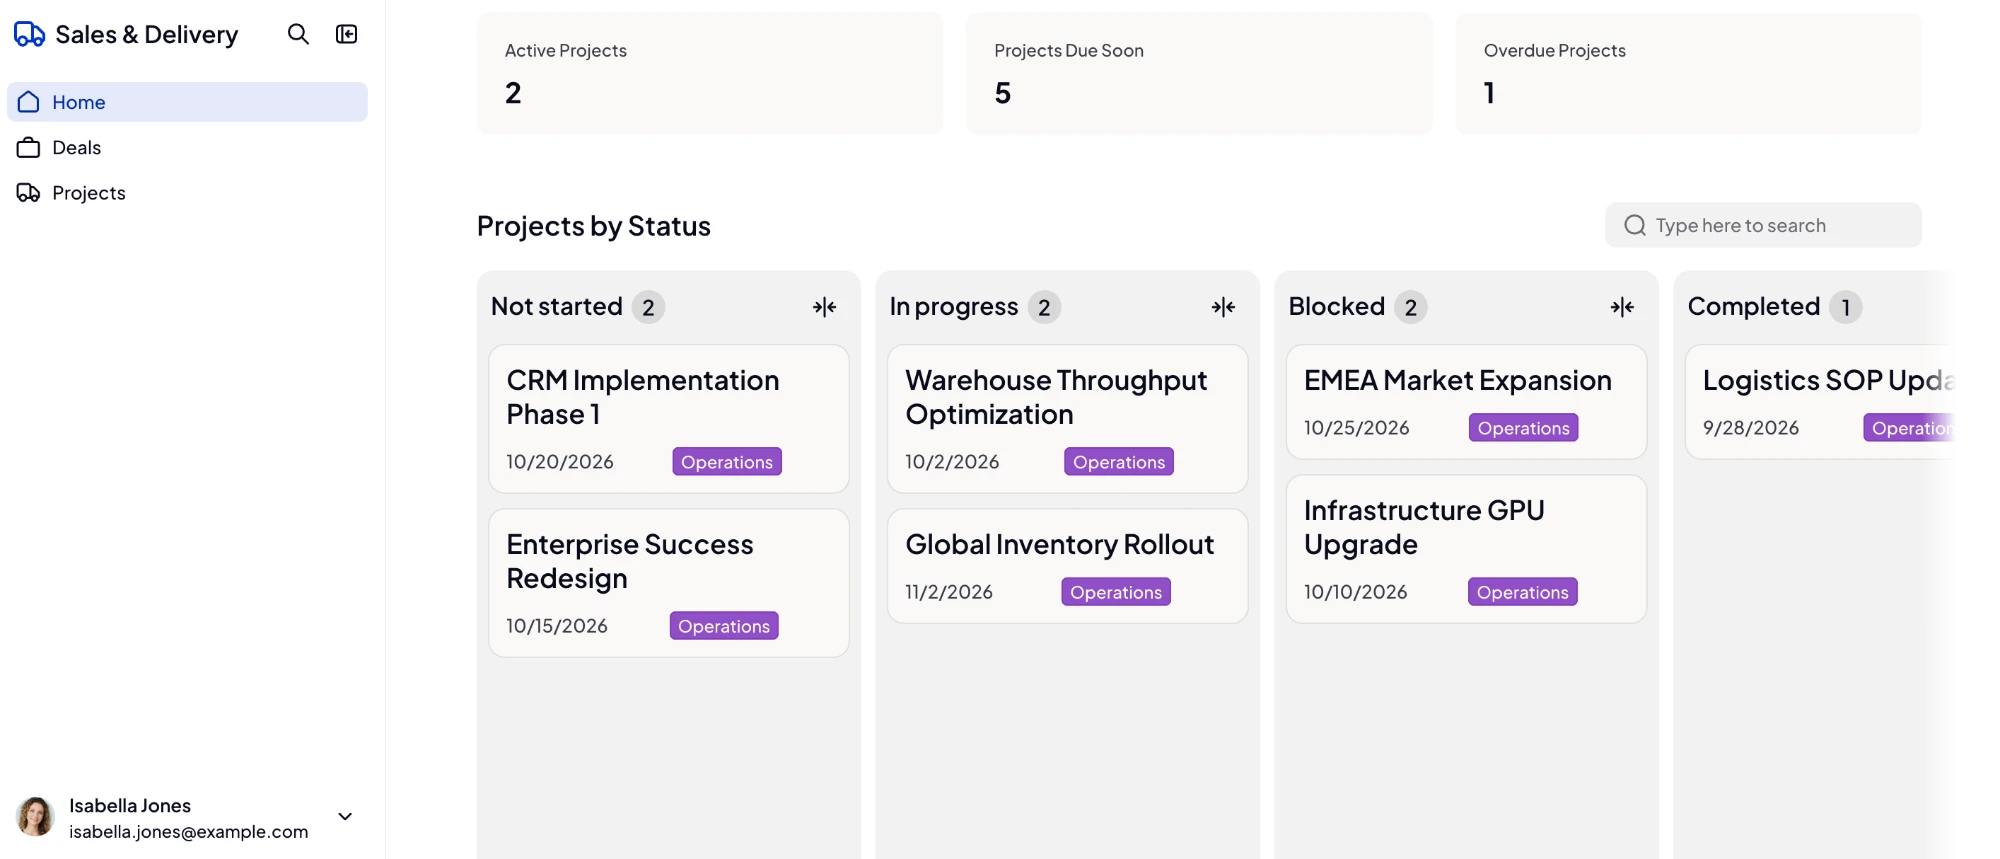
If Sales and Operations don't appear under Users > User Groups yet, ask the Co-Builder to create them from the team field. Then run this prompt:
On the Home page, add an Operations section below the Deals Pipeline: KPI cards for active projects, projects due soon, and overdue projects, plus a kanban of projects by status. Make the deal KPI cards and Deals Pipeline visible only to the Sales and Leadership groups, and the new project KPI cards and project kanban visible only to the Operations and Leadership groups.
Everyone lands on the same page, but block visibility decides which dashboard a team sees after logging in. In the next steps, we'll determine which records appear inside these blocks.
Step 3: Determine what each role sees
Of course, you'll need to map out your basic access rules before you configure them. For this app, two teams share two tables, with each record filtered to an owner and a team:
| Role | Deals | Projects | Home dashboard |
|---|---|---|---|
| Sales member | Deals they own | Projects they're the account manager on | Sales section |
| Sales lead | All Sales deals | None | Sales section |
| Operations member | None | Projects they own | Operations section |
| Operations lead | None | All Operations projects | Operations section |
| Leadership | All deals | All projects | Both sections |
Every row becomes an access condition in the next step. Member permissions are scoped by the owner field, leads by the team field, and leadership has no rule at all (since we want them to see everything in this example). And remember: you can always change any of this to suit your specific business needs.
Step 4: Restrict records by role
Global data restrictions serve as a firewall at the app level. They apply everywhere, regardless of how individual pages or blocks are configured.
Add global data restrictions on view. Deals: the Member group can only view deals they own, and the Lead group can only view deals whose team matches their own team. Projects: the Member group can only view projects they own or are the account manager on, and the Lead group can only view projects whose team matches their own team. Leave Leadership unrestricted.
Each restriction is set to Allow only, with a condition that compares the record to the logged-in user. For example, Owner includes the Logged-in user's Email, or Team includes the Logged-in user's Team. A restriction only applies to the groups you add to it, so Leadership, with no rule, can access everything.
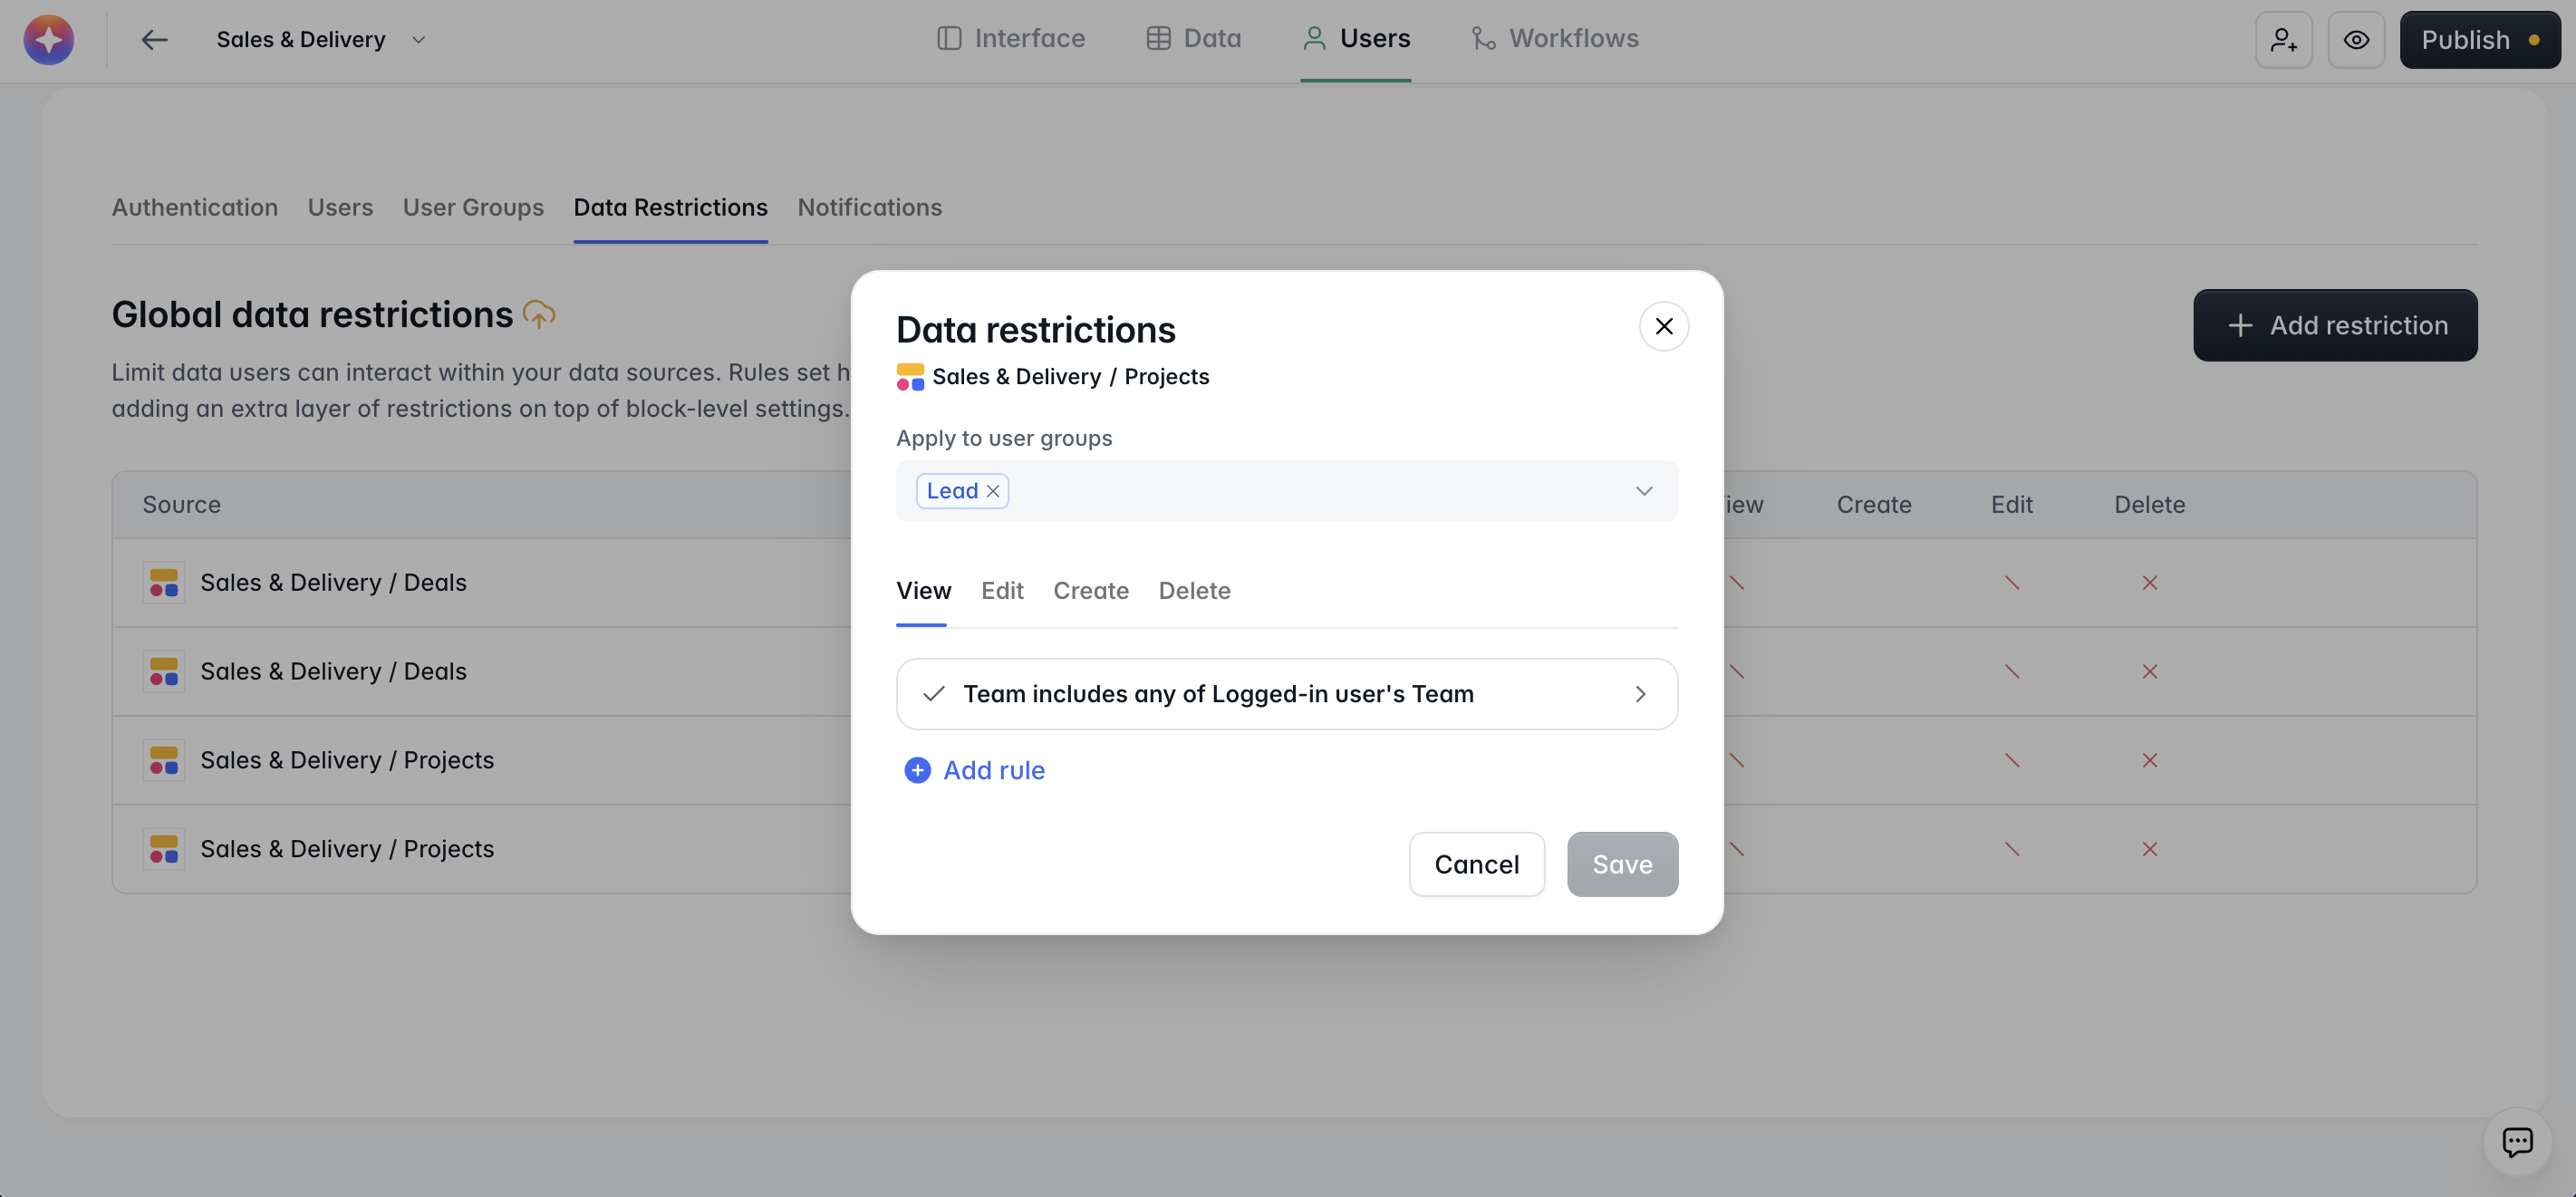
Then finish two settings in Users > Data Restrictions:
- Account manager: Members should also see the projects they manage. Open the Members' Projects rule, click Add condition, and add Account Manager includes Logged-in user's Email. With matching set to any, either condition lets the record through.
- Edit and create: On each rule's Edit tab, choose Allow only with the same condition as View, so people can edit their own records. On the Create tab, make sure creating isn't blocked.
💡 View restrictions work on every plan. Create, edit, and delete restrictions need the Business plan or higher.
Even if you make a mistake later (like forgetting a filter or misconfiguring a block), data restrictions prevent the wrong data from ever reaching the user's browser.
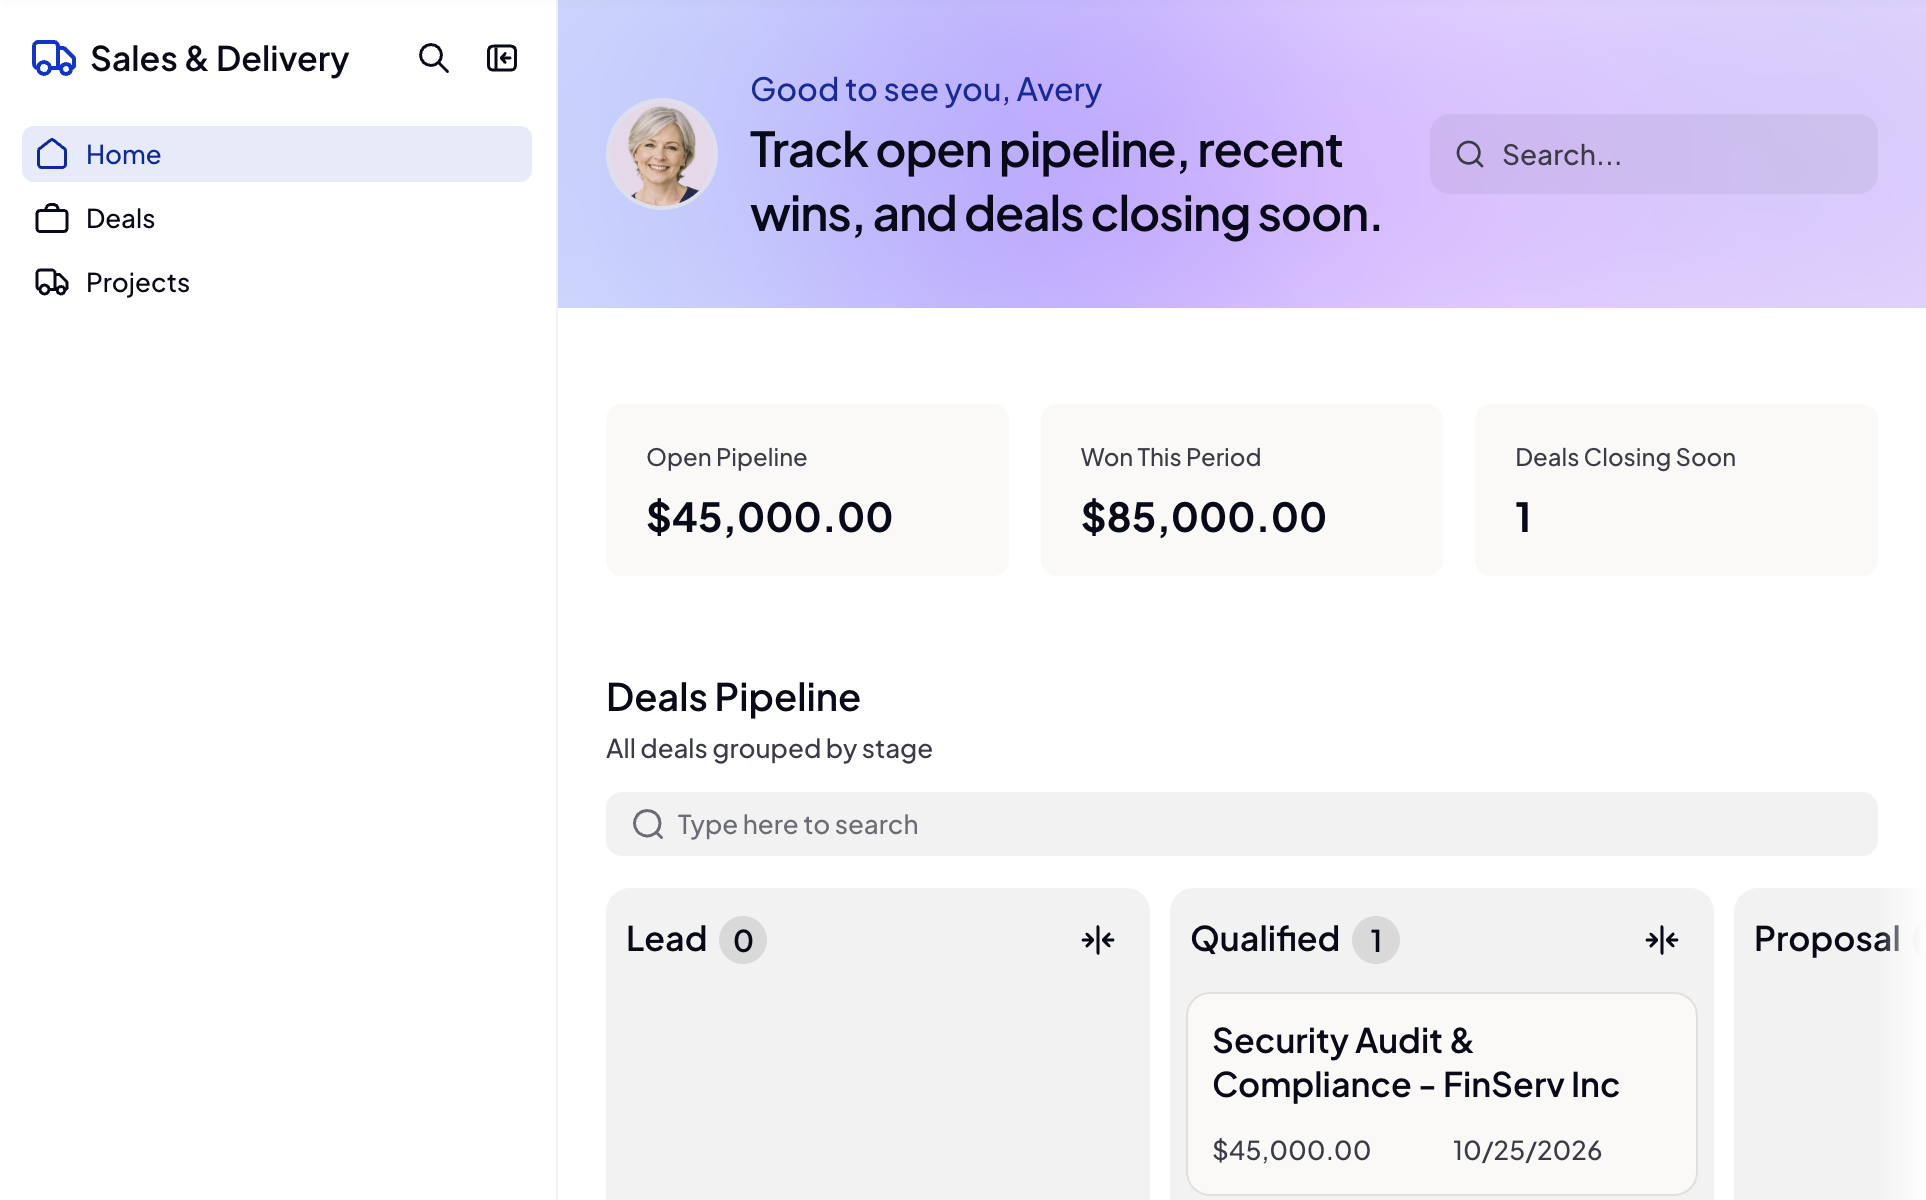
With data restrictions in place, each page needs only one set of blocks. The same Home page shows a rep their own $45,000 pipeline and the Sales lead the team's total ($264,500).
Step 5: Reuse the pattern for additional teams
Additional dashboards tailored to other teams can be built from our earlier prompts, but with a few words swapped. For example, to create a dashboard for Support, add it as an option on the Users table's team field and create a user group for it (this can also be done through Softr MCP).
Then, reuse the Step 2 prompt with the relevant blanks filled in:
On this Home page, add a [team] section: KPI cards for [metric], [metric], and [metric], plus a [kanban or table] of [records] by [field]. Make it visible only to the [team] and Leadership groups.
The Lead rules match on team, so a Support lead sees every Support record without a new rule. If the team brings its own table, such as tickets, reuse the Step 4 prompt with that table's owner and team fields.
Step 6: QA the app before you publish
Even on a secure, permissioned platform like Softr, every AI-built app should get a QA pass before you invite real users. I recommend running through this checklist ahead of publishing:
- Users: Open the Users table and confirm that every user has a team and a role assigned.
- Records per role: Preview the app as one user from each role and team. Compare what they see against the table in Step 3, and confirm each sees only their team's section on Home.
- KPI counts: For each previewed user, check a few KPI cards against their records in Softr Databases. For example, check that Overdue Projects leaves out completed and cancelled projects.
- Editing: As a member, edit one of your own records, then confirm you can't edit anyone else's.
- Restriction tabs: Open Users > Data Restrictions and check the Create, Edit, and Delete columns, not just View.
And not to get you stuck in an AI feedback loop, but Claude can also double-check the setup through Softr MCP. Just ask it to confirm that users are in the right groups and that each team sees the correct dashboard.
Give every role its own dashboard with Softr
Softr lets you build and permission multiple role-based dashboards in a single app, all connected to the same database. Or, you can build an app for every dashboard. Either way, block visibility and data restrictions provide role-based access control for every user who logs in.
👉 Try Softr free and build your first RBAC dashboard today.
Frequently asked questions
What's the best way to build role-based dashboards for different teams?
What's the difference between page visibility and data restrictions?
How many user groups should a role-based app have?
Do I need a separate app for each team?
How do I test what each team sees before I publish?