Transcript
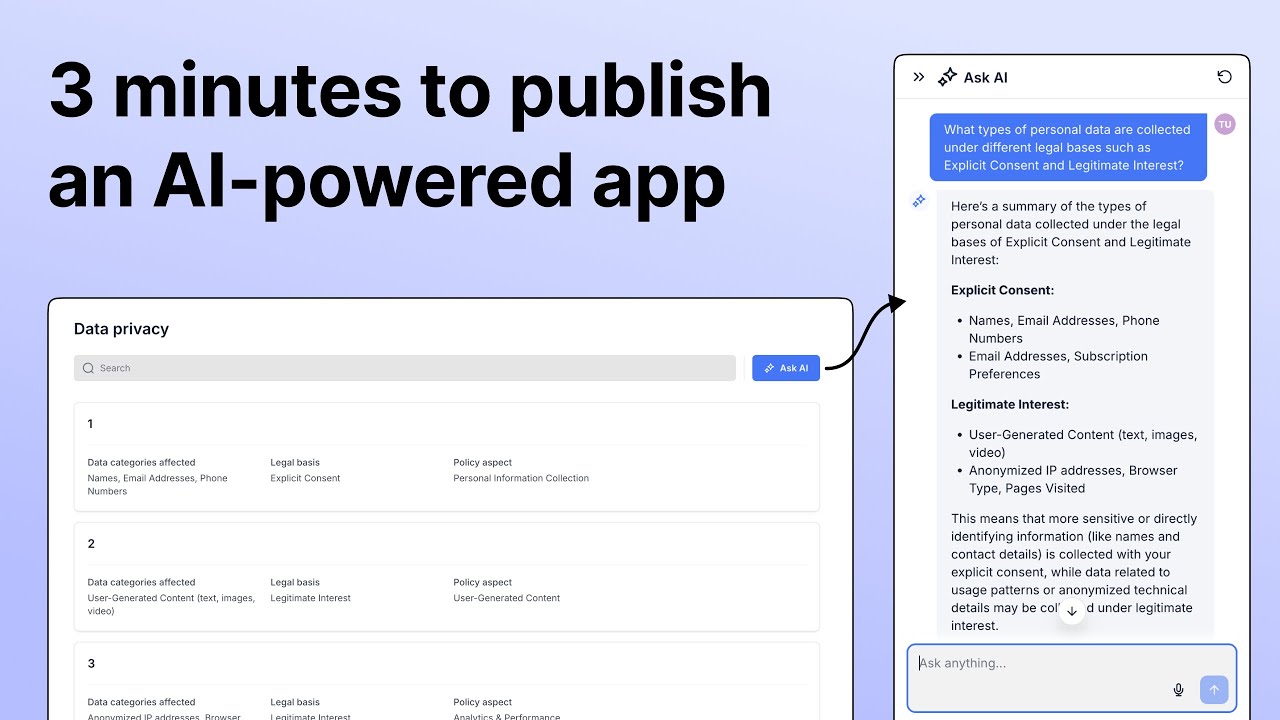
Welcome to this in-depth tutorial where I will show you how to set up e-signing workflows using DocsAutomator eSign in Softr. We will be using the native DocsAutomator integration in Softr. I want to show you the results first by clicking on create booking confirmation here.
The use case is that we want to send out booking confirmations to our customers, and then those customers will sign them. This has been initiated basically with DocsAutomator, and we get this booking confirmation link. You could distribute this link yourself, or it is also clickable from here.
This opens the DocsAutomator signing page. I agree here, and then I get my signing fields that I have defined. I add a date here, add my signature, and then complete this.
Completing this adds the signed document here in Softr to my record. It now has the certificate page attached to it, along with the signature, date, and name that I filled out. Please note that there are watermarks on here because we are still in test mode.
Let's see how we set this up and what the moving pieces are. We are going to start in DocsAutomator because you will need an account, plus an automation setup where the data source is Softr. Then we have this template that I defined.
The template can be any use case or contract you want to get signed. I used this booking confirmation, which is one of the templates you can find in the DocsAutomator template gallery. On here we have a couple of placeholders that we fill out, like the client name, email, and our e-signing text.
What we pass here in our workflow is the client name and email. Both are needed, and we use the client name to identify the Softr record. We are going to look at the Softr workflow that we have to set up to catch a webhook that DocsAutomator sends out on signing events.
[.blog-callout]
Note from Softr: When dealing with webhooks and advanced logic, Softr Workflows allow you to keep your logic as close to the design as possible. This helps to consolidate tools and reduce reliance on third-party automation platforms.
[.blog-callout]
We use the name to match the record in our Softr database. If we go under the fifth action, which is actions after document generation, we enable e-signatures. Then we set up the email here as the recipient email for the first signer.
In our use case, I turned on links-only mode to show you that you can get links back from DocsAutomator and distribute the signing links yourself. This means an email isn't being sent automatically through DocsAutomator. That would only happen if you set it to send via email.
The last thing I want to show you that needs to be set up is the webhook address. We get the webhook address from a Softr workflow where the trigger is a webhook. You need to set up this webhook trigger to get the URL, copy it, and simply paste it here in DocsAutomator.
This becomes the address that DocsAutomator sends events to during the signing process. It sends them for two events in particular. One is when signing is initiated, and the other is when signing has been completed.
Let's go into the interface quickly to show you how this is initiated. From this button to create a booking confirmation, we initiate this automation that we just set up in DocsAutomator. I am here on actions, and I have this action to create a booking confirmation, which runs a custom workflow.
I pass the two variables for name and email, and then click on edit workflow to show you how it works. All of this is set up by Softr automatically. The only thing I had to add is the DocsAutomator action, which you can find under integrations.
I added my account by pasting my DocsAutomator API key, and then selected the automation called booking confirmation. I set the document name to the client name we are passing as one of our two variables in this workflow. The two variables I defined are the email and the client name.
These match the email and name that we are passing into the system. You will also find these two variables on the template within DocsAutomator. This initiates the signing process because e-signing is enabled on the automation under actions after document generation.
That simply turns the sequence into an e-signing automation, which triggers once we click the button in Softr. That is one side of the sequence, which handles the initiation. Because we registered the webhook, we are now getting events sent to it, and we need to catch these events to do something with them.
That logic is what is set up in the Softr workflow. Under workflows, you can see I have this DocsAutomator signing flow started by our webhook. The first thing I do is find the record that is part of this webhook, which is the record we started the signing process for.
I find this by using a Softr database action to find the record in our leads table. I can also open the data here in our leads table to check.
[.blog-callout]
Note from Softr: While Softr integrates with 17+ external sources, Softr Databases is the powerful, native way to manage data directly within Softr for maximum performance.
[.blog-callout]
In the action, I set a condition where the full name equals the client name from the webhook body's source data. This is because we are passing the entire source data through our webhook, meaning everything we add to our documents is also available there. I can specify that I want to match this client name, test it, and it finds the exact record in our Softr database.
We then need to branch out into two different events that are happening. One is when the signing process has been initiated, which is when the status property on our webhook is still pending. Pending means the link is prepared, and it is now waiting for signers to sign.
The other event is when it is completed, which lets us know all the signers have signed. When it is pending, we update the Softr record that we found in the second step. We go into our database, select the record from the find step, and update our booking confirmation link field with our target URL.
Event number two is when the signing is completed. For this event, we update the file field for the booking confirmation with the PDF that we get back from DocsAutomator. That signed document is sent to our webhook, as I can show you here.
On the webhook body, we have a URL for the signed PDF, and we select this. When you set this up, you should go into test mode in DocsAutomator and listen to the first event when you initiate signing. You test this webhook so that you get the entire payload and complete data for that first event.
When signing is completed, you listen to the webhook and run the test again to get the final data payload. That represents the entire flow from start to finish. You initiate the process via this button in Softr, which gives you a link that can be distributed to whoever needs to sign.
You then catch the signed PDF in the same workflow by listening to this webhook and initiating the corresponding sequence of actions. As mentioned before, if you enable the send via email option, DocsAutomator handles sending out the signing link directly. You simply provide the email, customize the email text, and the platform delivers the signing link for you.
If you use that option, you only need to listen to the completed event. You wouldn't need to track the pending event because you are only looking to catch the signed document at the end. I hope this gave you a good overview of how to build e-signing workflows in your app.