How to build a QR code scanner app for inventory management

Managing physical inventory—whether it's maintenance equipment, office assets, warehouse products, or membership cards—involves the same bottleneck: linking a physical object to a digital record quickly and reliably. Barcode and QR code scanners solve this, but building the software around them has always required developer resources.
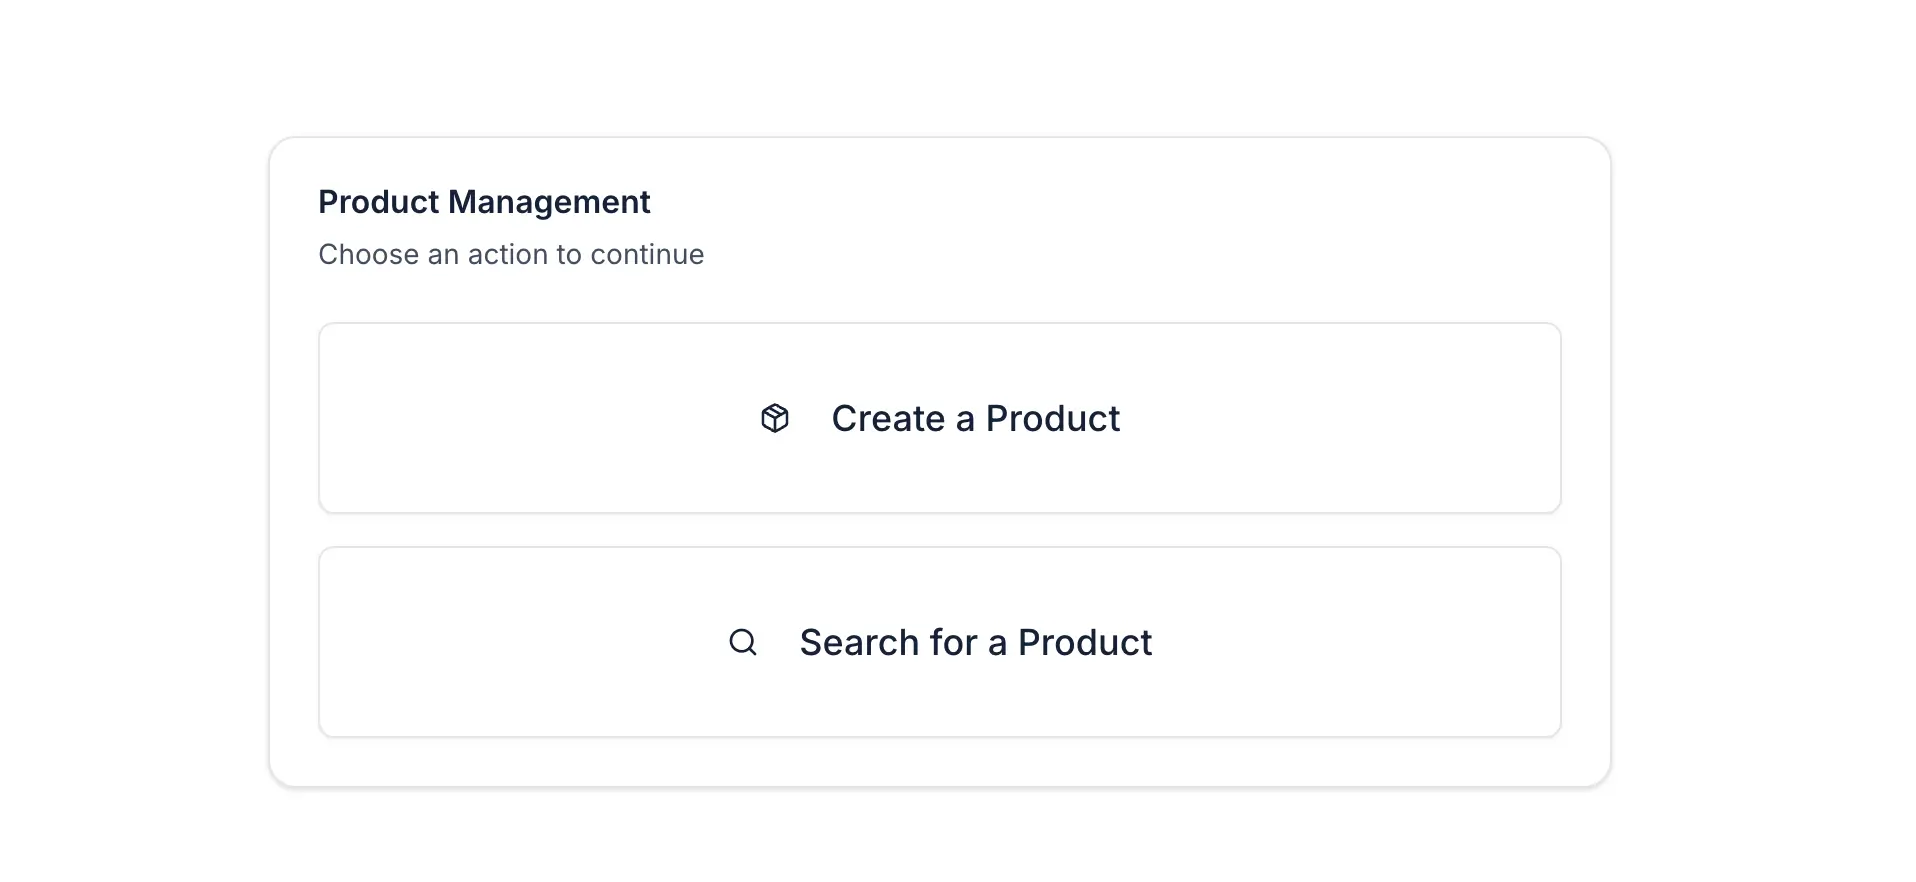
In this tutorial, we'll build a product inventory app that solves both sides of this problem. When a new product is registered, the app automatically generates a QR code and stores it in the database. When a team member needs to log a maintenance check or pull up product details, they scan the QR code with their phone camera and the relevant record opens immediately in the app.
You don’t need developers or barcode hardware — just a Softr app and a phone camera.
What is Softr?
Softr is a full-stack app builder that combines Softr Databases, an AI-powered interface builder, and Softr Workflows in one platform. Teams use it to build real working business apps without writing code.
For this inventory app specifically, we'll use:
- Softr Databases to store products, their unique IDs, and QR code images.
- The Vibe Coding block to build both the QR code generator (on product creation) and the QR code scanner (on product lookup).
- Native blocks (Table, Detail) to display product records and maintenance history.
Who is this QR scanner app for?
This app covers a range of real operational contexts:
- Facilities and maintenance teams tracking equipment service dates.
- Warehouse managers linking physical stock to digital inventory records.
- IT teams tracking devices, hardware, and their maintenance histories.
- Event managers managing membership cards or attendee check-ins.
- Co-working spaces managing bookable assets like projectors, cameras, or pods.
But no matter which of these aligns with your business, there are two core user groups to include:
QR scanner app blueprint
Before we jump into the actual building process, here are the key pages and database schema we’ll be using to structure our app.
Inventory app pages
Inventory database structure
Part 1: Setting up the database
Core principle: Success in Softr is 80% data structure. Always start with the database.
1.1 Create the Products table
- From your Softr dashboard, create a new app and select Softr Databases as your data source.
- Use the AI Co-Builder to generate your Products table. Here’s a prompt you can use:
Create a Products table with: Name (short text), Unique ID (short text, auto-generated), QR Code (file attachment), Status (single select: Active, Inactive, Under Maintenance), Category (single select), Last Maintenance Date (date).
Then, add 3-5 sample products so you have data to test with. Leave the QR Code field empty for now; the Vibe Coding block will populate it.
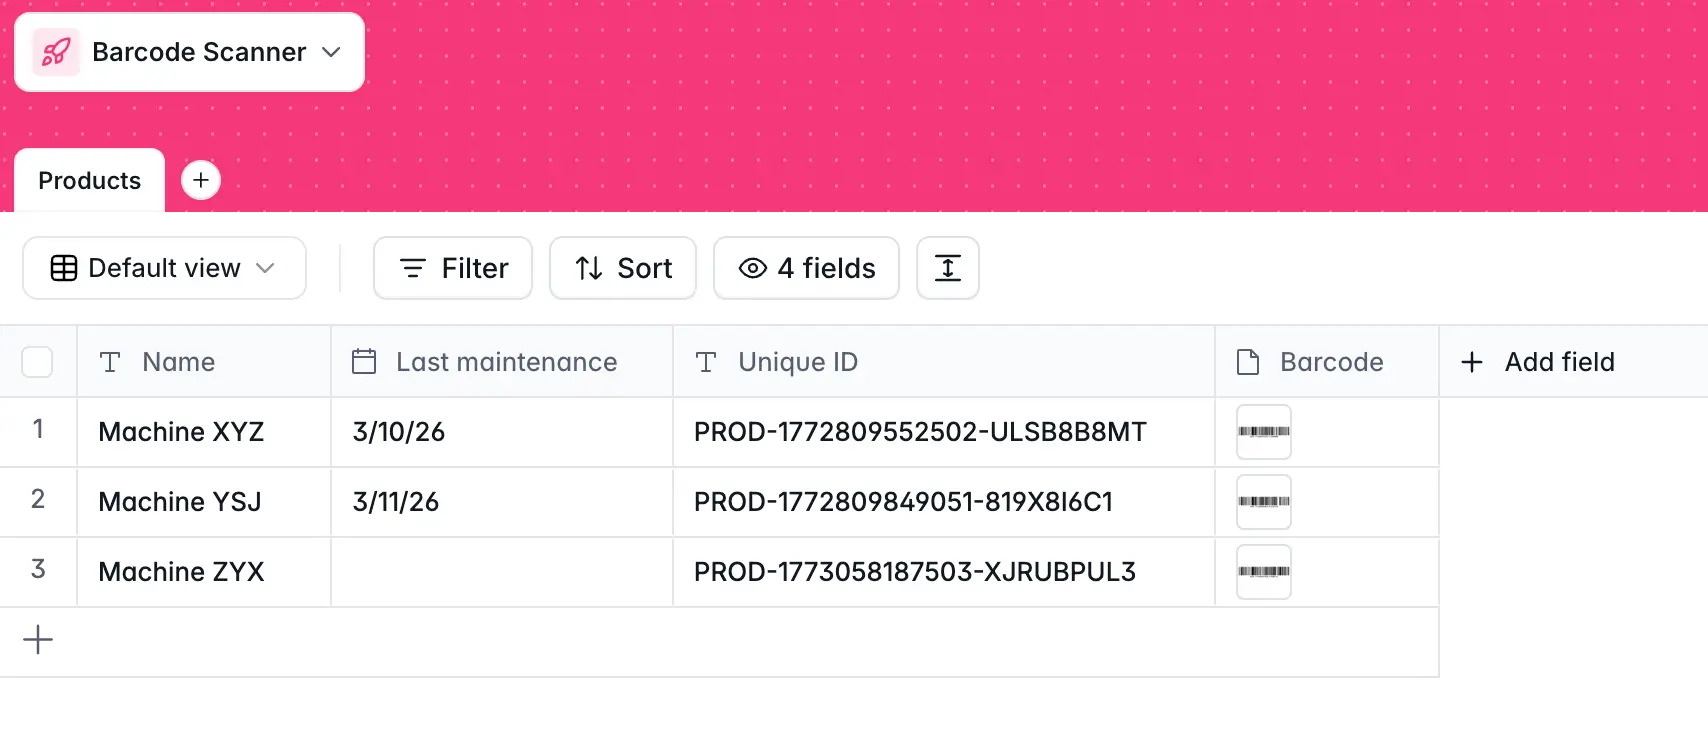
About Unique IDs: Softr Databases assign every record a native Record ID automatically. For QR codes, you have two options:
- Use the native Record ID as your unique identifier (simplest approach).
- Generate a custom formatted ID (e.g.,
PROD-0017) using a formula field and store it in the Unique ID field.
The QR code will encode whichever ID you choose, so the scanner block needs to use the same field to match records.
1.2 Create the Maintenance Logs table
Next, create a Maintenance Logs table with the following fields:
- Product (Related record): Link to the Products table.
- Date (Date & time): When the maintenance was performed.
- Performed By (Email): The logged-in user's email, auto-filled.
- Notes (Long text): Optional details about the work done.
- Status After (Single select): The product's status after this maintenance event.
Part 2: Building the product registration block
With our database built and structured, it’s time to vibe code a tool for registering products directly inside the app.
2.1 Add the Vibe Coding block to the Product Registration page
- Add a Vibe Coding block to the Product Registration page.
- Connect it to the Products table with Create permission enabled.
- Write your prompt.
[.blog-callout]
I need a product registration form. It should have a text input for the product name.
When the form loads, automatically generate a unique product ID in the format "PROD-" followed by a 6-digit random number (e.g., PROD-028471).
When the user clicks "Register Product," do two things:
1. Generate a QR code image that encodes the unique product ID as its value.
2. Create a new record in the database with the product name, the unique ID, and the QR code image stored in the "QR Code" file field.
After creating the record, show a success message with the product name, the generated ID, and a preview of the QR code image.
[.blog-callout]
What to expect from the first generation: The block will generate the QR code using a JavaScript QR code library (typically qrcode.js or similar). It will encode the product ID and attempt to store the resulting image in the database file field. This sometimes needs one iteration to ensure the image is stored in the correct format.
If the image isn't saving correctly, add this to your follow-up prompt:
Convert the QR code canvas to a PNG blob and store it in the QR Code file field as a PNG image.
2.2 Test the registration flow
- Preview the app.
- Enter a product name and click Register Product.
- Check the database to confirm that the new record was created with the product name, unique ID, and QR code image.
- Download the QR code image and scan it with your phone to verify that it correctly encodes the product ID.
Part 3: Building the QR code scanner
Next, we’ll create a QR code scanner so users can easily scan a product's QR code and pull up its details from their phone.
3.1 Add a second Vibe Coding block to the Scanner page
The scanner is a separate block from the registration form. Keep them on separate pages or use a Tab Container to organize them.
- Add a Vibe Coding block to the Scanner page.
- Connect it to the Products table with Read permission. Also connect to the Maintenance Logs table with Create permission.
- Write your prompt:
[.blog-callout]
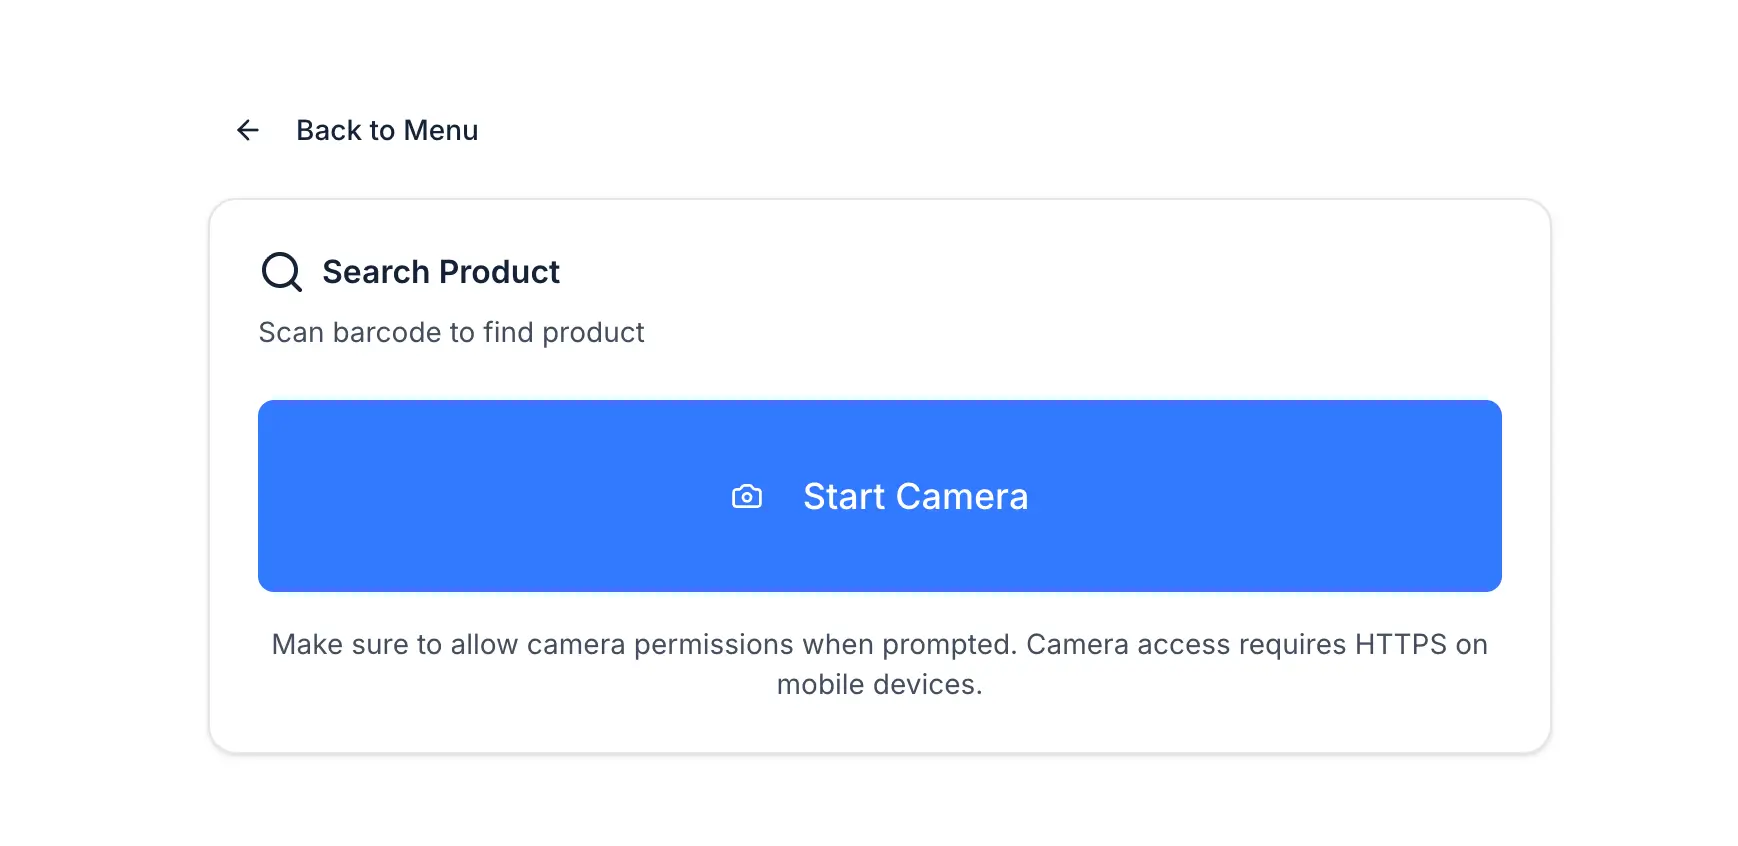
I need a QR code scanner block that uses the device's camera.
When the page loads, show a "Start Scanner" button. When clicked, activate the device camera and display a live preview with a scanning frame.
When a QR code is detected, read its value (a product ID). Search the Products database for a record where the Unique ID field matches the scanned value. If a match is found, display the product details: name, ID, status, category, and last maintenance date.
Below the product details, show a maintenance log form with: a date picker (defaulting to today), a text area for notes, and a "Log Maintenance" button. When submitted, create a new record in the Maintenance Logs table with the product (linked by record ID), the date, the current user's email, and the notes.
After logging, update the "Last Maintenance Date" field on the product record to today's date, and show a success confirmation.
[.blog-callout]
3.2 Optimizing the scanner for mobile
QR codes scan more reliably than traditional barcodes when using a phone camera. Here are a few tips to consider:
- Use QR codes, not linear barcodes. QR codes are designed for camera scanning. Standard 1D barcodes (the kind you see on grocery products) were designed for laser scanners and often require precise focus and alignment to read from a phone camera.
- Test on an actual phone, not just a laptop camera. Most QR scanning use cases happen in the field. Open the scanner page on your phone's browser after publishing the app to a Softr subdomain.
- Ensure adequate lighting. The scanner block uses the device's camera API. In low light, detection can be unreliable. If this is a concern for your use case, add a note in the UI reminding users to scan in good light.
- Keep the QR code size reasonable when printing. A QR code printed at 2x2 cm or larger scans reliably at a normal arm's distance.
If the camera isn't activating, add this to your follow-up prompt:
Request camera permissions explicitly using navigator.mediaDevices.getUserMedia. Show an error message if the user denies camera access, with instructions to allow camera permissions in browser settings.
Part 4: Building the admin experience
Now, we need to create a table, page, and user group specifically for admins.
4.1 Inventory table
- On the Inventory page, add a Table block connected to the Products table.
- Display: Name, Unique ID, Status, Category, Last Maintenance Date.
- Enable search and add filters for Status and Category.
- Enable the Download action on the QR Code field, so admins can download and print product QR codes directly from the table.
4.2 Product Detail page
- Create a Product Detail page (linked from the table via click action).
- Add a Detail block showing all product fields.
- Below it, add a List block connected to the Maintenance Logs table, filtered to show only logs linked to the current product. Display: Date, Performed By, Notes, Status After.
This gives admins a full maintenance history for each product, ordered by date.
4.3 User groups and permissions
- In Settings > Users, create two User Groups:
- Admins: Can access the Product Registration page, the Inventory page, and Product Detail pages.
- Field Team: Can only access the Scanner page.
- Use Page Rules to set Admin as the default landing page for Admins, and Scanner as the default page for Field Team.
- In the database permissions, set Field Team users to Read Only on Products and Create Only on Maintenance Logs. This prevents them from editing or deleting product records accidentally.
Extending your QR scanner app
Once the core app is live, there are some natural next steps to consider:
- Automated maintenance reminders: Use Softr Workflows to trigger an email notification to the relevant team when
Last Maintenance Dateis more than 90 days ago. - Status auto-update: Create a workflow that automatically changes a product's Status to
Due for Maintenancewhen the threshold is crossed. - PDF labels: Generate a printable PDF label for each product including the QR code, product ID, name, and category. The Vibe Coding block can generate a print-ready PDF, or you can connect to a service like Docs Automator via a Softr Workflow for more complex branded documents.
- Membership cards: The same pattern works for membership card programs. Replace "Product" with "Member," generate a QR code per member, and use the scanner to pull up member profiles and log check-ins.
Softr takes you from printed label to digital record in seconds
This app replaces a clipboard, a spreadsheet, and a manual data entry step with a phone scan and an automatic log entry. A field team member walks up to a piece of equipment, scans the code, taps "Log Maintenance," and keeps moving.
The QR codes are generated inside the same app that tracks the records. The scanner reads the same data source. There's no middleware, no export/import, and no manual cross-referencing between systems.
👉 Try Softr for free and start building an inventory management solution today.
Frequently asked questions
- Do I need special hardware to scan QR codes in this app?
- Can I print the generated QR codes and attach them to physical products?
- What is the difference between a barcode and a QR code for this use case?
- Can the same app work for membership cards or access control?