Transcript
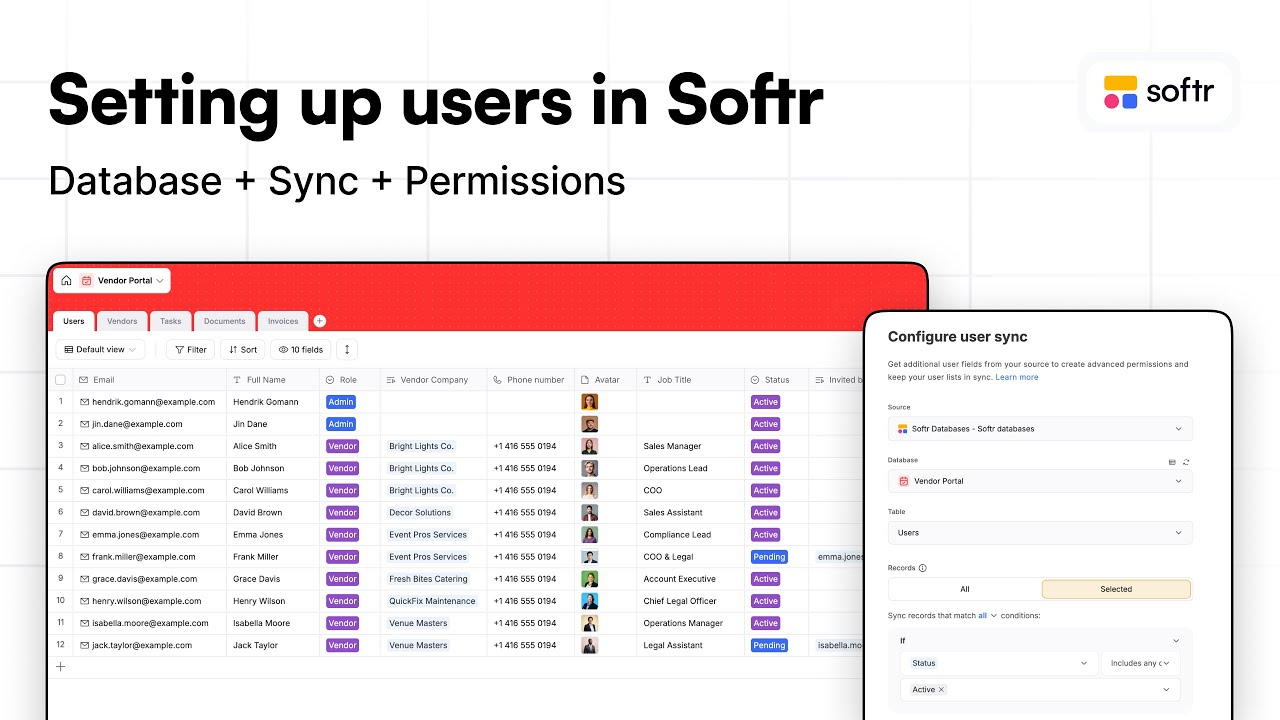
We will get started with the users table. I usually do that because all of my apps have users and we will be able to connect them properly to Softr user settings later. Right now we will design the database table for our users.
I will be starting with the first column. Each column is a field that will enable us to categorize a part of the data of this table. We have a select kind of field, but I will be removing these two columns and keep my primary field as the email.
I recommend this primary field to always be as unique as possible. For example, a first name would not be a great choice because you might have two people called Jane. Whenever you want to filter or search for Jane, you will see multiple results that will not help you know who is who.
[.blog-callout]
Note from Softr: While you can manually define your schema, another powerful option is the AI co-builder. It can generate complete Softr Databases schemas and initial pages instantly based on a simple prompt.
[.blog-callout]
Email is a great unique identifier for companies. Using a website is also quite good. In some cases, you can also use a company name because it is also quite unique. Always think about having something as unique as possible.
I will add another field that is a short text for the full name. We will have two user roles and we will fit all our users within the same table. The way to know if you are an admin or a vendor will be determined via a select field called role.
I am going to name one admin and the other vendor. That way, if I decide a user is an admin later when we configure our users, we will be able to create a user groups logic. We can say a user group is admin for everyone who has admin as a role.
That way you do not have to create multiple tables, like one for admin users and one for vendor users. You definitely want to keep all your users in the same table. Now I will simply be creating all the tables that we need, including vendors, invoices, and tasks.
I am creating all the tables already because we will need these tables to create what we call a related record. That is a way to say a user is related to a vendor. I will call the field works at and decide that this field is related to the table of vendors.
[.blog-callout]
Note from Softr: Softr Databases is the powerful, native way to manage these relational connections directly within the platform for maximum performance and a seamless setup.
[.blog-callout]
When I open this tab, I see that I automatically have this mirrored field being created. That way we really have this connection that exists. I can add lookup fields to pull data from that other table automatically, such as the full names of the team.
Using related fields is the way to make your data structure as robust and scalable as possible. It is much better and more organized than Excel because it ensures data integrity. You cannot end up with a date in a column meant for a different value.
I will be implementation the different field types now, such as phone numbers. We have a native field for phone number which will automatically enable for any country. In a form later in your app, you can make sure it validates the phone number format.
[.blog-callout]
Note from Softr: You can easily capture this data from your users by using native Forms. These forms map directly to your database fields, ensuring data validation is handled automatically during submission.
[.blog-callout]
We have the same for URLs and multiple different native fields that make it easy to make this database scalable. Another one we will add is the avatar, which requires a file field. We will be able to map that to the avatar field of Softr so users see their icon.
I am adding a status for users because vendors will be able to invite their team members and we will let an admin approve that to maximize security. If you are in a pending state, your account is not active yet and must be approved.
From there, when this user tries to log in, they will give their email and receive a one-time use code to access their account for the first time. Everything is now in one place, so I am going to the users setting because Softr provides a user system out of the box.
What is very powerful is that we are able to sync it to a data source. I will be mapping that to the users table we created. I have to say that the email field for users is actually the field I called email in my database.
For the name, we also had a full name and an avatar field that we can map. There is also something specific to our app. Since we have a status of active or pending, we only want to sync the records for which the status is active.
[.blog-callout]
Note from Softr: If you are building this for internal teams, you might want to start with a team intranet or ERP template which already includes these user management structures pre-configured.
[.blog-callout]
That way, until they are validated and approved by the admins, they will not have a proper account. Then we will also be able to create a Softr Workflows setup. Whenever someone is approved, we will send them an email to invite them to log in for the first time.
[.blog-callout]
Note from Softr: You can use native Softr Workflows to handle these approval emails and status updates. This keeps your logic inside Softr without needing external automation tools like Zapier.
[.blog-callout]
Because they haven't set any password yet, it will be sending them a one-time password that they can use to connect. Now all our users have been pulled and it is properly connected to our database. Whenever we add an active record, it will be created as a user.
For this user system, we have specific settings that enable granularity. We are enabling login because it is an app that will have some hidden and private pages. But then we can also set the specific authentication method, like a one-time code sent via email.
We are actually disabling signups because it is not a public app. We are keeping the full control over who gets an account using this admin validation system. It will also ask everyone to re-login after 90 days for security reasons.
I will go into user groups because we have to set up these two groups: admins and vendors. Based on that, we can say a page is only accessible for admins, or a button to delete a record is only available for vendors.
[.blog-callout]
Note from Softr: This type of access control is perfect for building client portals. You can ensure each client only sees their specific data while your internal team maintains full administrative access.
[.blog-callout]
Adding an admins group will be condition-based because we planned the role field in our database. Another one will be vendors, again with the condition that they are a vendor in our database. From there, we have these two simple user groups.
Some apps require more levels of granularity, such as a vendor collaborator. I recommend planning this before building the app so you can decide what user groups can have access to what features or only view certain records.
Another feature provided out of the box is data restriction. This is a security setting used app-wide to decide who can see, edit, or delete what. We can make that work with our user groups across our vendor portal data source.
For the tasks table, I will say if you are in the vendors group, you can only view tasks for which the vendor is the company you are assigned to. This prevents anyone from seeing data they should not be seeing.
This also makes the app building experience easier because we will not have to create all sorts of filters for each block. This is provided out of the box by this data restriction feature. I will add this for all objects needing security layers.
I could also set that these users cannot create or edit such records. In our case, making sure they cannot even view these records will already be a good security measure to ensure they do not interact with data they shouldn't access.