Web design is a passionate field but can be overwhelming at times. When starting out, coming up with a plan on how to tackle your website or a web app idea often feels daunting: Where should you begin? What are some of the major steps you cannot miss? Is there a checklist you can go through to make sure you don’t leave anything behind?
Whether you’re designing for yourself or for a client, breaking down each and every step from ideation to finished product (and what comes afterwards) will help simplify the entire process and ensure you’re not forgetting anything.
Softr helps people and companies build websites and web apps without code. We’ve seen hundreds of projects come to life, from simple (and not so simple) ideas to actual business products generating revenue. In this article, we will share our 8 easy steps for an effective web design process.
Let’s get into it.
The Web Design Process in 8 Steps
We’ve broken down the web app design process into 8 steps for you to go along with: from planning how to execute your idea, all the way to post-launch.
1. Strategy
The very first web design process step has to be a strategy. Just like with anything in business or life, and regardless of whether you’re designing a website or web app for yourself or a client, you don’t want to jump in without a plan.
Things you want to decide on at this stage are:
- Goals and purpose;
- Scope;
- Timeline;
- Branding elements (Optional).
Let’s take a brief look at each.
Setting goals for your project
Whatever the project you’re taking on, you always want each and every initiative you take to relay to the goals you’ve set for it. Goal-setting is critical because it will be key in making decisions throughout the project by asking yourself the right questions and prioritizing tasks and efforts.
As basic as it may seem, following the SMART framework is always a great idea when setting your goals, to ensure they’re effective:

Establishing scope
What is the scope of what you’re trying to build? Determining project safeguards, especially early on, will ensure you stay on track towards your freshly-established goals. Examples of things that can be considered as establishing scope include:
- Technical requirements;
- Content overview ;
- Limitations.
If you’ve ever worked on a web design project for a client, you know how important defining scope is. No one likes a scope creep.
Drafting a timeline
Now that you’ve defined your goals and scope, you should be able to move to the next web design process step: decide on a timeline.
This is easier said than done when starting out, so take it with a grain of salt: Everyone has once been guilty of saying a project “will be done by next week” before realizing they dramatically underestimated how hard it would be.
Nevertheless, setting a timeline will help a lot with accountability, both internal and external, and will help break down the project in distinct stages. You don’t have to reinvent the wheel, as a lot of tools such as Airtable’s timeline view will help you put it together.

Optional: Deciding on branding elements
This web design step is highly dependent on your personal inclinations and the nature of your project, but deciding on major key branding elements can be an instrumental part of your strategy planning, and a useful tool to visualize what you’re trying to achieve. For projects that require expert guidance, premium branding agencies can provide profess.
Typically, branding elements that can be decided at this stage might include:
- Copy/tone of voice;
- Visual guidelines;
- Images.
While it might seem premature to talk about design this early, thinking about these big-picture questions might help with figuring out who your target audience might be, how to address it, and getting a clearer idea of the general direction you’re trying to take.
2. Research
Now that your general plan and goals have been laid out, it’s time to conduct some research and find inspiration.
This part is fun because you’ve most likely done a significant amount of it already. Typically, it involves the entire team and can be turned into a fun brainstorming exercise, bouncing ideas and suggestions back and forth. Areas you can find inspiration from can include:
- Design and visual identity;
- Copywriting and tone of voice;
- Audience and industry;
- Go-to-market strategy;
- Marketing campaigns;
- And more…
Competitors, other industries, market leaders and up-and-coming tools…. Leveraging channels such as Pinterest or creating a research repository for your team can be a good way to pick everyone’s brain.

Nothing is off-limits here but be careful. It’s easy to lose focus, and you don’t want to get stuck in a “too many cooks in the kitchen” situation.
3. Wireframing
Time to start building the first iteration of your project!
To put it shortly, wireframes serve as a blueprint, a visual guide representing the skeletal framework of a website or application. It will be a raw version of your project, a great way to get your initial idea down in its first “physical” form.
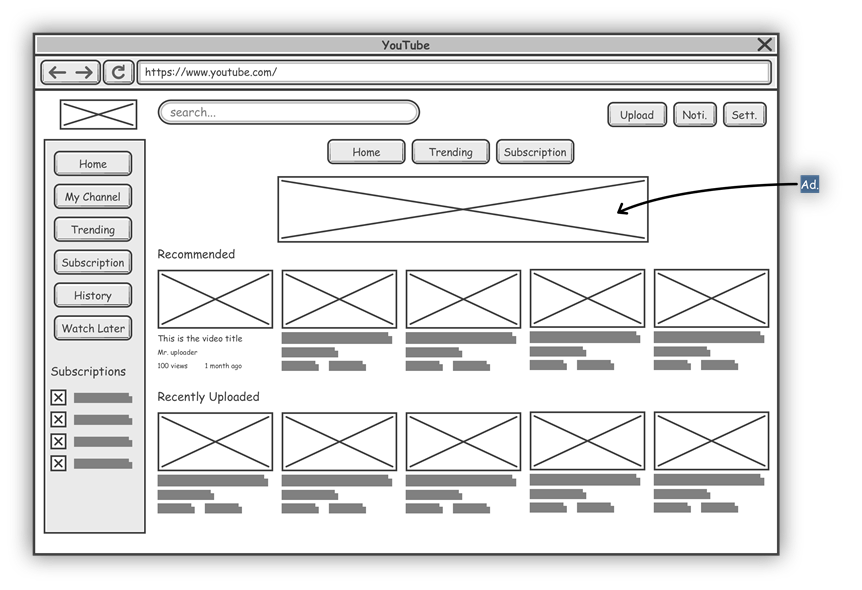
While it won’t be functional yet, it’ll be a major web design step to share with your team, potential leads or even investors, and will highlight issues that you might not have thought about previously. Wireframes are a great opportunity to move fast and break things, once they’re ready, you’ll be able to:
- Gather early feedback;
- Run UX testing groups;
- Iterate on your timeline if necessary;
- Get concept validation.
There are different ways to create wireframes. You can of course sketch them out on paper to start with, but creating a digital version will eventually be much more practical to share them.
There are a variety of tools available out there to build wireframes. You can start anywhere from your old trusty pal MS Paint all the way to more advanced platforms like Balsamiq or design tools such as Figma and Sketch.
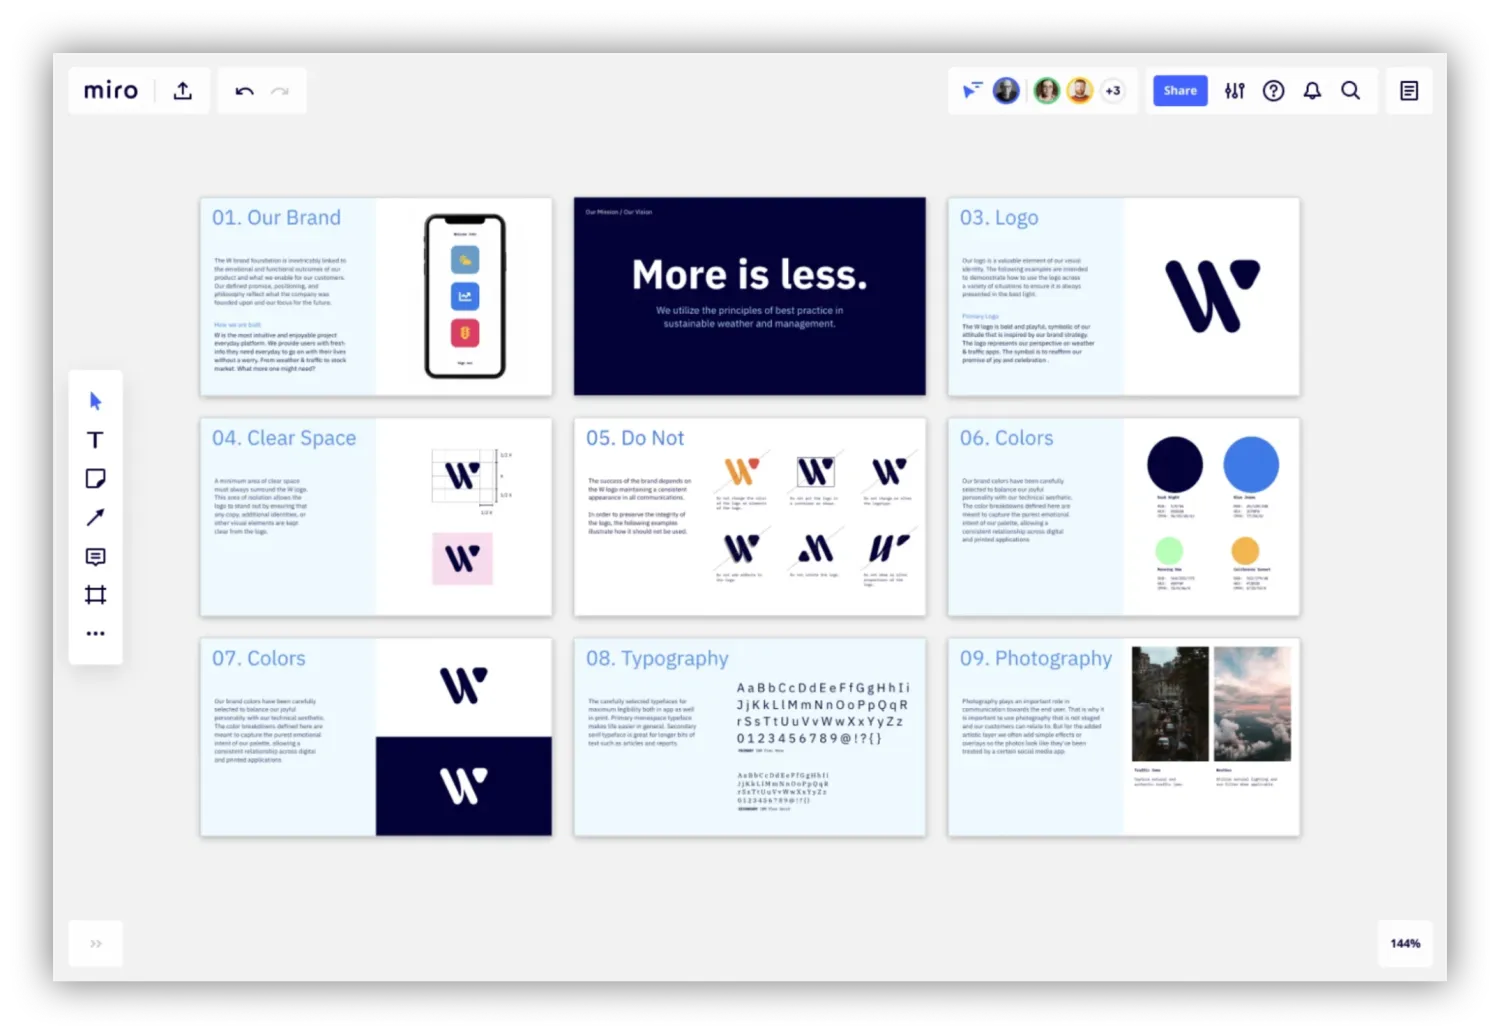
4. Branding and Design
Your wireframes are ready, time to consider the website design of your website or application!
Going back to our strategy step, you probably already have some of your custom logos and design choices in mind. Things you want to consider include:
- Colour scheme;
- Branding guidelines;
- Fonts;
- Images;
- Overall “feel” of the project;
- Copywriting.
These elements can then be gathered in a document that will be shared with all collaborators and should become a key reference document going forward.
These elements can then be gathered in a document that will be shared with all collaborators and should become a key reference document going forward.
Word of caution: This is the first iteration of your project, and we recommend not spending too much time on this section if possible. A lot of entrepreneurs and builders get stuck here wanting to ship something perfectly the first time around. Chances are, it won’t happen anyway, so you might as well try and build something fast. This is easier than ever if you’re using a modern photo editing tool to come up with the visual aspects of the branding and design. The best examples on the market today can further catalyze your initial iteration’s creation by harnessing the power of AI. This should help you have a rough-and-ready proof of concept in no time, preventing procrastination.
Word of caution: This is the first iteration of your project, and we recommend not spending too much time on this section if possible. A lot of entrepreneurs and builders get stuck here wanting to ship something perfectly the first time around. Chances are, it won’t happen anyway, so you might as well try and build something fast with your end users in mind.
"Design your solution to be so intuitive that new users can start using it with minimal training." - Jesus Vargas, Founder of LowCode Agency
5. First iteration of the website or app
Your wireframes are ready, your branding choices are set, you’ve tested out the user experience thanks to your wireframes… time for the fun part!
To build the first “real” version of your website or app, there are three options at your disposal:
Coding everything manually, in-house
Now that you’ve got the structure and the design of your project, you could opt for coding everything manually, either yourself if you have the technical skills, or using your in-house developers.
Pros:
- Totally Custom: Sky’s the limit (as long as you have the skills - and budget)
- In-house: You own the code and everything involved
Cons:
- Expensive: Developers are notoriously expensive and costs can quickly add up
- Time-consuming: Coding everything might take a long time, especially from scratch
Working with an agency/freelancers
Another option is to work with an external agency or freelancers that can bring your project to reality for you.
Pros:
- Expertise: Outsourcing is a good opportunity to get input and work from experts;
- Hands off: Limited oversight is generally needed when working with good professionals.
Cons:
- Expensive: Good agencies and freelancers are generally pricey;
- Limited control: You’re handing over your project to a third-party.
Doing it yourself, without code
Finally, using a no-code platform allows you to build your website or web app yourself, without code.
Pros:
- No code: If you aren’t able to code, no worries;
- Templates: Most of the no-code platforms provides lots of templates for different use cases (check out Softr's templates) to get started;
- Frontend and backend: You have full control over the entire project;
- Time saver: No-code tools normally save you a lot of time;
- Price: More affordable than playing a developer or an agency.
Cons:
- Hands-on: You have to get your hands dirty and do it yourself!

Regardless of the method, you end up going for, staying agile is vital in this step. The worst thing would be to stay stuck for months on end, only to find out after launching that no one cares about your idea. Using a no-code platform such as Softr is a great way to get your idea out there fast.
6. Testing
Once the first iteration of your website/web app is ready, it’s time for some testing to make sure it runs properly.
After so much time spent planning and building your project, you might be itchy to release it into the world. It’s perfectly understandable, but you don’t want to rush it and miss critical errors that you might have overlooked. Everyone makes mistakes, and it can’t hurt to dedicate a bit of time to go over everything. Some suggestions include:
- Gathering the entire team for a review day together;
- Organize a pre-launch with a selected group of users;
- Creating a testing checklist to go over.
Alongside these steps, setting up website uptime monitoring is essential to ensure the site remains functional after launch, providing immediate alerts if any downtime occurs. It’s also wise to confirm that your website is SEO friendly so it performs well in search rankings once it goes live.
Ultimately, while testing is an important part of the web design process, it’s not worth losing sleep over. Done is always better than perfect and when in doubt, keep this quote in mind:
“If you are not embarrassed by the first version of your product, you've launched too late.”
- Reid Hoffman, founder of LinkedIn
7. Launch
That’s it, you’re ready to launch!
The focus should be on getting constructive feedback and engaging with users. Launching products is an area of marketing in itself, but strategies you should consider are:
- Launching your project on Product Hunt;
- Getting involved in makers communities such as Indie Hackers;
- Leveraging your own network on social media and in real life;
- Taking part in conversations in niche communities related to your industry.
Being transparent, rallying an online community around your project and providing value will go a long way towards getting people to adopt it early and provide feedback. To learn more about the strategies we used ourselves, check out how we leveraged Product Hunt to launch and grow Softr.
8. Maintenance and iteration
The final step is the beginning of another process altogether. With the first iteration of your project out into the world, you now have to maintain it and iterate on the feedback and comments you receive from users.
Remember that things don’t need to be perfect the first time around. Take it from the CEO of OpenAI and former president of Y Combinator, Sam Altman.

Whether you’re building a full-fledged web app or your very first website, the same principles apply. Sharing your project with the world and listening to your audience will be key to shaping your project and growing it in the right direction.
It’s only the start!
Conclusion
Congratulations, you’ve been through our website design process in 8 steps, and should now have all the elements you need to get started!
Any complicated task can be broken down into shorter, actionable steps. Here are some key takeaways from the article for you to remember when embarking on your own process:
- Encourage continuous feedback and collaboration throughout the project;
- Stay open and iterate on ideas for a better-finished result
- Don’t stay stuck! Done is better than perfect.
- Use tools that can help you stay agile and move fast;
- Document your efforts to do even better next time.
Frequently asked questions about web design process
What is web designing process?
A web development process is a breakdown of the stages required to complete a standard web design project from beginning to end. It divides and categorizes the job before breaking down these high-level divisions into activities and resources that may be utilized as a project road map.
How do I setup a website?
To build a wesbite:
1. Make a plan for the structure and content of your website.
2. Choose a domain that ends in .com
3. To develop your site, look for a website builder (or no-code tool).
4. Make it SEO friendly.
5. Launch your website
What are the 5 elements to a good website design?
- Usability.
- Content.
- Visibility.
- Aesthetics.
- Interaction.
What are the five golden rules of web designing?
1. A call to action is a necessity for responsive websites.
2. Easy-to-use nav bar and layout.
3. Relevant and capturing content.
4. Everything should be double-checked before and after going live.
5. Contact forms and the "About Us" page.