


The foundation of any scalable operations platform is its database. Before you build vendor dashboards, design onboarding forms, or set up automated invoice reminders, you need a solid structure to hold your data.
This guide focuses specifically on how to architect a smart, relational database for a custom Vendor Portal. We will walk through structuring tables to securely manage external partners and using Softr’s Database AI Agents to automatically categorize vendors and documents—saving your operations team hours of manual tagging.
While this article focuses on the data layer, Softr is a full-stack app builder. Once your database is ready, you can use Softr to build the secure interface (frontend) and the logic (workflows) all in one platform.
If you want to jump ahead to building the visual interface, check out our complete guide to building the full Vendor Portal here. You can also skip the build and clone the fully functional Vendor Management Template here.
What is Softr and how does it help build a Vendor database?
Softr is a full-stack no-code platform that lets you build custom apps on top of your data. Softr Databases provide a native, high-performance backend for your apps, seamlessly connecting to your interface.
For a Vendor Portal, using Softr Databases offers distinct advantages:
- Granular Security: The ability to link specific users to specific vendor records ensures that Vendor A never sees Vendor B’s data.
- Native AI Agents: Built-in AI that can automatically categorize documents (e.g., distinguishing an NDA from an Invoice) or classify vendor types.
- One Ecosystem: Because the database is native, connecting it to your app's permissions and automated workflows happens instantly, with no API limits.
What you'll learn in this database tutorial
- Relational architecture: How to structure five interconnected tables to handle complex procurement lifecycles.
- AI data enrichment: How to configure fields that automatically classify vendors based on their description.
- Security foundation: How to set up specific fields (like "Role" and "Status") that will power your app's permission system later.
The core strategy: Why relational?
A simple spreadsheet cannot securely manage a vendor network. In a procurement context, you might have one Vendor Company that has multiple Employees, submits dozens of Invoices, and is responsible for various Tasks.
If you try to jam all that data into one row, you lose the ability to track the status of individual invoices or assignments.
Success in building apps is 80% data structure. Before you open the studio to build, map out your distinct "Nouns" (Objects) and their relationships.

In this case, we have 5 distinct entities:
- Users: The actual humans logging in (both your internal Admins and external Vendors).
- Vendors: The company entities.
- Tasks: Action items and deliverables.
- Documents: General files like contracts and insurance certificates.
- Invoices: Financial records requiring payment tracking.
Crucially, we separate Invoices from generic Documents.
Create separate tables for distinct entities rather than merging them. Invoices require unique fields (Currency, Payment Status) and calculations that a generic PDF contract does not.
Part 1: The foundation (Users & Vendors)
We’ll start by creating the database in Softr and setting up the two most fundamental tables.
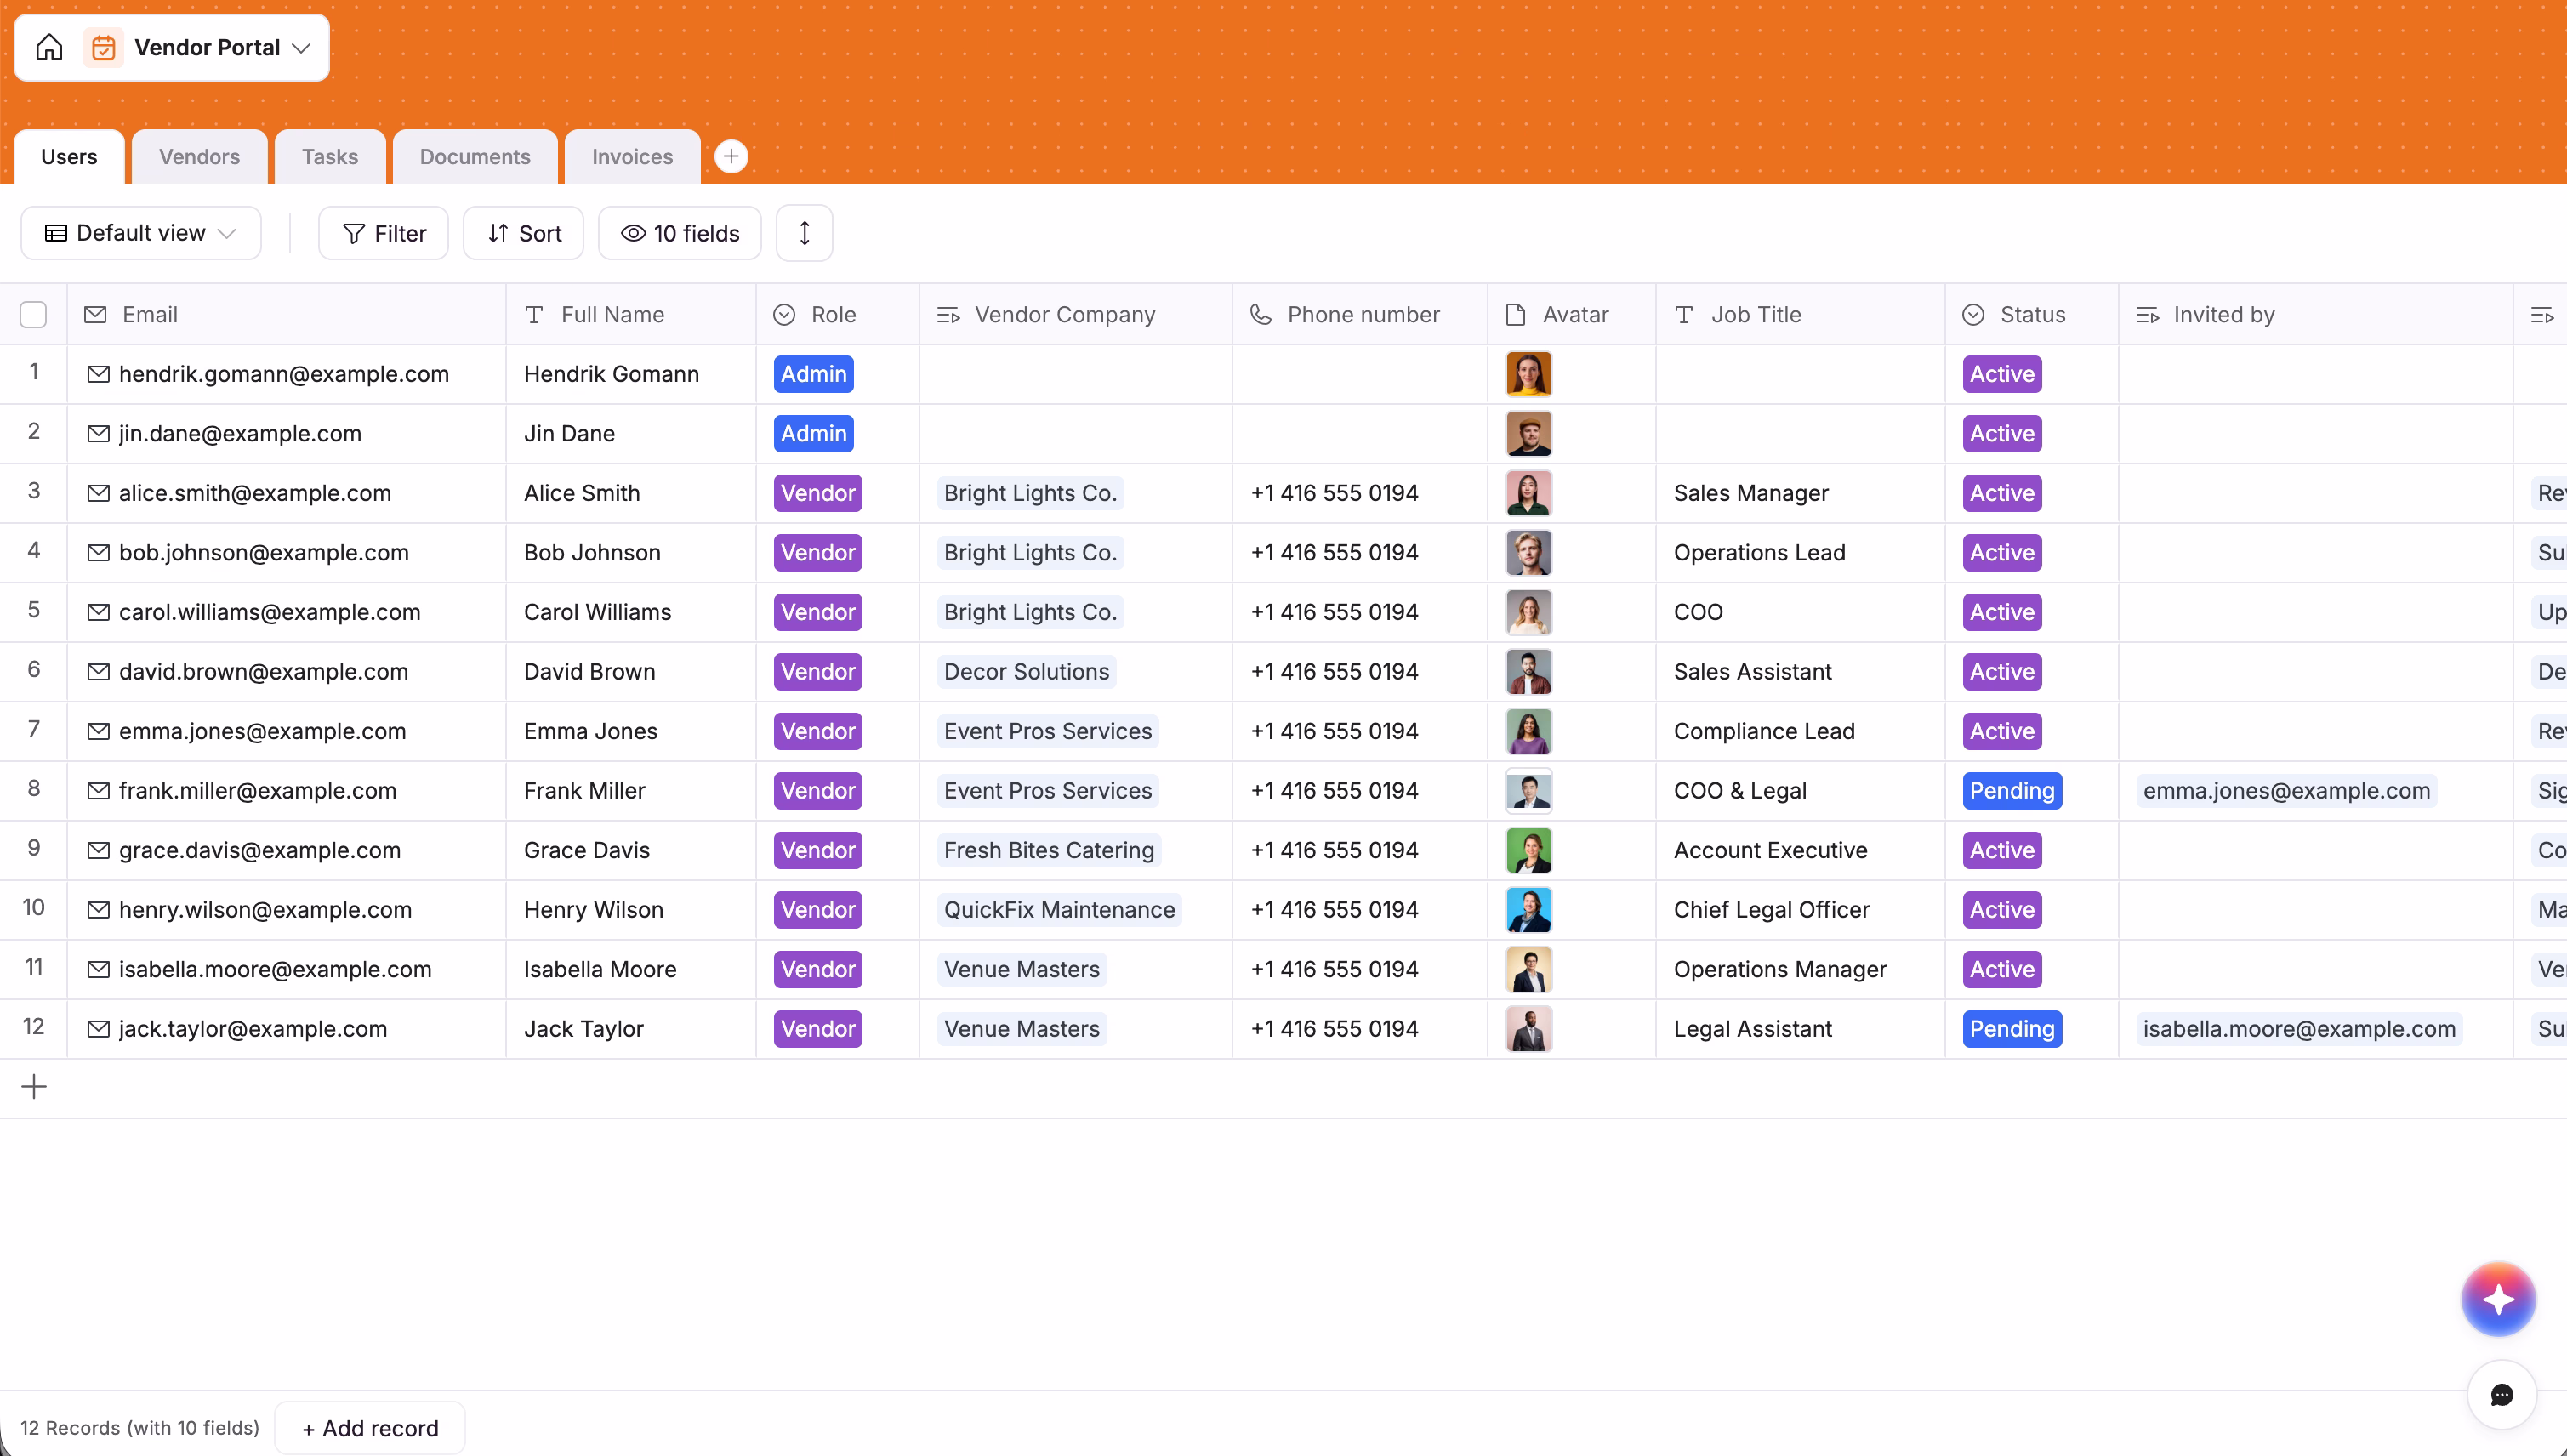
1.1. Create the database and the Users table
- In your Softr Dashboard, click Create Application.
- Select Softr Database as your data source.
- Navigate to the Data tab to see the default
Userstable.

This is the recommended process if you plan to then build an interface on top of this data. If you just want the database for now, you can create one from scratch under the Database section in the Softr studio dashboard.
A common mistake is creating separate tables for "Admins" and "Vendors."
Best Practice: Keep all app users in a single database table distinguished by a "Role" field. This simplifies authentication and makes promoting a user to an Admin as easy as changing a dropdown value.
Configure the Users table with the following fields:
- Email: Set this as the Primary Key (Type:
Email).
Always use the Email field as the primary unique identifier to prevent ambiguity and ensure reliable filtering.
- Full Name: (Type:
Text). - Role: (Type:
Select). Add options for Admin and Vendor. - Status: (Type:
Select). Add options for Active and Pending.- Why? This allows you to create an approval gate. Vendors can sign up, but they can't access data until an Admin flips this switch to "Active."
- Related Vendor: (Type:
Link to another record). We will link this to the Vendors table in the next step. This connects the human user to the company they represent.
1.2. Configure the "Vendors" table with AI Agents
This table represents the businesses you work with. Instead of manually tagging every new supplier, we will leverage Database AI Agents to classify records automatically.
Create a new table named Vendors and add these fields:
- Company Name: Primary Key (Type:
Text). - Description: (Type:
Long Text). This is where you or the vendor describes what they do. - AI Field: Vendor Category:
- Add a new field and select AI Agent.
- Prompt:
Classify the vendor category (e.g., Logistics, Software, Legal, Marketing) based on the [Description]. Return only the category name. - Settings: Set the trigger to "When
Descriptionis not empty".
- Open Tasks: (Type:
Rollup).

Use Roll-up fields to calculate stats (like "Open Tasks") directly on the parent record, rather than trying to filter and count on the frontend. This ensures your interface loads instantly.
The Result: When a vendor enters their description during onboarding, Softr's AI automatically categorizes them, keeping your database organized without manual effort.
Part 2: Managing Operations (Tasks & Documents)
Now we need to handle the actual work—deliverables and compliance.
2.1. Configure the "Tasks" table
This table tracks what needs to get done. We separate tasks from vendors so that one vendor can have 50 different tasks over time without cluttering their profile.
Create a Tasks table with these fields:
- Task Name: Primary Key (Type:
Text). - Status: (Type:
Select). Add options for To Do, In Progress, and Done. - Due Date: (Type:
Date). - Relationships:
- Related Vendor: Link to Vendors.
- Assignee: Link to Users.
Important: Use Linked Records to connect tables rather than text fields. Never type a vendor name manually; if a Company changes its name, the Linked Record ensures every Task updates automatically.
2.2. Configure the "Documents" table
This table stores contracts, NDAs, and insurance certificates.
Create a Documents table:
- Doc Name: (Type:
Text). - File: (Type:
File). - AI Field: Document Type:
- Add an AI Agent field.
- Prompt:
Analyze the [Doc Name] and classify it as "Contract", "Invoice", "Insurance", or "Other".
- Relationships: Link to Vendors.
Part 3: Financials (Invoices)
As mentioned in our strategy section, we strictly separate Invoices from generic Documents to enable financial calculations.
3.1. Configure the "Invoices" table
Create an Invoices table:
1. Invoice ID: Primary Key (Type: Text).
Include a Record ID field or unique text identifier to ensure every row has a permanent reference. This is crucial for reliable automation and future integrations with tools like QuickBooks.
2. Amount: (Type: Currency, set to your local currency).
Use specific field types (like Currency) rather than generic Numbers or Text. This ensures proper formatting in your dashboard charts later.
2. Status: (Type: Select) with options Pending, Approved, Paid.
3. Submission Date: (Type: Date).
4. Relationships: Link to Vendors.

From database to full-stack portal
You now have a robust backend structure. You have a secure user table with role-based flags, a vendor directory enriched by AI, and relational tables for tasks and financials.
But a database is just the starting point. To turn this into a usable tool where vendors can self-onboard and submit invoices, you need an interface.
This is where Softr's power as a full-stack builder comes in. Because your data is natively stored in Softr, you can instantly build the frontend—Admin Dashboards, Vendor Portals, and Kanban boards—without any complex integrations.
Next Steps:
- Build the Interface: Create a "God Mode" dashboard for your team and a limited, secure portal for your vendors.
- Set up Permissions: Use the
Rolefield we created to ensure vendors only see their own data.
Ready to finish the build? Read our step-by-step guide to building the full Vendor Portal interface here.
If you prefer to start with this exact database and interface already built for you, you can use our Vendor Management Template. Happy building!

.webp)