How to build a vendor management portal (guide + free template)

Managing a network of vendors, suppliers, or freelancers often descends into chaos. Contracts live in Google Drive, invoices are buried in email threads, and task statuses are trapped in local spreadsheets.
In this guide, we are going to build a solution: a Vendor Portal. A full-stack application built on Softr.
This will features a relational database, two distinct interfaces (one for your internal Admin team, one for external Vendors), and an automated backend that handles approvals and reminders.
By the end of this tutorial, you will have a secure environment where vendors can self-onboard, manage their tasks, and submit invoices, while your team maintains total oversight via a central dashboard.
If you prefer to skip the build, you can grab the Vendor Portal Template here.
What is Softr and how does it help building a Vendor Portal?
Softr is an AI-powered business app creation platform trusted by over 1 million builders worldwide. It gives business operators—ops managers, procurement teams, and department heads—a full-stack ecosystem to build production-ready software: a visual Interface Builder, native Databases, and automated Workflows, all without touching code.

For operations and procurement teams, Softr is uniquely suited to solve the "external user" problem. Most internal tools charge per user, making it prohibitively expensive to invite 500 vendors. Softr allows you to build a portal where:
- Security is granular: You can create "Data Restrictions" so that Vendor A never sees Vendor B’s data, while your internal Admins retain full visibility.
- Data is alive: Instead of static rows in a sheet, your data works for you. AI agents classify documents automatically, onboarding flows ensure profile completeness, and automated workflows handle the "chase emails" for you.
- Roles are distinct: You can serve a completely different interface to an Admin (high-level analytics) versus a Vendor (task execution) from the same application.
What you'll learn in this Vendor Portal tutorial
In this guide, we will cover:
- Full-Stack Architecture: How to design a robust relational database from scratch that links Users, Companies, Tasks, and Financials into a scalable ecosystem.
- Dual-Interface Design: How to build two completely different experiences from one data source: a "God Mode" dashboard for Admins and a focused, private workspace for Vendors.
- AI-Enhanced Functionality: How to infuse AI into every layer of your app—using Database Agents to clean data, Ask AI for instant insights, Vibe Coding for custom UI, and LLMs to write personalized emails.
- Enterprise-Grade Security: How to implement user permissions so reliable that vendors can never accidentally see each other's data, regardless of how you design the pages.
- Automated Business Logic: How to replace manual admin work with Custom Workflows that automatically handle user approvals, onboarding, and deadline reminders.
If you’re interested in watching the complete live-build session for this app:
Who’s this app for?
This application is designed for operations managers, procurement teams, or any business that manages relationships with external agencies, suppliers, or contractors. It is specifically useful for teams that need to enforce compliance (e.g., collecting insurance documents) or manage high volumes of invoices and tasks across multiple partners.
User groups and jobs to be done
Our Vendor Portal is a two-sided marketplace of sorts, serving two distinct groups:
- Vendors (the external users)
These are your external partners. Their primary job is to maintain compliance and get paid. They need a frictionless way to:
- Complete onboarding and submit required documentation.
- Track assigned tasks and their due dates.
- Submit invoices and track payment status.
- Invite their own team members (e.g., legal, finance) to the portal.
- Admins (the internal team)
These are your operations or finance managers. Their job is oversight. They need to:
- View a global dashboard of all vendors to see who is active and who is pending.
- Assign tasks to specific vendor companies.
- Review and approve pending vendor team members.
- Use AI to query document data and gain insights instantly.
Here’s the app plan we’ll end up building:

The app’s core structure
Before we build, we must plan. Success in Softr is 80% data structure. Instead of creating one giant spreadsheet, we will map our data into distinct "Objects."
Pages to be built:
We will separate our app into two distinct paths using Page Rules.
- Admin experience: Features a robust homepage with tabbed dashboards for "All Vendors," "All Tasks," and "Analytics," plus detail pages for deep dives.
- Vendor experience: Features an Onboarding Flow to capture profile data, followed by a "Vendor Home" with a personal status card, task Kanban board, and invoice submission forms.
Database structure:
We will use Softr Databases to create five interconnected tables:
- Users: A single table for all people (Admins and Vendors), distinguished by a Role field.
- Vendors: The company entities.
- Tasks: Action items linked to a specific Vendor.
- Documents: General files (contracts, certifications).
- Invoices: Financial documents.

Pro Tip: We separate Invoices from Documents because Invoices need unique fields like "Amount" and "Payment Status" for calculations that generic documents don't require.
Part 1: Structuring your database in Softr
We will start by building the data foundation using Softr Databases. A strong relational structure ensures our app is scalable and "AI-ready."
1.1. Configure the Users table (The source of truth)
We will start with the most important table. A common mistake is creating separate tables for "Admins" and "Vendors." Best practice is to keep all app users in a single table. This centralizes authentication and makes permission management much easier.

- Open your Softr Database and locate the default
Userstable. - Ensure
Emailis the primary field. Always use Email as the unique identifier, as names are not unique. - Add a Single Select field named
Rolewith options for Admin and Vendor. This will drive our permission logic later. - Add a Single Select field named
Statuswith options Active and Pending. We will use this to create an approval gate, ensuring vendors can't log in until an admin reviews them. - Finally, create a Linked Record field named
Related Vendorconnected to theVendorstable. This creates a physical link between a human user and the company they represent.
1.2. Configure the Vendors table with AI Agents
Next, we build the table for the companies. Here, we will leverage Database AI Agents to reduce manual data entry.

Create a Vendors table with standard fields for Company Name, Address, Process Start Date, and Approval Date. Then, let's make it smart:
- AI categorization: Add a Select field named
Category. Enable the AI Agent setting for this field. In the prompt, instruct the AI to "Classify the vendor category based on the [Description] field." Now, whenever a description is added, the database will automatically tag the vendor (e.g., "Logistics" or "Software") without human intervention.

- Rollups for quick stats: We want to see how many open tasks a vendor has directly on their profile. Create a Rollup field named
Open Tasks. Connect it to theTaskstable and set it to Count records where the status is not "Done."
1.3. Configure distinct tables for Tasks, Documents, and Invoices
Following the principle of separating distinct objects, we will create specific tables for the rest of our data.
Taskstable: Create fields for Title, Description, Status (To Do, In Progress, Done), and Due Date. Crucially, link every task to aVendorand anAssignee(User).Documentstable: This stores general files. Add a File field. Pro Tip: Enable an AI Agent on a text field here to "Classify this document based on the filename." It can automatically tag uploads as "NDA," "W9," or "Insurance" to keep your files organized.Invoicestable: Create this specifically for financial records. AddAmount(Currency) andStatus(Paid, Pending). Separating this allows us to easily build charts later, like "Total Outstanding Spend," which wouldn't be possible if invoices were mixed into a generic documents table.
Part 2: Building the admin interface ("Control Center")
Now that our data is structured, we will build the interface where Admins oversee the ecosystem.
2.1. Sync Users and define groups
Security starts with the User Sync. Navigate to the Users section in the Softr Studio. Instead of manually inviting users, we will Sync with Data Source and connect it to our Users table.

Here is a critical security step: Set a sync condition to only import users where Status is Active. This effectively creates a "waiting room." A vendor can be invited (creating a "Pending" record), but they cannot physically log in until an Admin flips that switch to "Active."
Next, define your User Groups dynamically. Create an Admin group with the condition Role is Admin and a Vendor group where Role is Vendor. This ensures that if you promote a user in the database, their permissions update instantly in the app.

2.2. Build the admin homepage
We want our Admins to have a high-level view without clicking through dozens of pages. We will build a single Admin Home page using a Tabbed Container to organize information efficiently.

- Vendors tab: Add a Table block to list all vendors. Include a filter bar for Status and Category so admins can quickly find "Pending" vendors.
- Tasks tab: Add a Kanban block to visualize work in progress. Enable drag-and-drop so Admins can move tasks from "To Do" to "Done" directly from the dashboard.
- Dashboard tab: Use Chart blocks to display KPIs. A Bar chart showing "Invoices by Status" or a Summary Card showing "Total Active Vendors" gives Admins immediate insight into the health of the portal.

2.3. The vendor details modal
When an Admin clicks on a specific vendor, they need to see everything related to that company. We will create a Vendor Details page and open it as a Sliding Modal. This preserves the Admin's context—they can check details and slide the modal away to return to their list.
On this page, use Conditional Filters to display related data. For example, add a Table block for Documents and set the filter to: "Show documents where the Related Vendor is the Current Record's Company Name." Repeat this for Tasks, Invoices, and Team Members. This creates a drill-down experience where all child data is visible on the parent record.

Pro Tip: Enable the Ask AI feature on these lists. This allows an Admin to simply type "Does this vendor have a valid insurance certificate?" into a chat bar. The AI will scan the documents list and answer, saving the admin from opening every PDF manually.

Part 3: Building the vendor portal experience
The Vendor experience must be distinct from the Admin view. It should be focused, personal, and foolproof.
3.1. The onboarding flow
We need to ensure vendors provide necessary data (like their Job Title and Phone Number) before they start working. We will use a User Onboarding Flow.
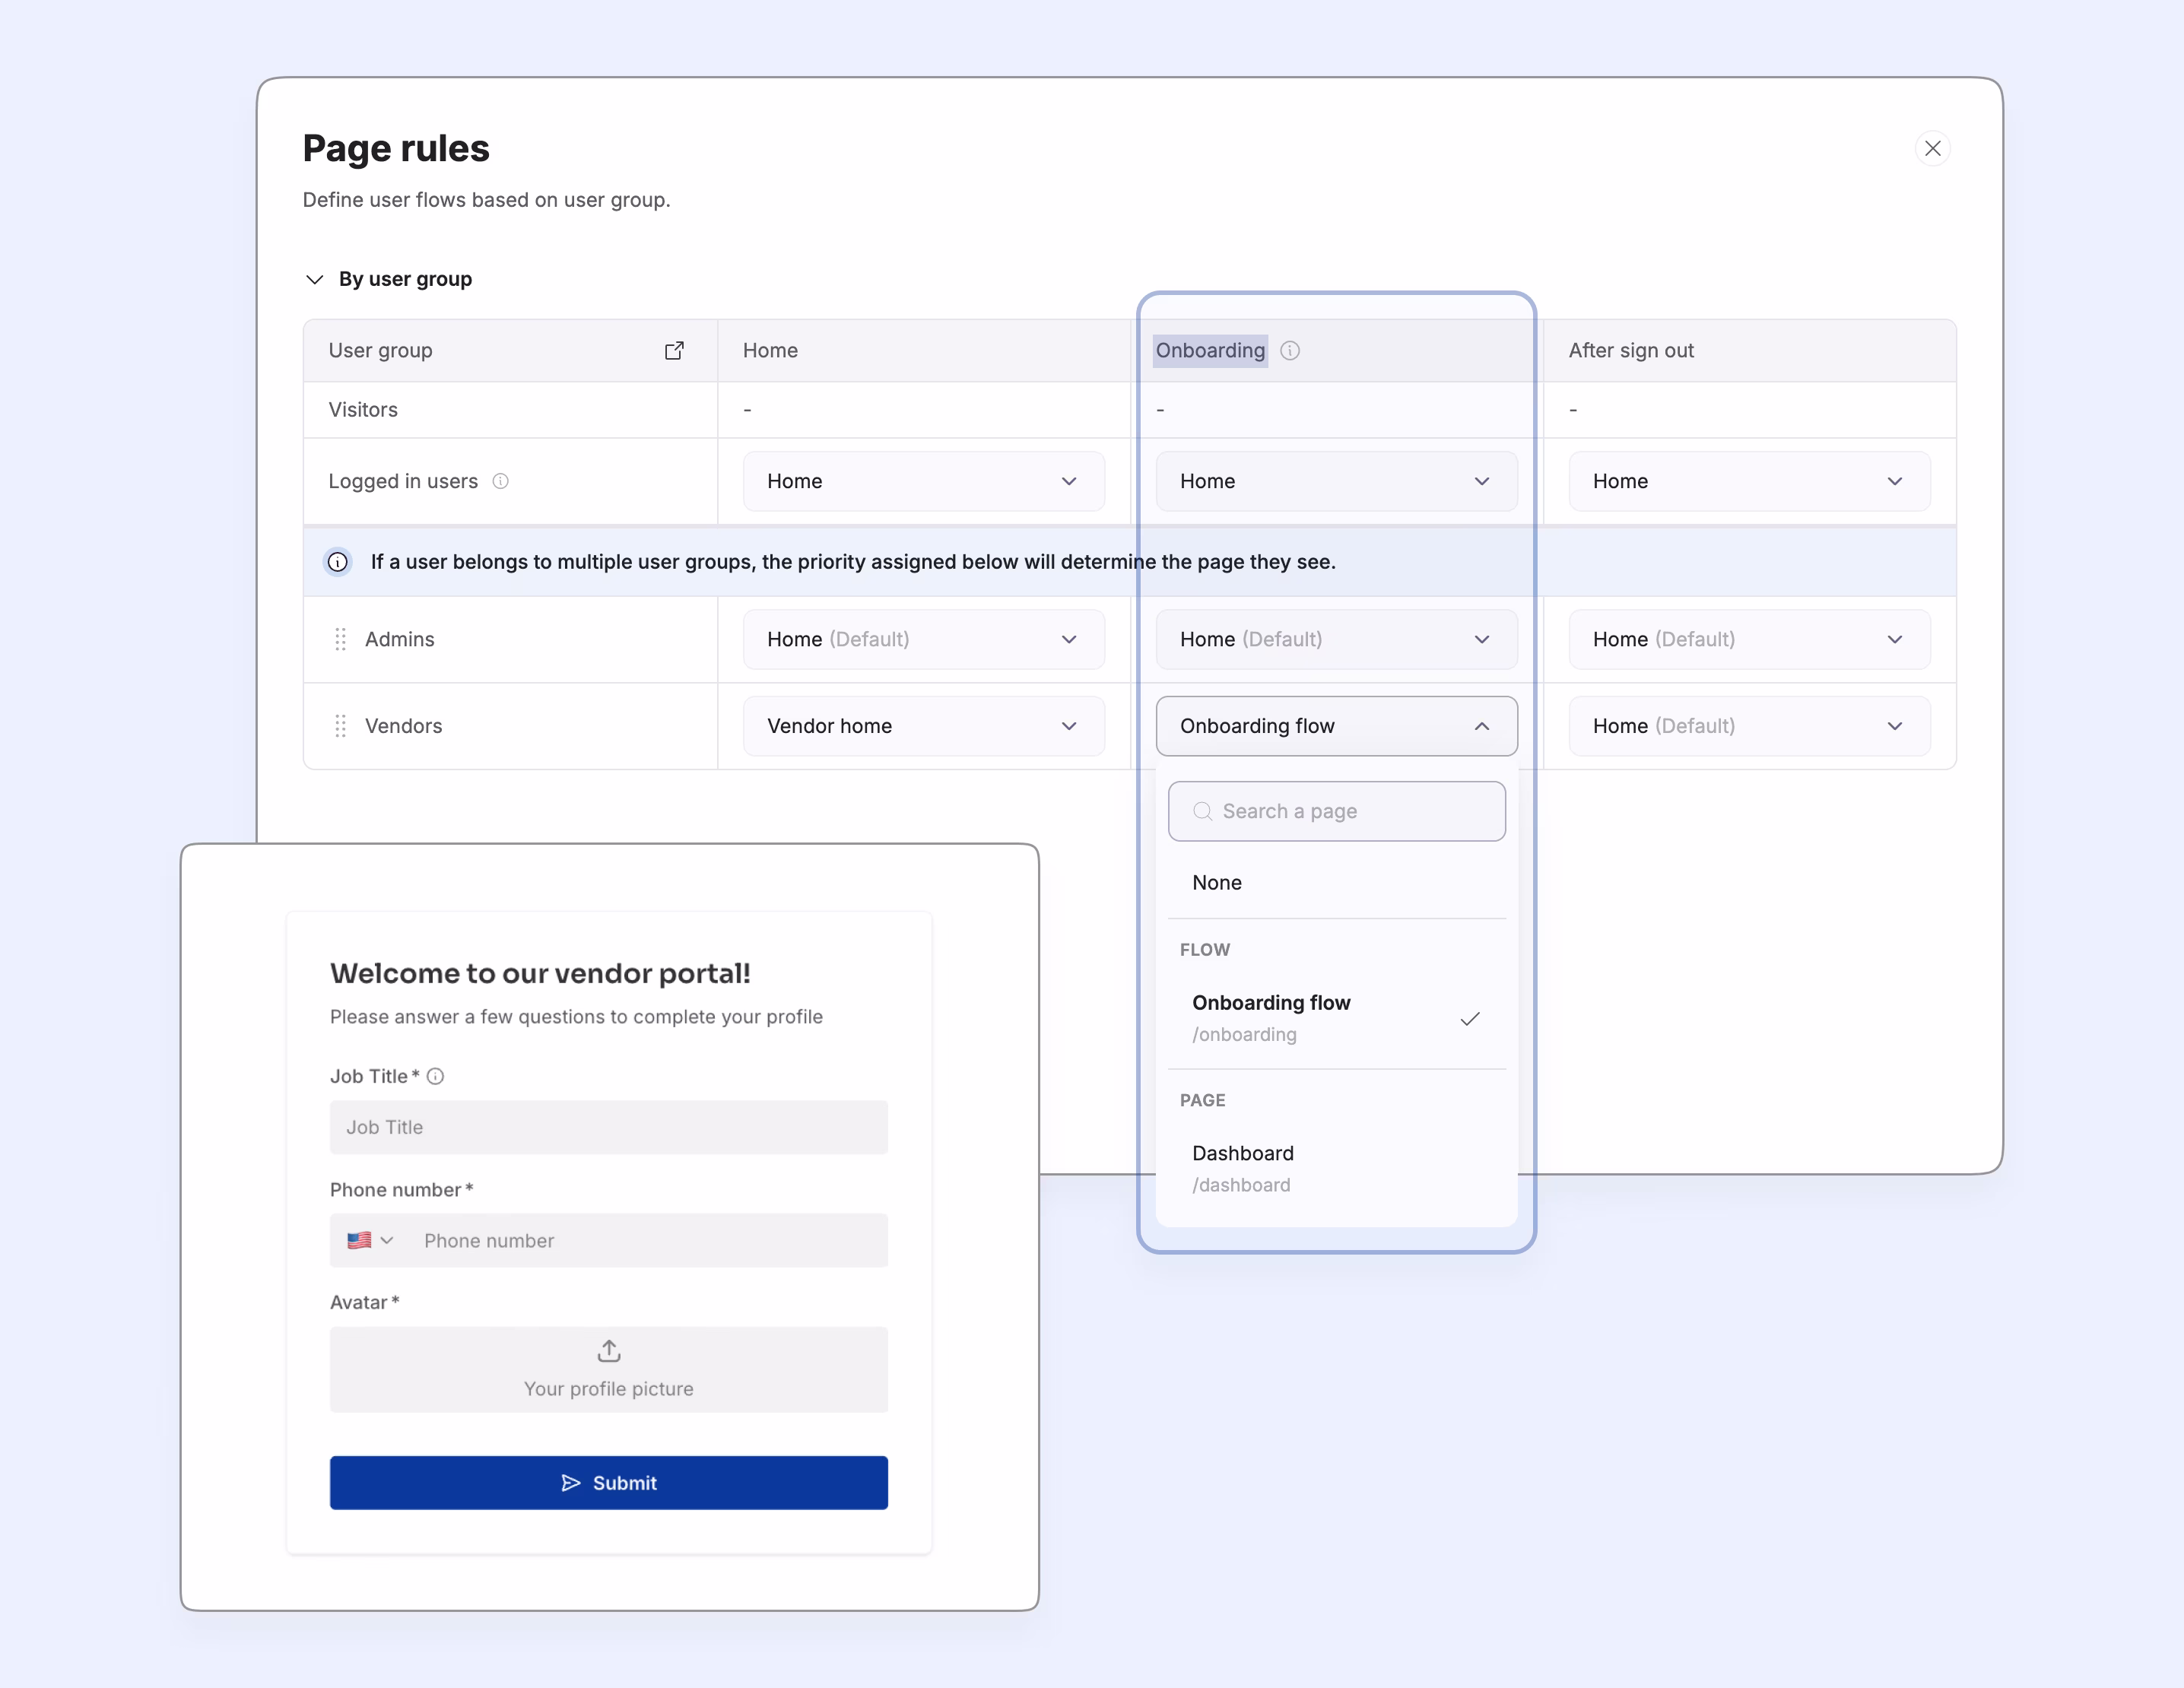
Create a new Onboarding page and assign it specifically to the Vendor user group in the page visibility settings. This forces new vendors to complete this form immediately after their first login. It guarantees data completeness—you’ll never have to chase a vendor for their phone number because the system won't let them in without it.
3.2. Vendor home & Vibe-Coding
Once onboarded, vendors land on the Vendor Home. We want this to look premium and personalized, not like a boring list.
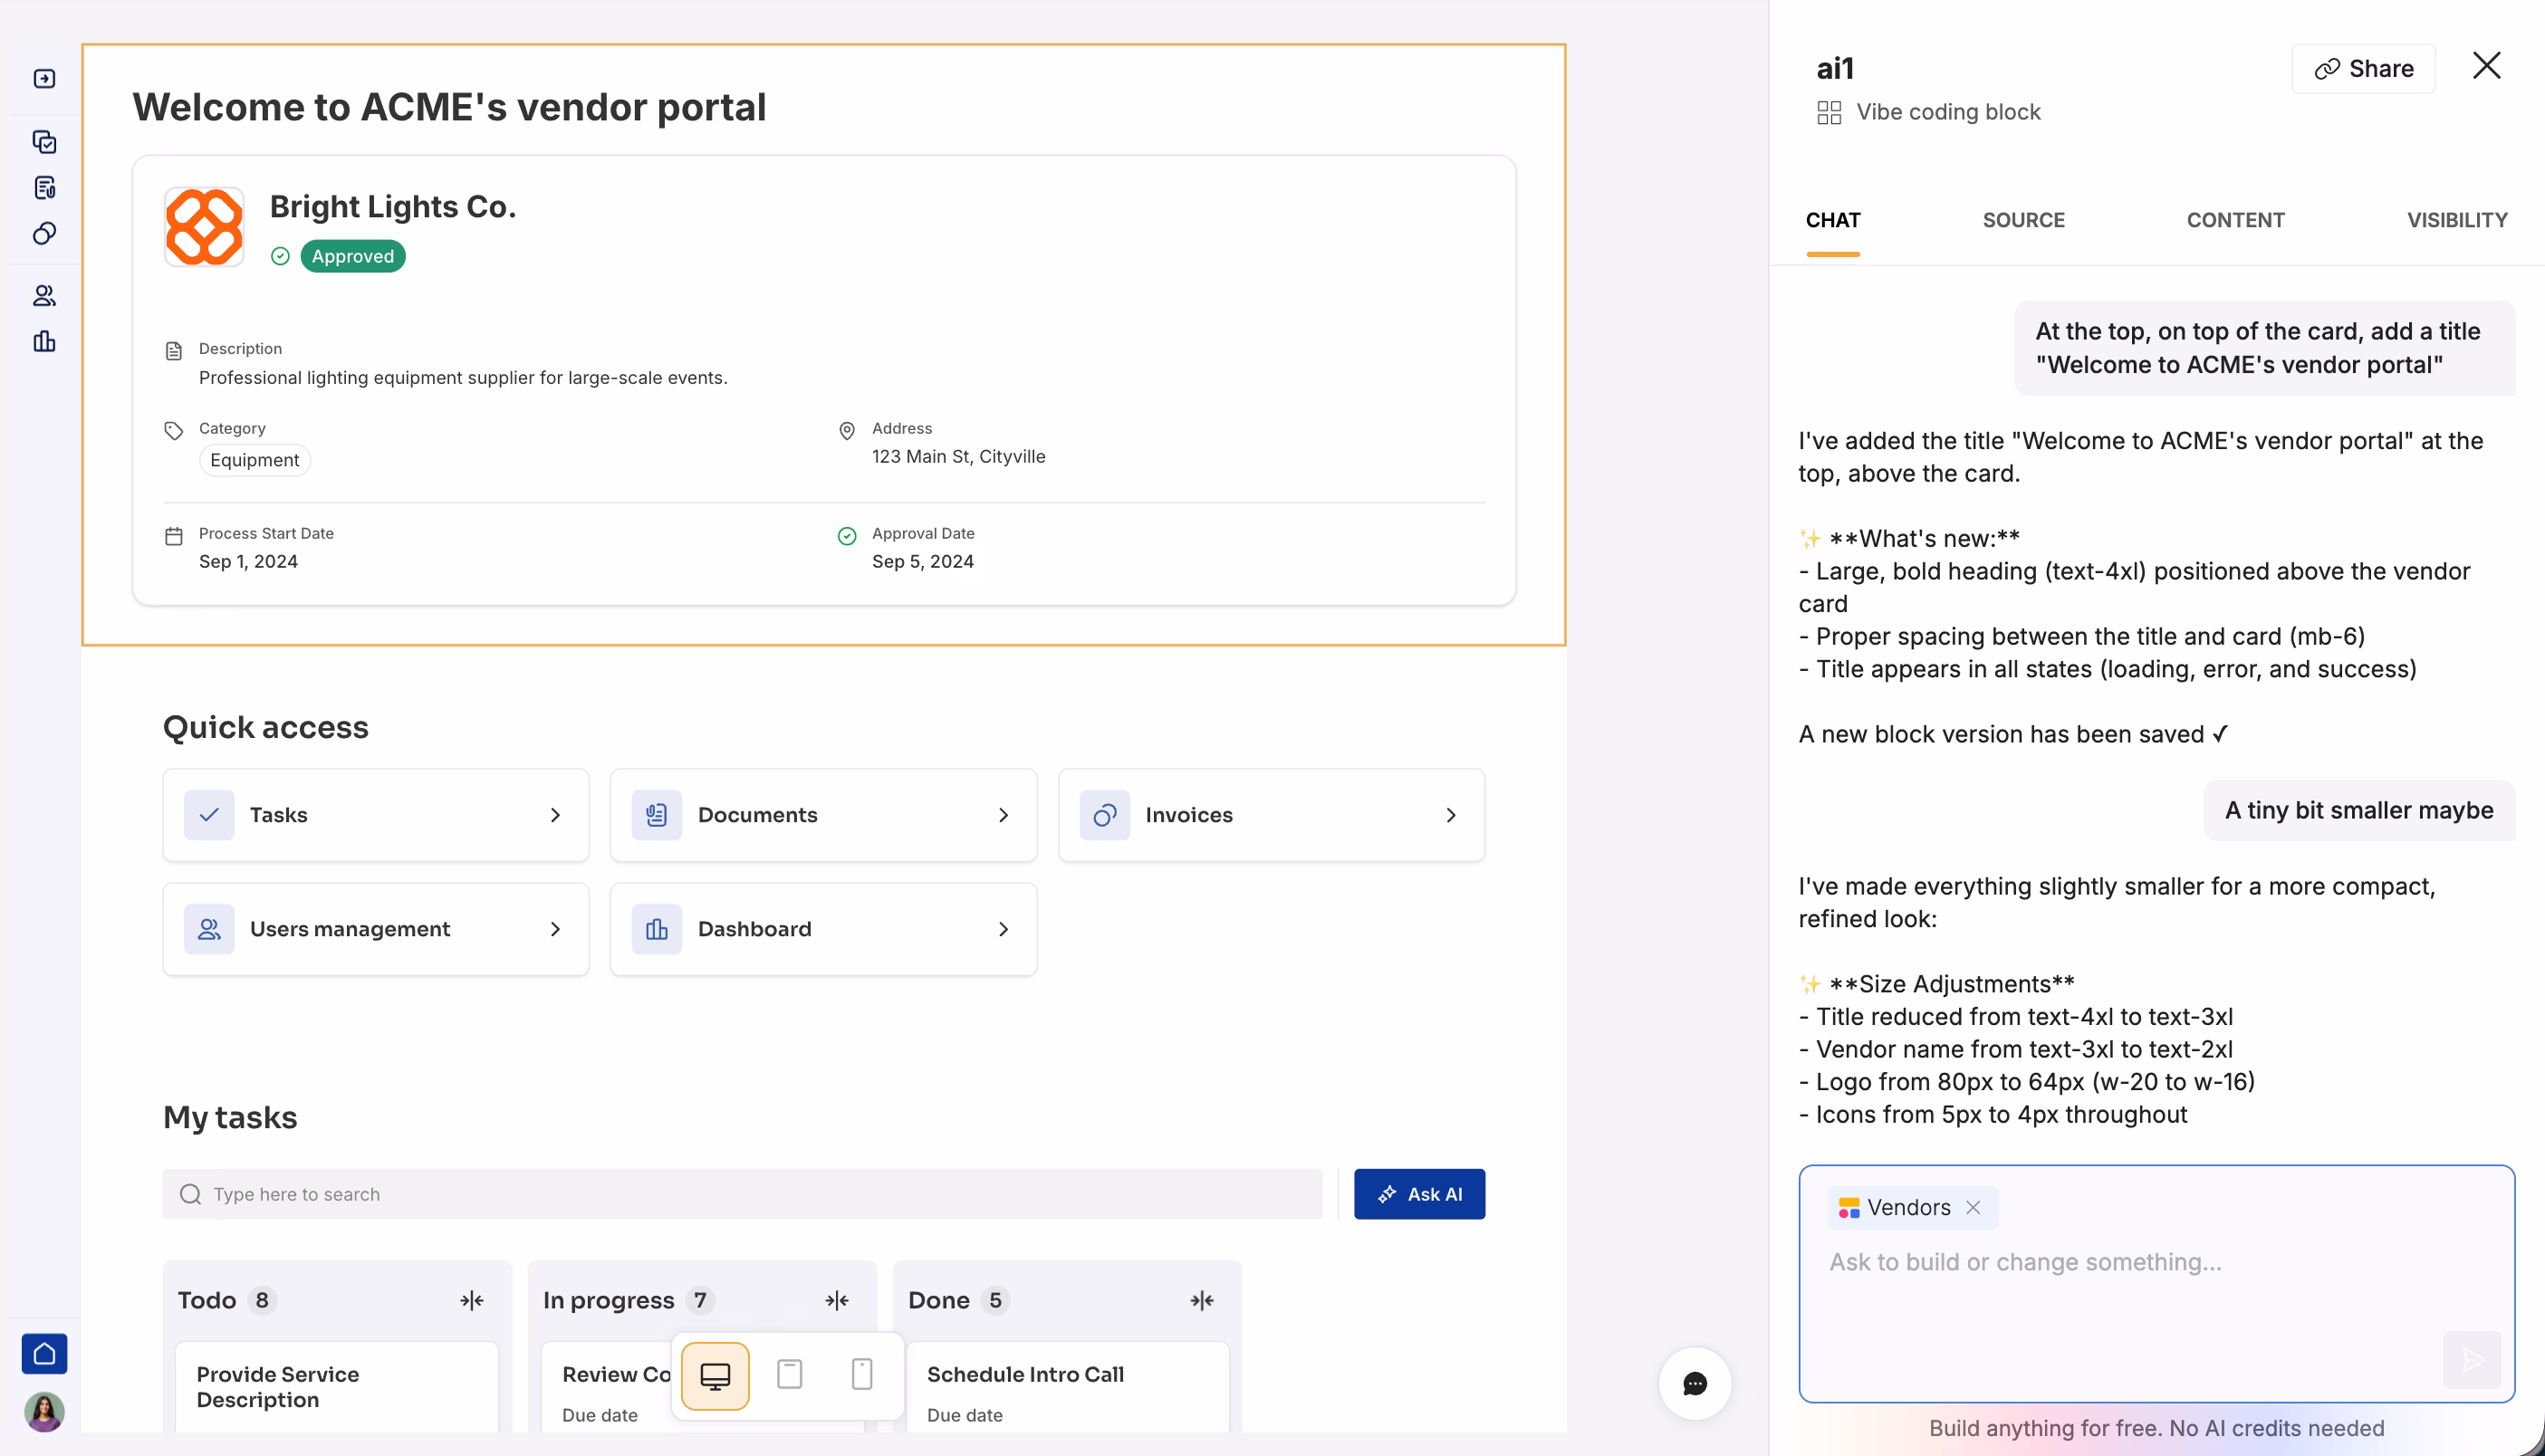
To achieve a unique look, we will use Vibe-Coding. Instead of a standard list, add a Vibe Coding block and type a prompt like: "Create a minimalist status card displaying the Vendor Name, Process Start Date, and Status with color-coded badges."
Softr’s AI will write the code to generate a beautiful, custom UI element that connects directly to your database, giving your vendors a polished "dashboard" feel.
3.3. Task and invoice management
The core utility of the portal is in the work execution.
- Tasks: Add a Kanban board linked to the Tasks table. We will set permissions momentarily so they only see their tasks.

- Invoices: Add a List block for past invoices and a Form block to submit new ones. Crucial: Use Hidden Fields in your form. You can hide the
Related Vendorfield and auto-populate it with theLogged-in User's Vendor. This means the vendor doesn't have to select their own company name from a dropdown—the system tags it automatically, preventing errors.
3.4. Security: Global Data Restrictions
This is the most critical step for a secure portal. We do not want to rely solely on page-level filters to hide data.
Go to Settings > Data Restrictions. For the Vendor user group, apply a rule to the Tasks, Documents, and Invoices tables: "Can view records where Related Vendor is Logged-in User's Related Vendor."

This acts as a global firewall. Even if you accidentally forget a filter on a specific page, the system will refuse to serve data belonging to other companies. This ensures watertight privacy between your vendors.
Part 4: Automating with custom workflows
Finally, we will automate the manual "chase" work using Softr Workflows.
4.1. User approval process and automation
When a vendor invites a colleague, they appear as "Pending" in your dashboard. When an Admin reviews them and changes their status to "Active," we want the system to take over.

Create a new workflow triggered when the User Status changes to Active. Add a Send Email action. Map the user's email and include a magic link to the login page. This replaces the manual process of drafting "Welcome" emails, ensuring vendors get instant access the moment they are approved.
4.2. Intelligent task reminders
Generic automated emails (e.g., "You have a task") are often ignored. We will use AI to make them effective.
Create a workflow triggered when a Task's Due Date is Tomorrow.
- Find record: Use this step to find the User record of the Assignee (so we have their name).
- AI custom prompt: Add an AI / LLM step. Prompt the AI: "Read the Task Title and Description and write a polite, personalized reminder email to [User Name]."
- Send email: Map the AI's output to the email body.
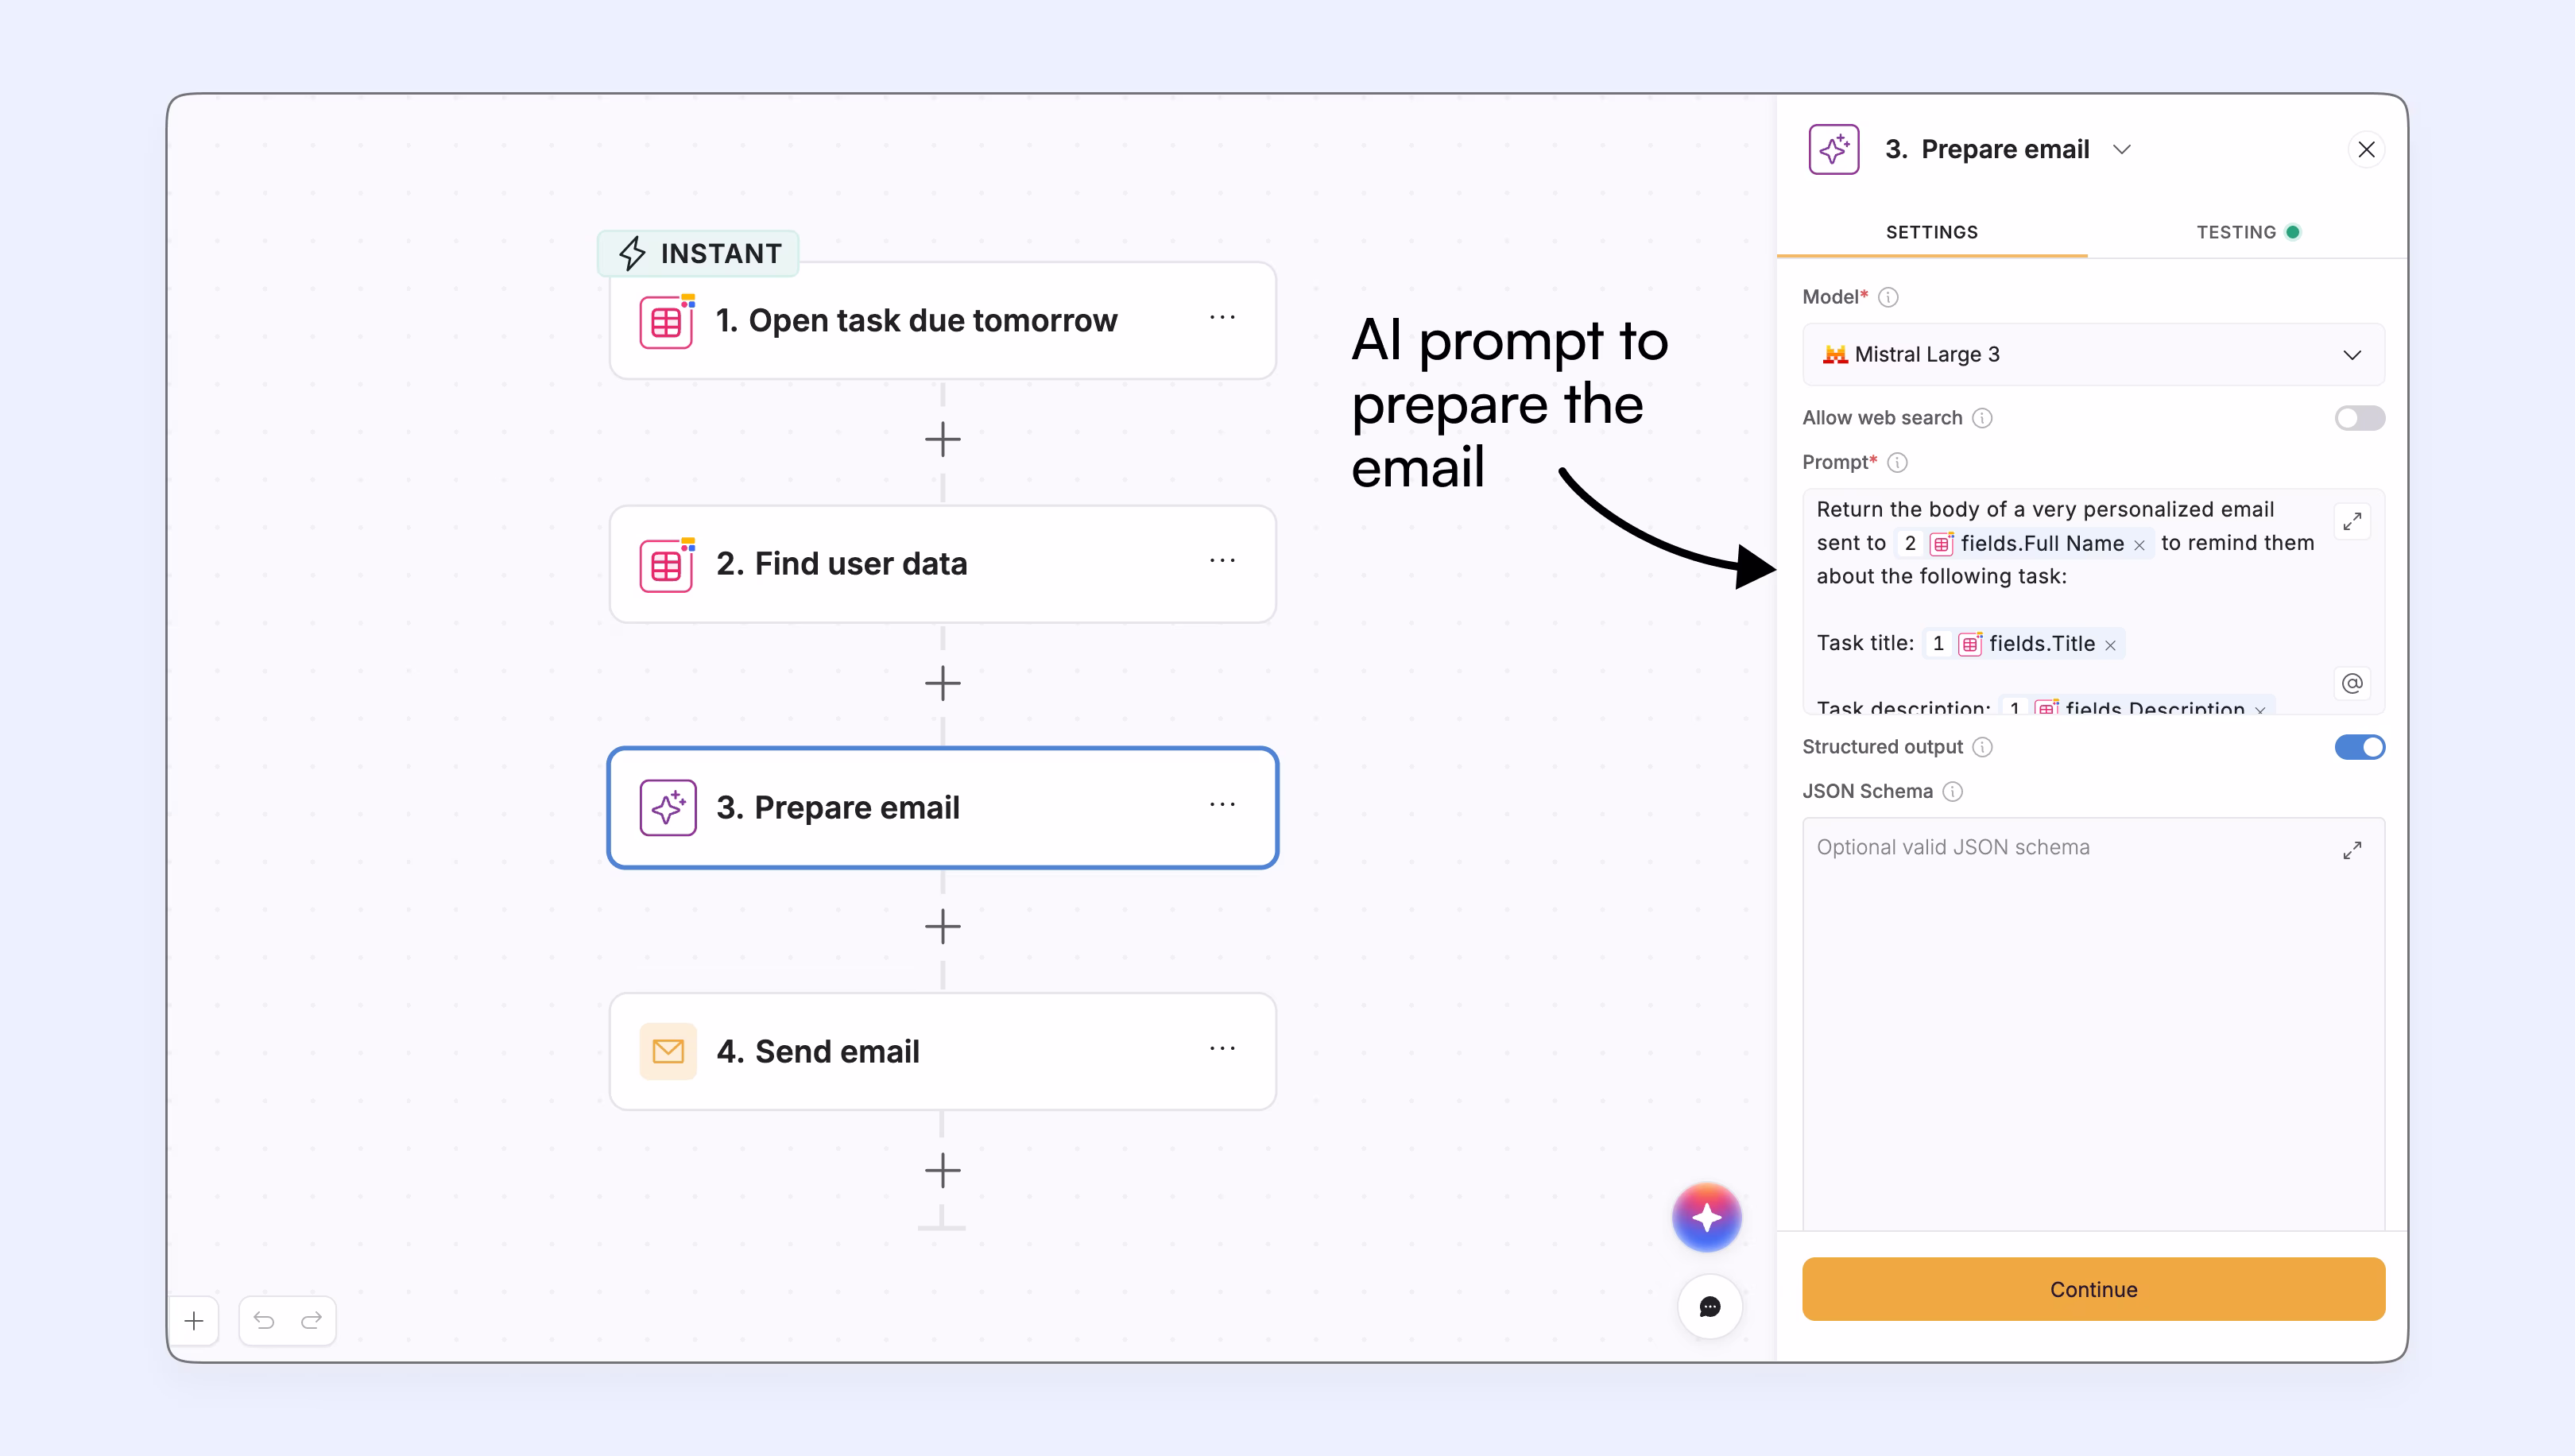
This makes your automation feel human and drastically increases the likelihood of the vendor taking action.
Your app is live
Congratulations! You have successfully built a full-stack Vendor Management Portal using Softr.
You moved beyond simple data display and built a robust application with a relational database, distinct user experiences for Admins and Vendors, and a secure permission architecture. You utilized advanced features like Database AI Agents for categorization, Vibe Coding for custom UI, Data Restrictions for security, and Custom Workflows to automate communication.
This portal is now ready to scale with your operations, saving your team hours of manual email coordination while giving your vendors a professional, transparent way to work with you. Happy building!
Frequently asked questions
- What is a Vendor Portal?
- How to build a Vendor Portal from scratch?
- How can AI improve my vendor management workflows?
- Why is Softr the best platform to build a Vendor Portal?
- What are the benefits of building a custom portal over buying software?