

Every content team faces this problem eventually. You've got a library of articles, guides, and documentation that was written a year (or three) ago. But things have changed: product updates, rebranding, new positioning, or a policy shift. Now you need to go through and update all of it.
So what are your options? You could make a spreadsheet and ask everyone to track their edits in a shared doc. You could log into your CMS and manually edit content field by field. But this is slow, manual, and when you have dozens or hundreds of articles to update, it simply doesn't scale.
And even use if you use AI to rewrite everything you might discover that it changed things it shouldn't have.
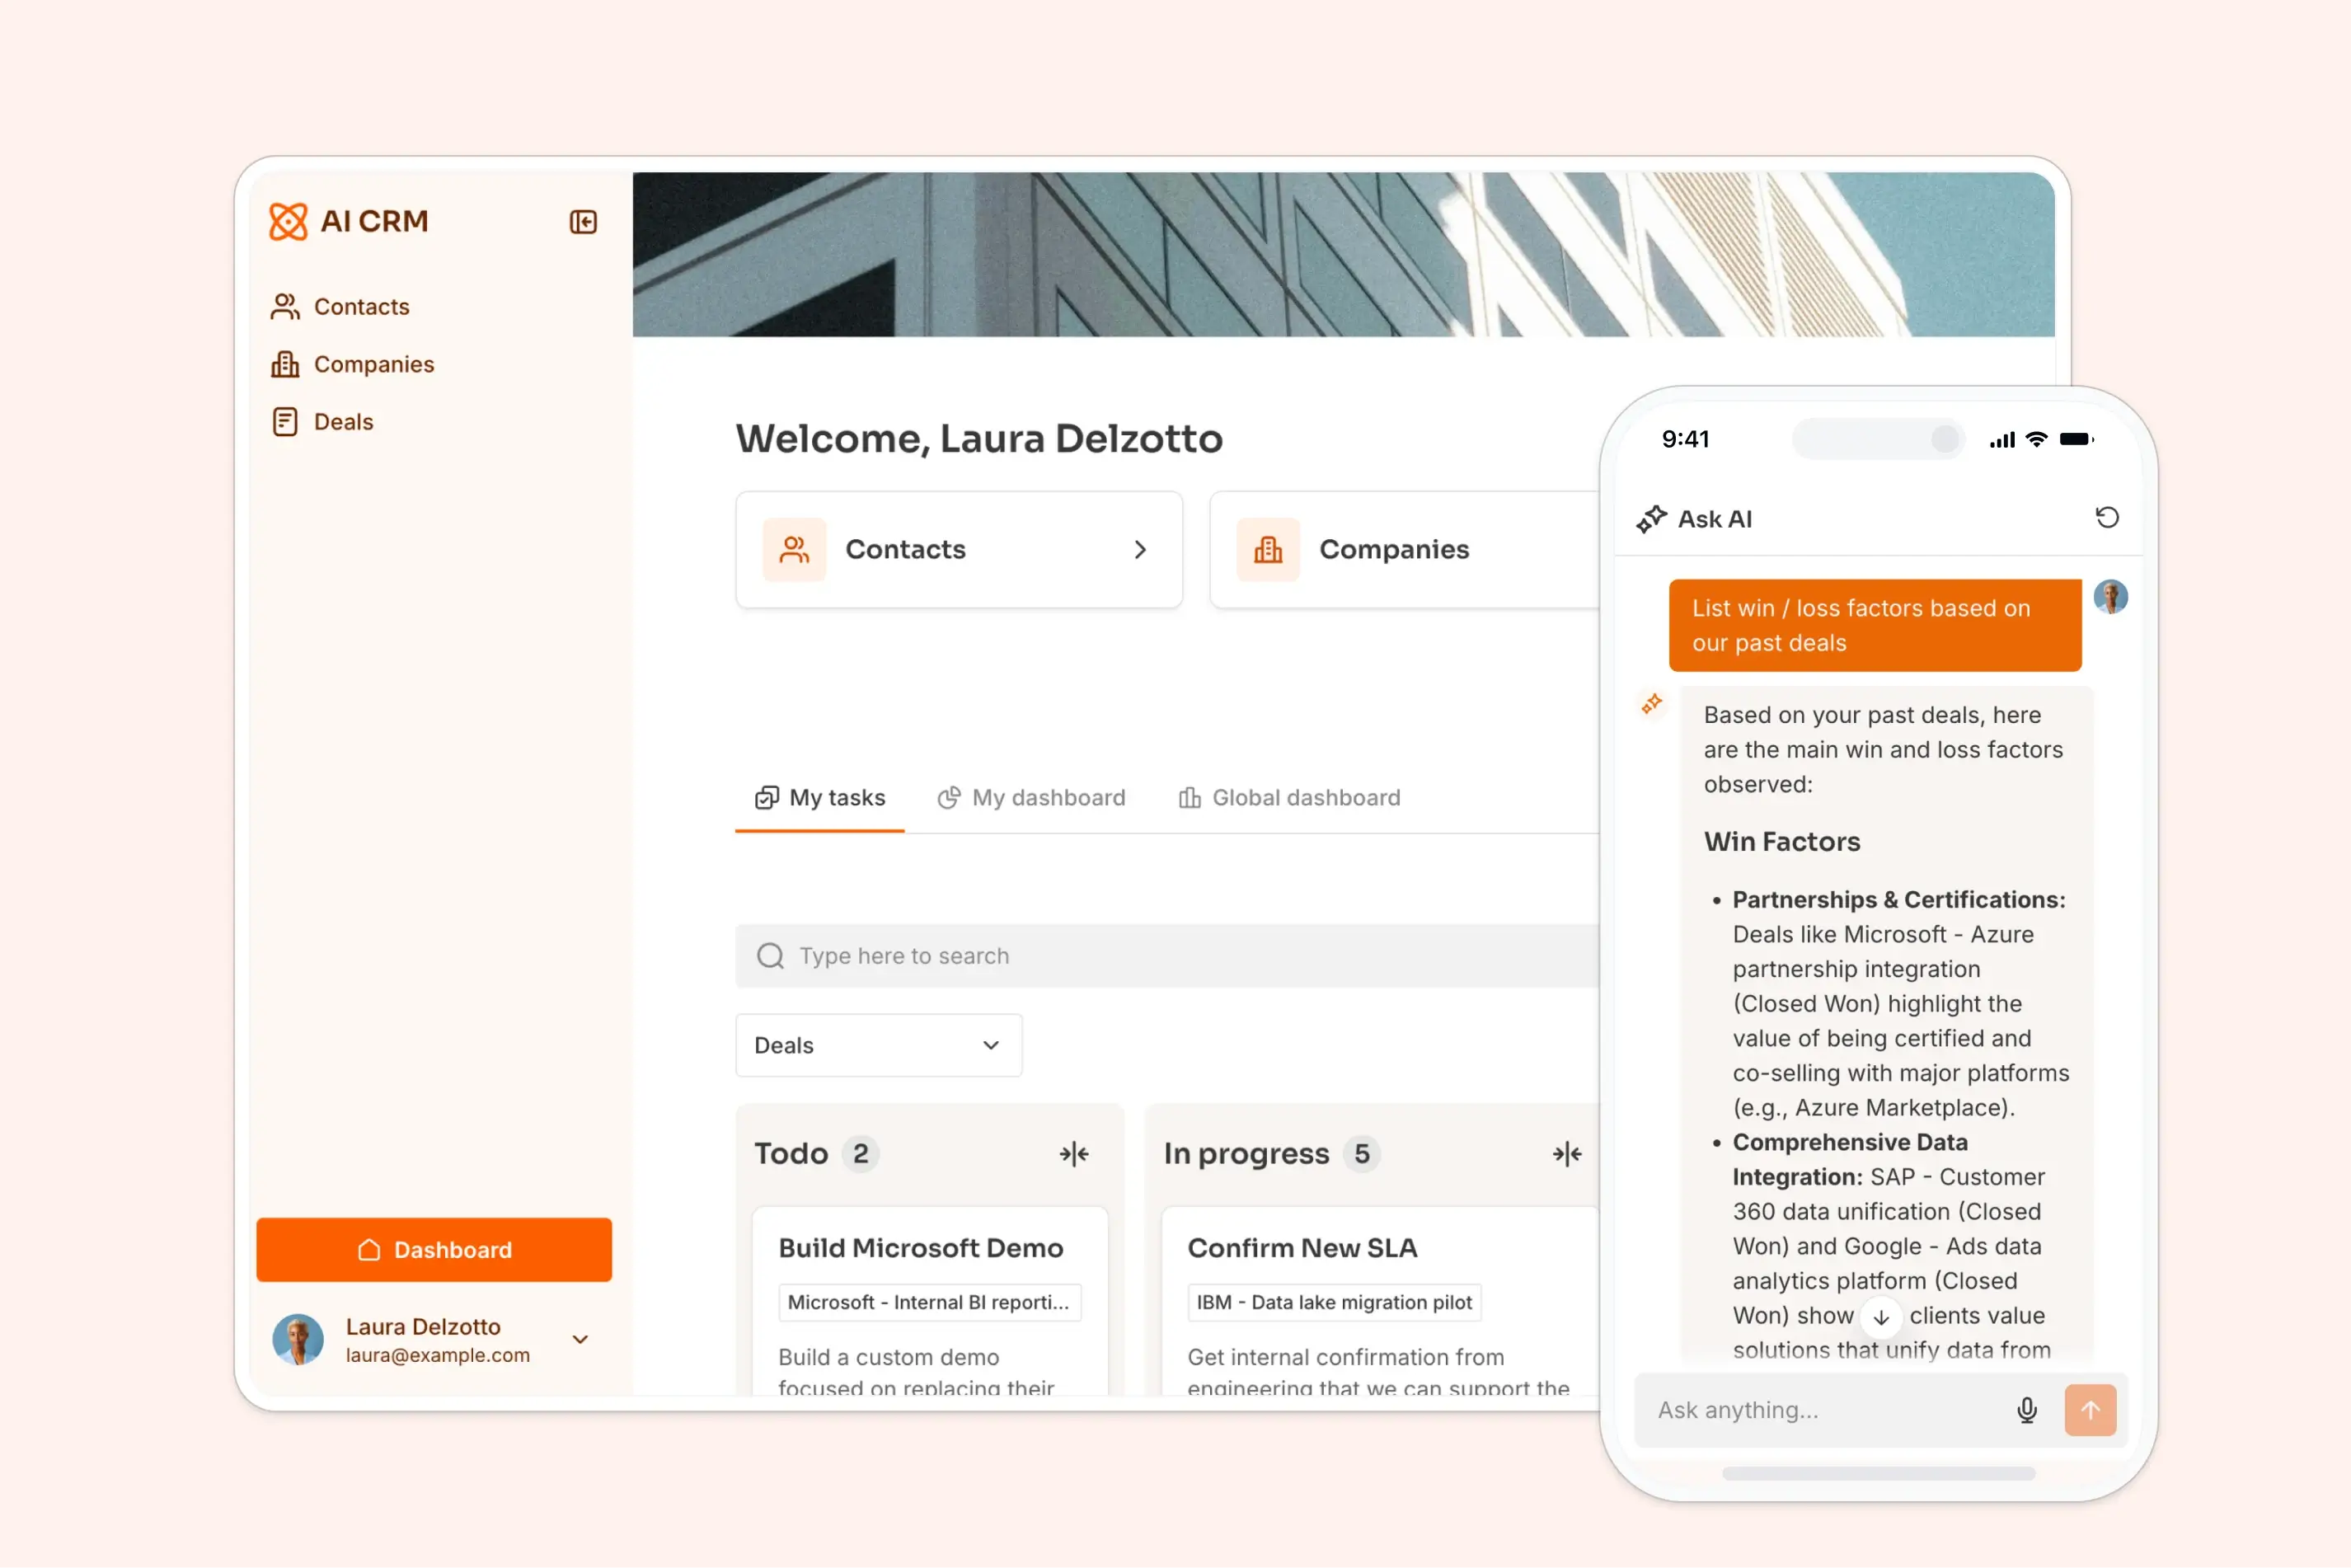
What actually works is giving your team a purpose-built tool: something that shows the AI-suggested updates next to the original, highlights exactly what changed at the word level, and lets reviewers approve or reject individual edits so a human stays in the loop the whole time. That's what we're building in this tutorial.
What is Softr?
Softr is a full-stack app builder that combines Softr Databases, an interface builder, and Softr Workflows in one platform. Teams use it to build production-ready AI business apps without writing code.
For this specific content review tool, we'll combine:
- Softr Databases to store the current and AI-suggested versions of each article.
- The Vibe Coding block to build a custom diff viewer that highlights changes at the word level.
- Softr Workflows to run an AI model against the current content and generate an improved version.
- Webhook round-trips to let the reviewer select a passage, send an instruction, and get an inline AI edit applied directly to the data source.
What you'll learn in this build
In this guide, you will:
- Fetch content from your existing CMS via its API and store it in a Softr Database.
- Build a workflow that takes the current article text, applies AI improvements based on your company's documented guidelines, and writes the result back to the database.
- Create a diff viewer block using the Vibe Coding block that shows word-level changes highlighted in green (additions) and red (deletions).
- Add inline selection and AI editing so reviewers can select a passage, give a written or spoken instruction, and get an improved version applied instantly.
- Add voice input so reviewers can dictate instructions rather than type them.
- Implement approve and reject actions so reviewers can confirm changes or revert to the original.
- Push approved content back to your CMS via API to close the loop end to end.
Who is this AI content review tool for?
This app is for content teams, marketing teams, and operations teams that need a structured way to review and approve AI-generated improvements across a library of content.
Here's how that breaks down by user group:
| User group | What they need |
|---|---|
| Reviewers (editors, marketers) | See exactly what the AI changed, edit specific passages with simple instructions, approve or reject changes. |
| Admins | Trigger AI rewrites across the content library, monitor review progress, export approved content back to the CMS. |
The app blueprint
Here's what the app's foundation looks like in terms of interface pages and database structure.
App pages
| Page | Purpose |
|---|---|
| Content Library | A table listing all articles with status filters (Pending Review, Approved, Rejected, Published). |
| Article Review | The detail page showing the diff view and review tools for a single article. |
Database structure
| Table | Key fields |
|---|---|
| Articles | Title, Current Text (long text), AI Suggested Text (long text), Status (Pending / Approved / Rejected / Published), Category, Last Updated |
The core structure is simple: two long text fields. One stores the live content and the other stores what the AI suggested. Everything else in the interface operates on these two fields.
Step Zero: Document your company's content rules
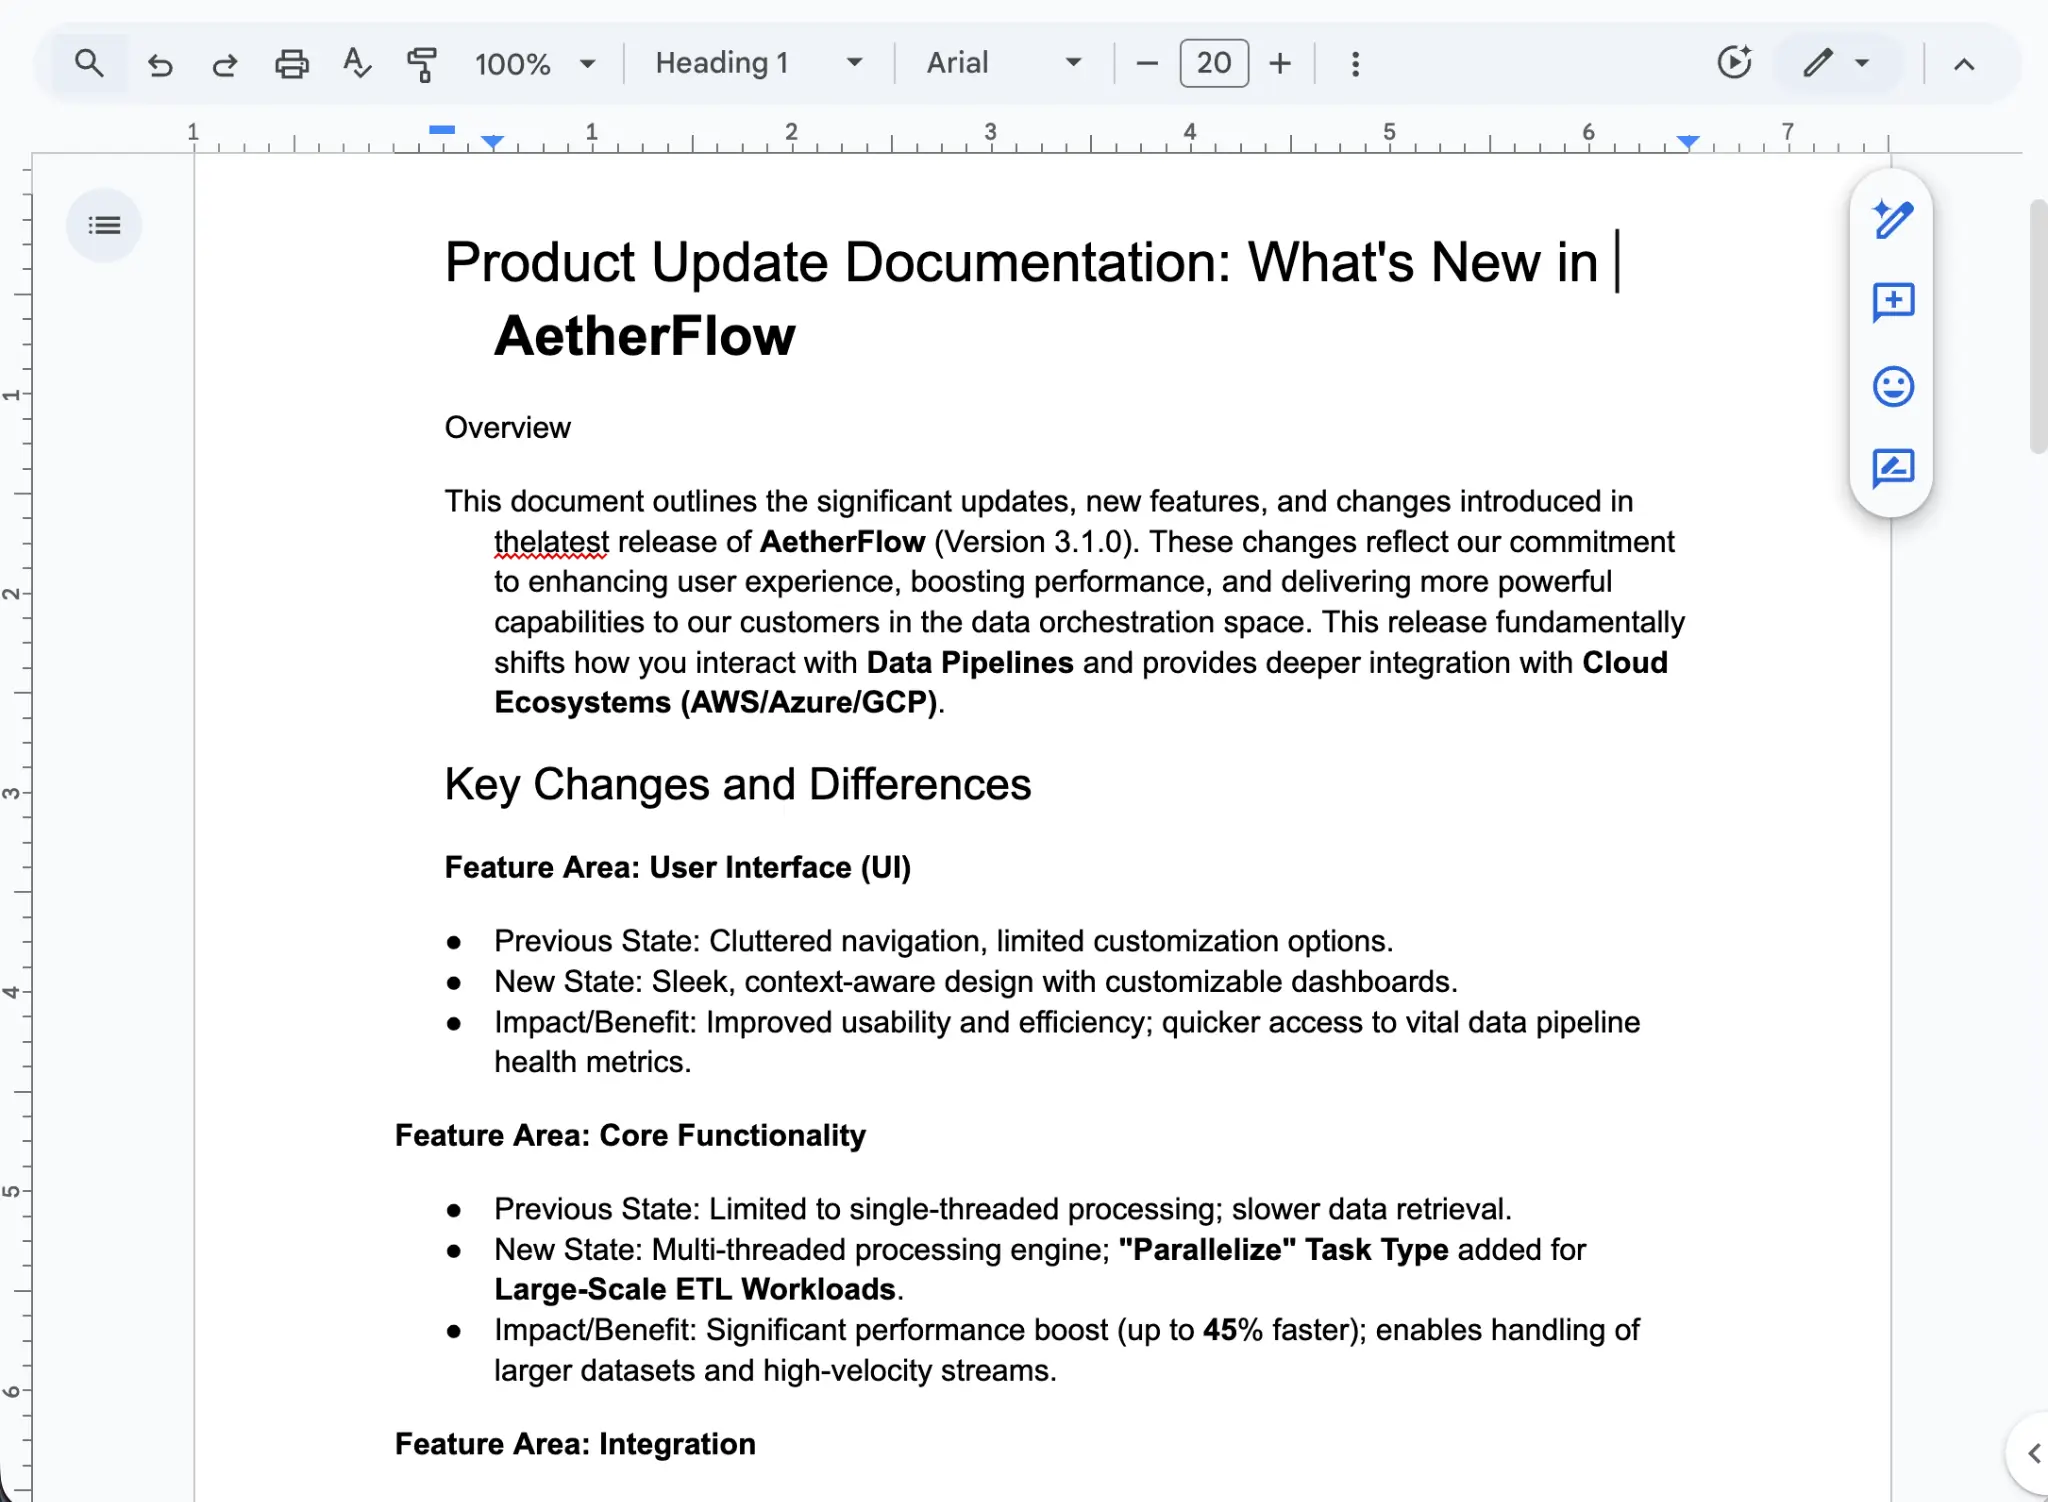
Before you start building workflows and AI prompts, there's an important step that many teams skip: properly documenting your company's narrative and content editing rules in writing.
In the age of AI, this documentation becomes incredibly valuable. The AI can only improve your content if it knows what "improved" means for your specific business. This goes beyond generic writing guidelines: it's about capturing what's changed about your product, your positioning, and the specific rules an editor should follow when updating old content.
For example, at Softr, we had a clear need: over the past few years, most of our articles described Softr as a tool that connects to external data sources like Airtable or Google Sheets. But we've since launched Softr Databases, a native database product.
So, one of our editing rules became: "When an article talks about data sources, also mention that Softr has its own built-in database, not just third-party integrations."
As you prepare your own documentation, write down rules like these:
- What product names or features have changed?
- What new capabilities need to be mentioned where relevant?
- What positioning shifts should be reflected?
- What should the AI not change (legal text, specific quotes, branded phrases)?
Once it's ready and approved by your marketing team, this document becomes the foundation of your AI prompts. You'll feed it directly into the workflow instructions so the AI applies your exact rules when rewriting content. The better your documentation, the more accurate and useful the AI's output will be.
Step 1: Setting up the database
Core principle: Success in Softr is 80% data structure. Always start with the database.
1.1 Create the Articles table
- From your Softr dashboard, create a new app and select Softr Databases as your data source.
- Create an Articles table with these fields:
- Title (Short text): The article title.
- Current Text (Long text): The live version of the article. This is what you import from your CMS.
- AI Suggested Text (Long text): The AI-revised version. This starts empty and gets filled by the workflow.
- Status (Single select): Options are
Pending Review,Approved,Rejected,Published. - Category (Single select): Useful for filtering by content type (e.g., Blog, Help Docs, Product Pages).
1.2 Import content from your CMS via API
Rather than copy-pasting articles one by one, you can use your CMS's API to pull content programmatically and store it in Softr.
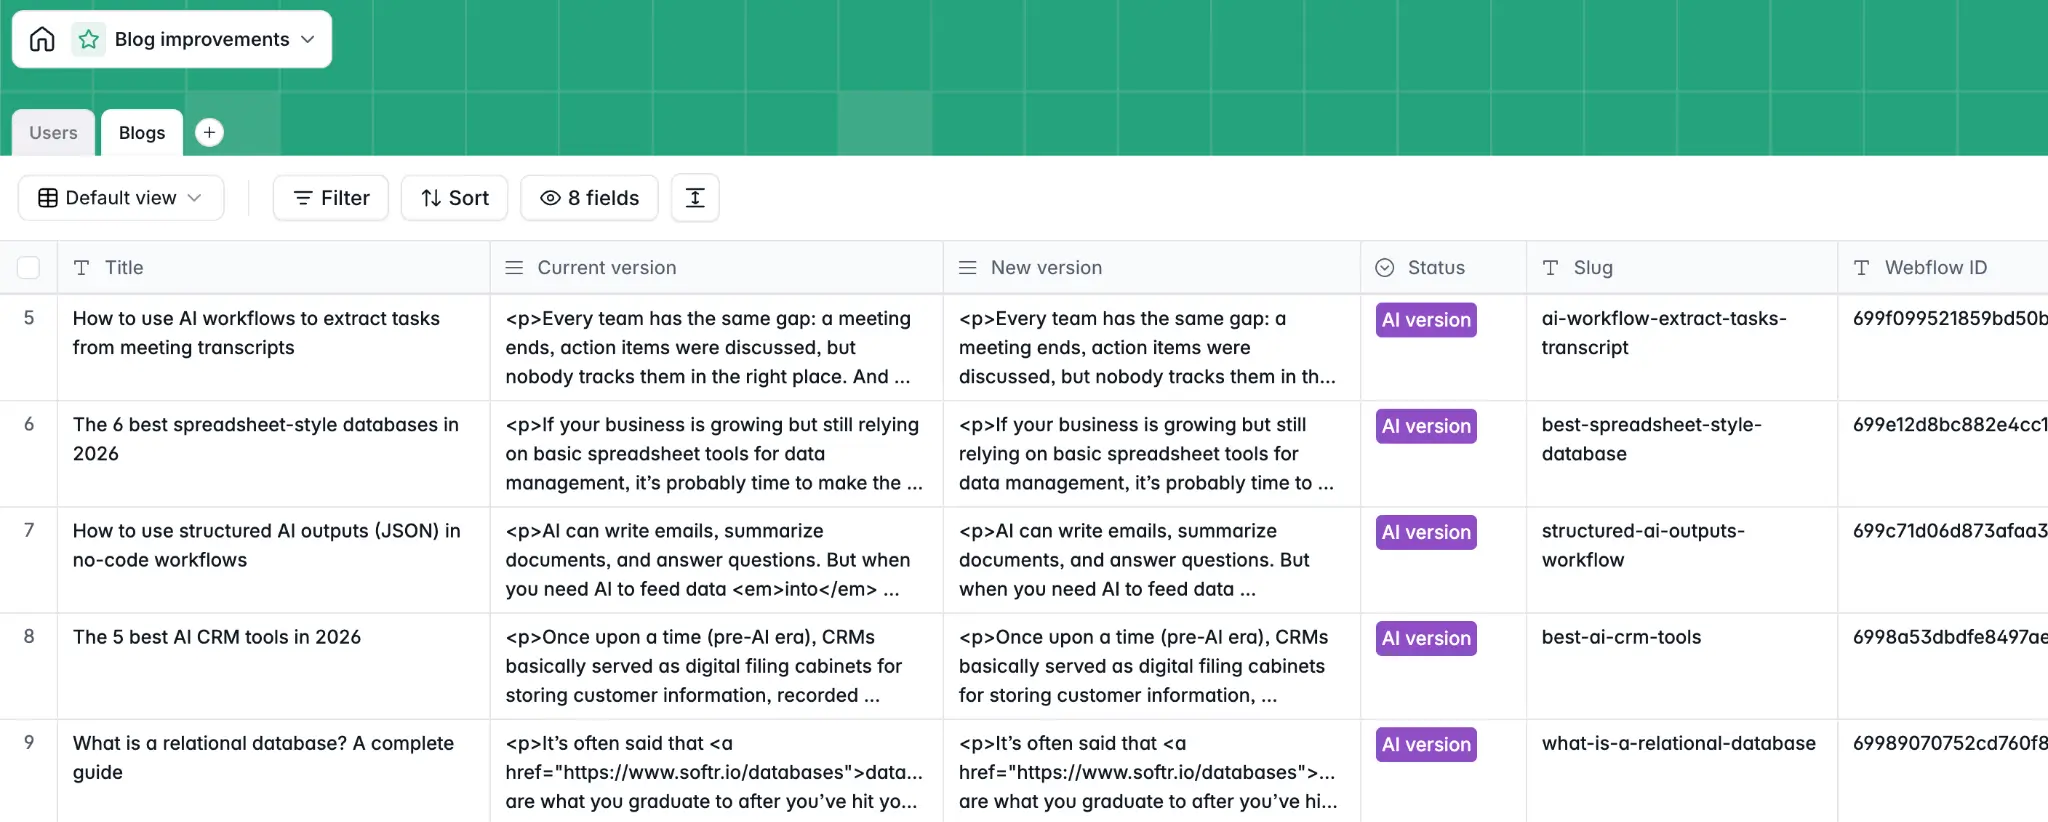
In our case, we used the Webflow API to fetch all the items from our blog CMS collection and store them in a Softr Database. The Current Text field holds the original content from Webflow.
Here's how to set this up:
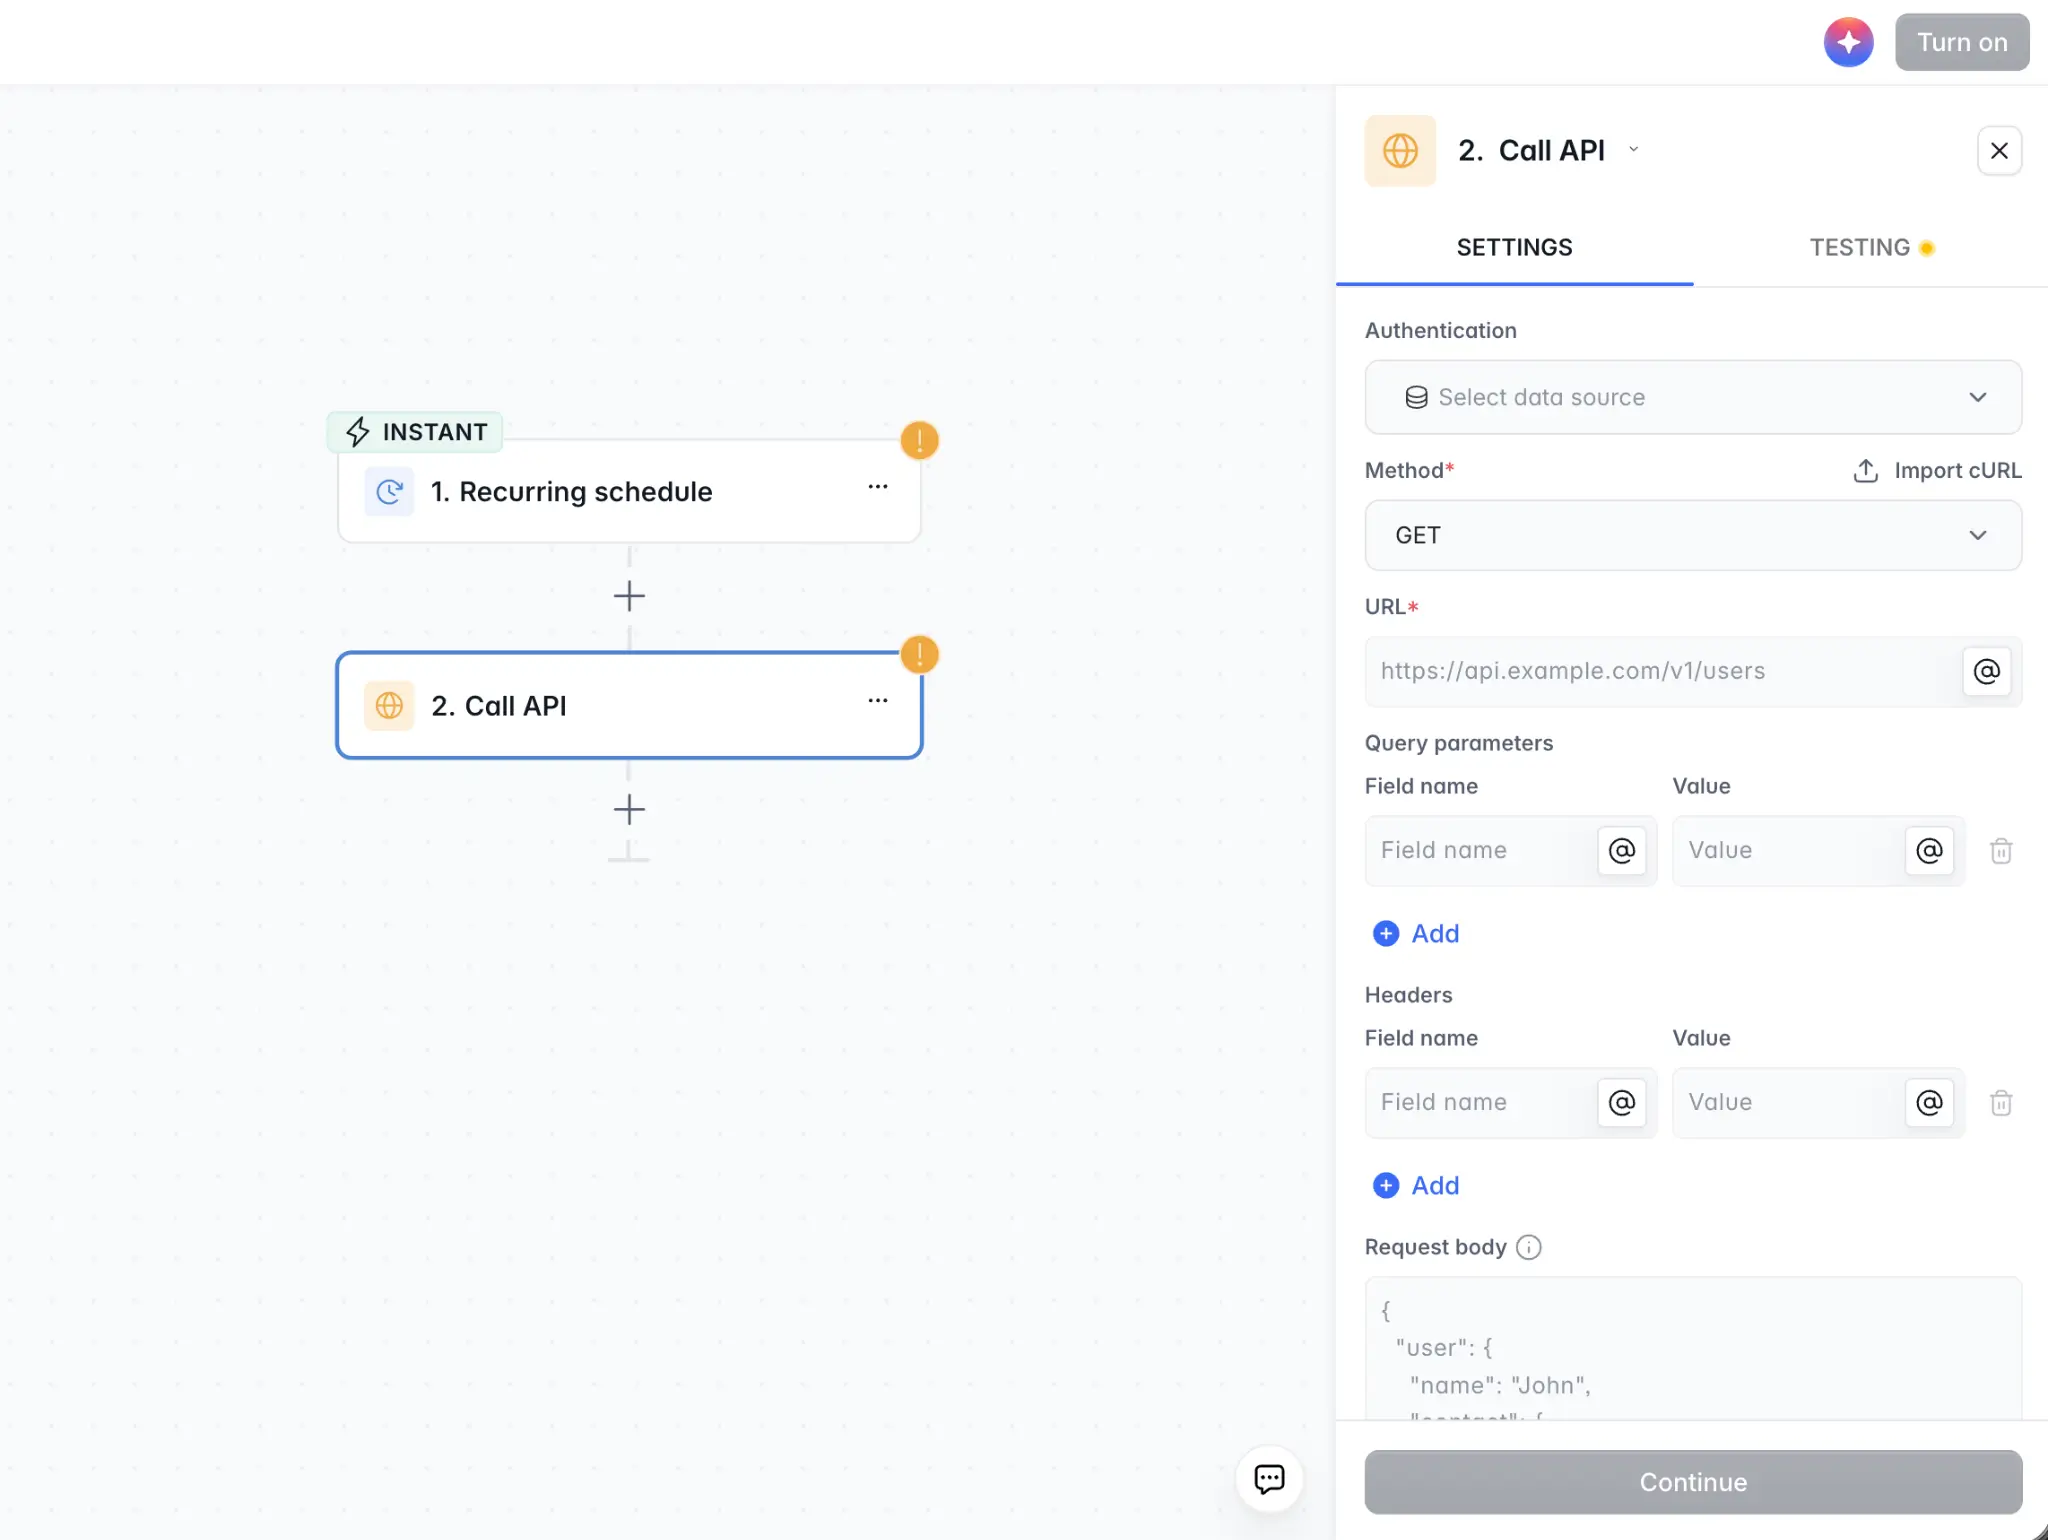
- Create a Softr Workflow with a manual or scheduled trigger.
- Add an HTTP Request step that calls your CMS API (e.g., Webflow's List Collection Items endpoint) to fetch your articles.
- Use a Loop step to iterate through the results and create one record per article in your Articles table, populating the Title and Current Text fields.
This gives you a clean, centralized copy of all your content in a Softr Database, ready for the AI to work on.
💡 Pro Tip: If your content includes HTML or rich text (with tags, links, and formatting), import it as is. The Vibe Coding block will handle parsing and rendering the diff correctly. Let the AI know the content format in your Workflow prompt.
Step 2: Building the AI rewrite workflow
This workflow does one thing: it takes the Current Text of an article, sends it to an AI model with your documented content rules, and writes the result back to AI Suggested Text.
2.1 Trigger options
You have two primary approaches when it comes to triggers:
Option A: Batch processing with a workflow trigger
- In Workflows, create a new workflow.
- Set the trigger to Database Record Updated in the Articles table.
- Add a condition: only fire when a specific "trigger" field changes (a good pattern is a Trigger Rewrite checkbox field that gets checked by admins when they want the AI to process an article).
Alternatively, you can trigger this workflow manually from the admin's Articles table using an Action Button (a "Generate AI Revision" button per row).
Option B: Database AI Agent
Instead of building a dedicated workflow, you can add a Database AI Agent step directly in your Softr Database. The AI Agent watches the Current Text field and automatically generates an improved version in the AI Suggested Text field based on your prompt. This approach is simpler to set up if you're processing content on the fly. Make sure the AI Suggested Text field is editable so reviewers can refine the output manually if needed.
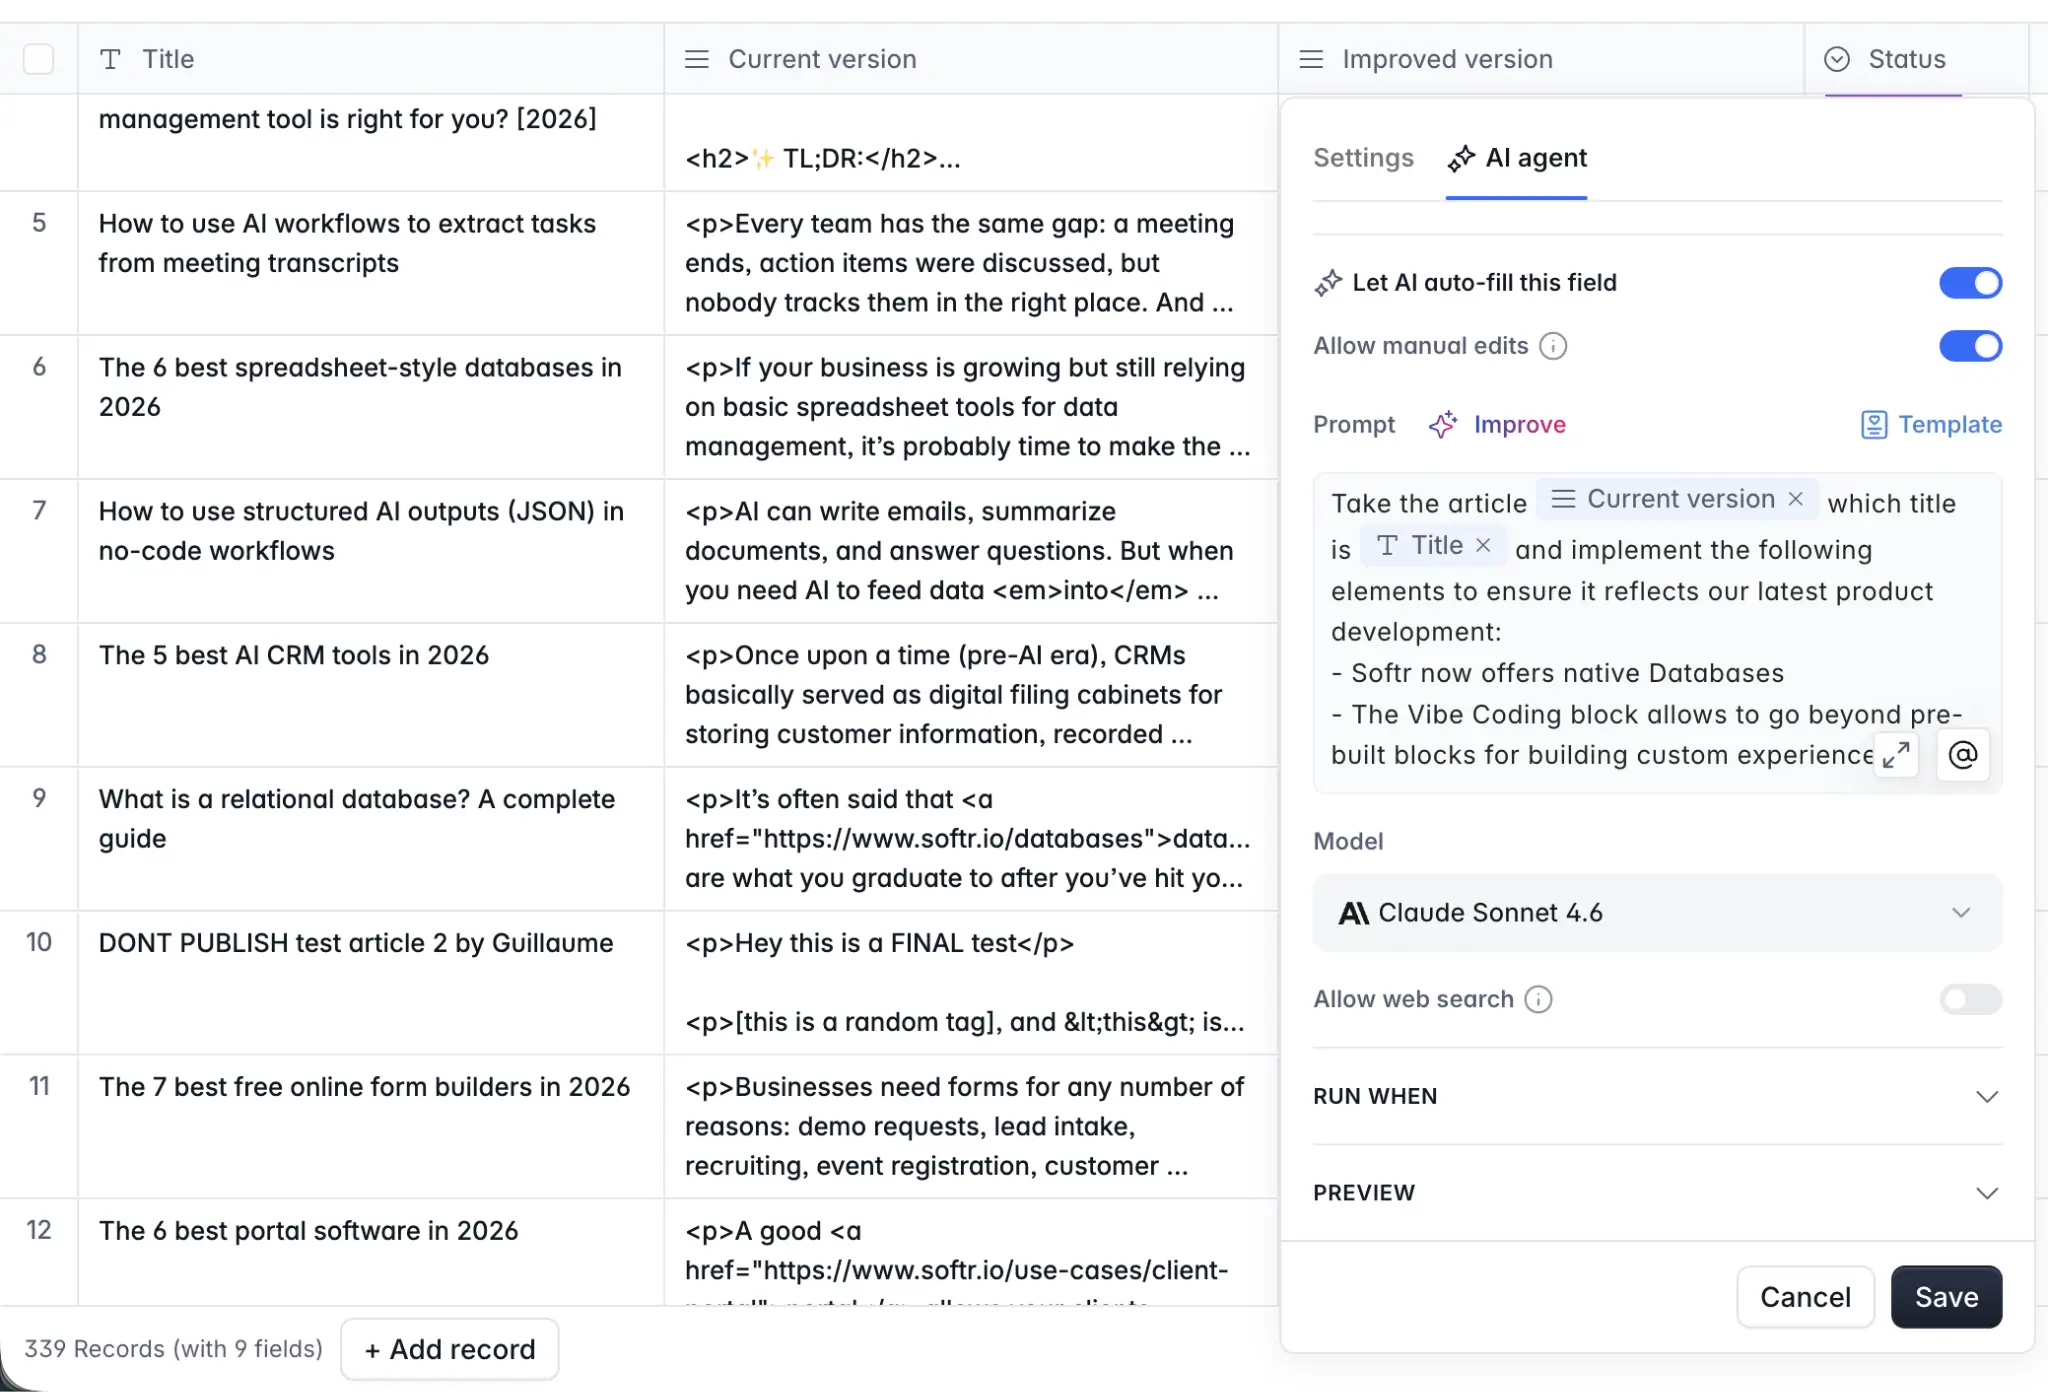
2.2 AI Custom Prompt step
- Add an AI Custom Prompt step (or configure the Database AI Agent prompt).
- Choose your model. For content rewriting tasks, choose the most capable models available, for example, the GPT-5 series or any other large model.
- Write your prompt. Reference the article content using the @ symbol to pull in the record's Current Text field. See below for a template.

You are an expert content editor. Your task is to improve the following article based on these guidelines:
1. Update any references to [old product name] to [new product name]. 2. Ensure the article mentions [new feature] where relevant. 3. Improve clarity and remove redundant sentences. 4. Do not change the overall structure, headings, or any external links.
Return only the improved article text, with no commentary.
Article:@Current Text
Remember, these prompts are just examples. Adapt them to your own use case and content editing rules. The key is to paste your company's documented content rules (from Step Zero) directly into this prompt so the AI applies your exact guidelines. Different teams will have different configurations depending on what they're updating and why.
2.3 Advanced structured outputs for search-and-replace
For teams that want more precision, speed, and token efficiency, there's an advanced alternative to having the AI rewrite the entire article: structured outputs.
Instead of asking the AI to return the full revised article, you instruct it to output a structured JSON schema describing only the specific changes — essentially a list of search-and-replace operations:
Analyze the following article and identify passages that need to be updated based on the guidelines above. Return a JSON array where each item has: "search": the exact text to find in the original and "replace": the updated text to replace it with
Only include passages that need changes. Do not rewrite the full article.
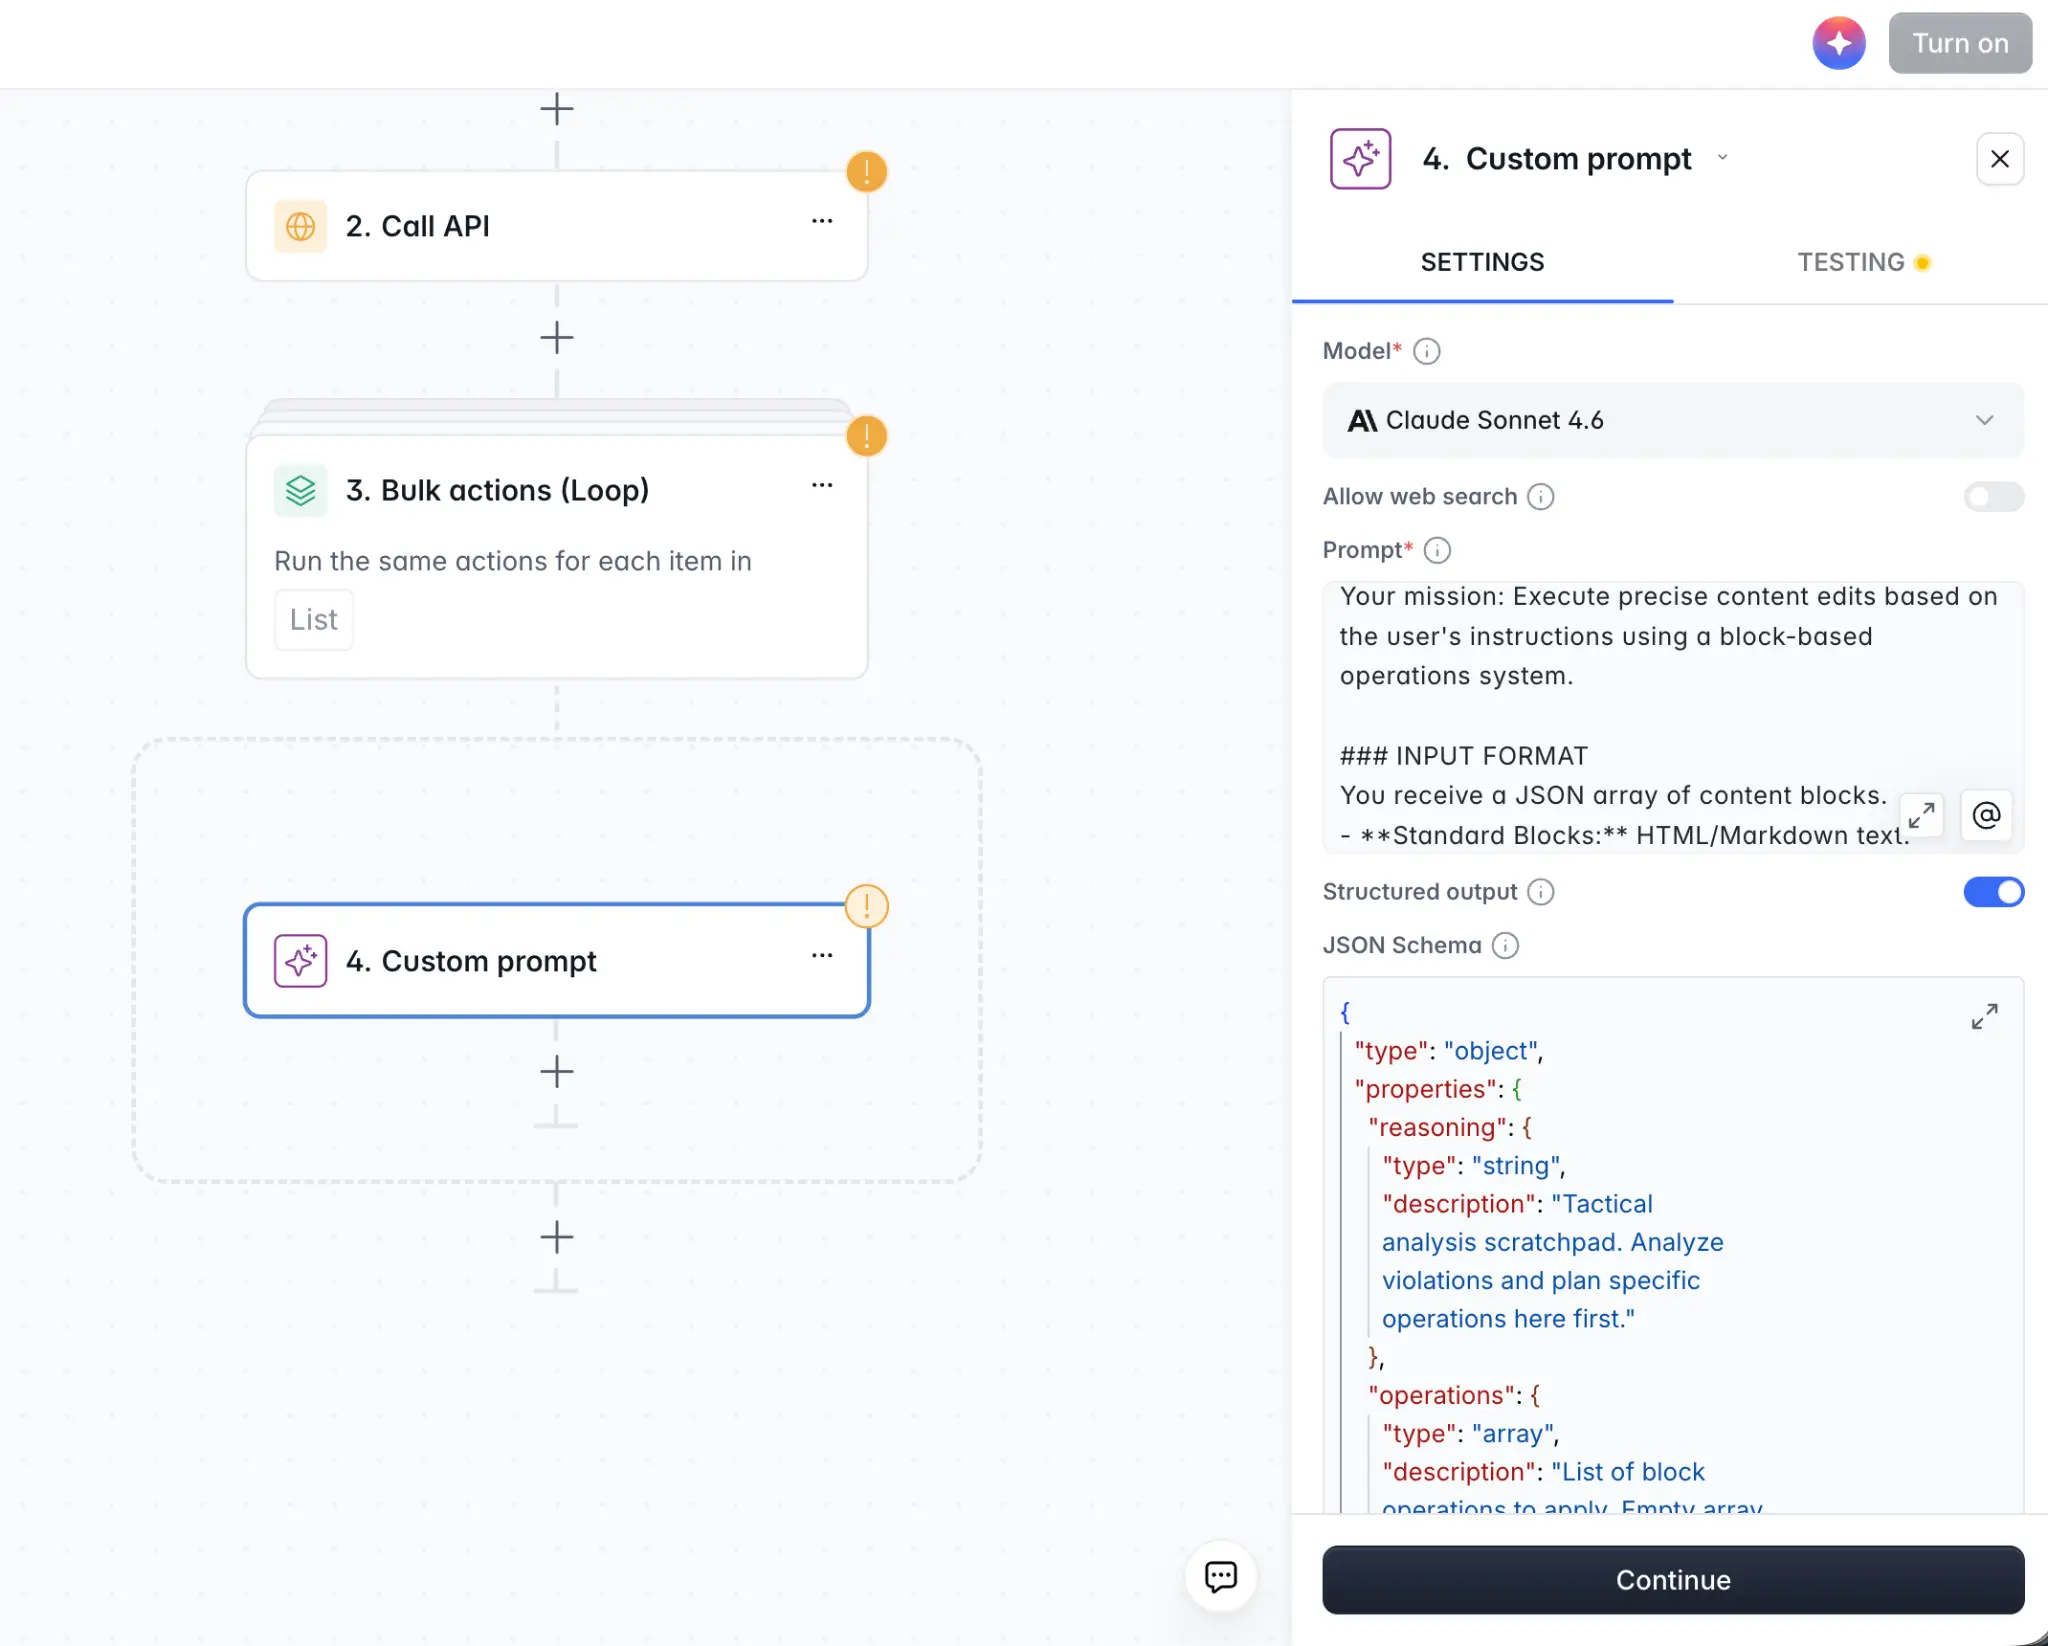
After the AI step, add a Code step in your workflow that takes the original text and applies each search-and-replace operation sequentially. This approach:
- Uses fewer tokens because the AI only outputs the parts that changed, not the entire article.
- Is more accurate because each change is isolated and verifiable.
- Is faster to process, especially for long articles where only a few passages need updating.
This is a more advanced setup, but it pays off when you're processing content at scale. And the AI co-builder for Softr Workflows can help you get there without coding knowledge.
2.4 Update record step
After the AI step (whether full rewrite or search-and-replace), add an Update Record action:
- Target the article record that triggered the workflow.
- Set AI Suggested Text to the output of the AI step.
- Set Status to
Pending Review.
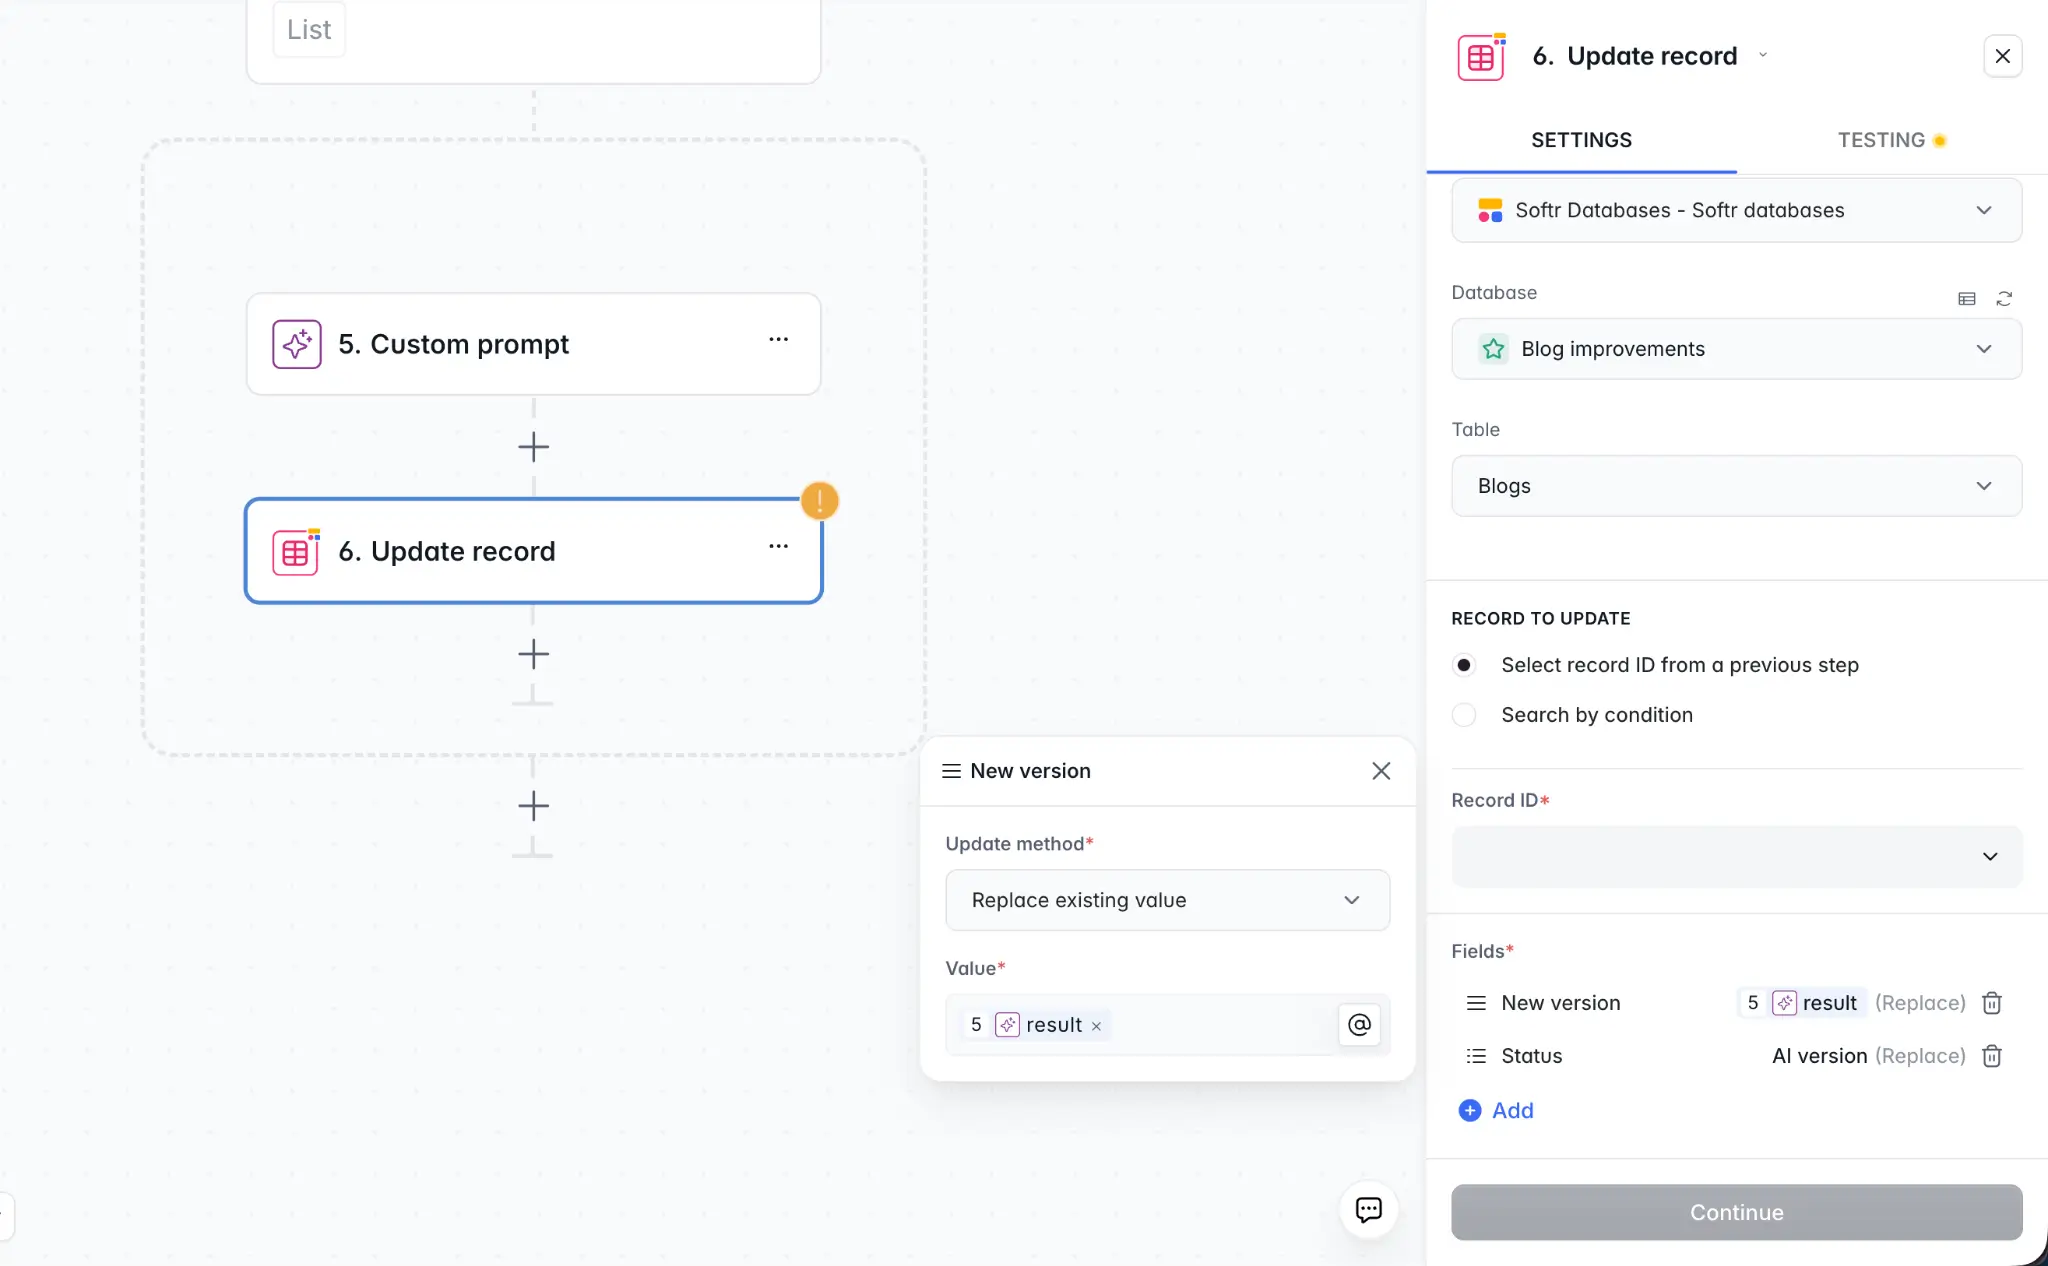
The article is now ready for a human reviewer.
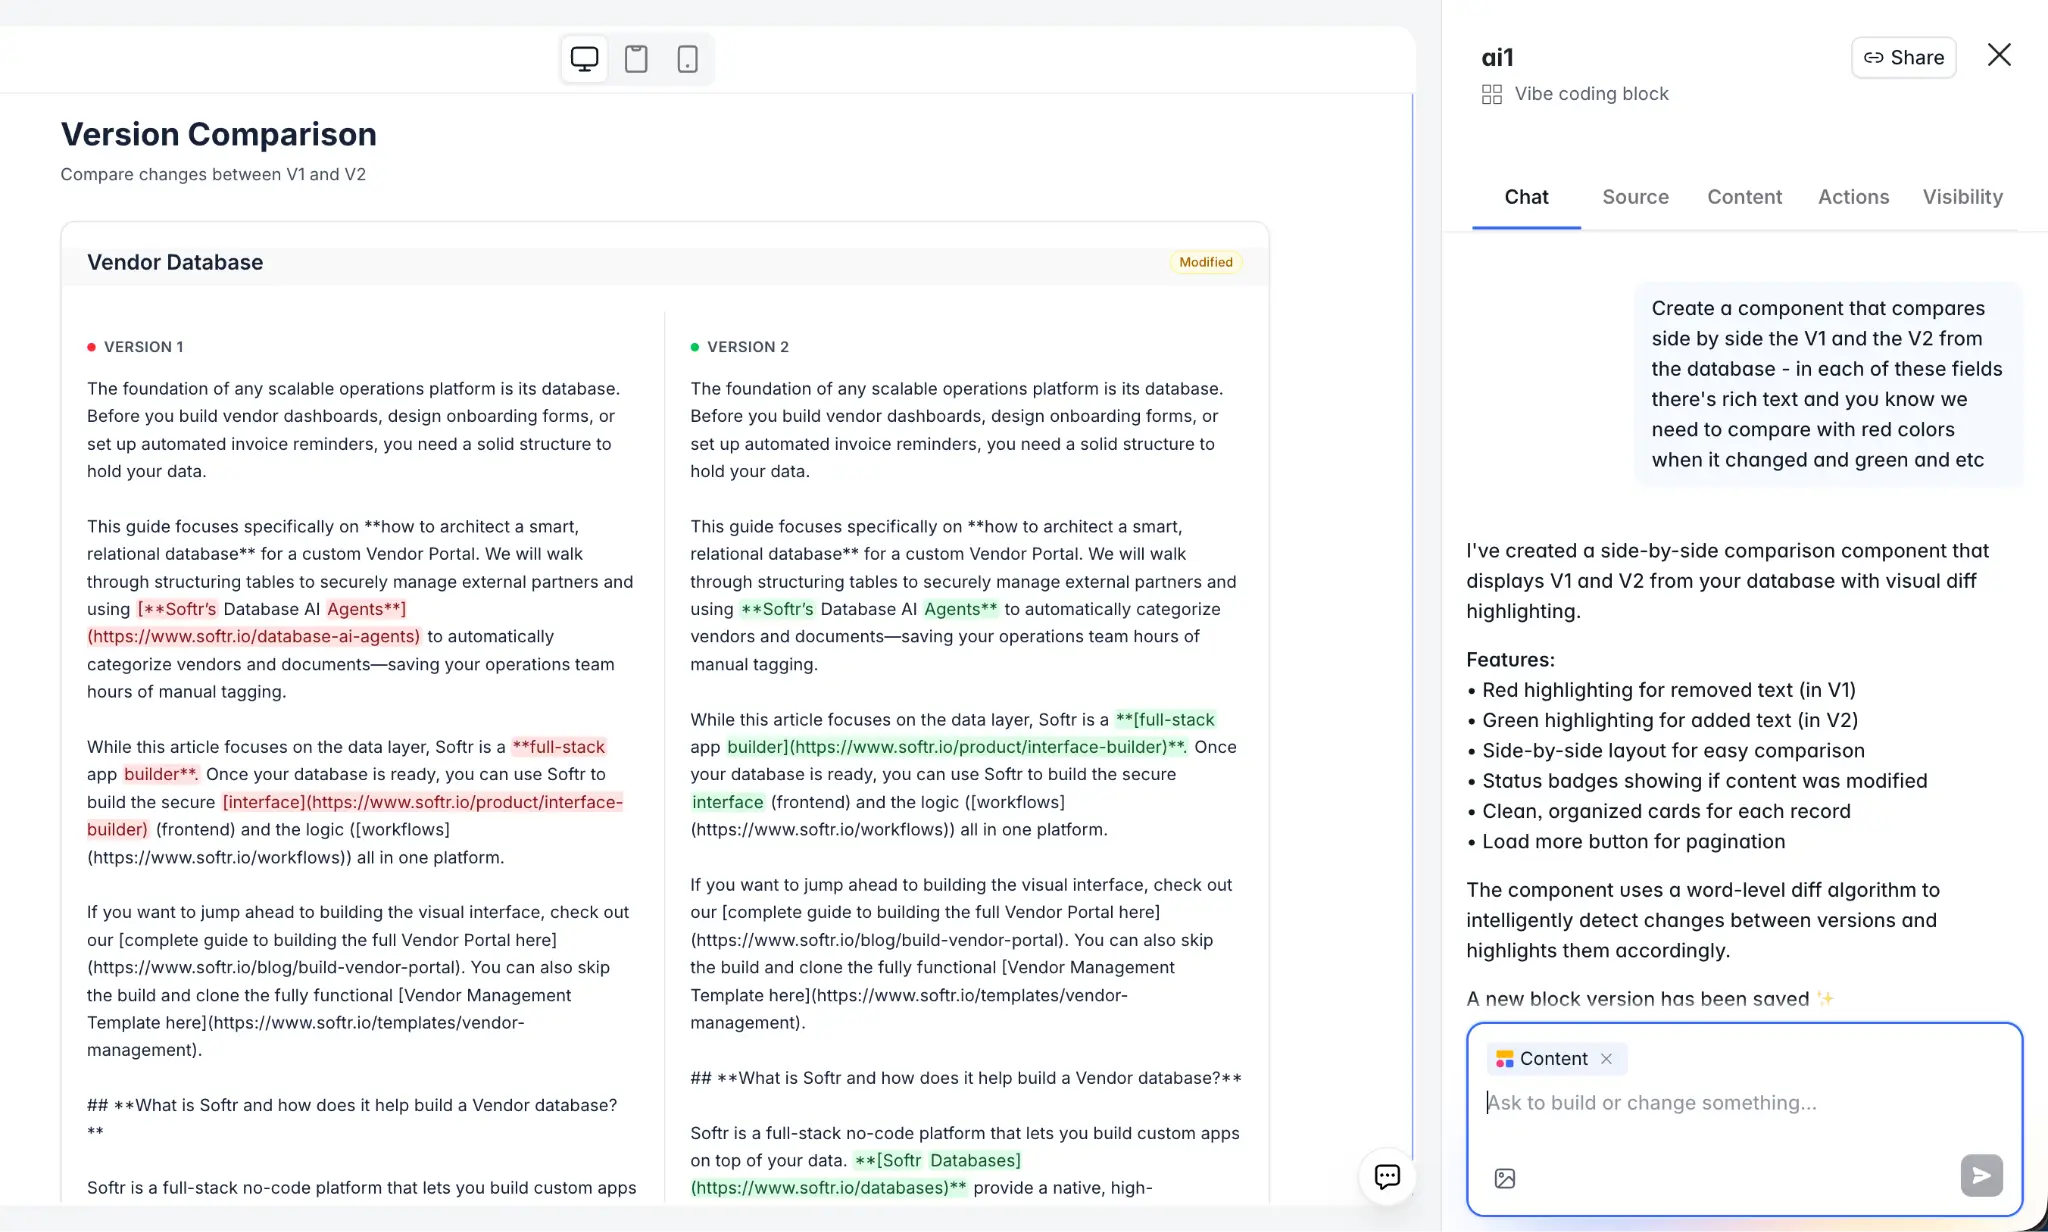
Step 3: Building the diff viewer
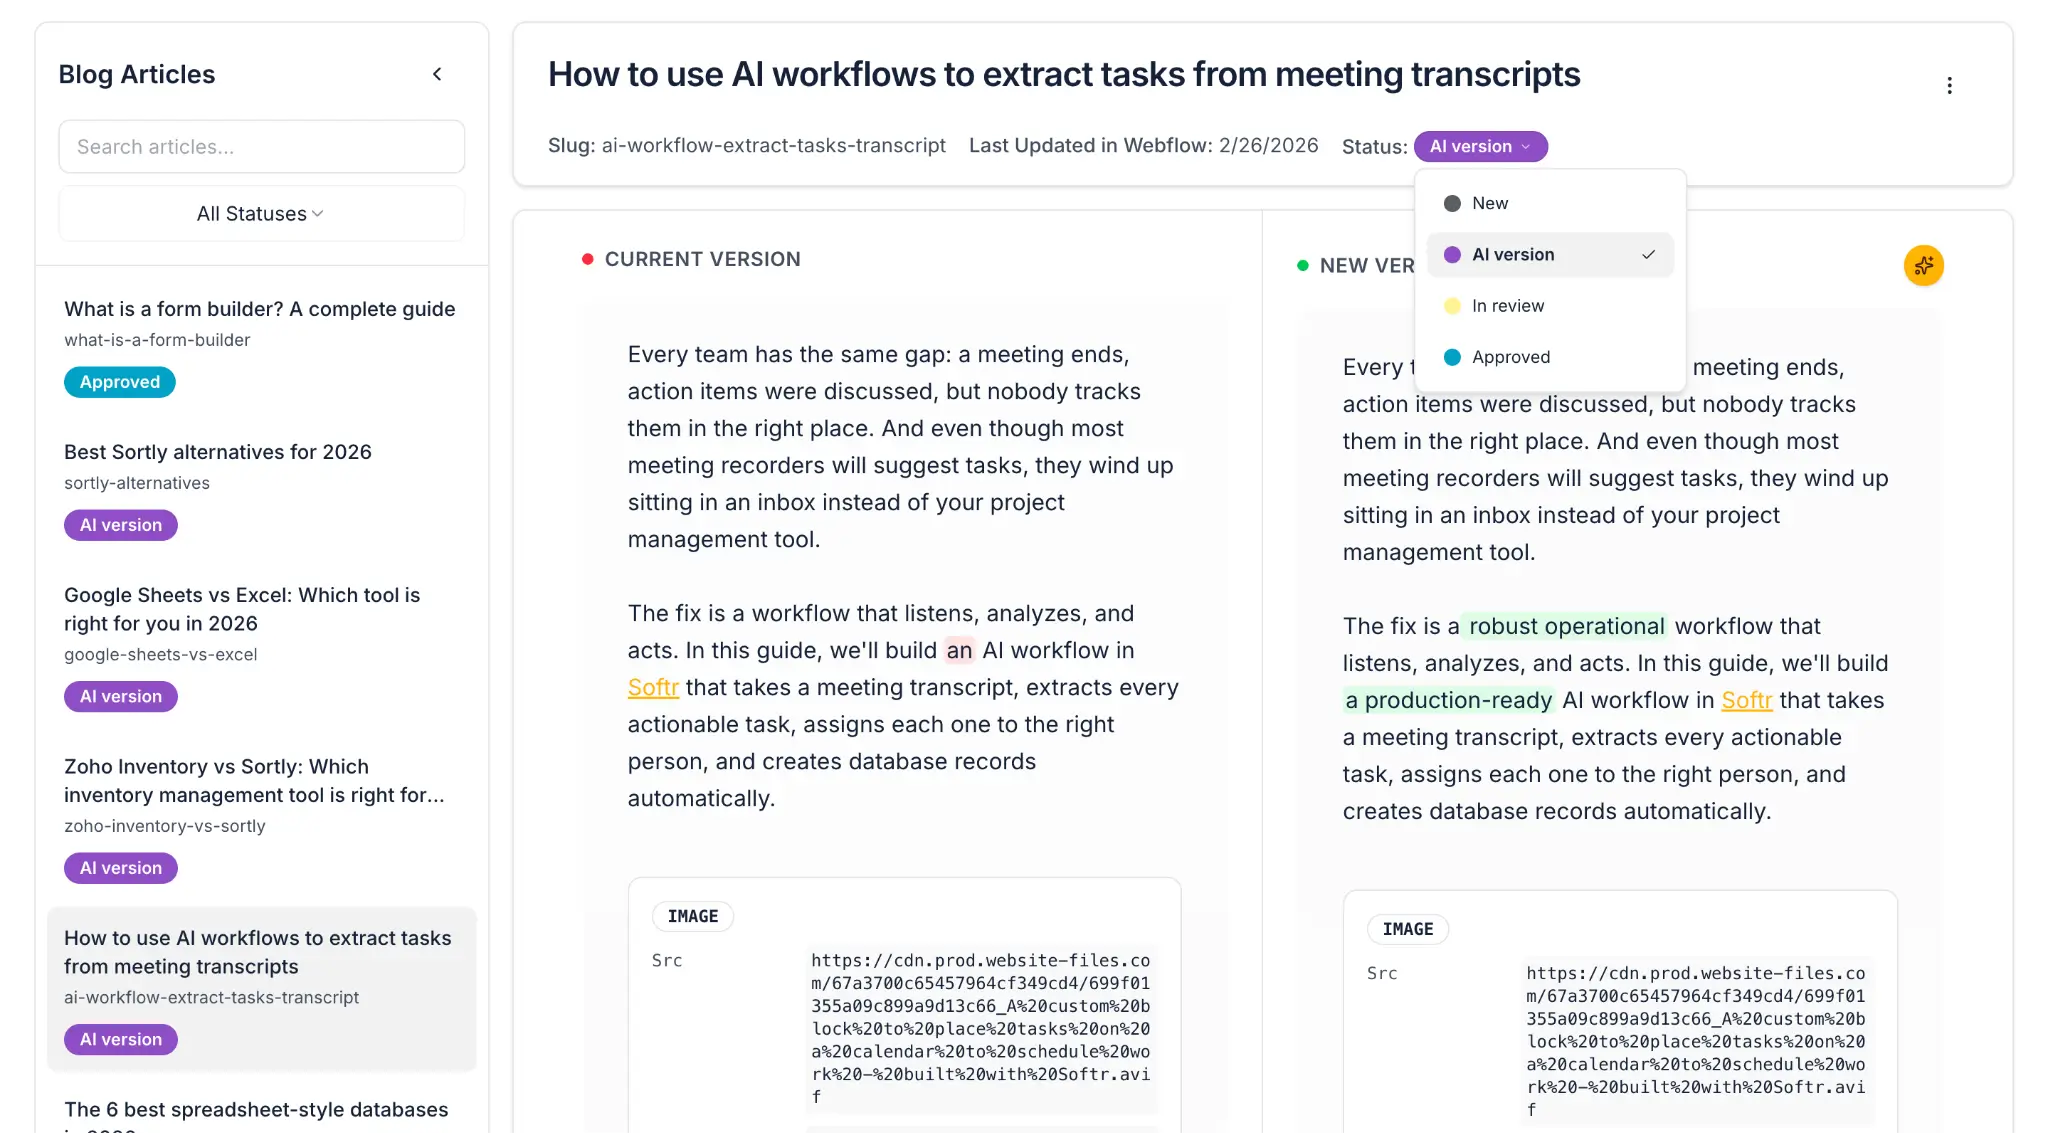
The diff viewer is the heart of the tool. We use Softr's Vibe Coding block to generate a side-by-side view of the two text versions, with word-level differences highlighted.
3.1 Add the Vibe Coding block to the Article Review page
- On the Article Review page, add a Vibe Coding block.
- Connect it to the Articles table and filter to show the current article (use the page's record ID as the filter).
- Enable Read and Update CRUD permissions so the block can save edits back to the database.
3.2 Write your prompt
Here's a prompt that generates the core diff viewer (adapt it to your specific needs):
I need a diff viewer component. The database has two long text fields: "Current Text" (the original) and "AI Suggested Text" (the AI revision).
Display them side by side. On the left, show the original text. On the right, show the AI version.
At the word level, highlight differences: words that were removed appear in the left column with a red background, words that were added appear in the right column with a green background. Words that are identical show with no highlight.
Below each column, add an "Approve Changes" button and a "Reject Changes" button. Approve should update the "Current Text" field to the value of "AI Suggested Text" and set "Status" to "Approved." Reject should set "Status" to "Rejected" and clear the "AI Suggested Text" field.
The AI will implement a word-level diff algorithm and render the two columns. Expect to need one or two iterations to get the diff highlighting precisely right, especially for paragraphs with mixed changes.
What to check in your first preview:
- Are words that are unchanged rendered without highlighting?
- Are added words shown in green on the right?
- Are removed words shown in red on the left?
- Does "Approve" correctly update the Current Text?
If the diff granularity is off (e.g., it's highlighting full sentences instead of individual words), follow up with:
Apply the diff highlighting at the word level, not the sentence level. If only one word in a sentence changed, only that word should be highlighted.
Step 4: Adding inline AI editing
Beyond reviewing the full diff, reviewers need to select specific passages and give targeted instructions. This uses the webhook round-trip pattern, but with an important design choice: the workflow updates the data source directly, and the webhook response simply confirms the update.
Why this architecture matters:
The Vibe Coding block is directly connected to your Softr Database. It reads data from the AI Suggested Text field. Instead of passing the new text back through the webhook response and relying on local state, the workflow writes the edit directly to the database.
The webhook response then returns a simple confirmation (e.g., {"status": "updated"}), which tells the block to reload the data from the source. This is more reliable because you're always displaying the latest version from the database, not managing local copies of the text.
4.1 Create the inline edit workflow

- Create a new workflow triggered by Webhook.
- The workflow receives the selected passage text, the reviewer's instruction, and the article's record ID.
- Add an AI Custom Prompt step (adapt this prompt to your needs):
You are editing a specific passage from an article. Apply the following instruction to the text and return only the improved version, nothing else.
Instruction: @instruction
Passage: @passage
- Add an Update Record step that writes the improved text back to the AI Suggested Text field of the article. (You'll need to handle replacing the selected passage within the full text — a Code step can handle this.)
- Add a Respond to Webhook action that returns a confirmation like
{"status": "updated"}.
4.2 Update the Vibe Coding block prompt
Add to your existing block prompt (again, these are example prompts — adjust to match your interface and needs):
Allow the reviewer to select any block of text in the right column (AI Suggested Text). When text is selected, show a small toolbar above the selection with: A text input where the reviewer can type an instruction. A microphone button that records audio and transcribes it to fill the instruction input. An "Apply AI Edit" button.
When "Apply AI Edit" is clicked, send the selected text, the instruction, and the record ID as a POST request to [webhook URL]. The webhook response will return a confirmation that the edit has been applied to the database. When the confirmation is received, reload the data from the database to display the updated version.
If the reviewer used the microphone, send the recorded audio to [second webhook URL], receive the transcript, and auto-fill the instruction input with it before sending the main edit request.
Notice the key difference: the block doesn't receive the new text in the response. It receives a confirmation that the data source has been updated, and then refreshes to show the latest version. This keeps the interface in sync with the database at all times.
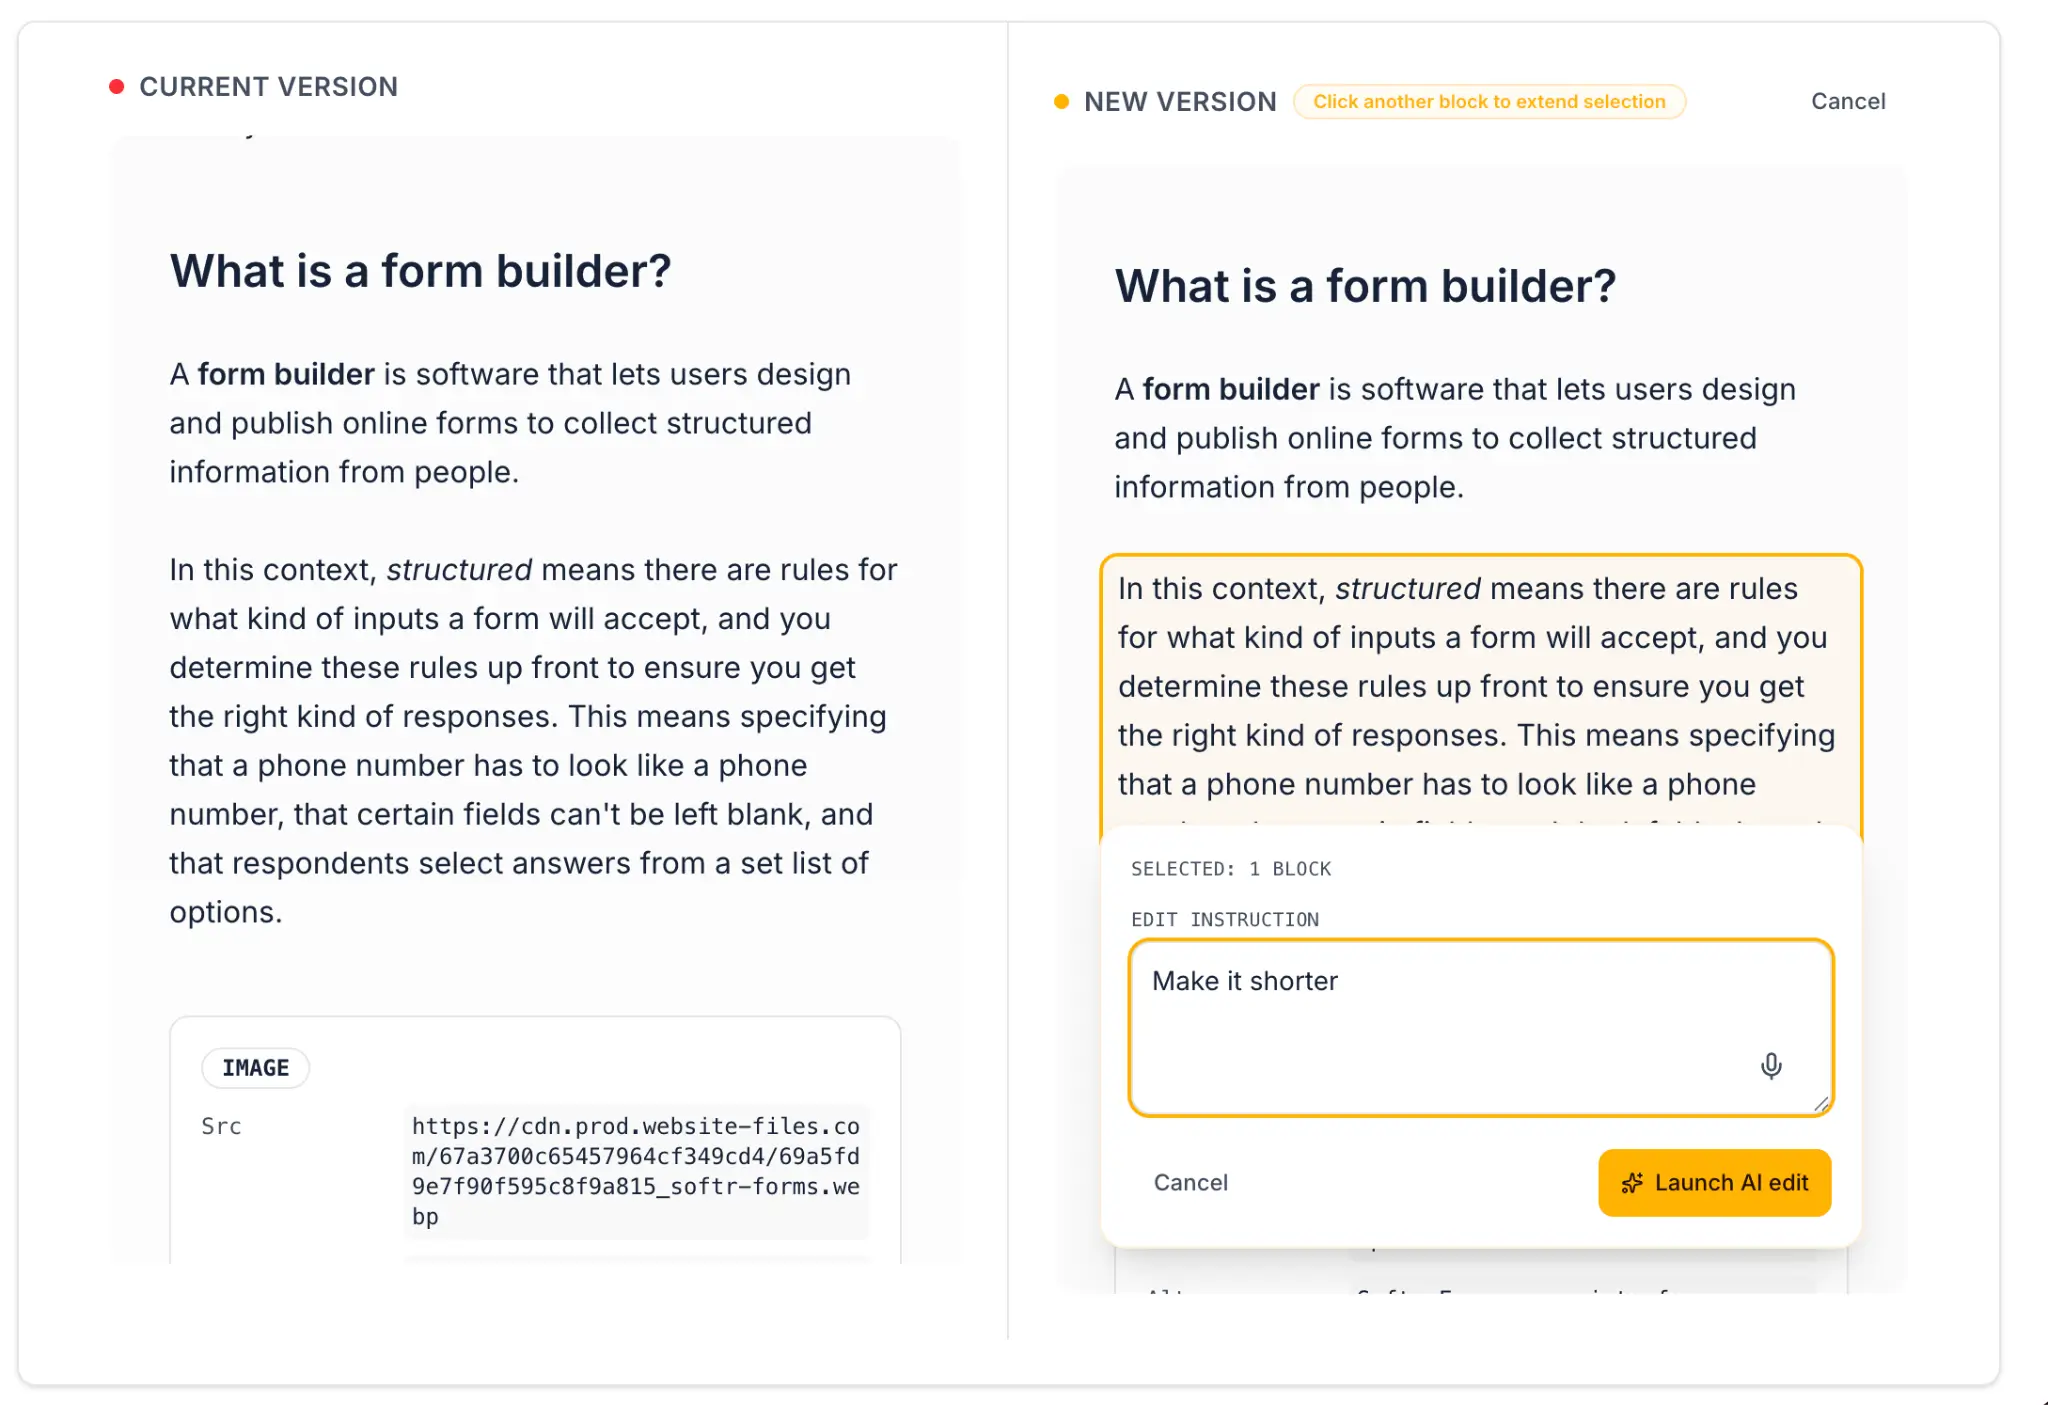
The microphone integration allows reviewers to dictate instructions verbally (e.g., saying "make this sentence shorter and more direct") rather than typing, which speeds up the review process significantly.
4.3 Using inline AI editing instead of manual editing
You might wonder why we use AI-powered inline editing instead of simply making the text manually editable. In some cases, manual editing works fine. But when your content comes from a CMS like Webflow, it often includes complex HTML formatting like nested tags, specific class names, custom elements. Making that content manually editable in a clean, error-free way is difficult, as a small mistake in the HTML can break the rendering.
By using an AI-powered editing step instead, the reviewer simply selects a block and sends written or spoken feedback. The AI handles the formatting correctly, preserving the HTML structure while implementing the change. This is especially useful when working with rich content formats.
4.4 Multi-selection for batch review
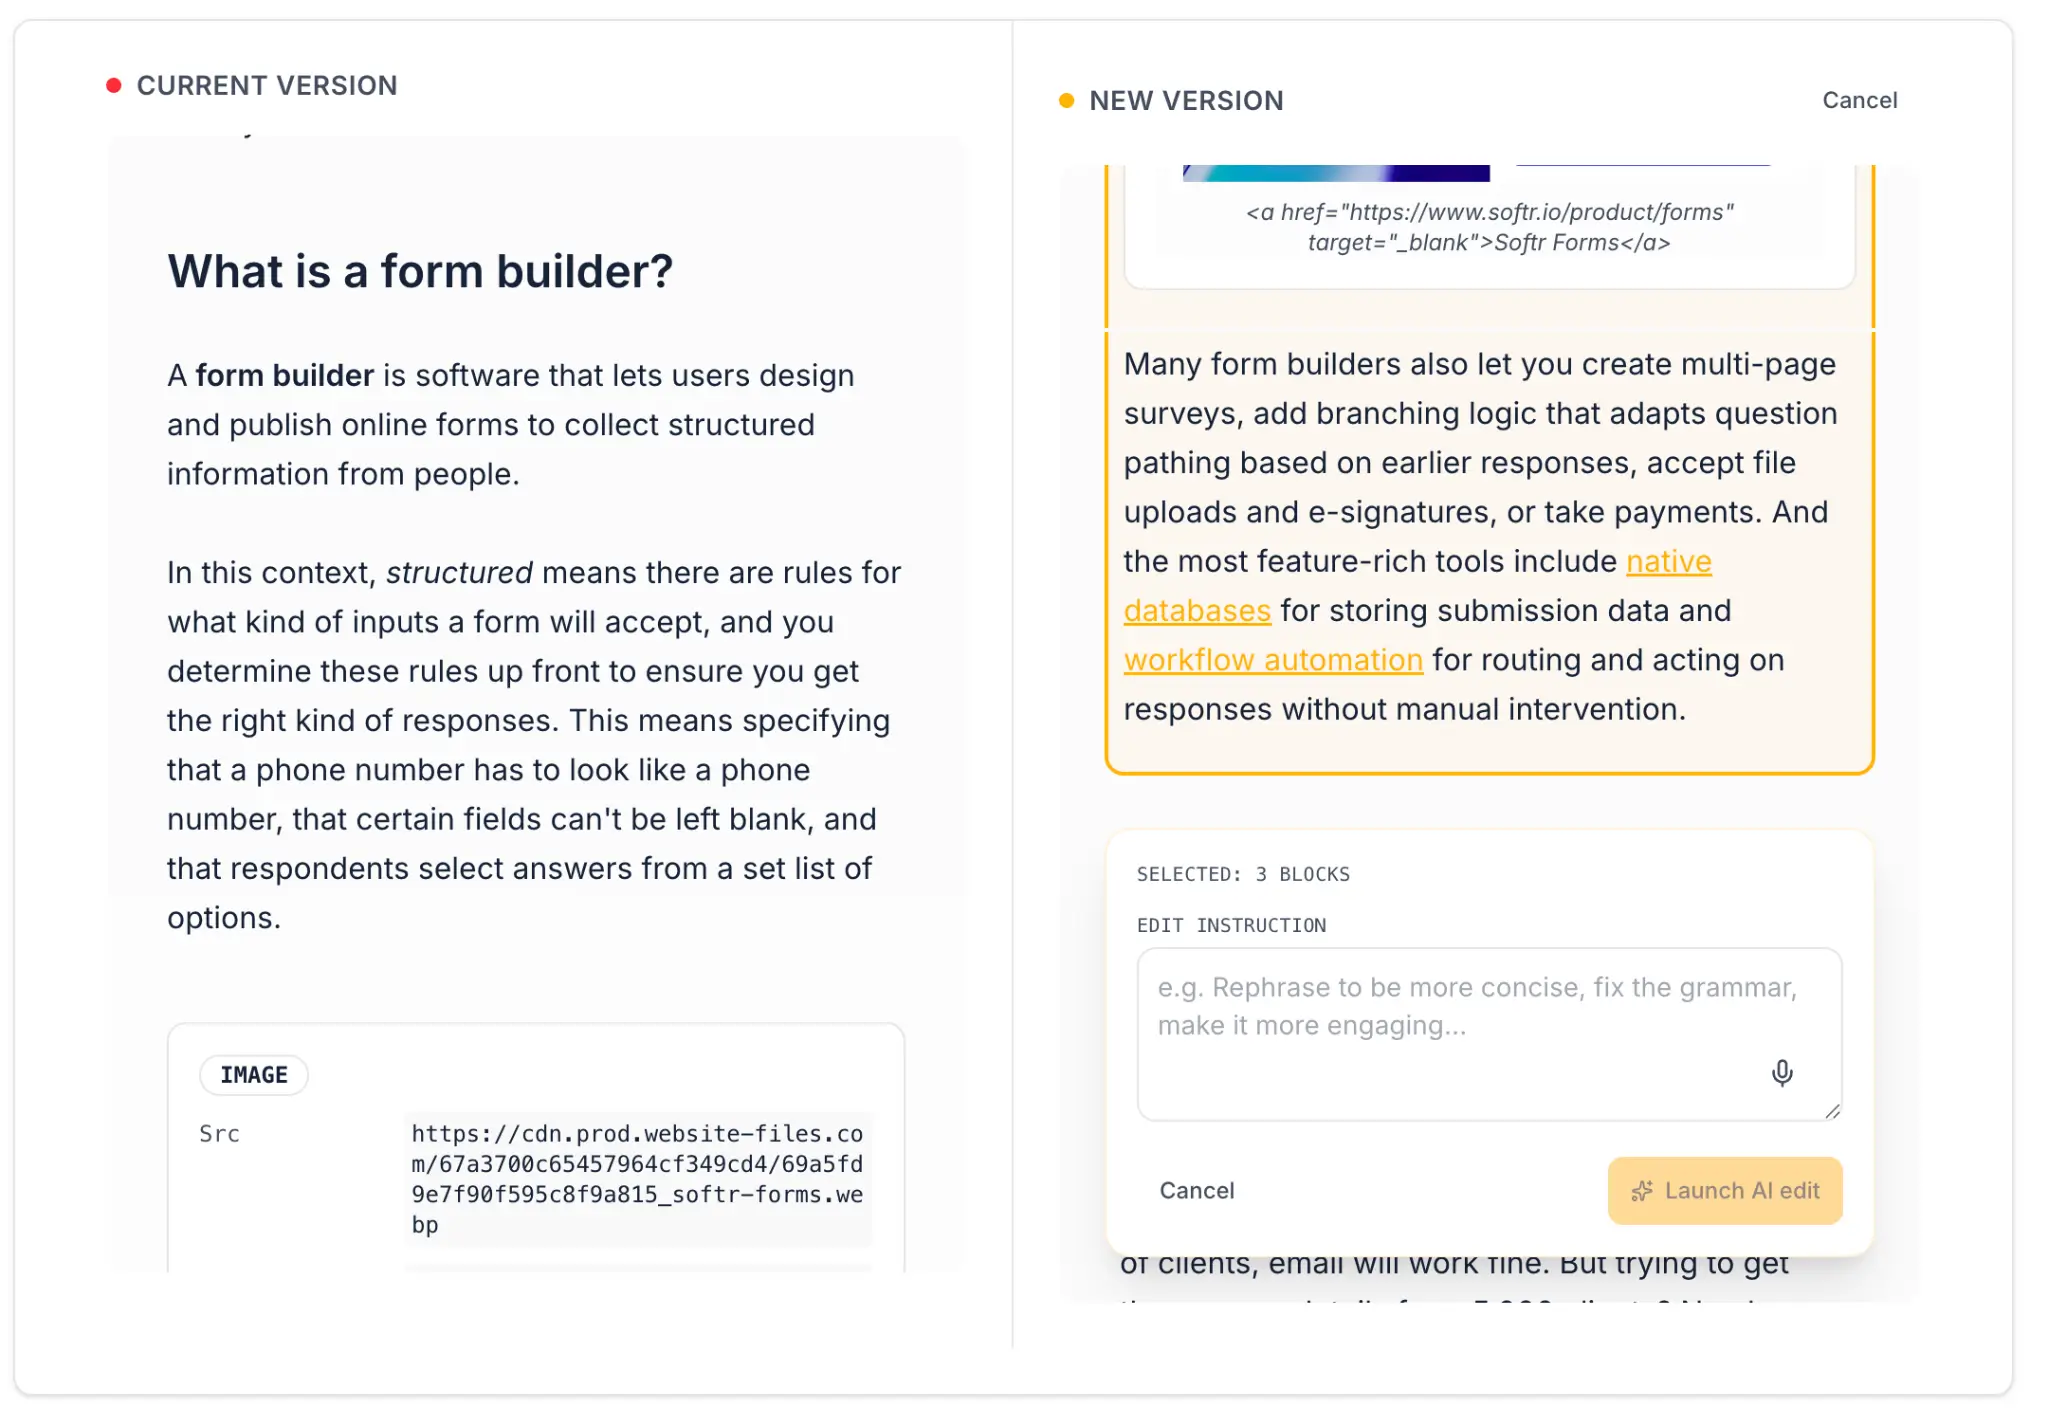
You can extend the block to allow reviewers to select multiple passages (e.g., three bullet points they want to improve simultaneously), send them all in a single webhook request, and receive revised versions for each. Add this to your prompt:
Allow reviewers to select multiple passages by holding Shift while clicking. Selected passages appear with a yellow border. When "Apply AI Edit" is clicked with multiple passages selected, send all selections in an array and replace each one with its corresponding revised version from the response.
Step 5: Managing statuses and the review pipeline
To track where each article is in the review process, use the Status field to create a clear pipeline:
| Status | Meaning |
|---|---|
| Pending Review | AI has generated a new version; no human has reviewed it yet. |
| Approved | A reviewer has approved the changes (or made inline edits and approved). |
| Rejected | A reviewer has rejected the AI's suggestions. |
| Published | The approved content has been pushed back to the live CMS. |
This lets admins filter and prioritize their queue. At a glance, they can see how many articles still need review, how many are approved and waiting to be published, and how many have been pushed live.
Step 6: Building the admin view
Now we need to give admins a way to manage the content review pipeline.
6.1 Content Library page
- Add a Table block connected to the Articles table.
- Display: Title, Category, Status, Last Updated.
- Enable filters for Status and Category so admins can quickly find articles that are pending review.
- Add an Action Button called "Generate AI Revision" that triggers the rewrite workflow (or checks the Trigger Rewrite checkbox field, whichever approach you chose in Part 2).
6.2 Status tracking
Add a Metrics block or chart to your admin dashboard showing:
- Total articles in the library.
- Count by status (Pending Review, Approved, Rejected, Published).
This gives the content lead an overview of how the review campaign is progressing without having to filter through the full table.
Step 7: Pushing approved content back to your CMS
The last step in the workflow is to close the loop: take the approved content and push it back to your CMS so it actually goes live without anyone having to copy-paste.
7.1 Create a publish workflow
- Create a workflow triggered by Database Record Updated in the Articles table.
- Add a condition: fire only when Status changes to
Approved. - Add an HTTP Request step that calls your CMS's update API. For example, with the Webflow API, you'd call the Update Collection Item endpoint with the article's Webflow item ID and the approved Current Text (or AI Suggested Text, depending on your flow).
- On success, update the article's Status to
Published.
This eliminates the bottleneck of someone having to log into Webflow (or whatever CMS you use), find the article, paste the new content, and publish it. If you want to scale your content operations, this last-mile automation is essential.
7.2 Manual option
If you're not ready to automate the CMS push, you can also add a "Copy to Clipboard" button in the review interface. This keeps a human in the loop for the final publishing step. It's a valid approach, but it won't scale if you're processing hundreds of articles.
Wrap-up: A content review tool built in an afternoon with Softr
Let's recap the full flow:
- Import: Pull all your content from your CMS (e.g., Webflow) via API into a Softr Database.
- Document: Write down your company's content rules and editing guidelines.
- AI rewrite: Run a batch workflow that applies your rules to every article, generating a V2 in the database.
- Human review: Display the original and AI version side by side in a diff view. A human expert reviews the changes.
- Approve or edit: The reviewer either approves directly, or uses inline AI editing to give targeted feedback on specific blocks.
- Publish: Push the approved content back to your CMS via API.
This is an app that a dedicated software team might quote as a multi-week project. It has a custom diff algorithm, voice input, inline AI editing, webhook round-trips, database write-back, status tracking, and a multi-user approval workflow.
Built in Softr, it took an afternoon. And because every component is connected to the same database and inherits the same authentication and permission rules, there's no integration glue, no security gaps, and no custom hosting to manage.
More importantly, it gives your content team something they can own and iterate themselves. Need to change the AI's revision guidelines? Update the workflow prompt. Need to add a new field to track the reviewer's name? Add a field to the database. Need to change how the content gets pushed to your CMS? Adjust the publishing workflow. The tool is as easy to evolve as it is to build.
Ready to get started?
Frequently asked questions
- Does this work for content stored in HTML or rich text format?
- Can I customize the AI's revision guidelines for different content types?
- How do I handle articles where I only want to approve some of the AI's changes?
- Can multiple reviewers work on the same article simultaneously?
- Is there a risk that the AI will change content it shouldn't?