[.blog-callout]
TL;DR
- Build a complete, AI-powered CRM on Softr using three layers: the Softr Databases schema, a drag-and-drop interface, and Softr Workflows for automation.
- Describe your CRM to the AI Co-Builder to generate the starting structure, or follow this tutorial to build it manually from scratch.
- Use database AI agents to auto-enrich company records (industry, employee count) straight from a website URL, no manual research needed.
- Give your sales team an Ask AI assistant that answers questions directly from deal and contact history.
- Automate lead handling, email sending, and deal summaries with Softr Workflows, no external automation tool required.
- Skip the build entirely with the free AI CRM template. [.blog-callout]
This tutorial guides you through building a complete, AI-powered Customer Relationship Management (CRM) application from scratch. We'll build the entire stack, the database, the application interface, and the automated workflows, using Softr's all-in-one no-code platform.
By the end, you'll have a fully functional, custom CRM that can automatically enrich company data, handle new demo requests, summarize deal interactions with AI, and empower your sales team to send emails directly from the app.
If you'd rather skip the manual build, you can describe your CRM to Softr's AI Co-Builder and it will generate a working database, pages, and permissions in minutes, or copy and personalize our AI CRM template directly. This tutorial walks through the manual build so you understand exactly how each piece works and can adapt it to your own sales process.
What is Softr and how does it help building an AI CRM?
Softr is an AI app builder that lets businesses build the custom, production-ready applications they need on top of their own data, with or without writing code.
For a sales team, off-the-shelf CRMs are often too rigid, overly complex, or force you into a workflow that doesn't fit. Softr allows you to build a CRM that perfectly matches your sales process. It's a true full-stack builder, meaning you can:
- Build your Database: Use the built-in, high-performance Softr Databases to structure all your contacts, companies, and deals exactly how you want, or connect to Airtable, Google Sheets, HubSpot, and 17+ other data sources if your data already lives elsewhere.
- Build your Interface: Use a simple drag-and-drop editor to create a beautiful and responsive web app with dashboards, Kanban pipelines, and secure user portals. For any custom widget the pre-built blocks don't cover, the Vibe Coding block generates it for you from a plain-language description.
- Build your Logic: Use Softr Workflows and AI features like database AI agents and Ask AI to automate data enrichment, send email follow-ups, and get instant insights.
Instead of stitching together multiple tools, you can build, manage, and scale your entire CRM from one place in hours, not months.
"In roofing, there were not many good CRM options, except for one that cost thousands of dollars a month. Instead, I used Softr to build our own CRM that rivals the expensive ones. I do not pay for features I will not use, and simply build the ones I want, exactly how I want them." - Verified user, Construction (small business), G2 review
What you'll learn in this AI CRM tutorial
We'll cover the following:
- How to design and structure a relational database from scratch using Softr Databases (or generate the starting schema with the Database AI Co-Builder).
- How to use database AI agents to automatically find a company's industry, employee count, and activity description.
- How to build a multi-page app with a public-facing lead capture form.
- How to set up custom user groups and permissions for "Admins" and "Sales Reps" to control visibility.
- How to display your sales pipeline as an interactive Kanban board with drag-and-drop functionality.
- How to add the Ask AI feature to let your team have a conversation with your deal histories and contact interactions.
- How to build Softr Workflows to automate lead handling and send emails directly from your app.
- How to create on-demand AI summaries for any deal with the click of a button.
Who’s this app for?
This application is designed for any sales team, typically in a small-to-mid-sized business, that finds generic CRMs don't fit their unique workflow. It's perfect for operators, sales managers, and business teams who want to build a tool that their team will actually love to use, one that saves them time instead of creating more admin work.
User groups and jobs to be done
Our CRM will have three main user groups:
- Visitors (Non-logged in): These are prospects visiting your public-facing page.
- Job to be done: Submit a "Request a Demo" form to get in touch with your sales team.
- Sales Reps (Logged in): The primary users of the CRM.
- Job to be done: Manage their assigned contacts, companies, and deals through the pipeline.
- Job to be done: Track their tasks and log all interactions (emails, meetings, calls).
- Job to be done: Use AI to get quick deal summaries, understand prospect history, and send email follow-ups efficiently.
- Admins (Logged in): Sales managers or operators who need full visibility.
- Job to be done: View all contacts, deals, and tasks across the entire team.
- Job to be done: Access global dashboards on team performance, closed-won revenue, and pipeline health.
- Job to be done: Manage user access and configure the application.
The app’s core structure
Our app will consist of a simple public page for lead capture and a secure, private internal application for the sales team to manage everything.
Pages to be built
- Public Homepage: A simple landing page with a "Request a Demo" form.
- Utility Pages: Sign In, Reset Password, User Profile (auto-generated by Softr).
- App Homepage: An internal dashboard with key metrics (Total Contacts, Open Deals, etc.) and charts.
- Contacts: A page with a table of all contacts and a detail page for each one.
- Companies: A grid view of all companies and a detail page for each one.
- Deals: A Kanban board to manage the deal pipeline and a detail page for each deal.
- Tasks: A simple list of to-do items for the sales team.
Database structure
The foundation of our smart CRM is a well-organized database. We will use Softr Databases to create six interconnected tables:
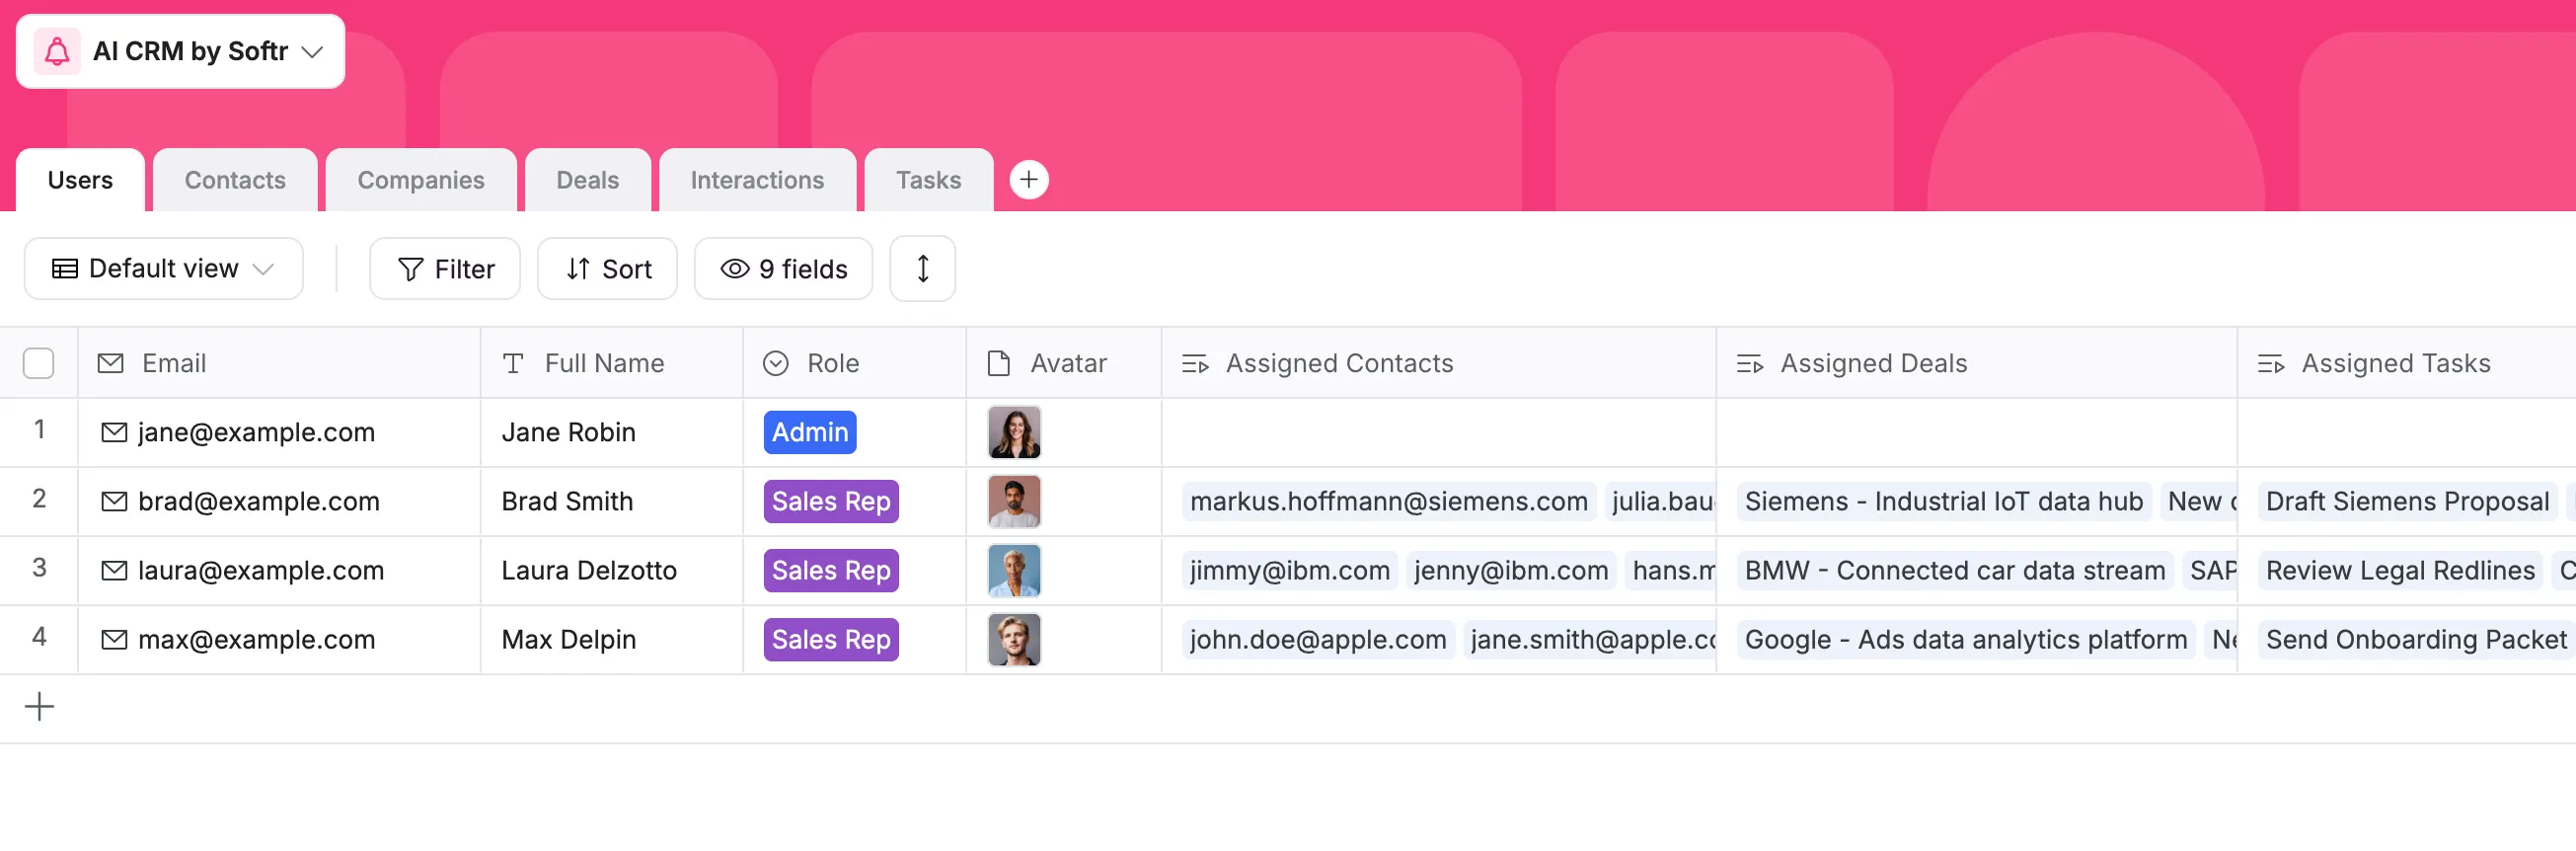
- Users: Stores the internal app users (
Sales RepsandAdmins) and their roles. This table powers the app's login and permissions. - Companies: Stores client company information. This is where we'll use AI to auto-populate data like
IndustryandEmployee Count. - Contacts: Stores individual prospect details (email, job title) and links them to a
Company. - Deals: Tracks each sales opportunity, its
Amount,Stage(e.g., "New," "Negotiation"), and links it to aCompany. - Interactions: This is the fuel for our AI. It's a log of every email, meeting, or note, linked to a
Contact. - Tasks: A simple to-do list for sales reps, linked to
UsersandDeals.
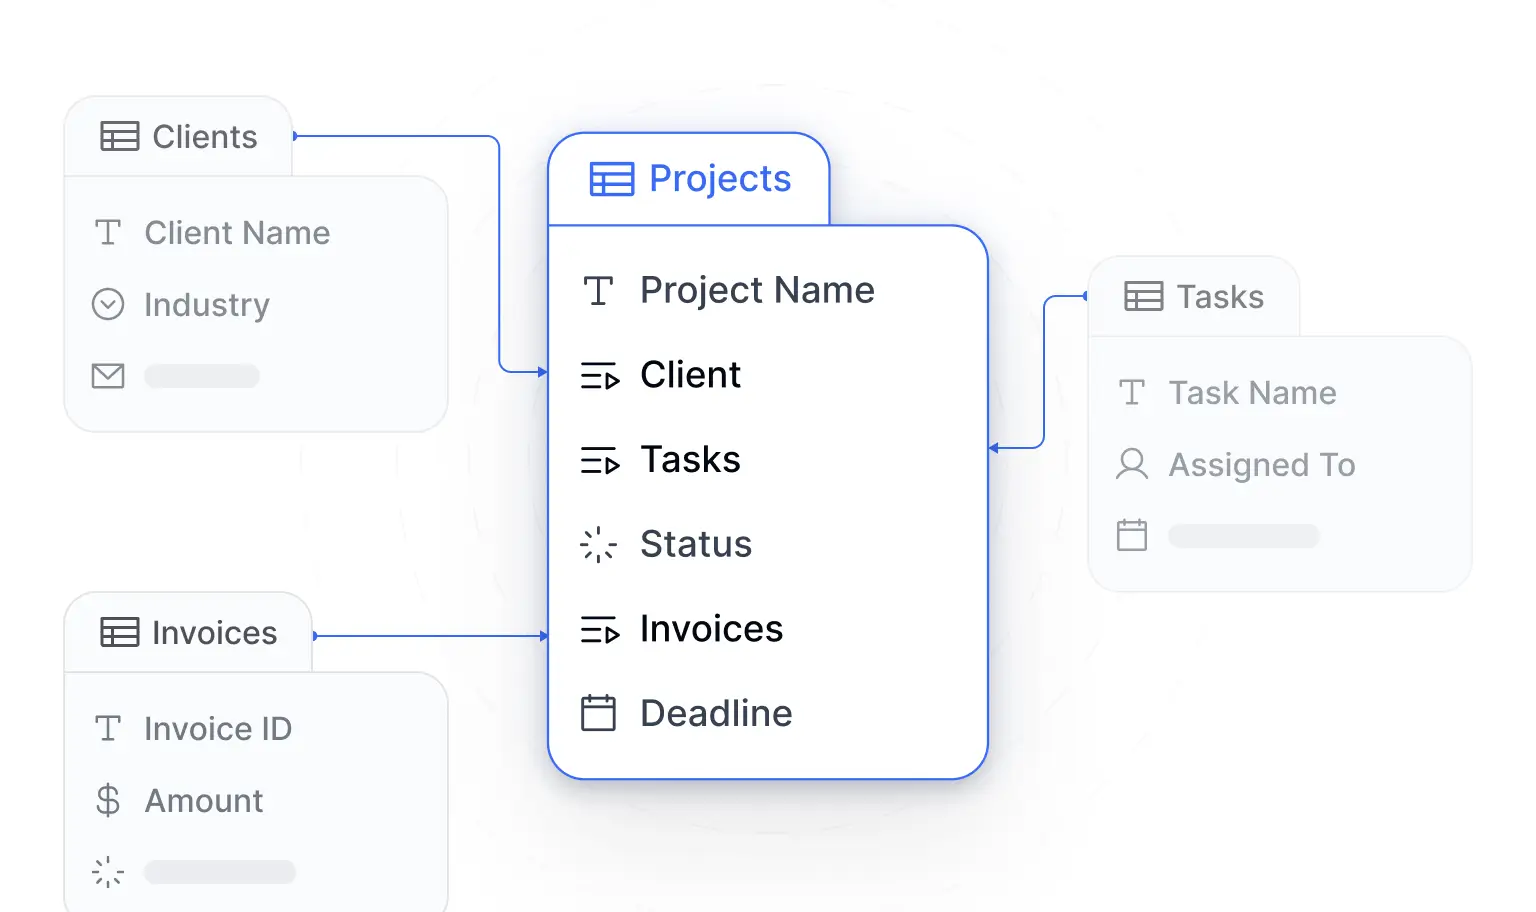
Keeping Deals as its own table, separate from Companies, matters more than it looks. As Guillaume Duvernay, a Softr builder who has shipped 50+ business apps, puts it:
"A company can have multiple deals over time (like a pilot followed by an expansion). Both need to coexist, which is why deals need to be their own unique object."
Part 1: Structuring your database in Softr
Let's build the foundation. A powerful app starts with a clean, relational database. We'll use Softr Databases for its speed, scalability, and deep integration with AI features.
1.1. Create your database and tables
- From your Softr dashboard, click Create Application.
- Select Start from scratch. When prompted for a data source, choose Softr Database. (You can also describe your CRM to the AI Co-Builder and let it generate the tables and sample data for you in one step, or pick a template as a starting point.)
- A new app and a new database will be created. Click the Data tab at the top of the studio to open your database.
- You'll see a
Userstable by default. We'll use that. - Click the + icon in the data tab to create five more tables, or describe the structure to the Database AI Co-Builder and let it generate the tables and fields for you. Name them:
ContactsCompaniesDealsInteractionsTasks
1.2. Configure the Users table
This table holds your internal team's login info. It's the key to managing permissions.
- Click the
Userstable to open it. - Set the primary column to
Emailand change its field type toEmail. This ensures each user has a unique login. - Add a
Full Namefield (type:Text). - Add an
Avatarfield (type:File) for profile pictures. - Add a
Rolefield (type:Select). Click the field to configure it and add two options: Admin and Sales Rep. This field is the cornerstone of our app's permissions. - Add
Related Recordfields to link users to their work:Assigned Contacts(link toContactstable, enable "Allow linking to multiple records")Assigned Deals(link toDealstable, enable "Allow linking to multiple records")Assigned Tasks(link toTaskstable, enable "Allow linking to multiple records")
1.3. Configure the Companies table with AI enrichment
This is where database AI agents save our sales team hours of manual research. Nearly 4 in 5 (88%) early adopters of AI agents already report positive ROI from at least one use case like this, and enrichment is one of the easiest to set up.
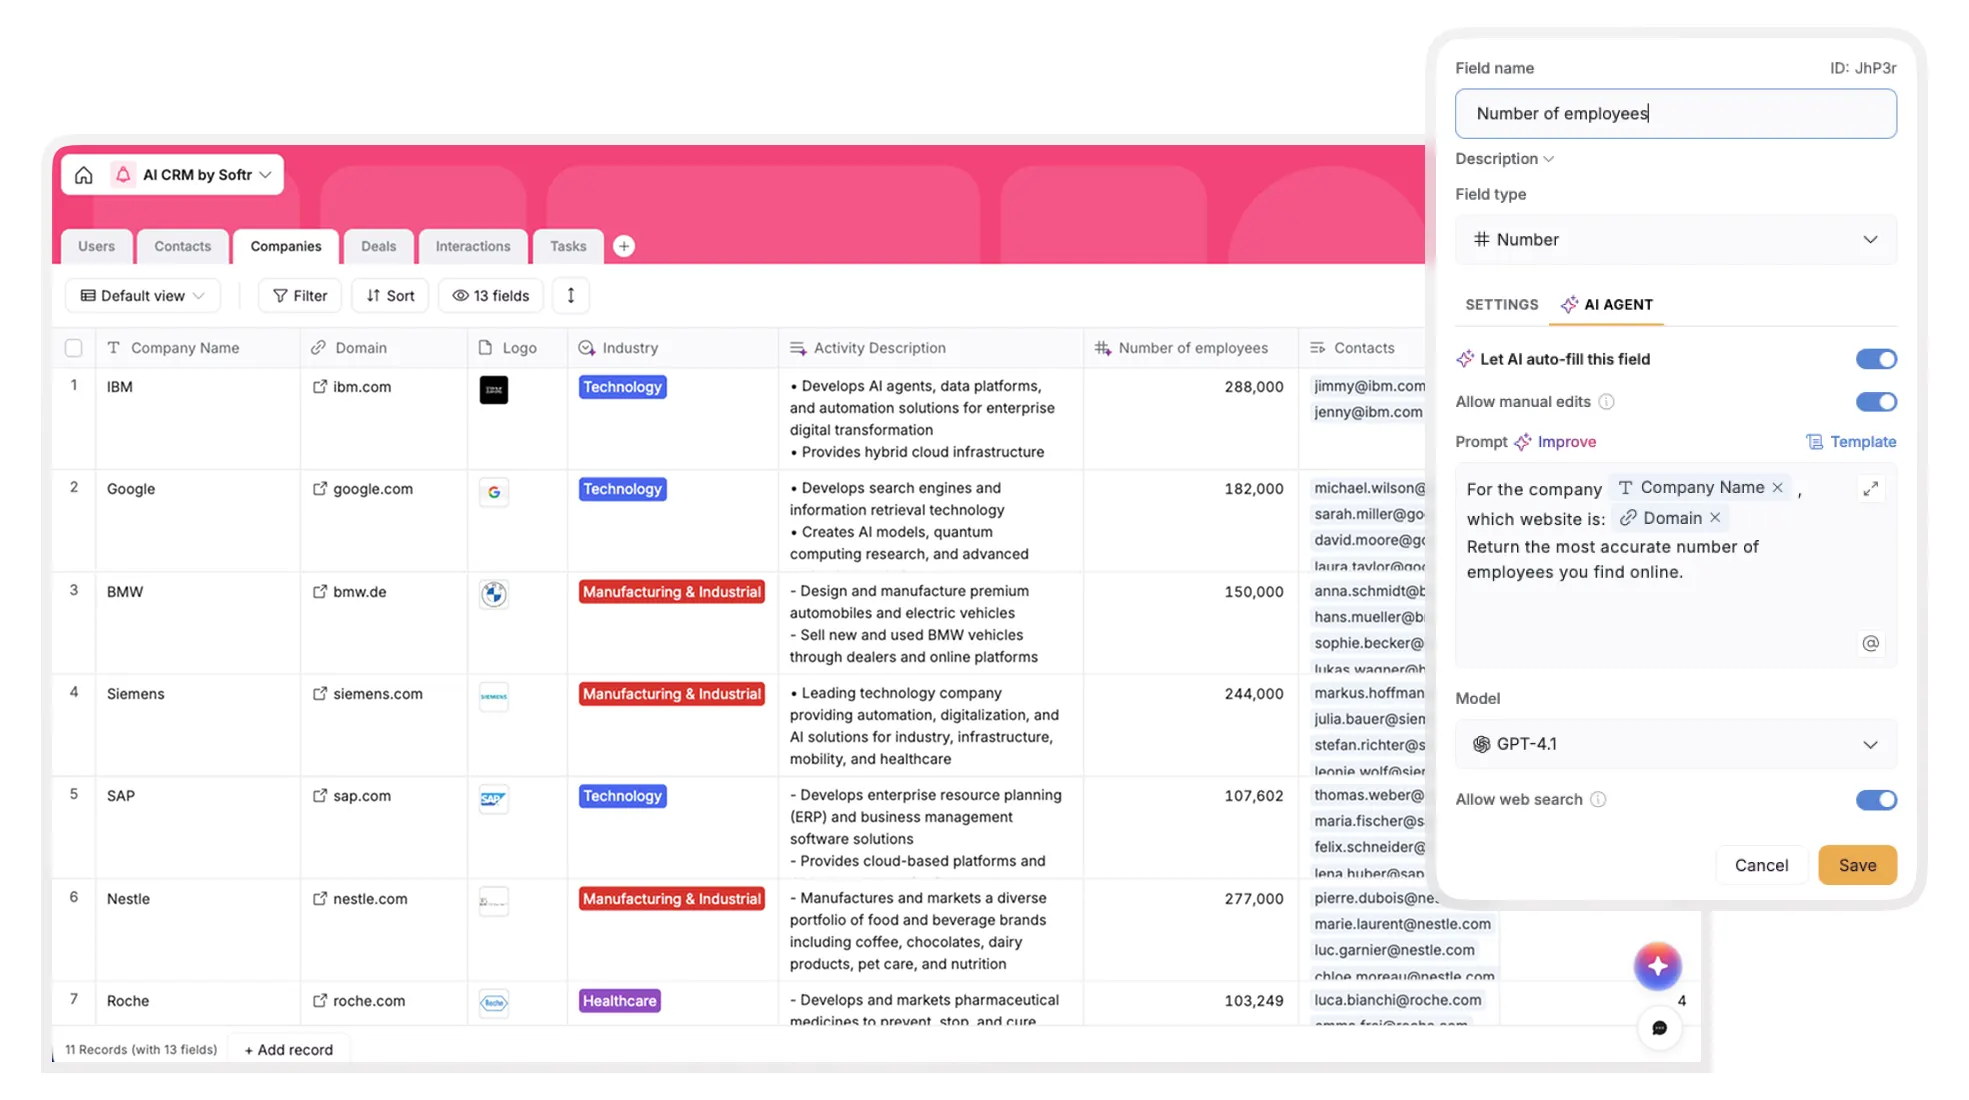
- Click the
Companiestable. - Set the primary column to
Company Name(type:Text). - Add a
Websitefield (type:URL). This will be the trigger for our AI. - Add an
Industryfield (type:Select). - Add AI Enrichment:
- Click the + to add a new field. Scroll down and select AI Agent Field.
- Name it
Activity Description. - In the prompt box, write:
Generate three concise bullet points in markdown format describing the company's activity, based on the [Company Name] and [Website].(Use the@symbol to reference your other fields). - Toggle on Web Search. This allows the AI to browse the web for information.
- Set the trigger to run When a condition is met:
[Website]is not empty.
- Add a second AI Field:
- Add another AI Agent Field and name it
Number of Employees. - Use the prompt:
Return the most accurate number of employees for the company with website [Website]. Return only the number. - Enable Web Search and set the same trigger (
[Website]is not empty).
- Add another AI Agent Field and name it
- Add Relations: Add a
Related Recordfield namedContacts(link toContacts, enable multiple) andDeals(link toDeals, enable multiple).
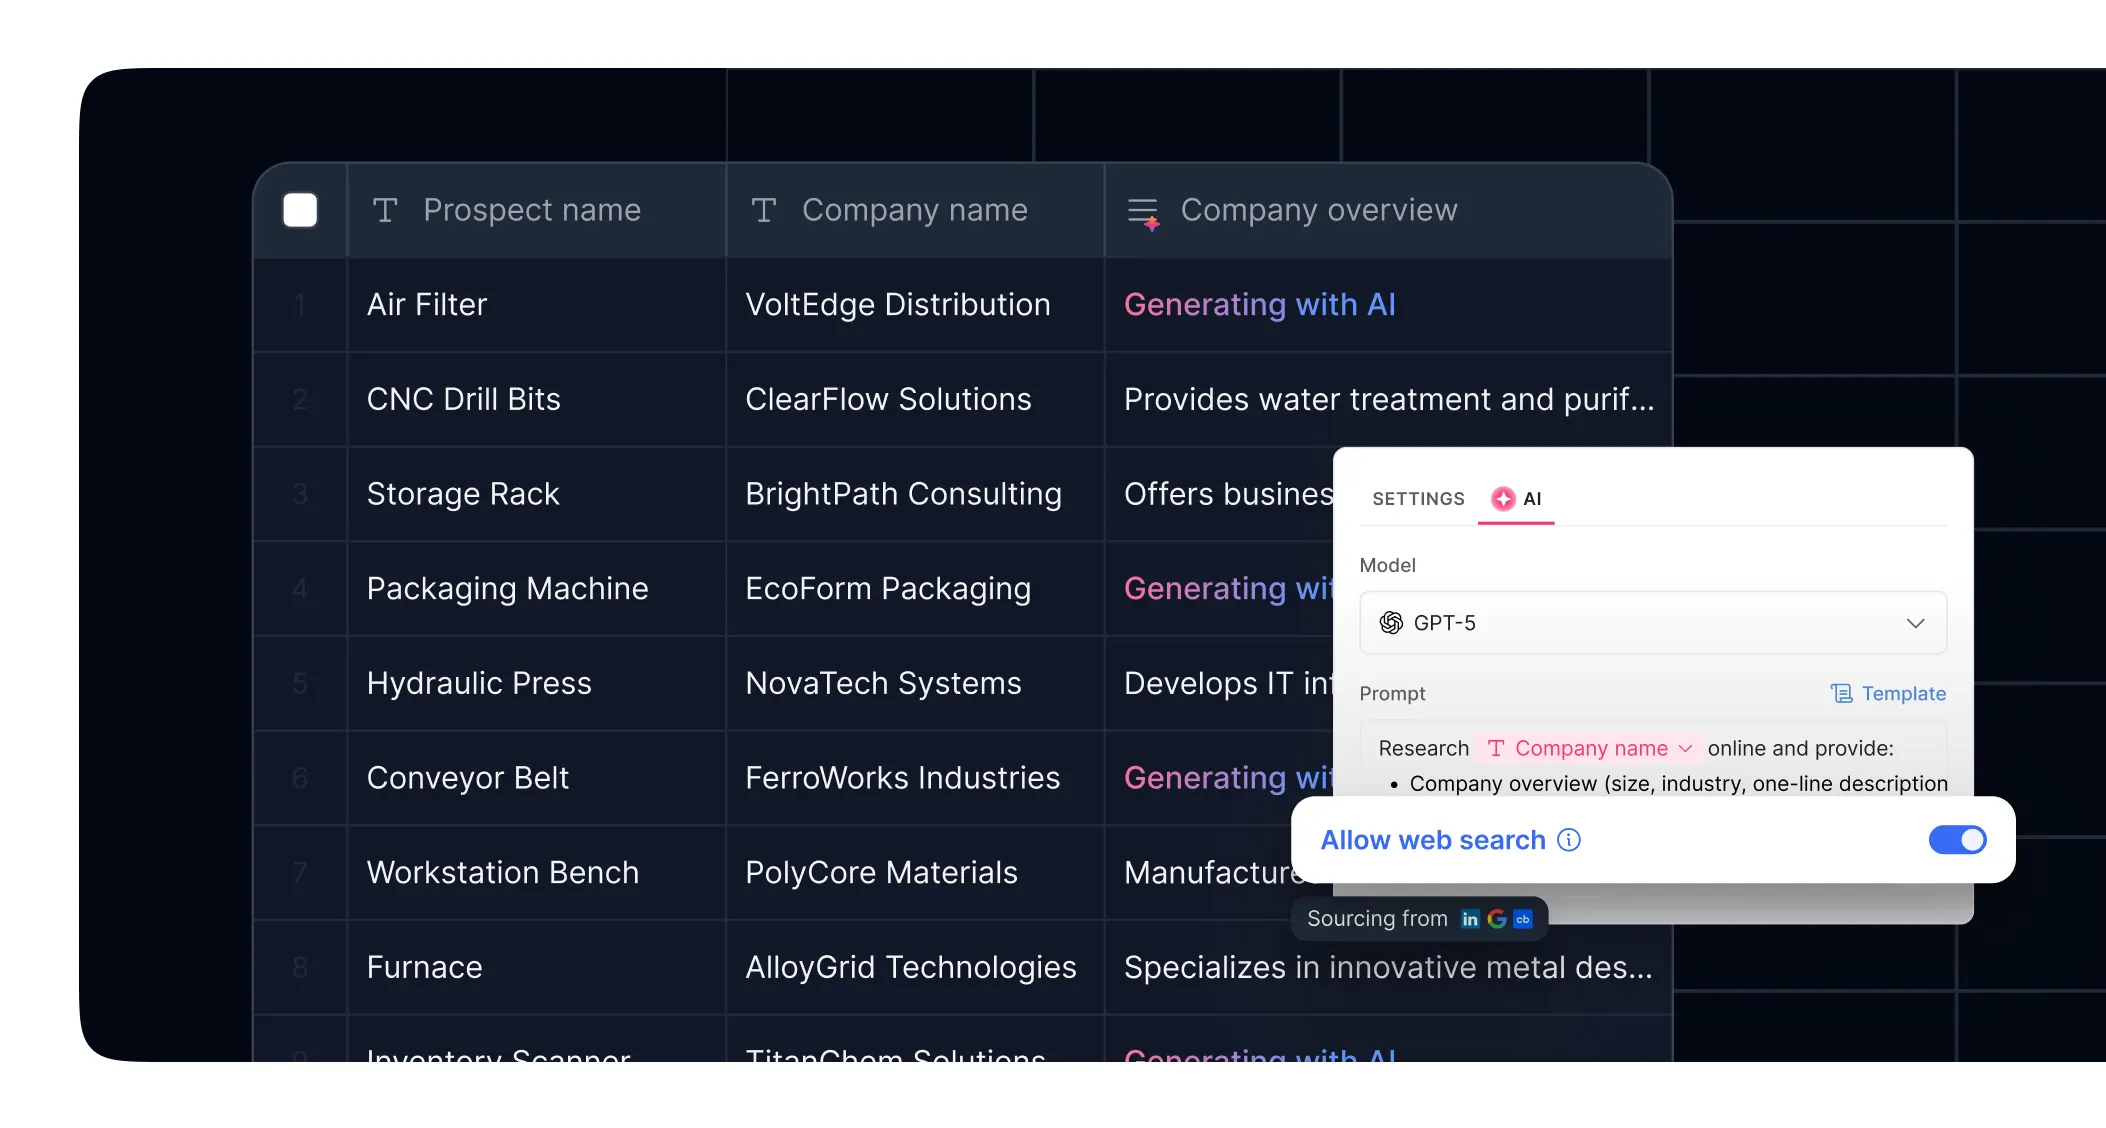
How this works: Now, whenever you add a company and its website, these AI agents will automatically run, browse the web, and fill in the company's description and employee count for you.
1.4. Configure the remaining tables
Follow this logic to build out the rest of your database structure, or describe the fields and relationships to the Database AI Co-Builder and let it build them for you. Add sample data as you go.
ContactsTable:- Primary:
Email(type:Email) - Fields:
First Name(Text),Last Name(Text),Job Title(Text),Phone(Phone). - Relations:
Contact Owner(link toUsers, disable "Allow linking to multiple records"),Company(link toCompanies, disable "Allow linking to multiple records"),Interactions(link toInteractions, enable "Allow linking to multiple records").
- Primary:
DealsTable:- Primary:
Deal Name(type:Text). - Fields:
Amount(Currency),Deal Stage(Select: "New Opportunity", "Negotiation", "Closed Won", "Closed Lost"),Close Date(Date),Interaction Digest(Long text). - Demo Fields (for our form):
Demo Request Email(Email),Demo Request First Name(Text),Demo Request Last Name(Text),Demo Request Message(Long text),Demo Request Date(Timestamp). - Relations:
Deal Owner(link toUsers),Company(link toCompanies).
- Primary:
InteractionsTable:- Primary:
Title(type:TextorFormula, e.g.CONCAT(Type, " - ", Contact)). - Fields:
Type(Select: "Email", "Meeting", "Note"),Content(Long text),Direction(Select: "Inbound", "Outbound"),Date(Timestamp). - Email Fields:
Email Subject(Text),Email Body(Long text),Email to send?(Checkbox). - Relations:
Contact(link toContacts),User(link toUsers).
- Primary:
TasksTable:- Primary:
Title(type:Text). - Fields:
Status(Select: "To Do", "In Progress", "Done"),Description(Long text),Due Date(Date). - Relations:
Assignee(link toUsers),Deal(link toDeals).
- Primary:
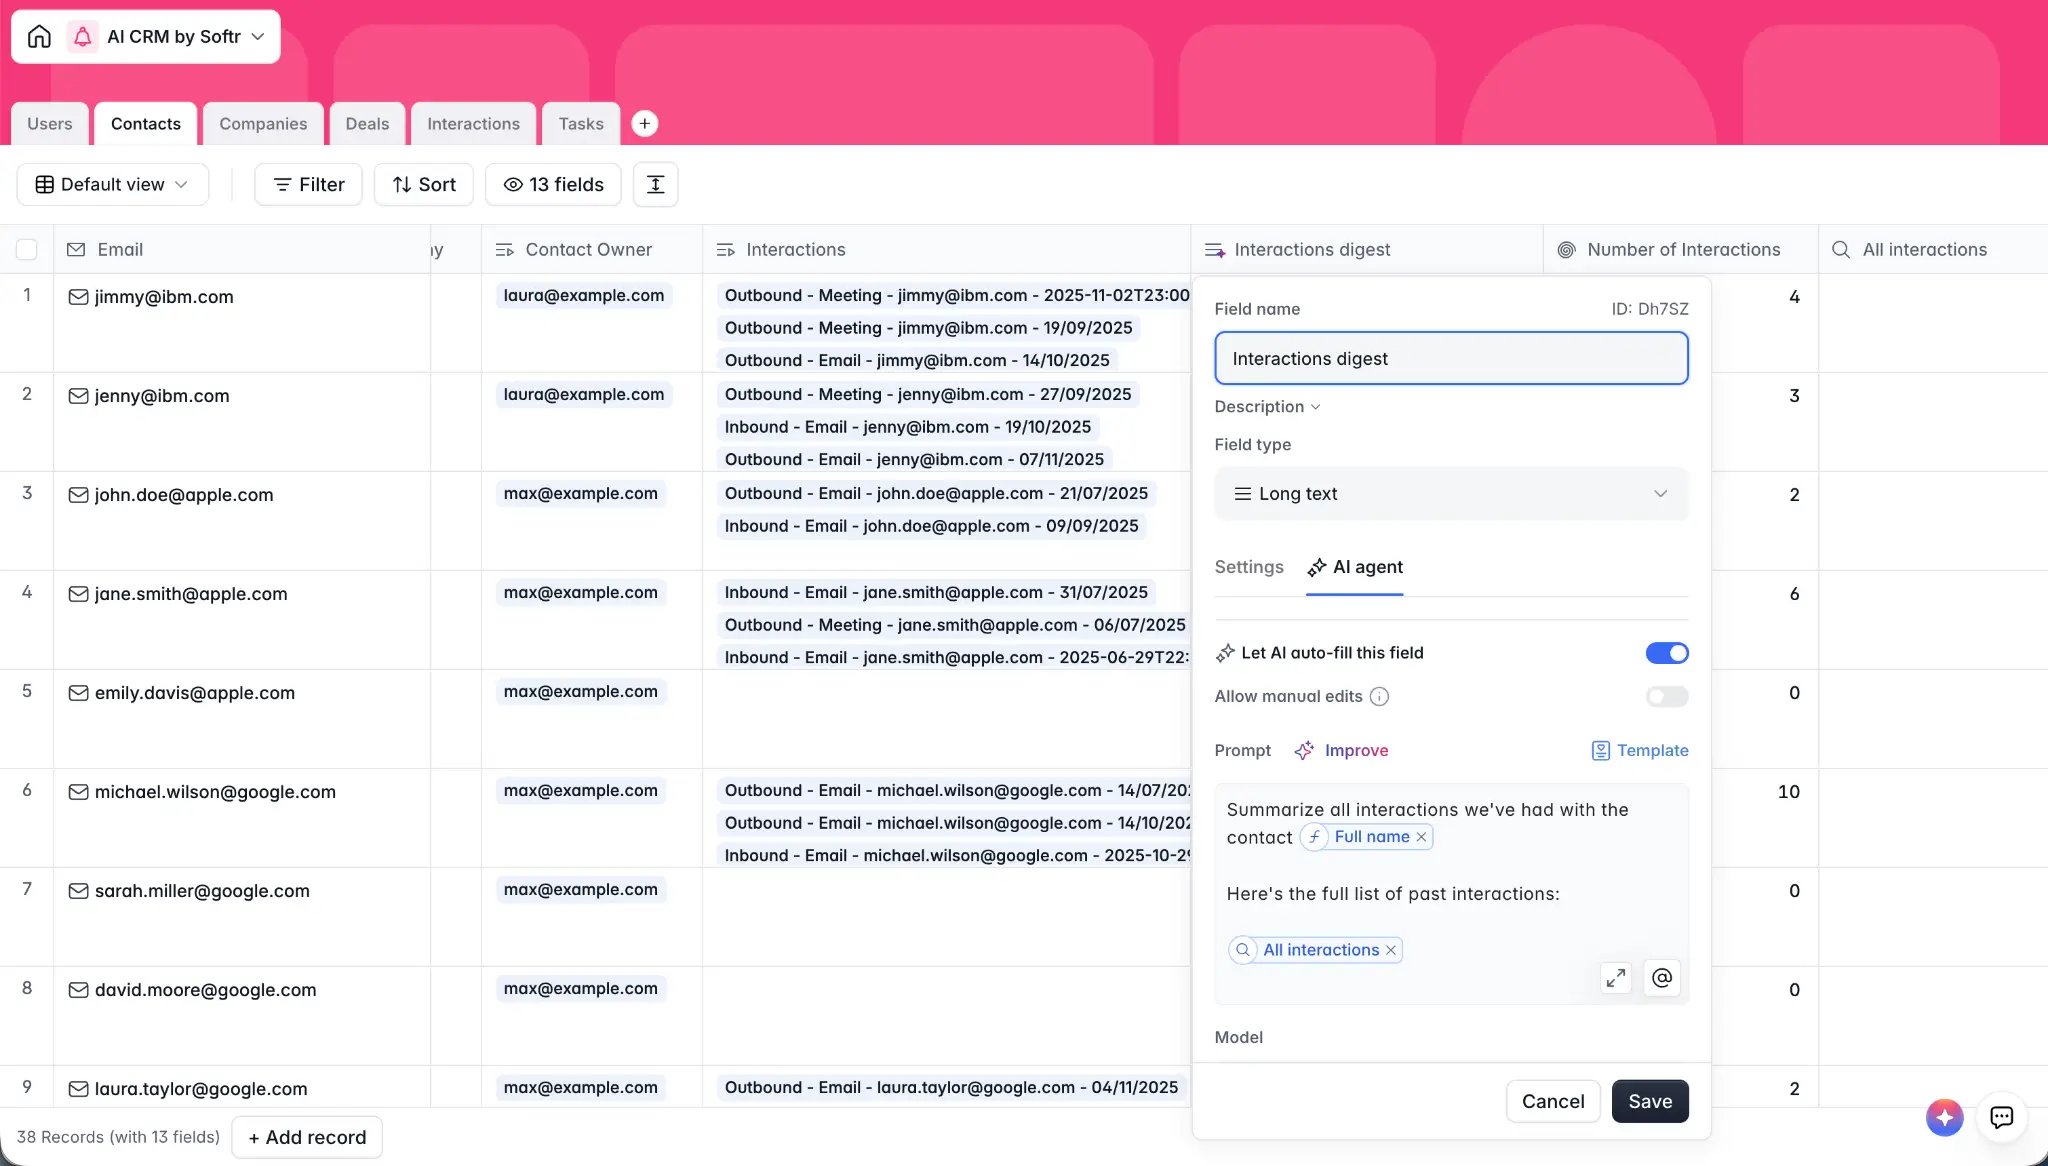
Interactions table is the fuel for AI summaries later: every email, call, and note logged here gets rolled up and summarized on demand.Part 2: Building the CRM interface
With our database and sample data ready, let's build the visual part of the app.
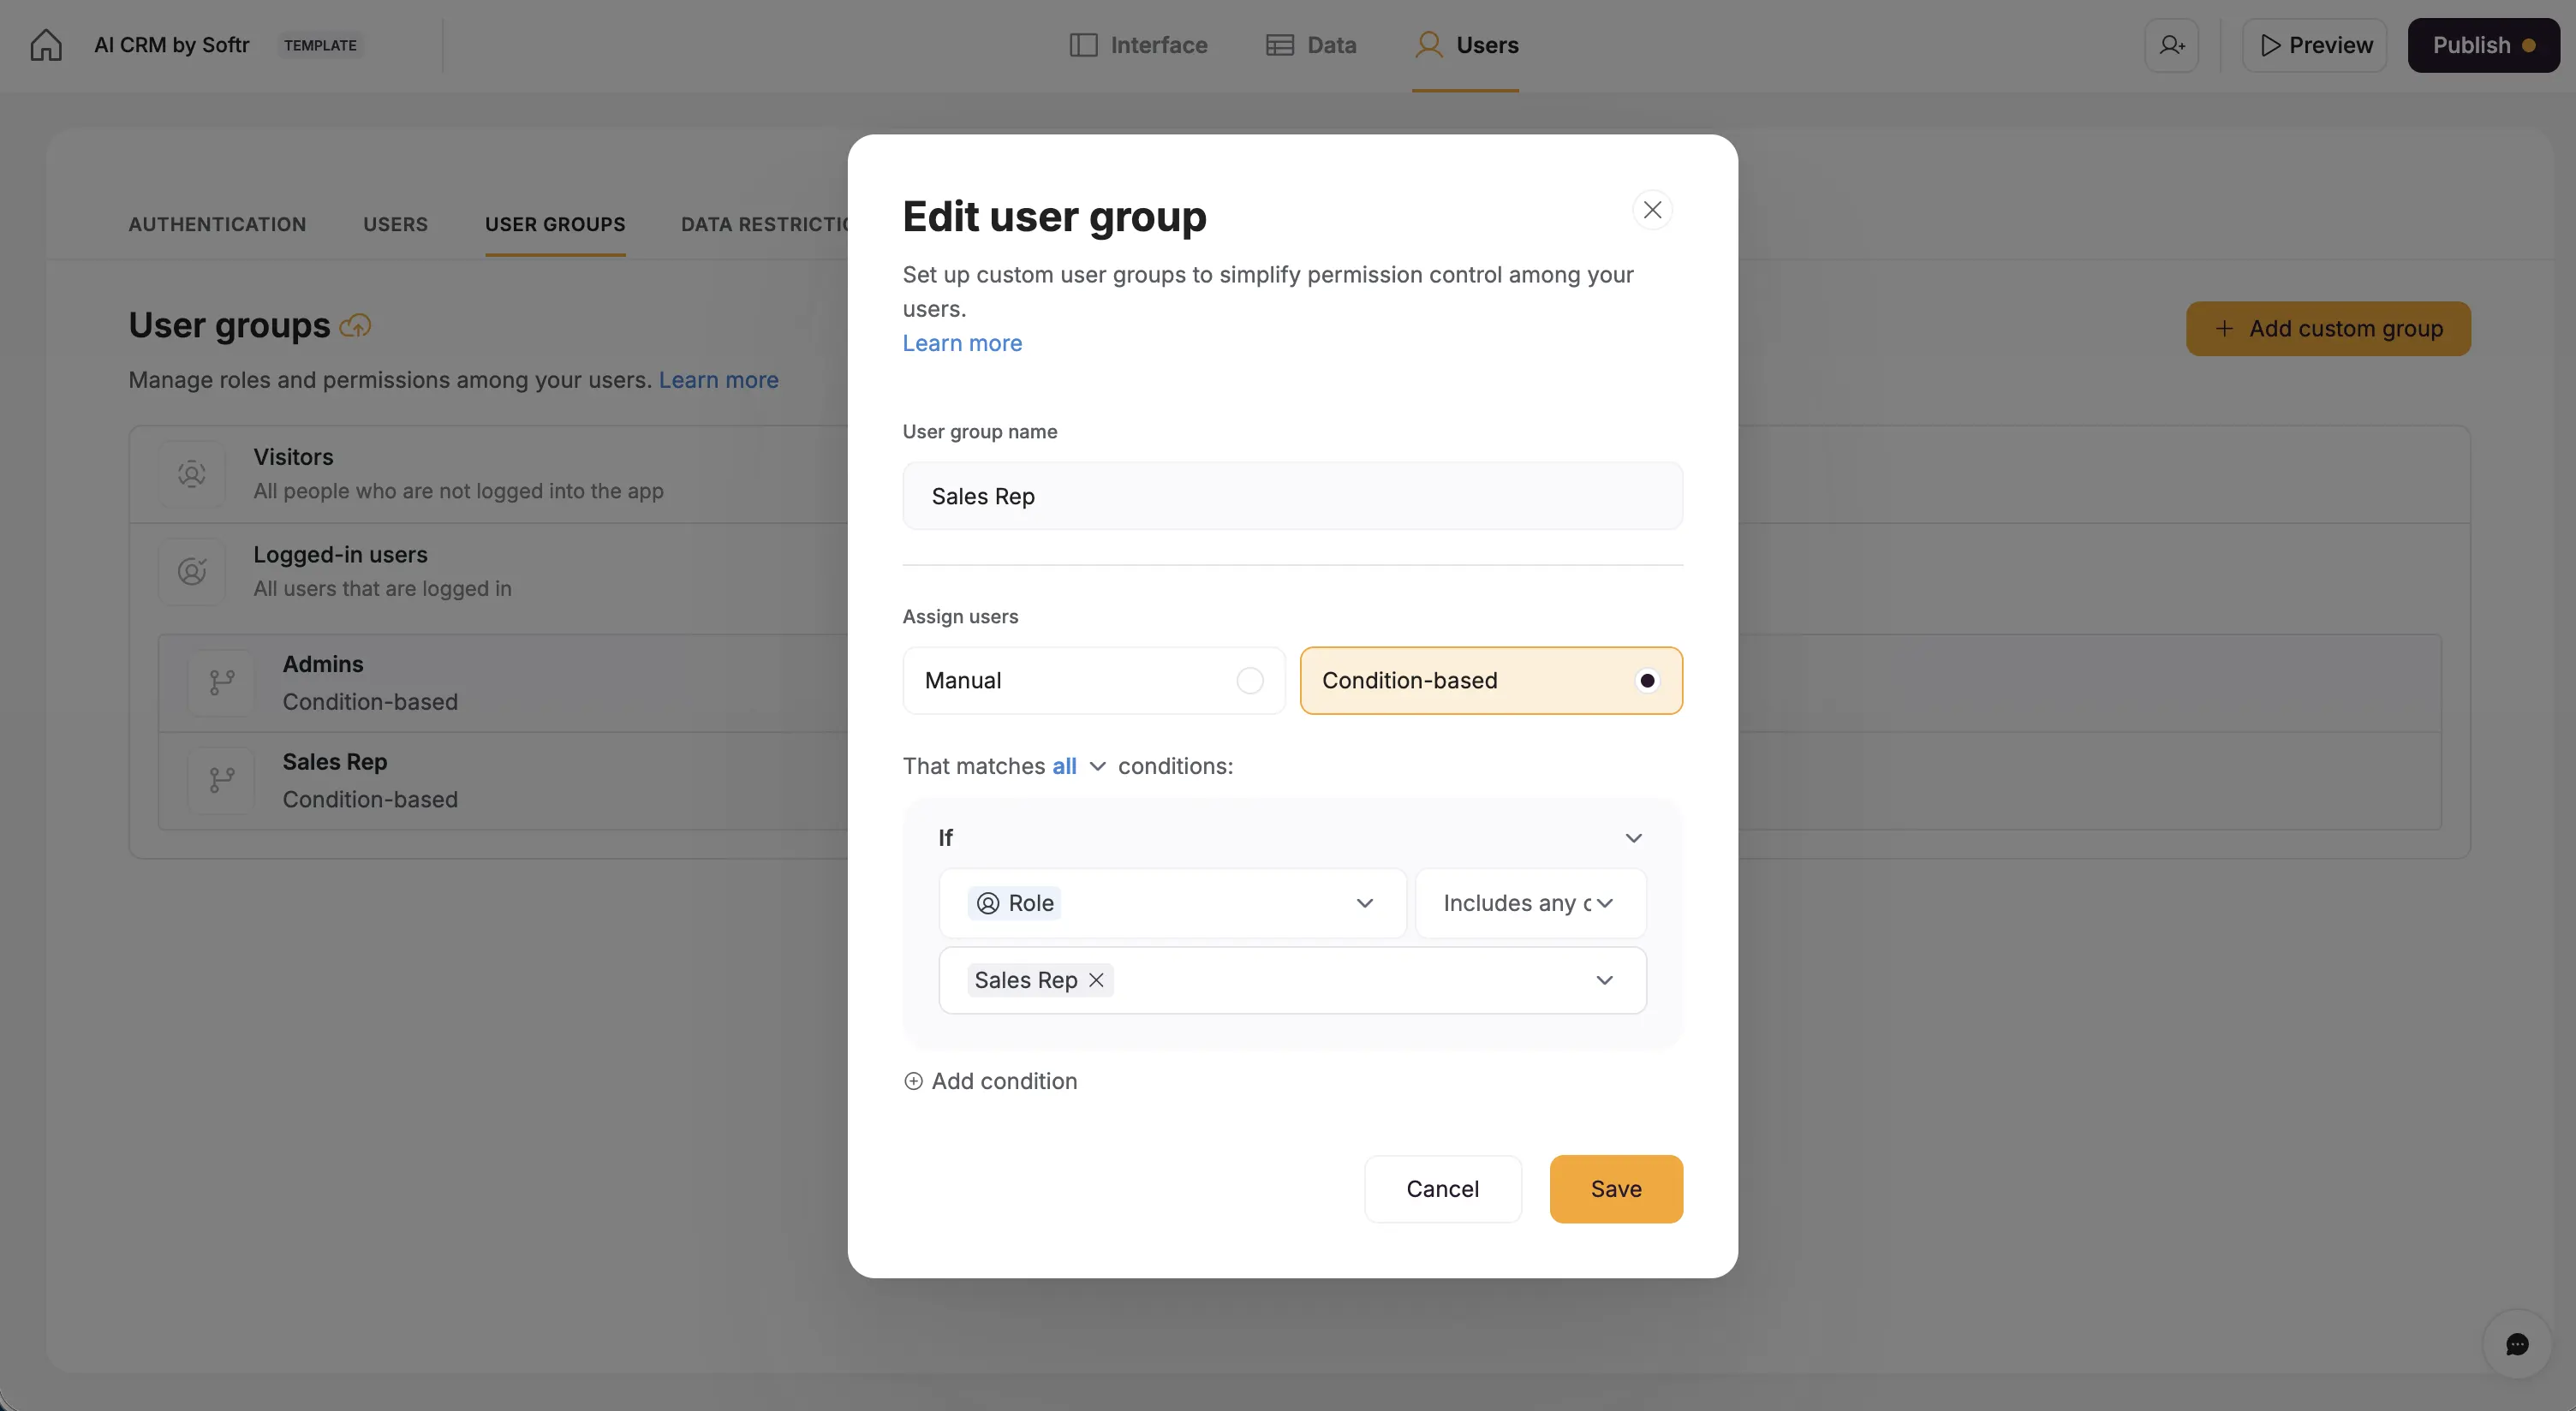
2.1. Connect users and set up permissions
This is the most critical first step for a secure app.
- Go back to the App tab (the paintbrush icon) in the Softr studio.
- On the left panel, click the Users tab.
- Click Sync with data source and select your Softr Database and the
Userstable. - Map the
Email,Name, andAvatarfields from your table. Click Save and Sync. Your sample users will be imported. - Go to the User Groups section.
- Click Add User Group. Name it Admin and set the condition:
When the user's 'Role' (from your database) is 'Admin'. - Create another group named Sales Rep with the condition:
When the user's 'Role' is 'Sales Rep'.
Now we can make any page or button visible only to Admins or only to Sales Reps. See our full guide on setting up user groups and permissions for more advanced configurations, like data restrictions.
2.2. Build the public demo request form

- Go to the Pages tab and select the "Homepage."
- Click the gear icon next to its name to open Page Settings.
- Set Visibility to Everyone. This makes it your public-facing page.
- Add a Form block (under the "Forms" category).
- In the block's settings (clicking the block), go to the Data tab.
- Connect it to your Softr Database and the
Dealstable. This form will create a newDealrecord on submission. - Configure the form fields to map to your database:
- Map the
Emailfield toDemo Request Email. - Map
NametoDemo Request First Name. - Add a
Last Namefield and map it toDemo Request Last Name. - Add a
Messagefield (and set it toLong text) and map it toDemo Request Message.
- Map the
- Add a Hidden Field (under "Form fields").
- Map it to
Demo Request Date. - Set its value to Current Date and Time.
- Map it to
- Finally, go to the block's Visibility settings and set it to Non-logged in users.
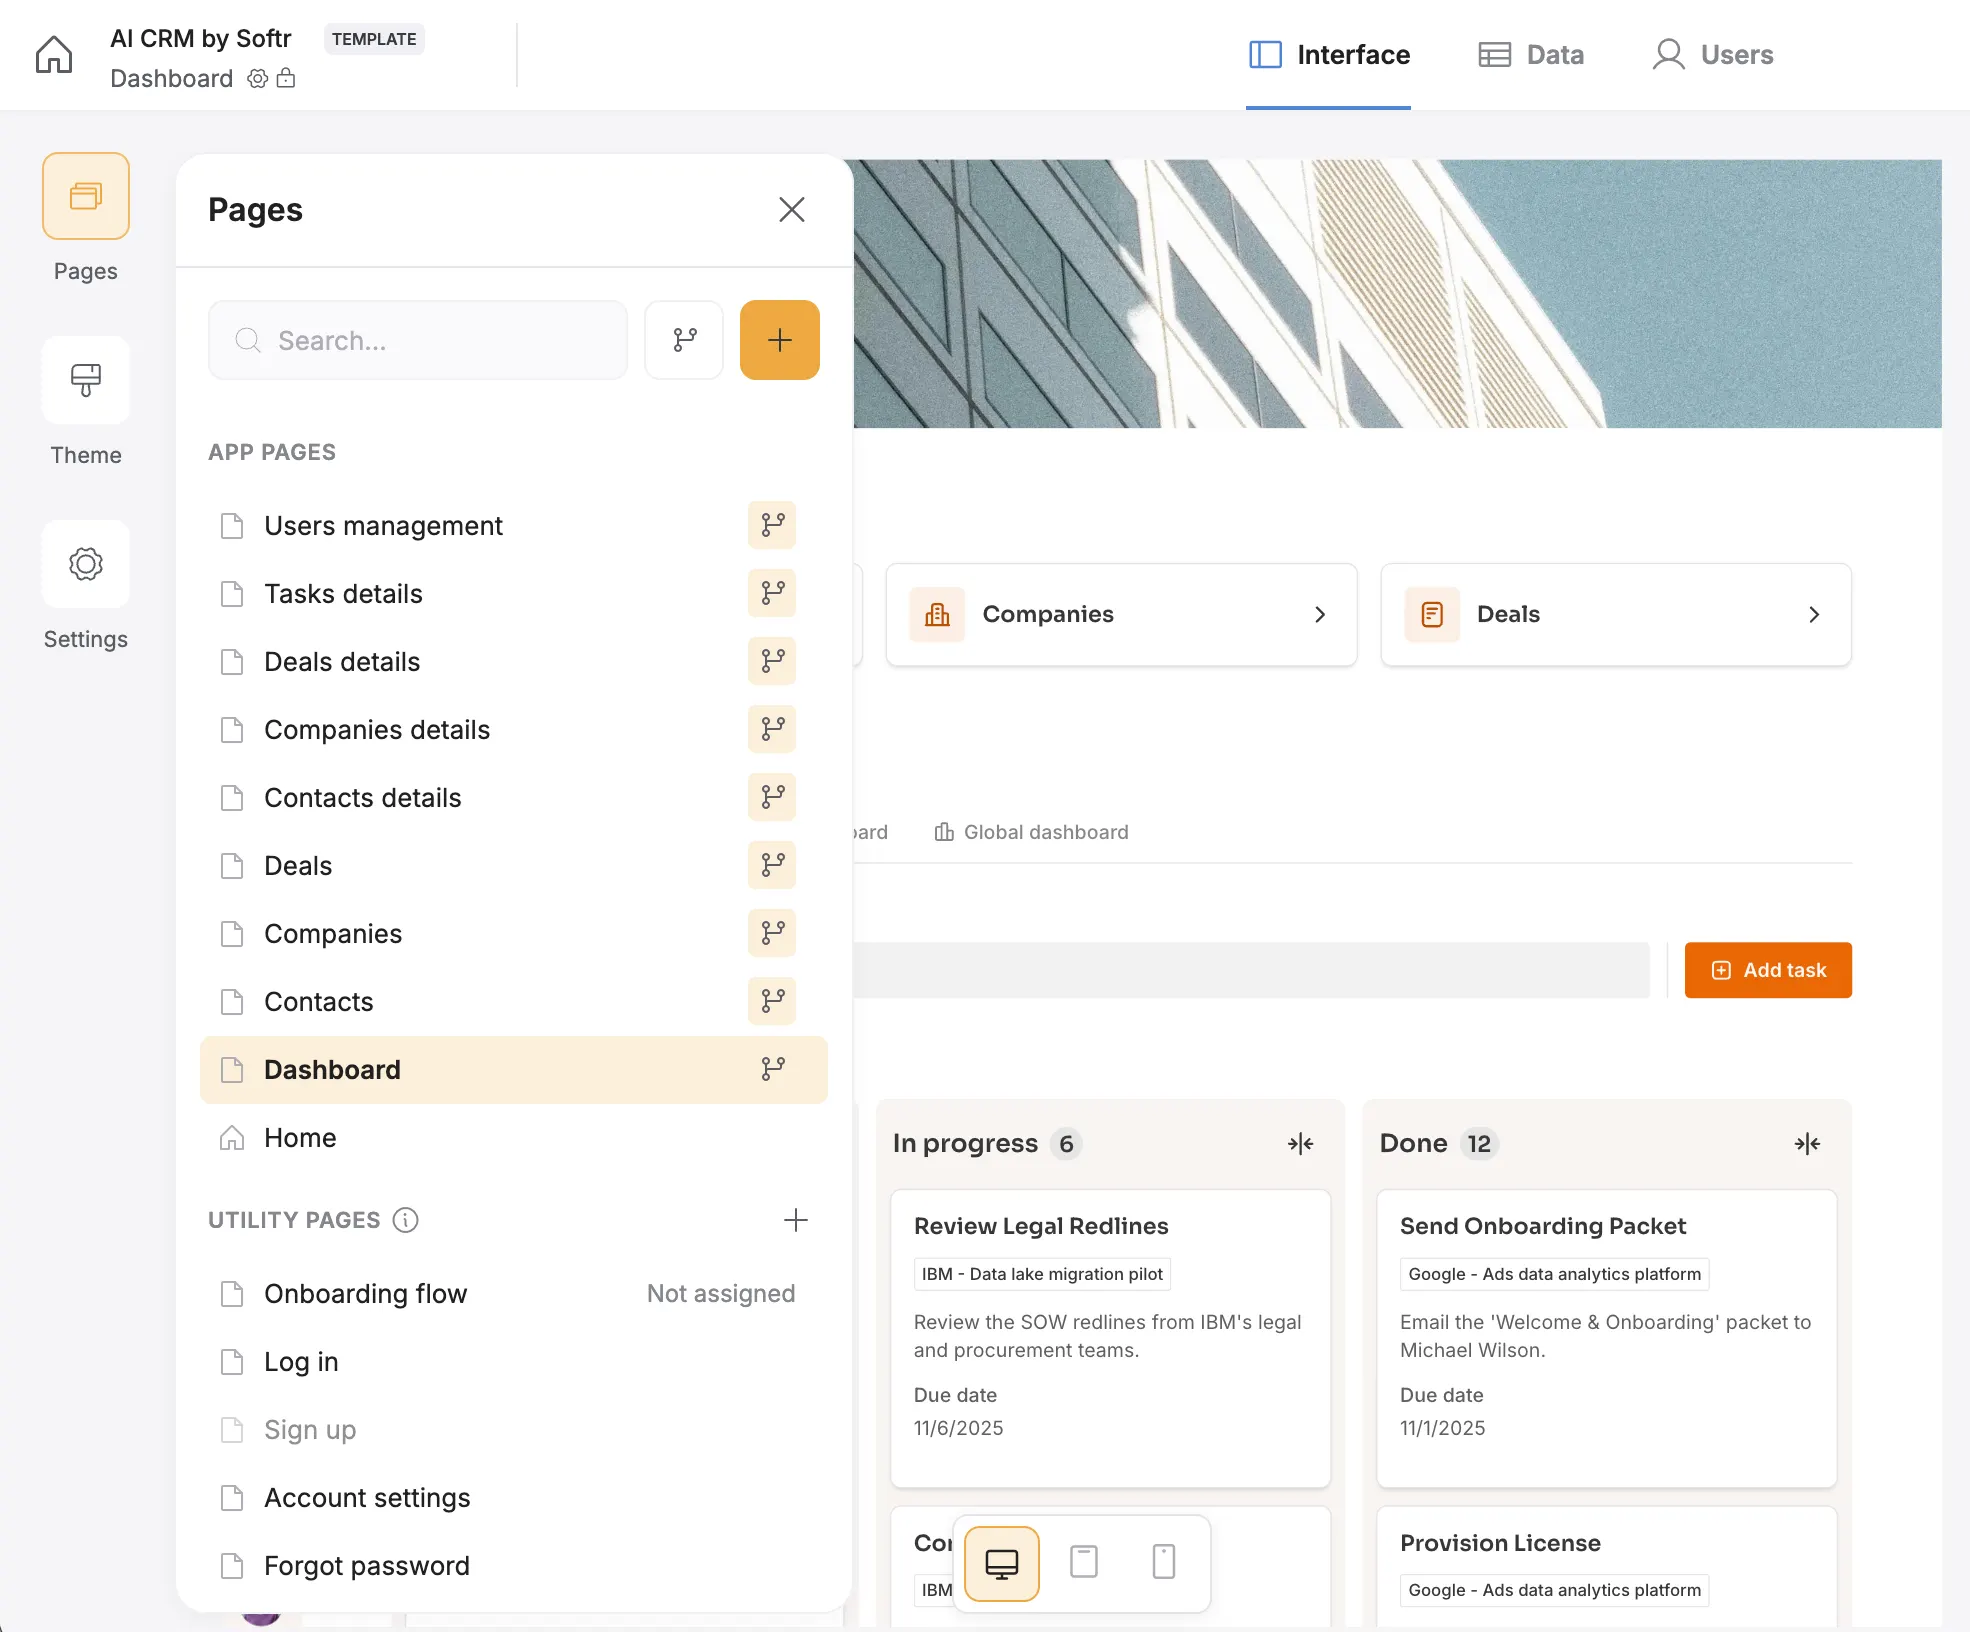
2.3. Build the internal dashboard and navigation

- Create a new page named App Home. In its Page Settings, set Visibility to Logged in users. This is now your secure, internal homepage.
- Add a Header block. In its settings, add links to the
Contacts,Companies, andDealspages (you'll need to create these blank pages first from the "Pages" panel). This will be your main app navigation. - Add Metric blocks (under "Charts & Metrics") to the page, or ask the AI Co-Builder to add a dashboard with the metrics you want and skip the manual setup.
- Connect one to the
Contactstable. Set the Value toContacts(or any field) and Aggregate to Count. This shows a live count of "Total Contacts." - Add another for
Companies(Count). - Add one for
Deals. Set Aggregate to Sum ofAmount. Add a filter:Deal Stageis not"Closed Won" ANDDeal Stageis not"Closed Lost". This creates a "Total Open Pipeline Value" metric.
- Connect one to the
2.4. Build the Deals pipeline (Kanban) and details page
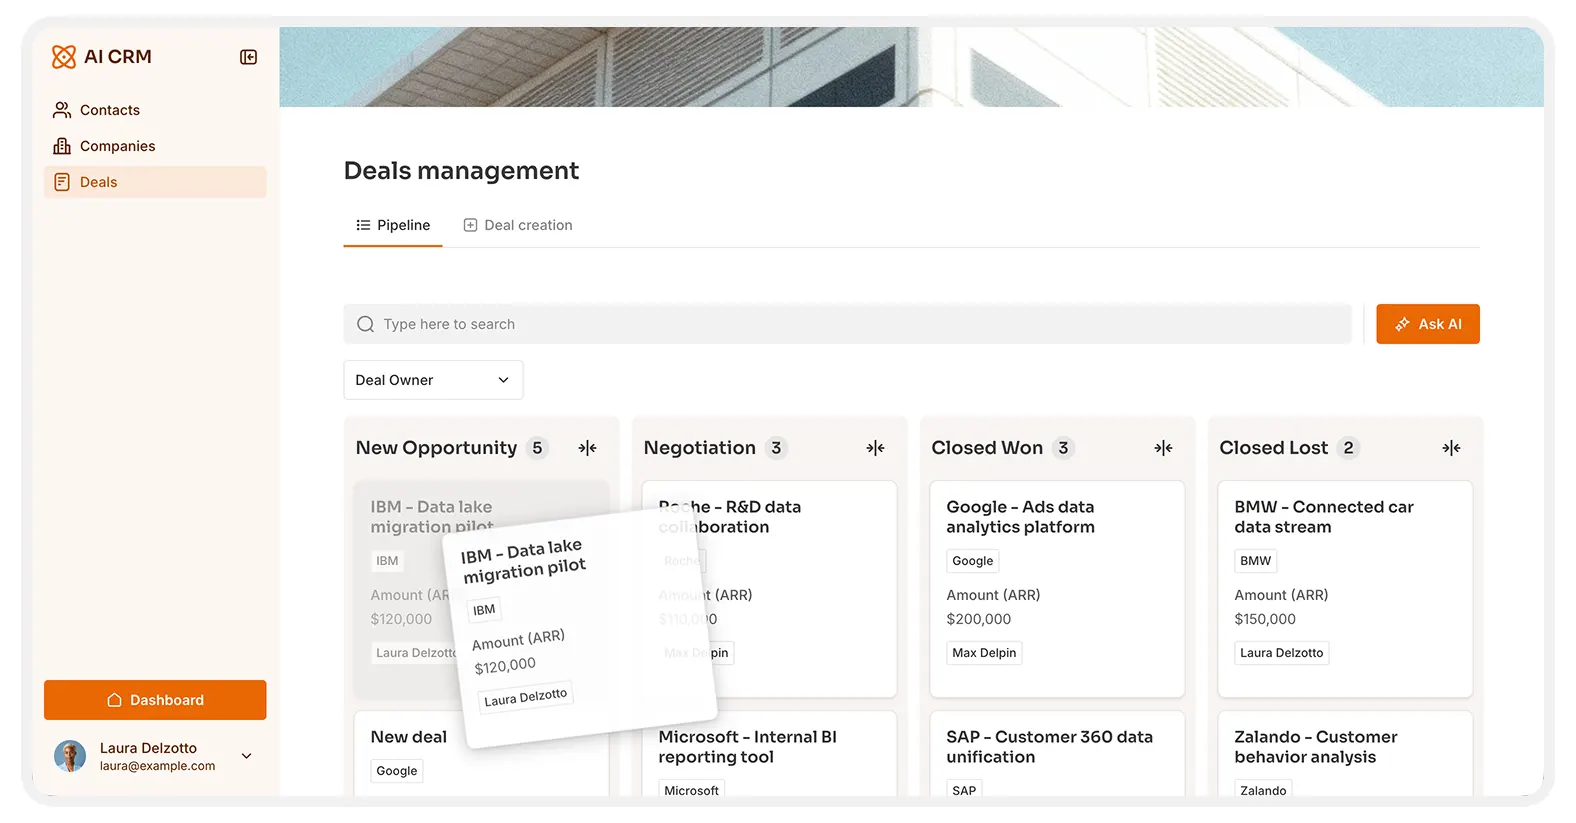
- Go to your "Deals" page.
- Add a Kanban block (under "Lists").
- Connect it to your
Dealstable. - In the Data tab, set the Group by option to your
Deal Stagefield. - Check the box for Enable Drag & Drop. This is a key feature: your sales reps can now visually move deals through the pipeline, and it updates the database instantly.
- Configure the Item On Click action to Open Detail Page. Select "Create New Page" and name it "Deal Details."
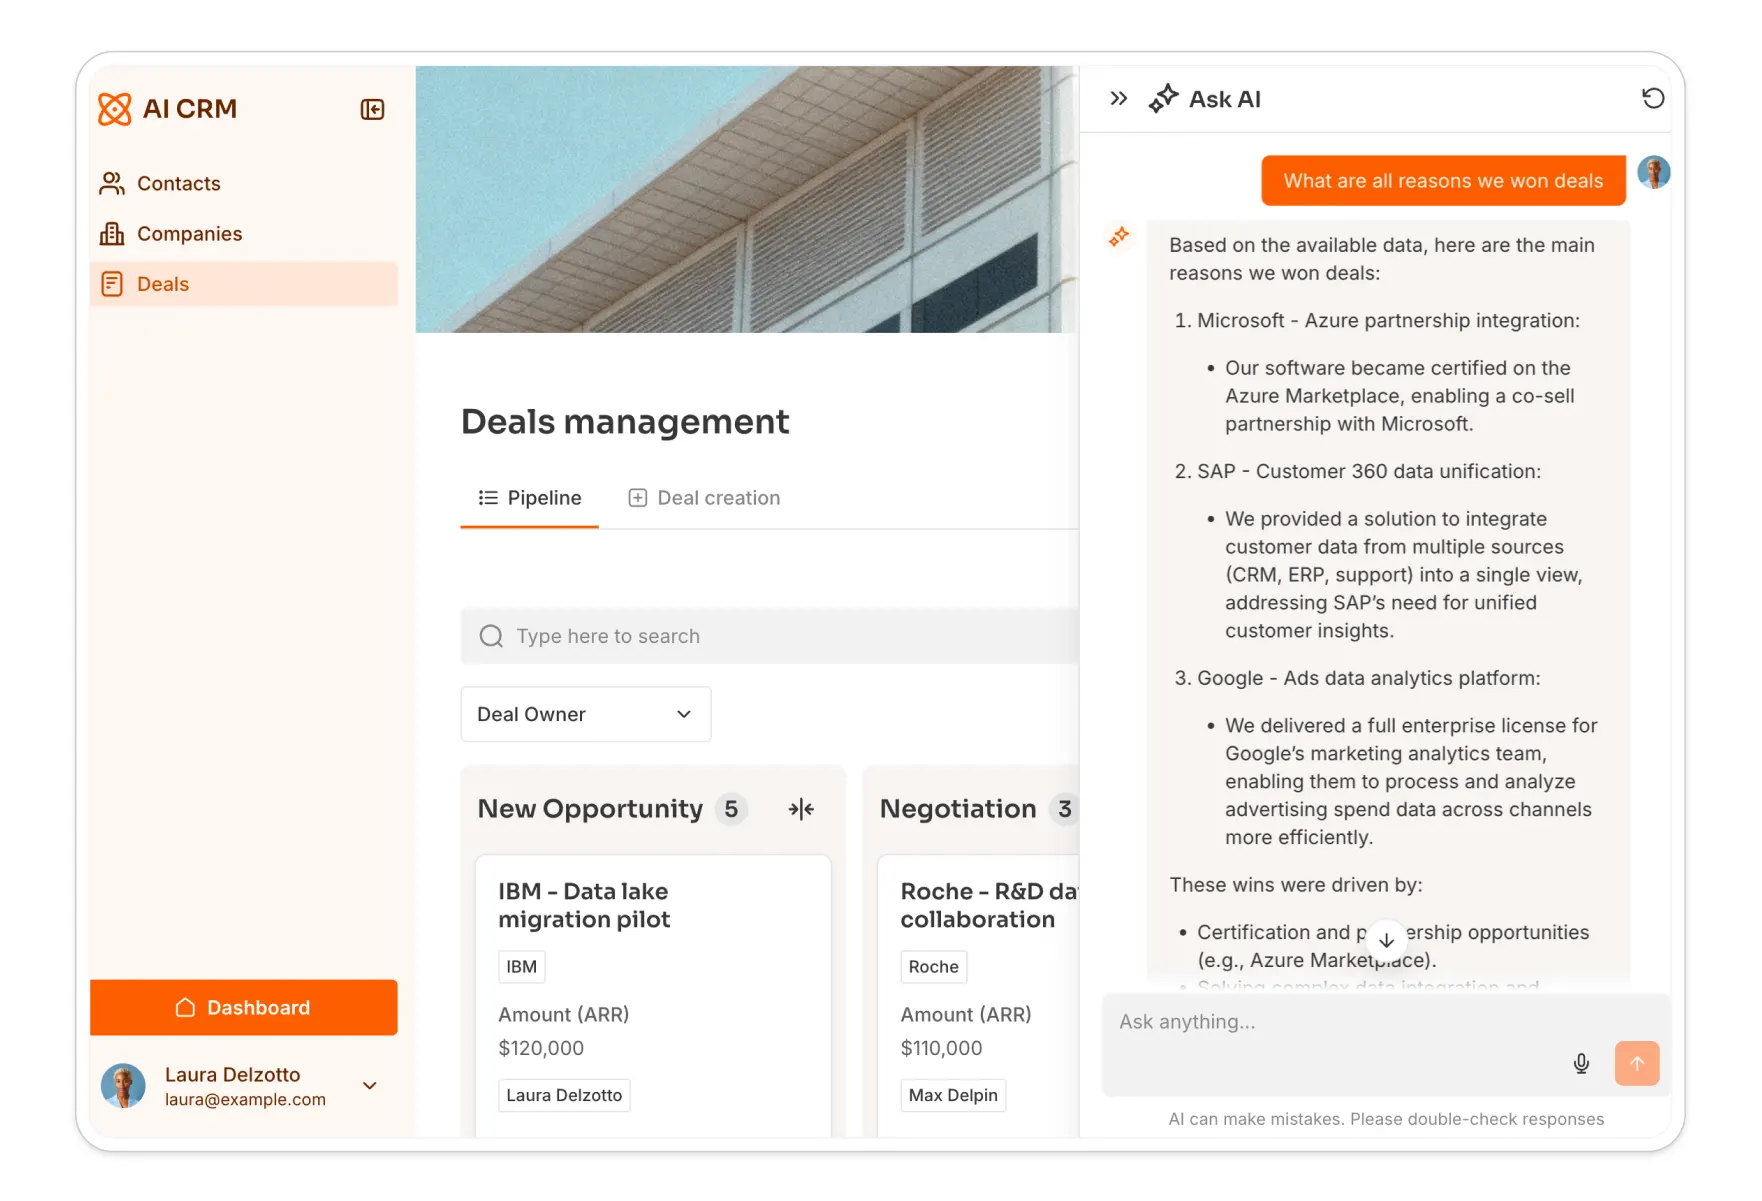
2.5. Add on-demand AI chat with Ask AI
This is where the CRM gets really smart. We'll add an AI assistant to our "Deal Details" page.
- Go to the "Deal Details" page Softr just created. You'll see a List Details block. Configure it to show key deal info (
Amount,Deal Owner,Company). - Add a Tabs block to organize related information. Create tabs for "Company," "Contacts," and "Interactions."
- In the Interactions tab, add a List block and connect it to the
Interactionstable. - This is important: add a Conditional Filter to the list block so it only shows relevant interactions.
Contact'sCompanyisCurrent Record'sCompany. (This complex filter links the interaction's contact, to that contact's company, and matches it to the deal's company).
- Activate AI Chat:
- On this
Interactionslist block, go to the Actions tab. - Find the Ask AI feature and toggle it ON.
- Customize the button text ("Ask AI") and the welcome message, e.g., "Ask me anything about the history of this deal."
- On this
Now, when a sales rep opens a deal, they can click "Ask AI" and have a direct conversation with the entire history of that deal's interactions. They can ask, "What was the main objection in our last meeting?" or "Summarize all emails from the CFO" and get an instant, accurate answer.
2.6. Build the Contacts and Companies pages
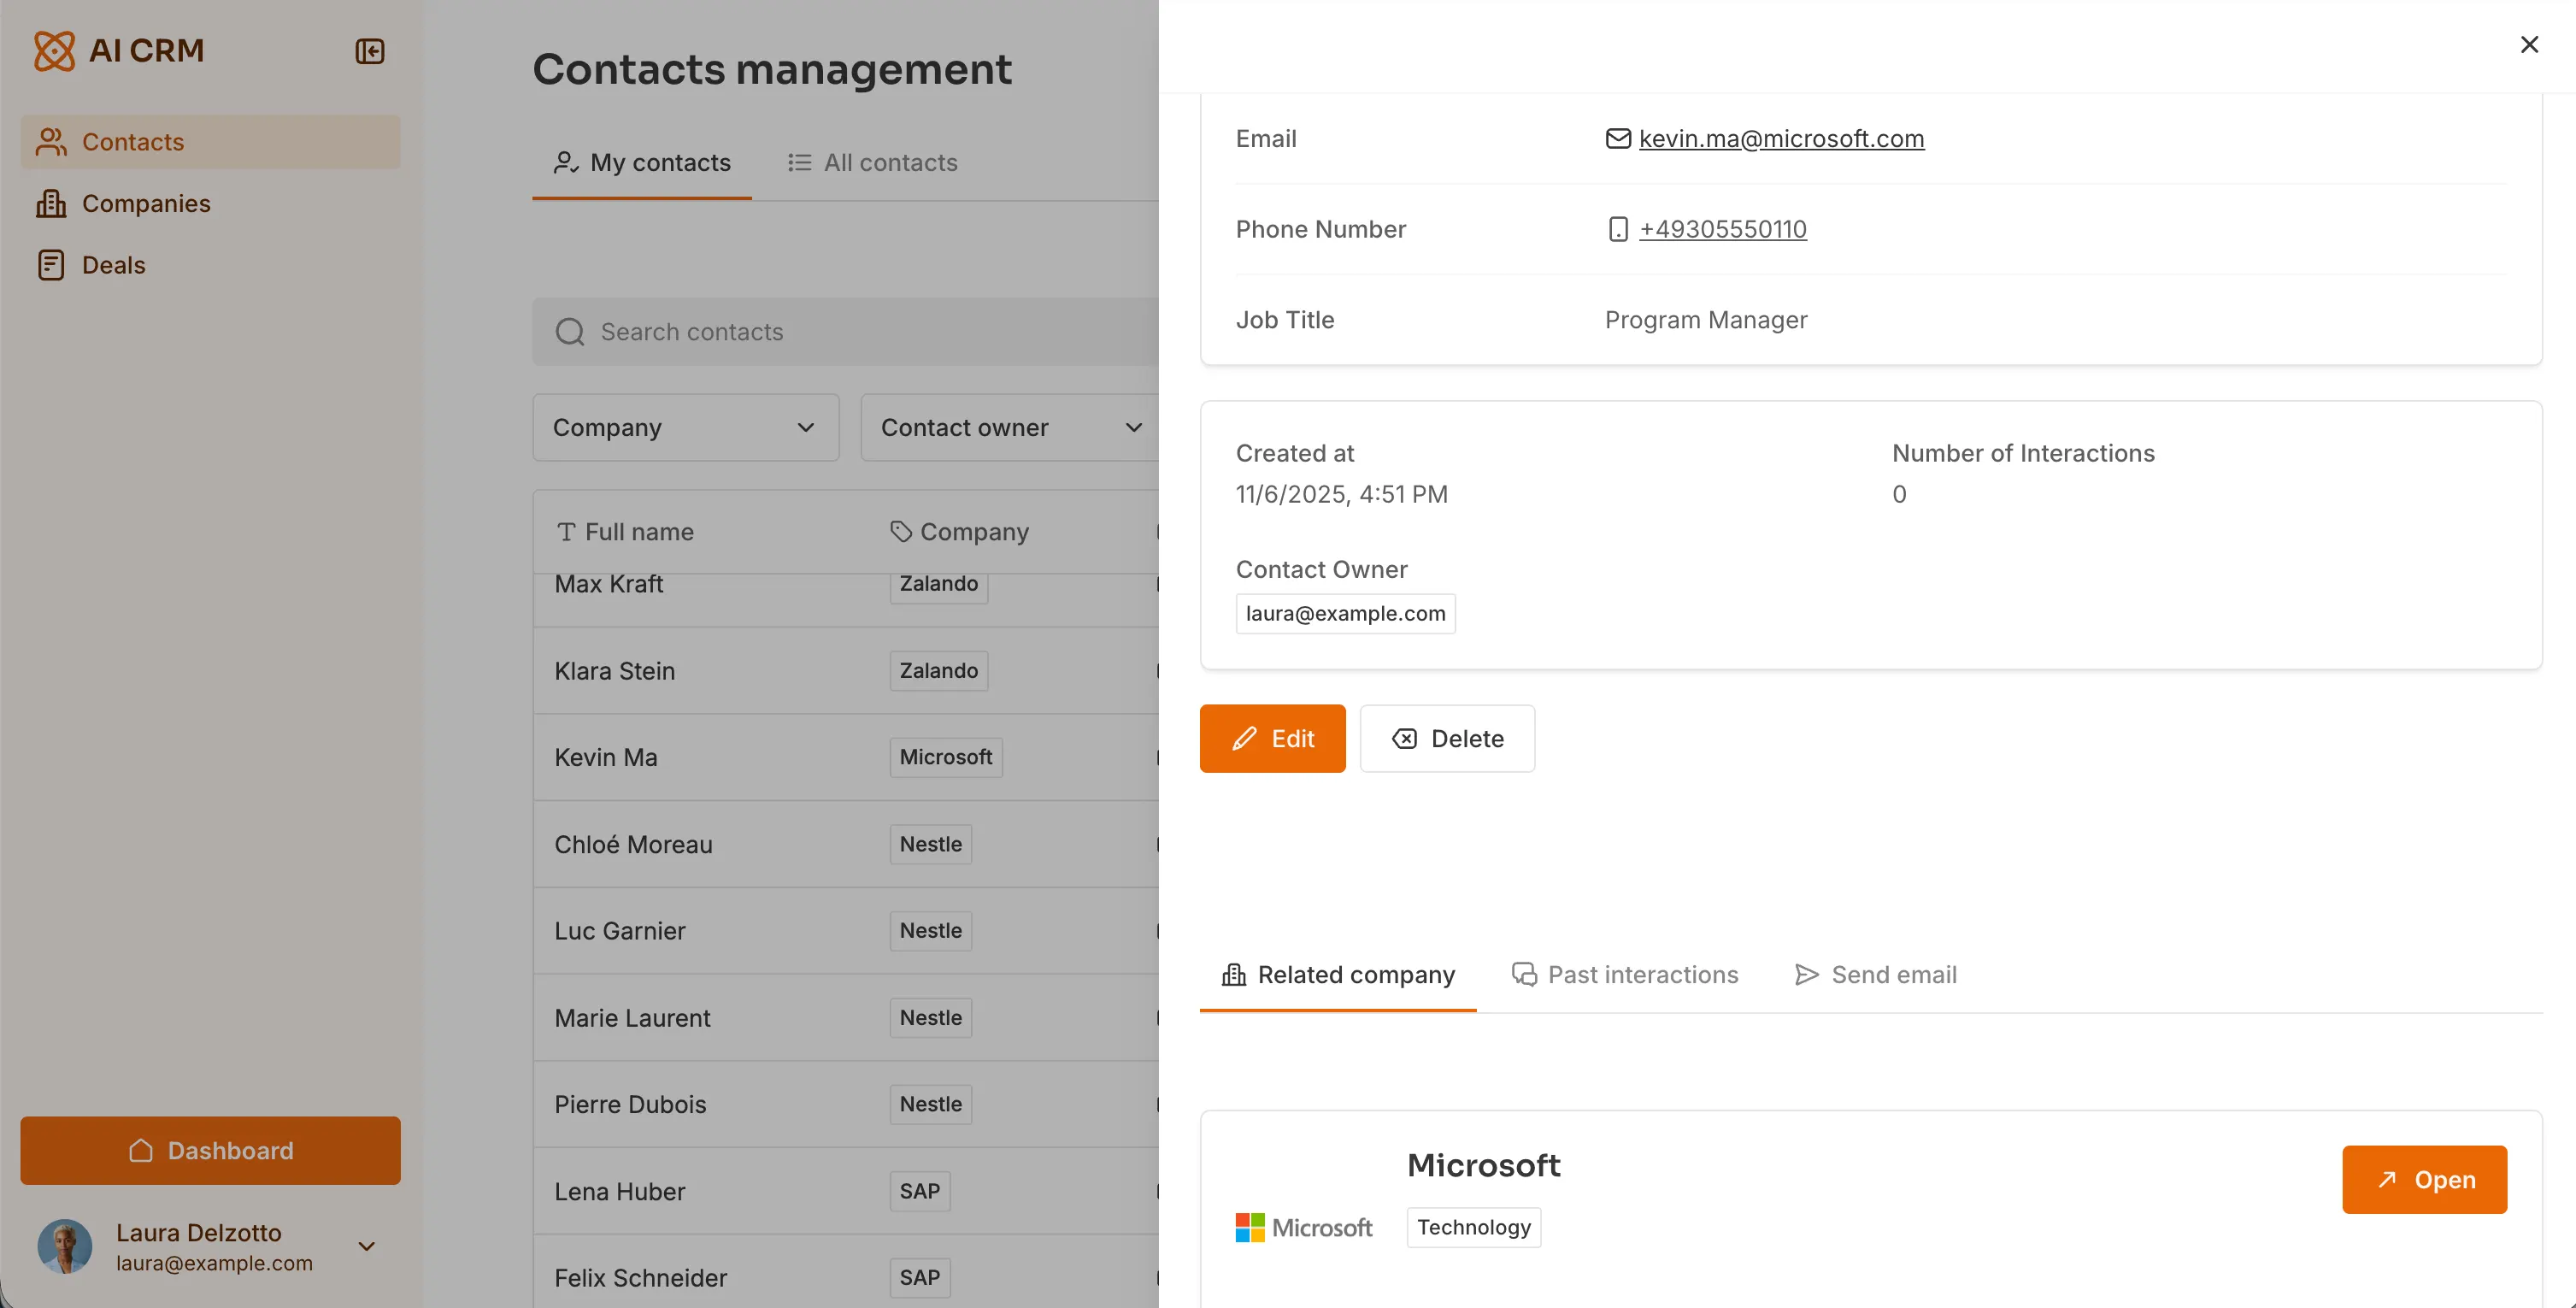
- On the "Contacts" page, add a Table block. Connect it to the
Contactstable. Configure the columns you want to see. Add filters (e.g., filter byContact Owner). - On the "Companies" page, add a Grid block. Connect it to the
Companiestable. - Create a "Company Details" page. On it, add a List Details block for the company info. Below that, add a Table block connected to
Contactsand add a Conditional Filter:CompanyisCurrent Record'sCompany Name. This creates a dynamic, filterable list of all contacts who work at that specific company.
Part 3: Automating your CRM with Softr Workflows
The interface is built; now let's make it smart. We'll build three automations using Softr Workflows to handle the app's logic. For each one, you can build the steps manually as shown below, or describe the automation to the Workflow AI Co-Builder and let it assemble the trigger and actions for you.
3.1. Workflow 1: Handle new demo requests
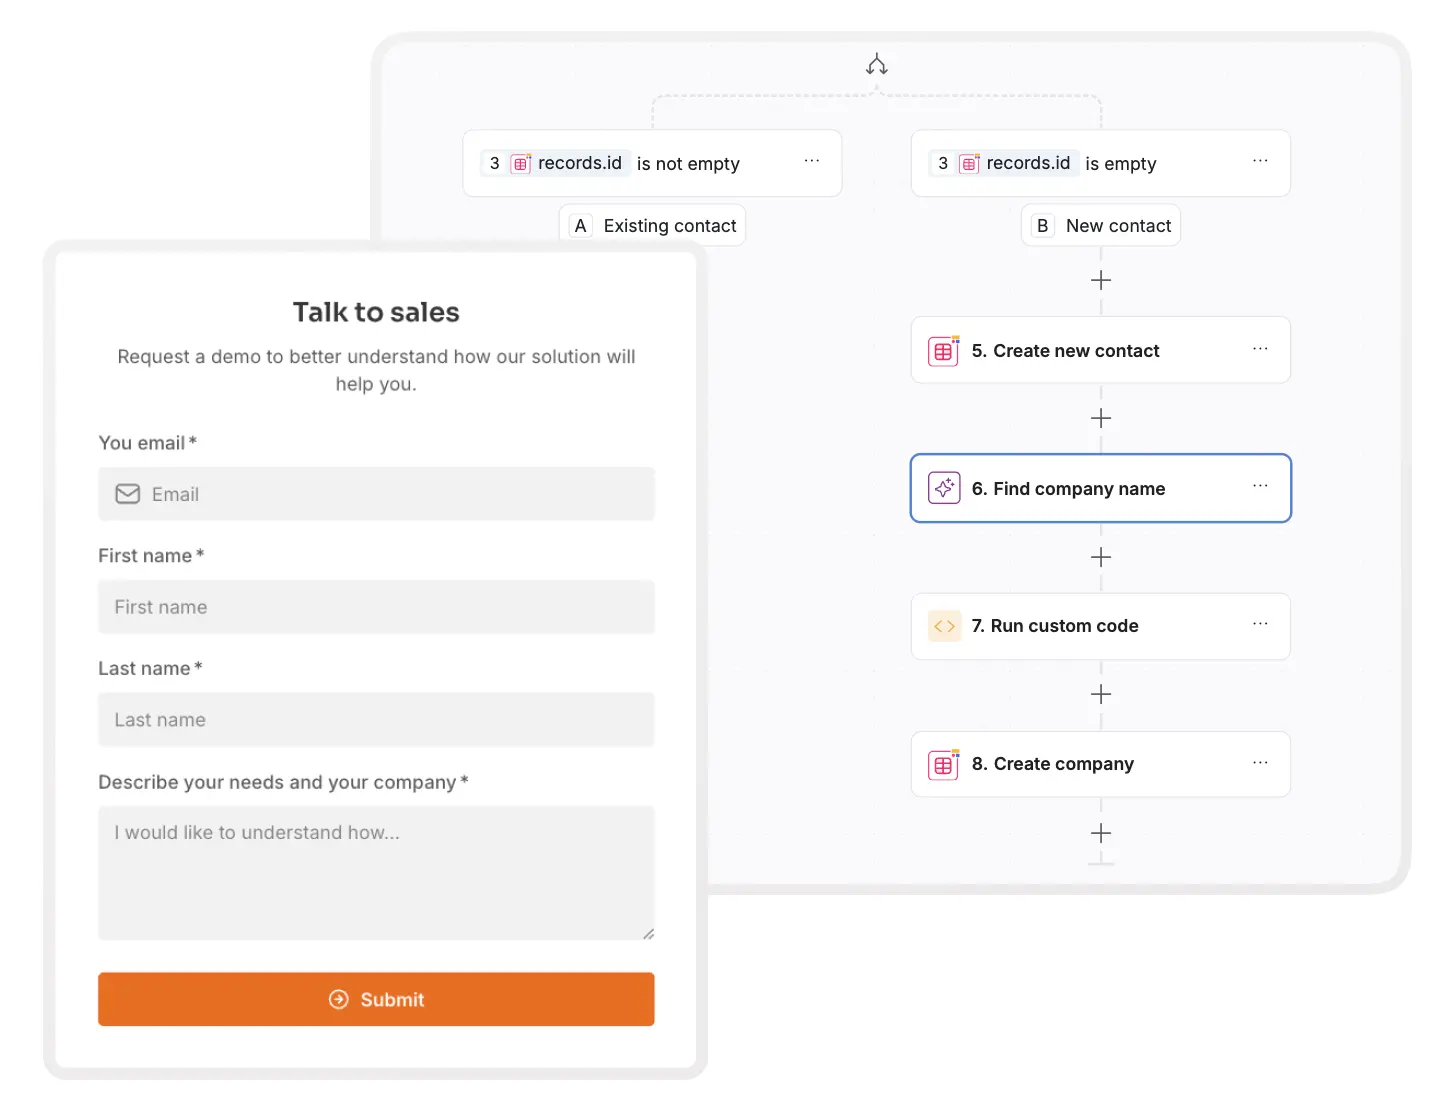
This workflow will run when a prospect fills out our public form. It will check if the contact exists, create them if not, find their company info using AI, and notify the team.
- Go to the Workflows tab in the top bar of the studio.
- Create a new workflow.
- Trigger: Select Record meets condition.
- Table:
Deals - Condition:
Demo Request Emailis not empty. (This isolates deals created by our form).
- Table:
- Action: Select Find multiple records (from the Softr Database actions).
- Table:
Contacts - Condition:
Emailis[Trigger's Demo Request Email]. (We are checking for duplicates).
- Table:
- Action: Add a Conditional Branch.
- If Branch (New Contact):
[Find Record's recordId]is empty.- Action: Create record in
Contacts. MapEmail,First Name,Last Namefrom the trigger'sDealrecord. - Action: AI Custom Prompt (under "AI"). Prompt:
Based on the domain of [Trigger's Email], strictly return the company name.Enable Web Search. - Action: Create record in
Companies. MapCompany Namefrom the AI step's output. You can also link the newly createdContacthere.
- Action: Create record in
- Else Branch (Existing Contact): (You could add an action here to link the existing contact to the new deal, but for now, we'll leave it).
- If Branch (New Contact):
- Action (after the branch): Post to Slack.
- Message: "New demo request from
[Trigger's Demo Request Email]! :tada:"
- Message: "New demo request from
3.2. Workflow 2: Send emails from the app
This lets reps send an email from a contact's page and logs the interaction.

- Prep: On your "Contact Details" page, add a Form block. Configure it to create a new record in the
Interactionstable. Add fields forEmail SubjectandEmail Body. Add a Hidden Field forEmail to send?and set its value totrue. - Workflow Trigger: Record meets condition.
- Table:
Interactions - Condition:
Email to send?is checked (true).
- Table:
- Action: Send Email (a native Softr action).
- To:
[Trigger's Contact Email] - Subject:
[Trigger's Email Subject] - Body:
[Trigger's Email Body] - Reply-to:
[Trigger's User Email](This pulls the logged-in sales rep's email).
- To:
- Action: Update record.
- Table:
Interactions - Record ID:
[Trigger's Record ID] - Action: Update the
Contentfield with theEmail SubjectandEmail Bodyto create a permanent log of the sent message.
- Table:
3.3. Workflow 3: On-demand AI deal summary
This workflow is the "summarize" button we saw. It's triggered by a user, scans all interactions, and updates the deal with an AI summary. As Guillaume Duvernay puts it:
"A single action button can trigger a custom workflow that runs AI analysis over past interactions, giving sales reps an instant history briefing."
- Prep: On the "Deal Details" page, add a Button block. Set its action to Run Custom Workflow. Create a new workflow and pass the
Record IDof the deal. - Workflow Trigger: Run Custom Workflow.
- Action: In the trigger settings, enable Show waiting screen. This gives the user feedback while the AI works.
- Action: Find record.
- Table:
Deals - Record ID:
[Trigger's Deal ID].
- Table:
- Action: Find multiple records.
- Table:
Interactions - Condition:
Companyis[Find Deal's Company]. (Finds all interactions for this deal's company).
- Table:
- Action: AI Custom Prompt.
- Prompt: "You are a sales assistant. Summarize the following interactions:
[Find Interactions' Content]... Also take into account the initial demo request:[Find Deal's Demo Request Message]... Return 3 bullet points on the deal's status, progress, and next steps."
- Prompt: "You are a sales assistant. Summarize the following interactions:
- Action: Update record.
- Table:
Deals - Record ID:
[Trigger's Deal ID] - Action: Set the
Interaction Digestfield to the[AI Prompt's Result].
- Table:
- Action: In the trigger's On Success settings, choose Reload Page to show the new summary.
Your app is live
You've built a full-stack, AI-powered CRM: a Softr Database structured around contacts, companies, and deals, an interface with dashboards and a drag-and-drop pipeline, user permissions that keep Admins and Sales Reps seeing exactly what they should, database AI agents that enrich company data automatically, and Softr Workflows that handle lead intake, emails, and deal summaries without any manual work.
If you'd rather start from something pre-built, copy and personalize our AI CRM template or the simpler Sales CRM template.
From here, keep expanding: add a new field, a new automation, or a new user group as your sales process evolves. You can make each change visually or describe it to the AI Co-Builder, without rebuilding what already works.
Frequently asked questions
- What is a CRM?
- How to build a CRM from scratch?
- How can AI automate data entry in my CRM?
- Why is Softr the best platform to build a CRM?
- What are the benefits of building a custom AI CRM over buying one?