

This guide will walk you through the entire process of building an application in Softr: a fully customizable client portal powered by your own business data. By the end of this article, you'll have a live, working portal that you can share with your clients. If you prefer a video tutorial format, you can access the full course at this link on the Softr Academy.
Whether you're completely new to building or already familiar with other no-code tools, this step-by-step tutorial will make the process clear and manageable.
What is Softr and how does it help building portals for your customers?
Simply put, Softr is a powerful AI-powered business app creation platform that lets you build portals and internal tools using your existing business data. You can start with Softr's native databases for the best performance and ease of implementation, or connect to external tools like Airtable, Google Sheets, HubSpot, Notion, and many more. You'll be able to customize the layout, logic, and design without writing a single line of code.
What you'll learn in this client portal tutorial
- Customization: Learn how to customize your portal for specific client needs, whether you're managing documents, tracking projects, or handling billing.
- Advanced Permissions: Control exactly what each client sees. You can build one portal for multiple clients, with each seeing only the information that matters to them.
- Data Integration: Bring all your data and tools into one easy-to-use interface, so your clients won't have to juggle multiple spreadsheets or platforms.
To follow along, all you'll need is a free Softr account. We'll be using Airtable as the data source in this tutorial, so a free Airtable account will also be handy—though note that you could build the exact same app using Softr's native databases for extra performance and a more streamlined setup. Once you have those, you're all set. Let's get started!
Who’s this app for?
This application is designed as a client portal, primarily for service-based businesses that manage projects, tasks, and billing for their clients. A key example used throughout the course is a marketing agency.
Other types of companies that could benefit include:
- Consulting firms
- Design and development agencies
- Legal firms
Or any business that requires a dedicated, secure space for client collaboration and information sharing.
User groups and jobs to be done for client portals
There are two primary user groups defined in the application: Admins (the agency/company staff) and Clients.
Admins can:
- View all projects, clients, and invoices in the system.
- Create, edit, and delete projects.
- Create, edit, delete, and assign tasks to projects and users.
- Add new clients to the system.
- Create, edit, and delete invoices.
- View a dashboard with all open projects and client invoices.
- Manage team members and their skills.
Clients can:
- View only the projects, tasks, and files that are assigned to them or their company.
- View and comment on tasks within their projects.
- Add new tasks for the agency.
- Upload files related to their projects.
- View their invoices.
- See a personalized dashboard with their company info, assigned projects, and unpaid invoices.
The app’s core structure
The application will consist of the following pages:
- Utility pages: Sign Up / Sign In / Reset Password / User settings
- Homepage / Dashboard (with different views for Admins and Clients)
- Projects (a list of all projects)
- Project Details (a detailed view of a single project)
- Tasks (a list of tasks, often displayed on the Project Detail page)
- Task Details (a modal/pop-up view for a single task with commenting)
- Clients (a list of all clients, visible to admins)
- Client Details (a detailed view of a single client)
- Invoices (a list of all invoices for admins, and project-specific invoices for clients)
- Project Files (a modal/pop-up showing files for a specific project)
The app's data is organized into 6 interconnected tables to manage clients, projects, and communication efficiently.
- Users: Stores information for everyone who can log in. The most important field is User Role (Admin or Client), which controls what each person can see and do in the app. Users are also linked to a Company.
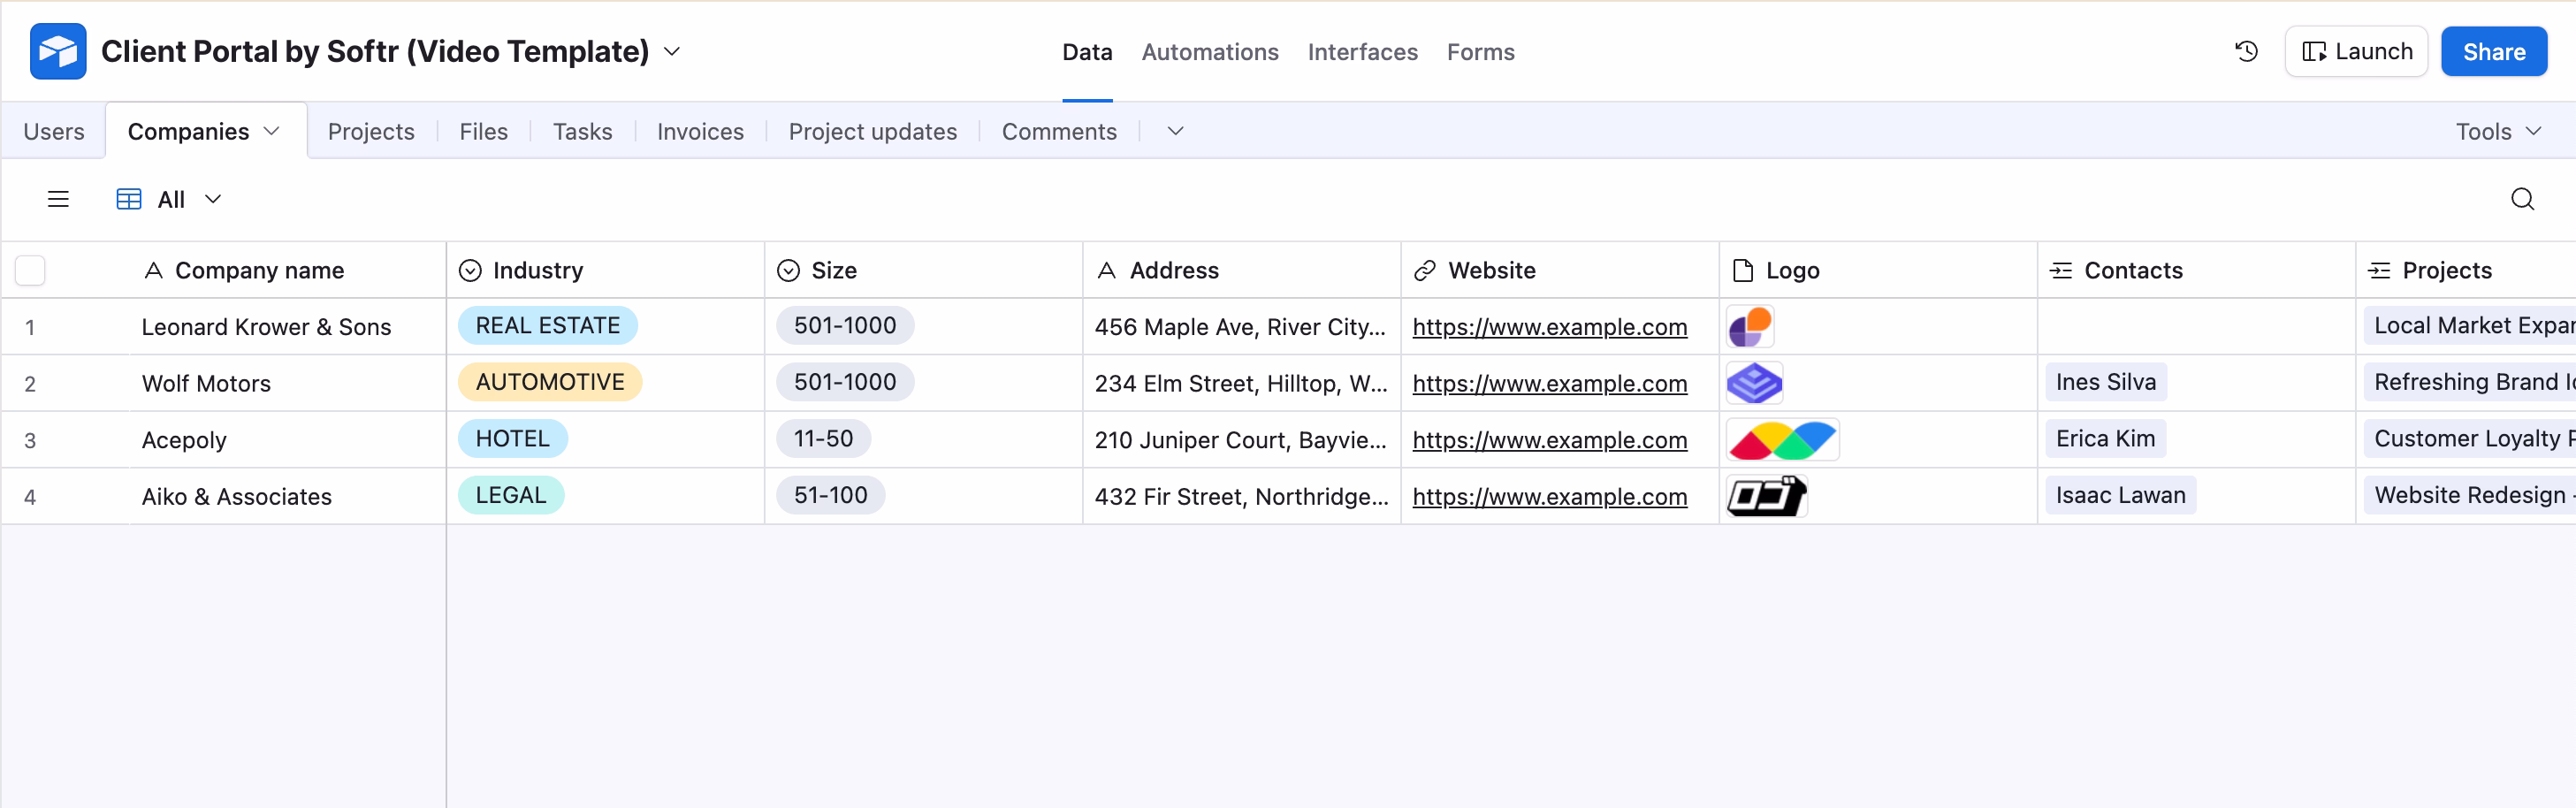
- Companies: Represents the client businesses. This table holds general details like Company Name and Industry to help admins categorize and manage their clients.
- Projects: Tracks all the work being done for clients. Key properties include the project's Status (e.g., To Do, In Progress) and links to the associated Company and the specific Project Members (users) involved.
- Tasks: Breaks down large projects into smaller, manageable action items. Each task is linked to a Project and an Assignee, and has its own Status and Deadline to keep work on track.
- Files: A central place for storing and sharing important documents. Files are linked to a specific Project, ensuring that clients can only access documents relevant to them.
- Invoices: Manages all billing information. Each invoice has a Status (e.g., Unpaid, Paid), an Amount, and is linked to both a Project and a Company for clear accounting.
Part 1: Structuring your database in Airtable
Every great application starts with a well-structured database. For this build, we'll use Airtable as our data source—but keep in mind you could build the exact same app entirely within Softr's native databases, which offer superior performance and tighter integration with the platform.
1.1. Create your Airtable base and tables
- Start with a new, blank base in Airtable.
- The first table will be our user table. Rename the default table from "Table 1" to "Users".
- Create a second table from scratch and name it "Company". This will store information about your clients.
- Create a third table and name it "Projects".
1.2. Configure the "Users" table
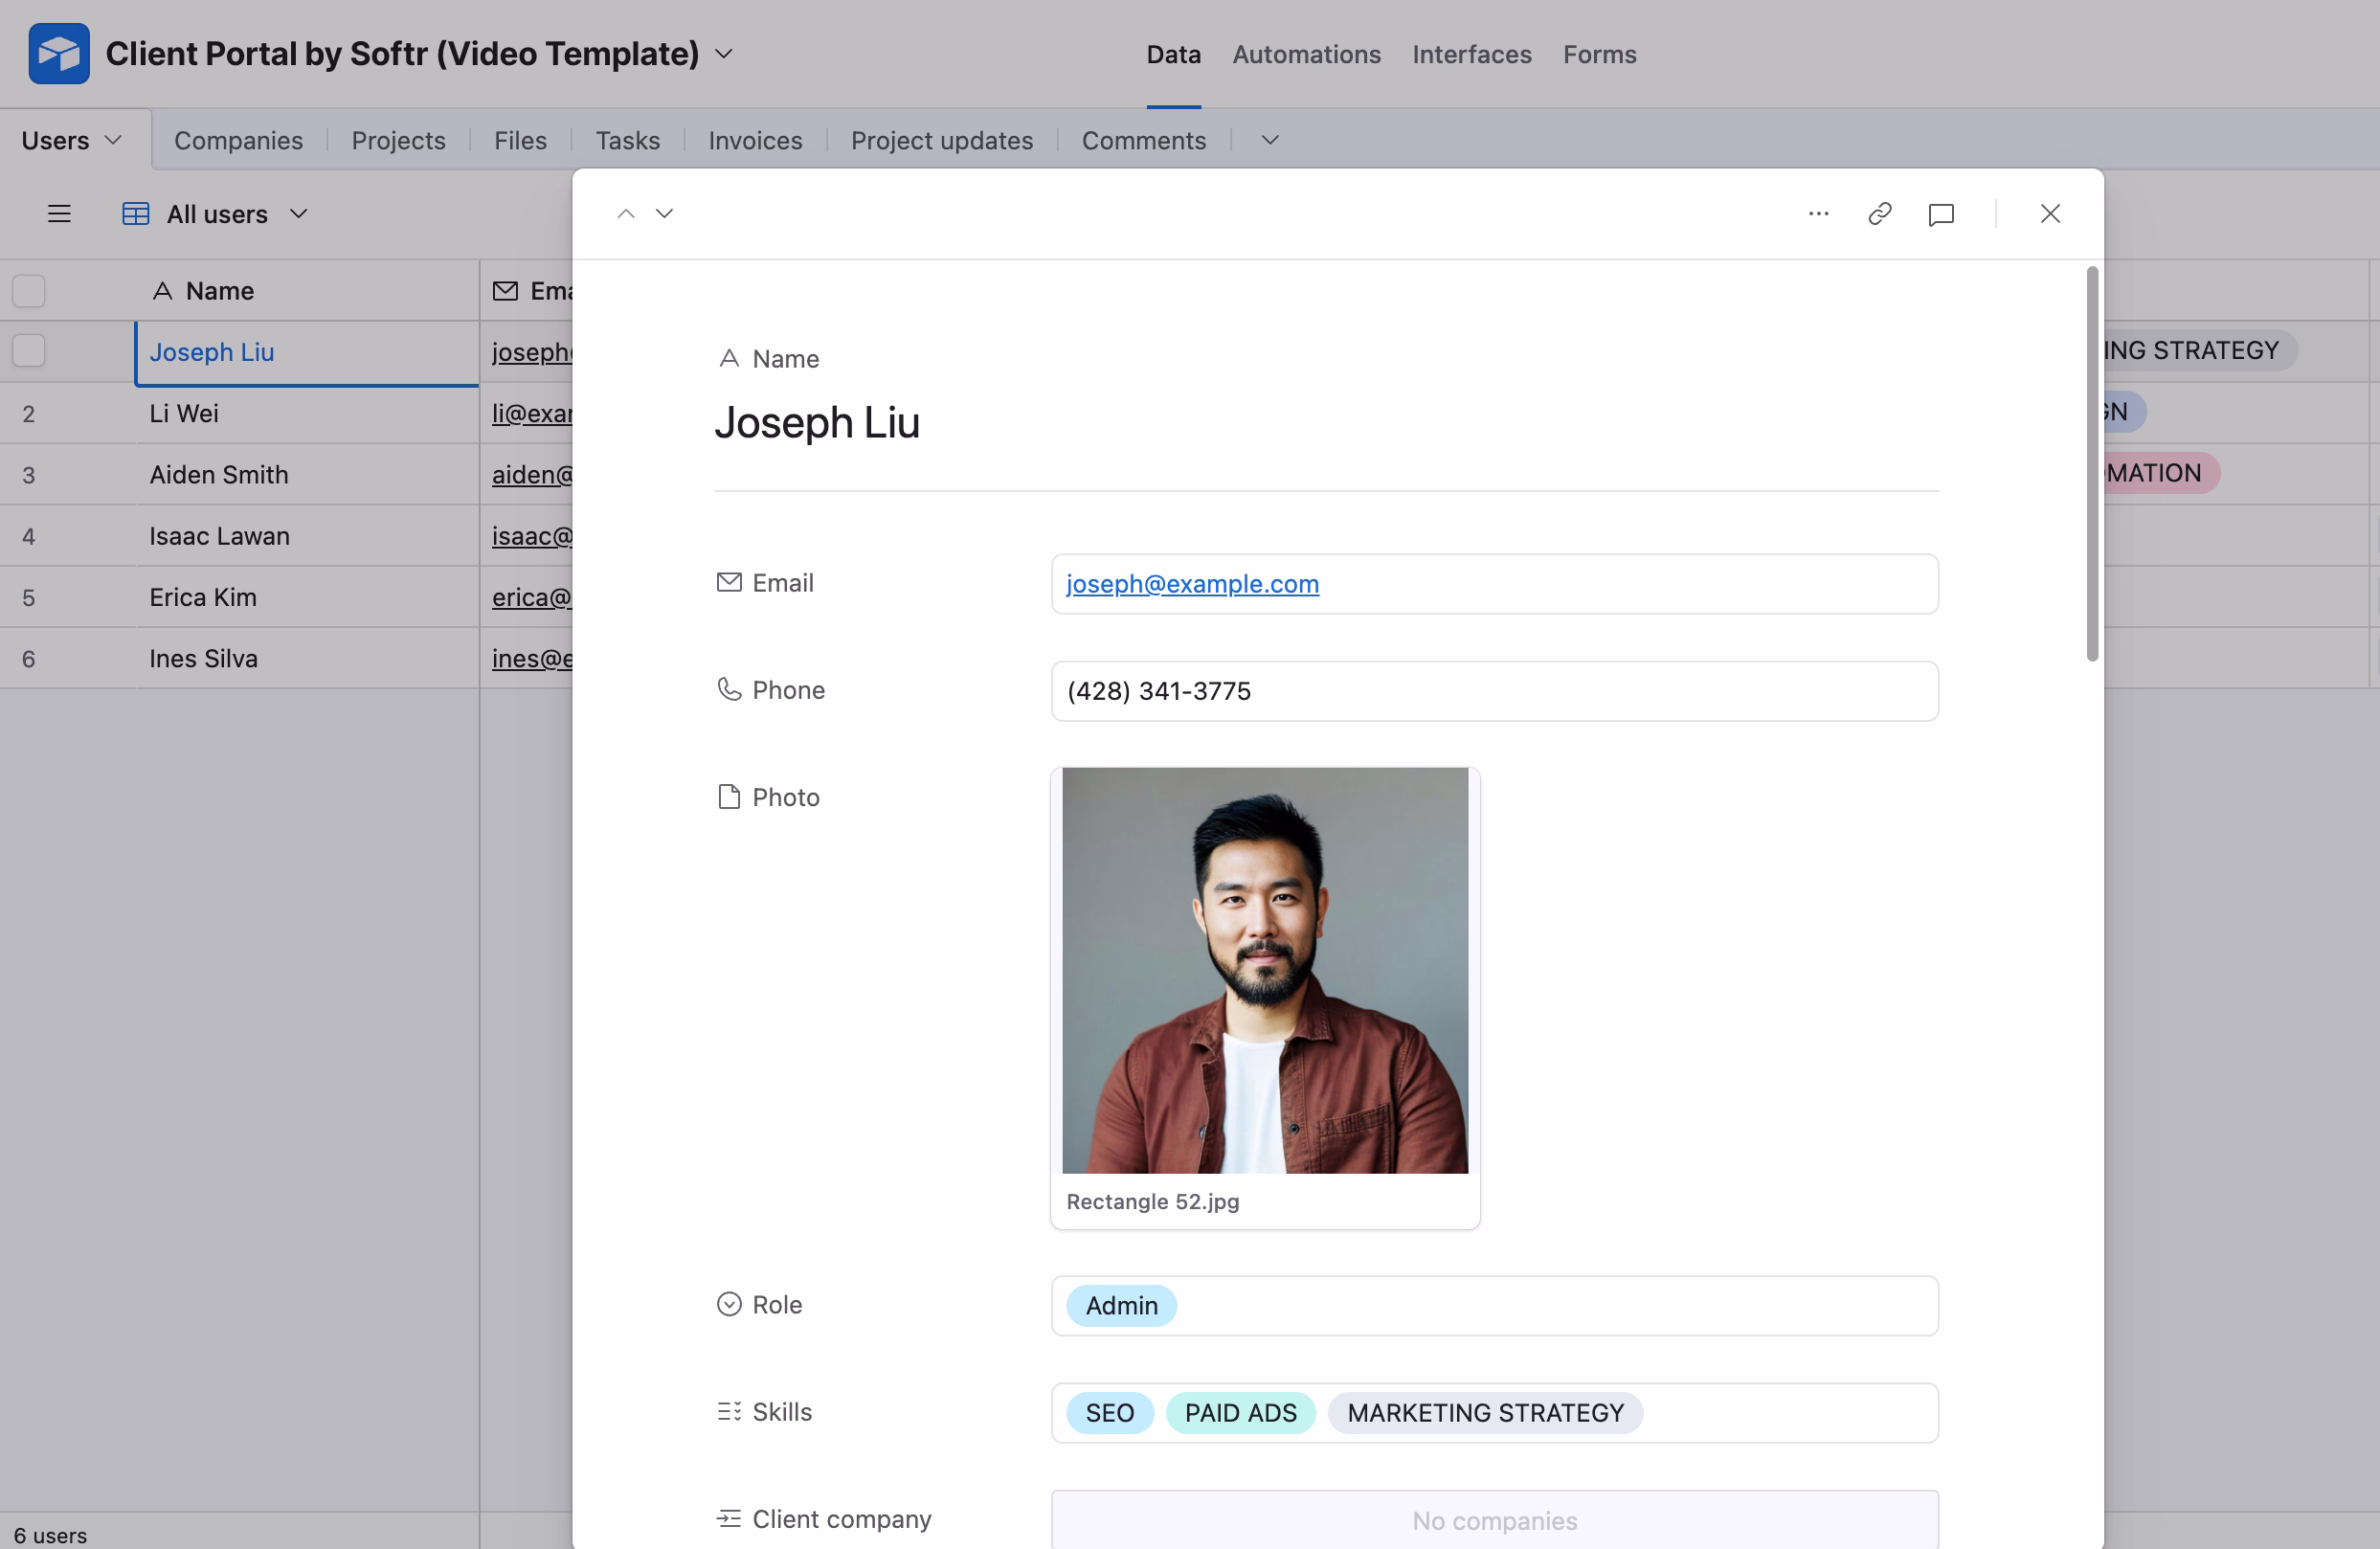
Within each table, columns are called fields. Each field has a specific format type that tells the database what kind of data it's holding.
- Name: This field should be a
Single line texttype. - Photo: Create a new field named "Photo". Set its type to
Attachment. This will be for user headshots. - Email: Rename an existing field to "Email" and change its type to
Email. - Phone: Create a "Phone" field with the
Phone numbertype. - User Role: This is a crucial field for setting permissions.
- Rename a field to "User Role".
- Set the type to
Single select. - Create two options: Client and Admin. This will allow us to show a different experience to clients versus internal admins.
- Skills: This field is for internal use (e.g., matching an admin's skills to a client's needs).
- Create a "Skills" field.
- Set the type to
Multi-select. - Add skills relevant to your agency, such as "SEO," "Paid Ads," "Branding," etc.
- Company Link: We need to link users to their respective companies.
- Create a new field.
- Set the type to
Link to another recordand select the Company table. This creates a relationship between a user and their company.
1.3. Configure the "Company" table
- Company Name: The primary field, a
Single line texttype. - Industry: Set this up as a
Single selectfield with options like "Real Estate," "Automotive," "Legal," etc. - Size of Company: Another
Single selectfield with ranges like "0-50," "50-100," etc. - Logo: An
Attachmentfield for the company's logo. - Projects Link: Link companies to their projects. Create a field with the type
Link to another recordand connect it to the Projects table. Allow linking to multiple records.
1.4. Configure the "Projects" table
- Project Name: A
Single line textfield. - Project Description: Use a
Long textfield. - Status: A
Single selectfield with options like "To Do," "In Progress," and "Done." - Company: This field links a project to a specific client company.
- Set the type to
Link to another record. - Select the Company table.
- Ensure "Allow linking to multiple records" is turned off, as a project typically belongs to one company.
- Set the type to
- Cover Image: An
Attachmentfield for a project-specific image. - Project Members: A field of type
Link to another recordconnected to the Users table. Allow linking to multiple records.
With your database structure in place, you can add some sample data to each table to help with the build process.
Part 2: Creating your first Softr application
Now that our data is structured, it's time to build the front end in Softr.
2.1. Start a new application
- From your Softr dashboard, you have three options: Start from scratch, Create an app from data, or Build an entire app with just AI.
- For this course, we will Start from scratch.
- Click "Create Application." You are now in the Softr studio!
2.2. Connect your data source
The first step inside the studio is to connect your Airtable database.
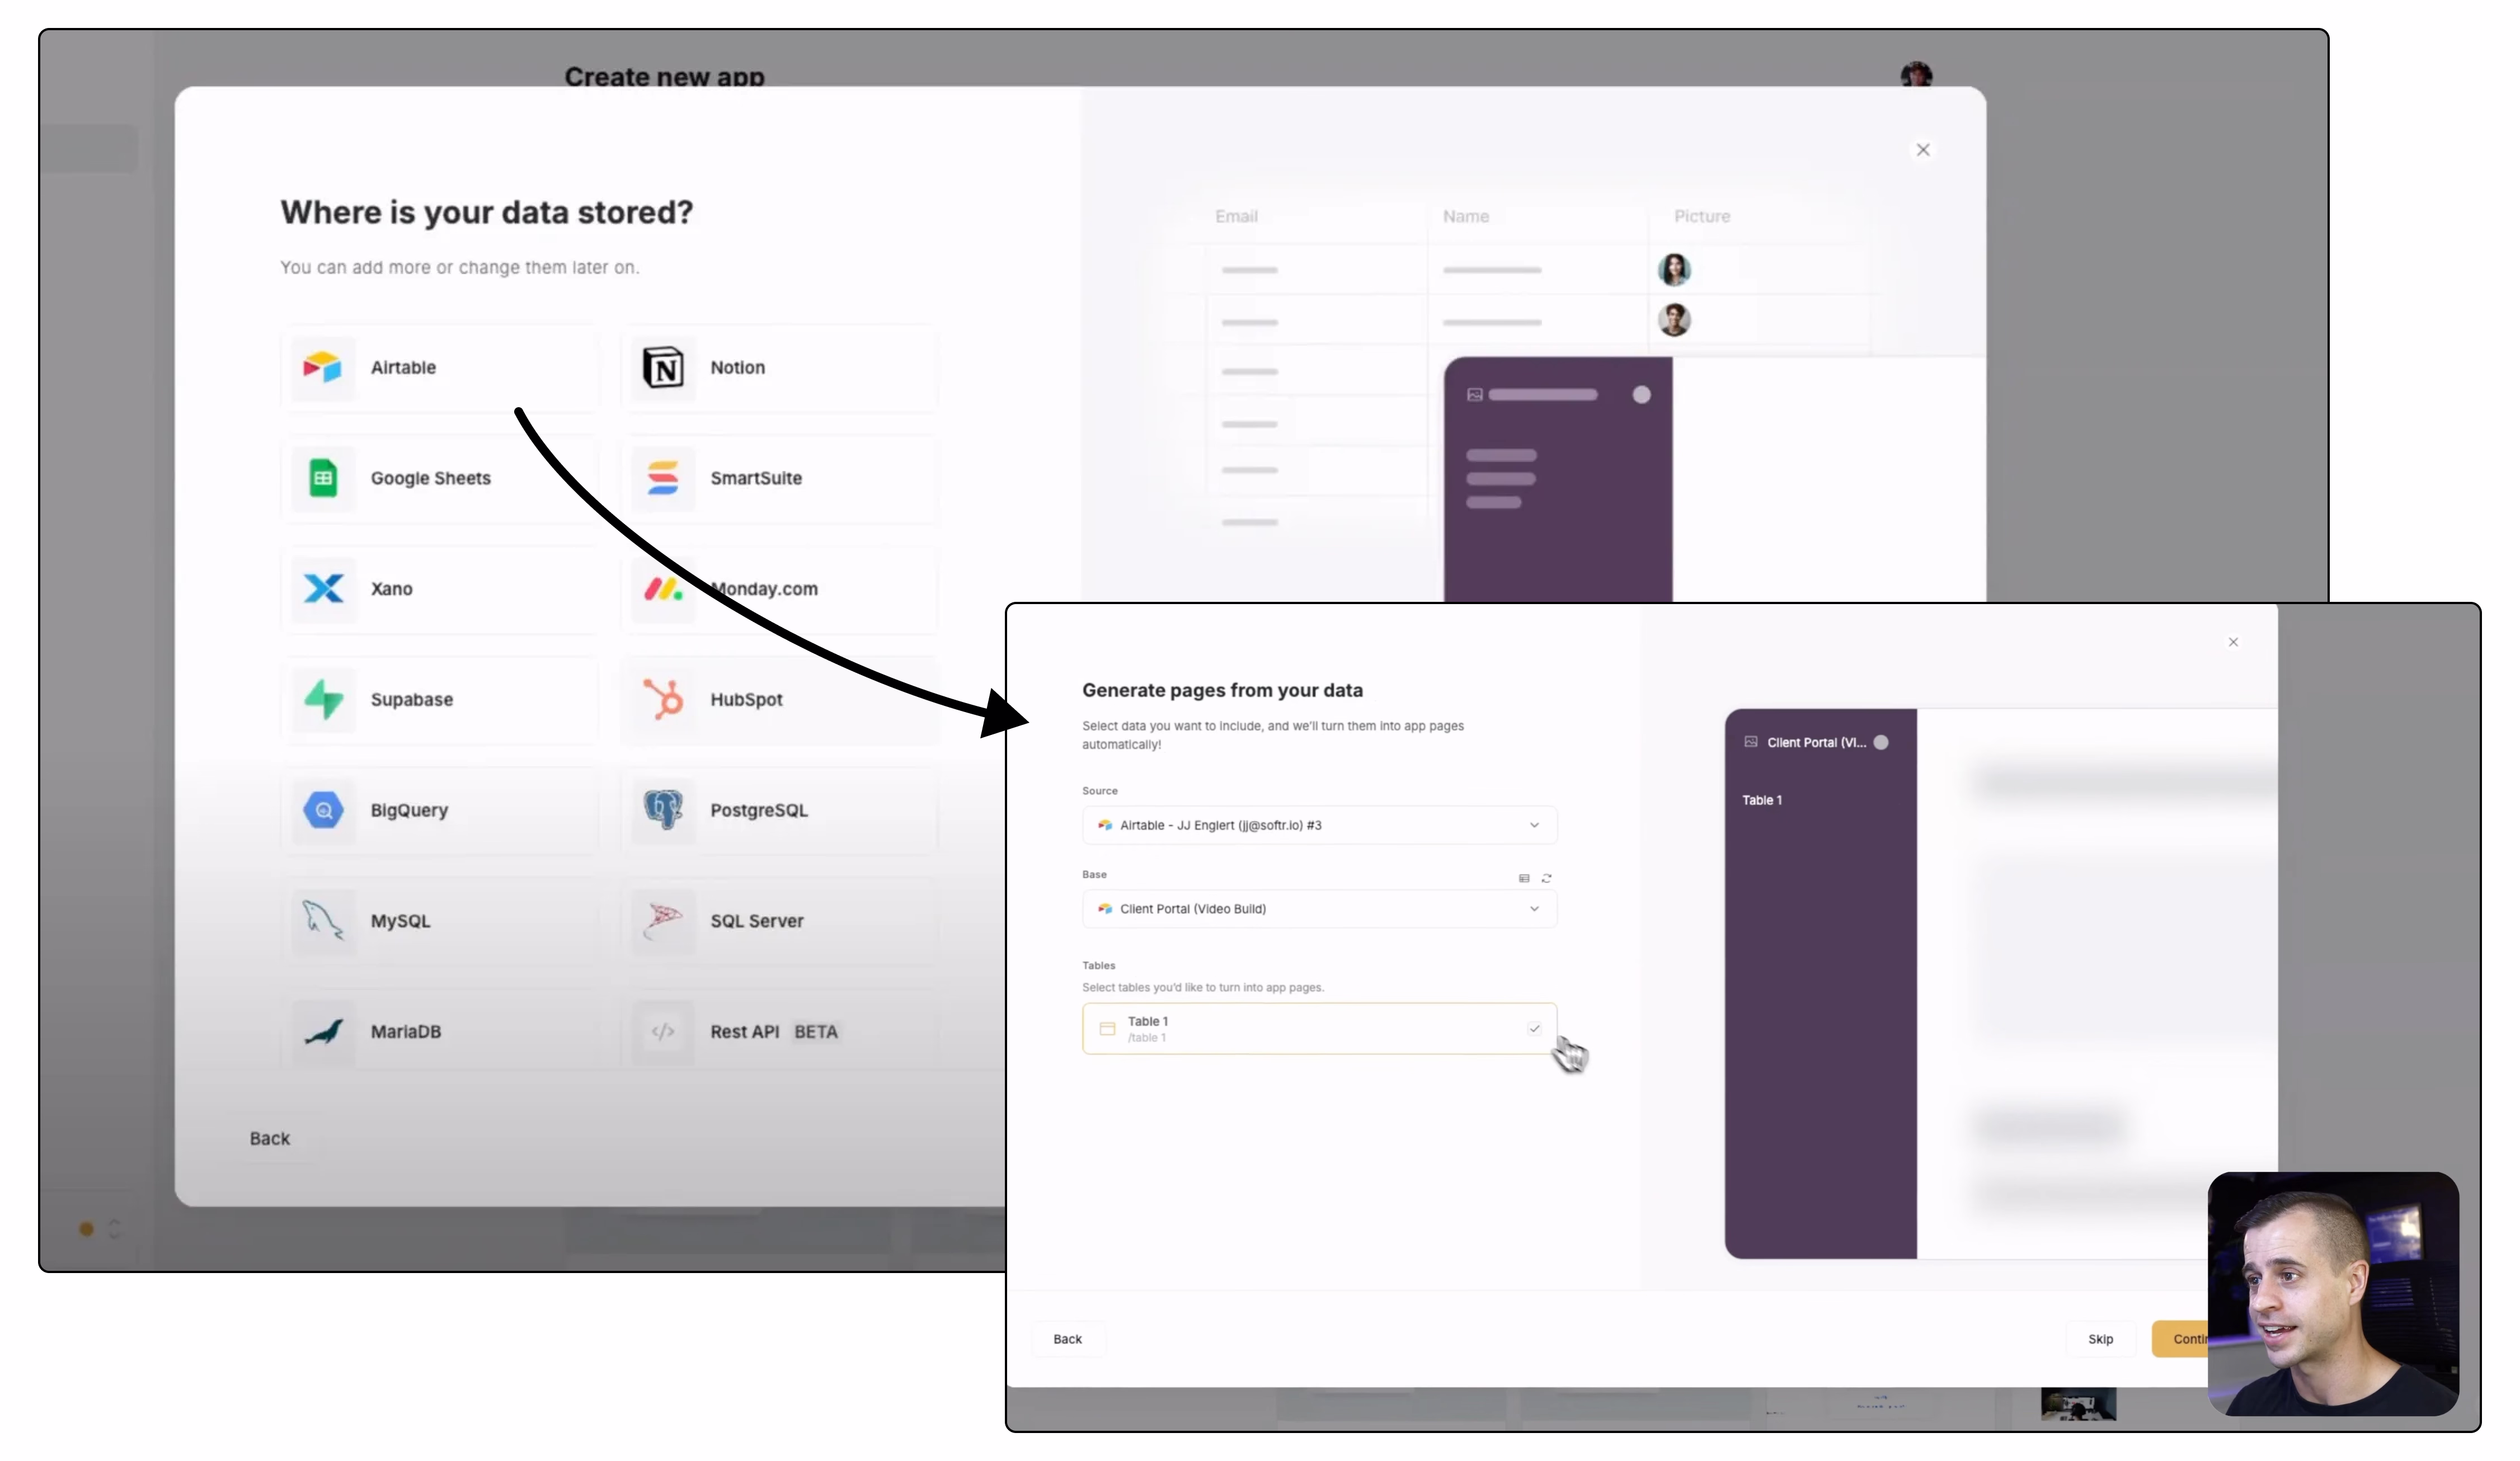
- Navigate to the Users tab on the left-hand menu.
- Click Sync with data source and select your Airtable base (e.g., "Client Portal Video Build").
- For the user table, select the "Users" table from your base.
- Map the fields:
- Email ->
Emailfield - Name ->
Namefield - Avatar ->
Photofield
- Email ->
- Click Save and Sync. Softr will now pull in the user data from your Airtable base.
2.3. Set up user groups
User groups are how you control permissions and visibility.
- In the Users tab, go to the User Groups section.
- You'll see two defaults: Logged in and Non logged in. We need to create two more.
- Click Add User Group and name it Client.
- Select Condition-based.
- Set the condition to:
When the user's User Role is Client.
- Create another group named Admin.
- Set the condition to:
When the user's User Role is Admin.
- Set the condition to:
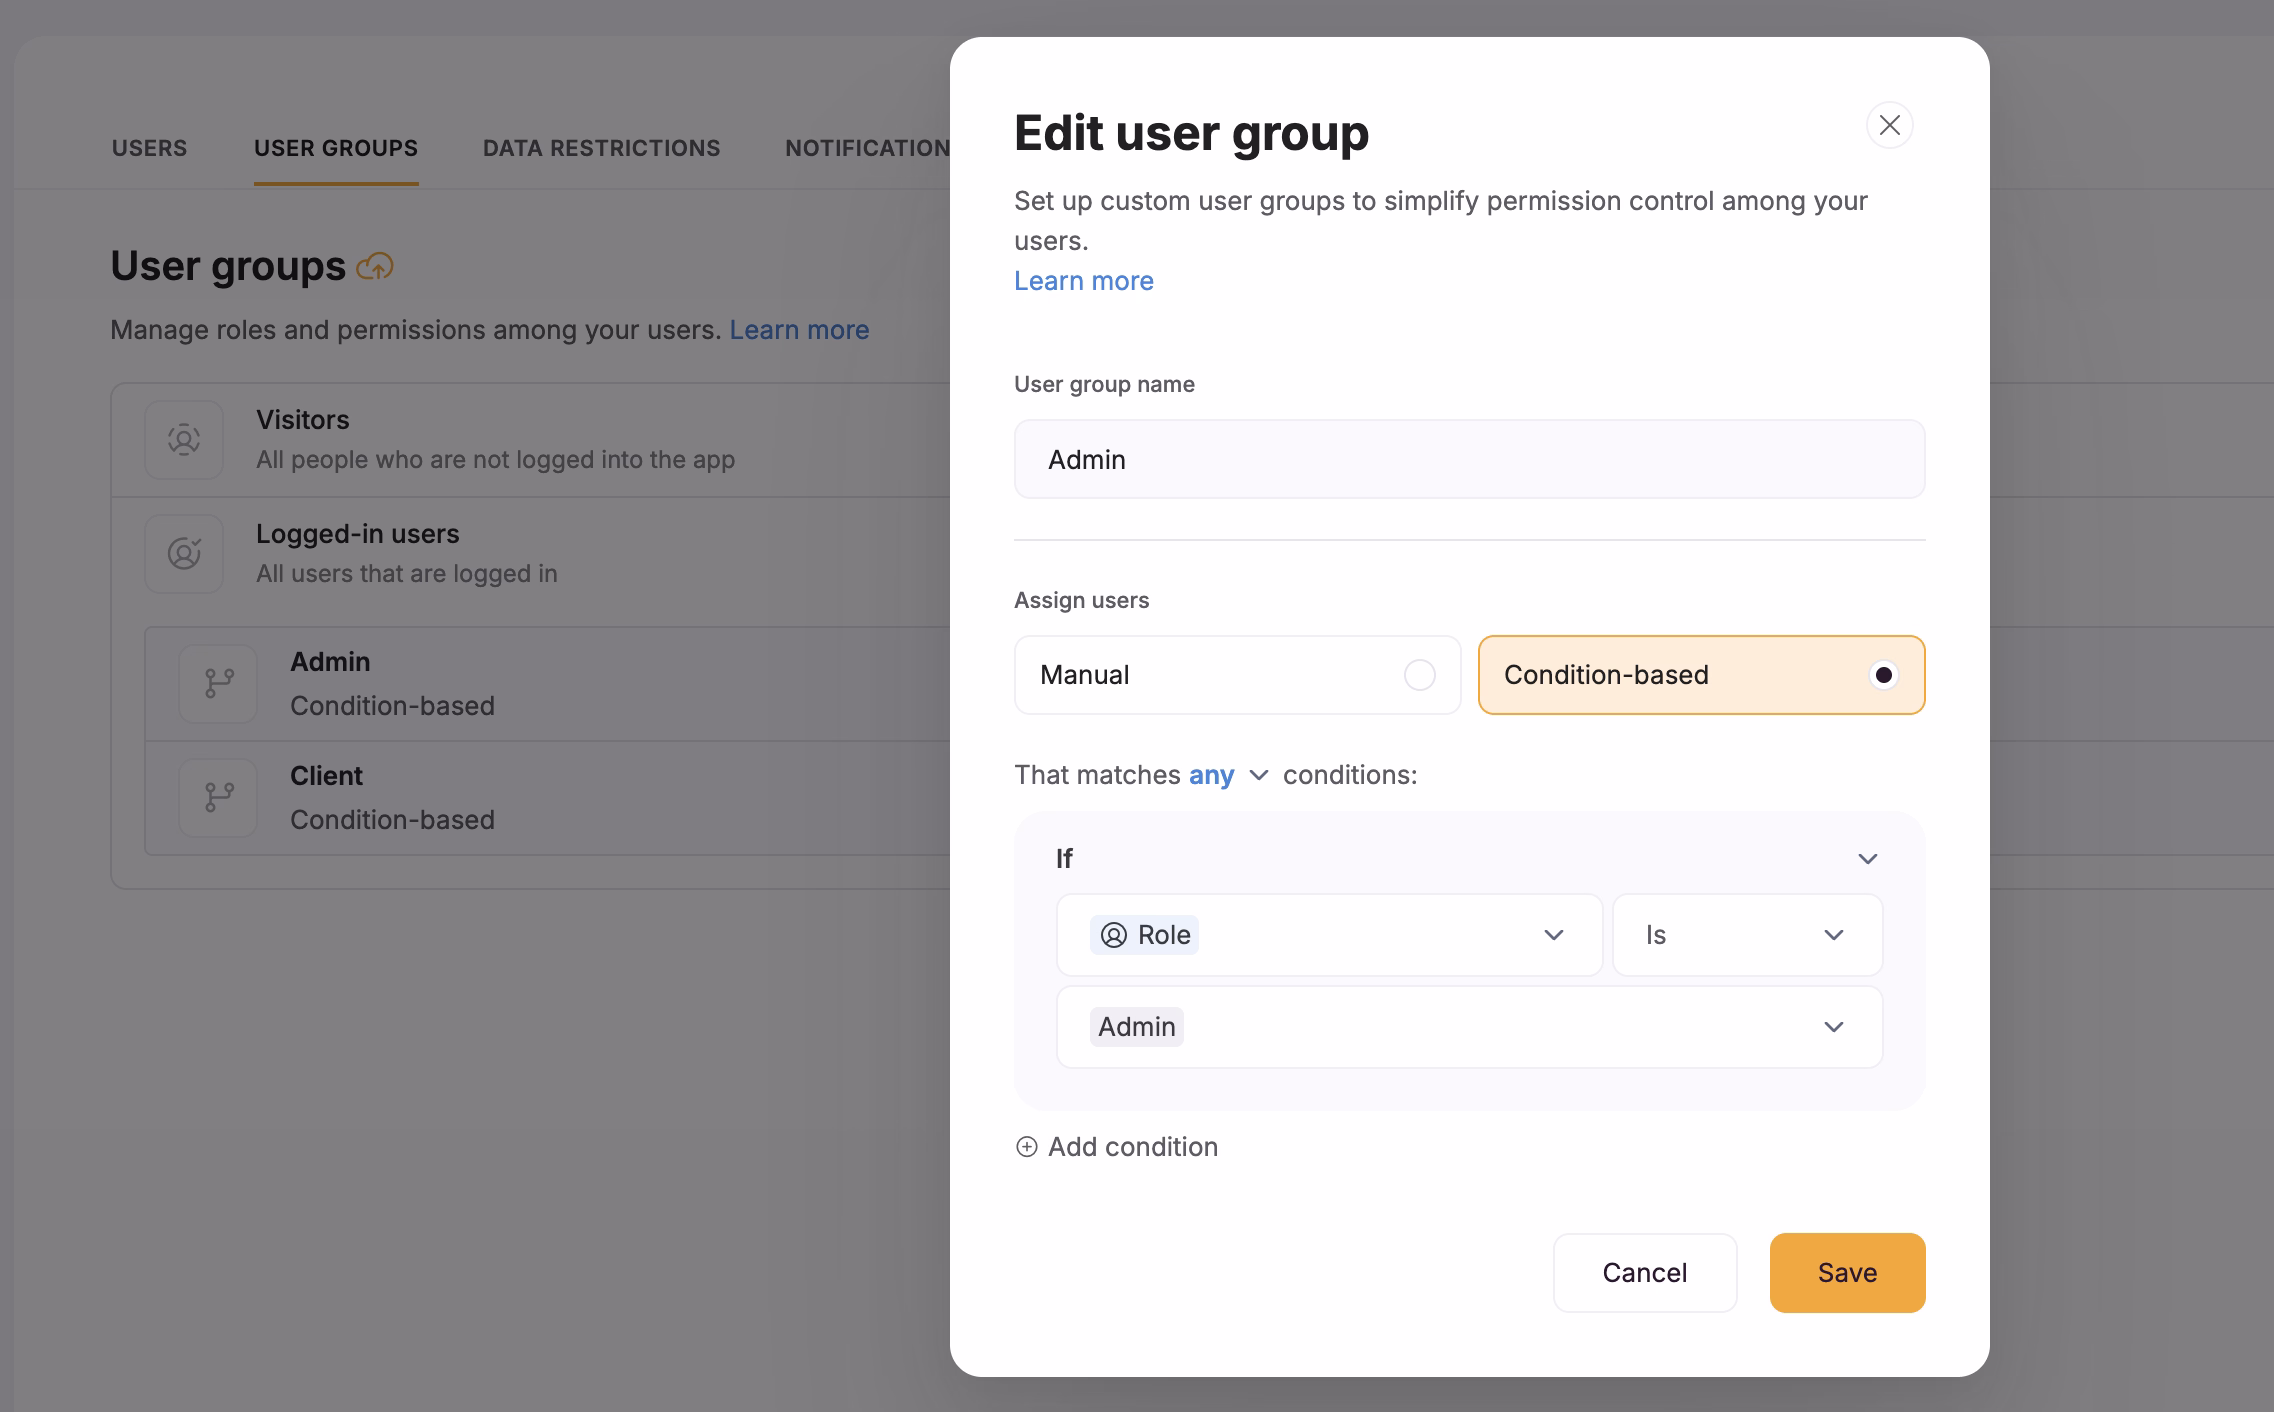
Now, you can control which blocks and pages are visible to clients versus admins. For example, by clicking on any block, you can go to its Visibility settings and select which user group can see it.
Part 3: Building the portal's pages and theme
With the foundation set, let's create the necessary pages and apply a consistent theme.
3.1. Create the application pages
Navigate to the Pages tab. We will create a structured set of pages for our portal.
- Dashboard: Rename the "Homepage" to "Dashboard". In its settings, set the visibility to Logged in users only.
- Projects: Create a new page named "Projects". Set its visibility to Logged in users only.
- Project Details: Create a "Project Details" page, also for logged in users.
- Tasks: Create a "Tasks" page.
- Clients & Client Details: Create a "Clients" page and a "Client Details" page.
- Invoices: Create an "Invoices" page.
Organize the pages by dragging and dropping them in the left-hand menu to create a logical hierarchy.
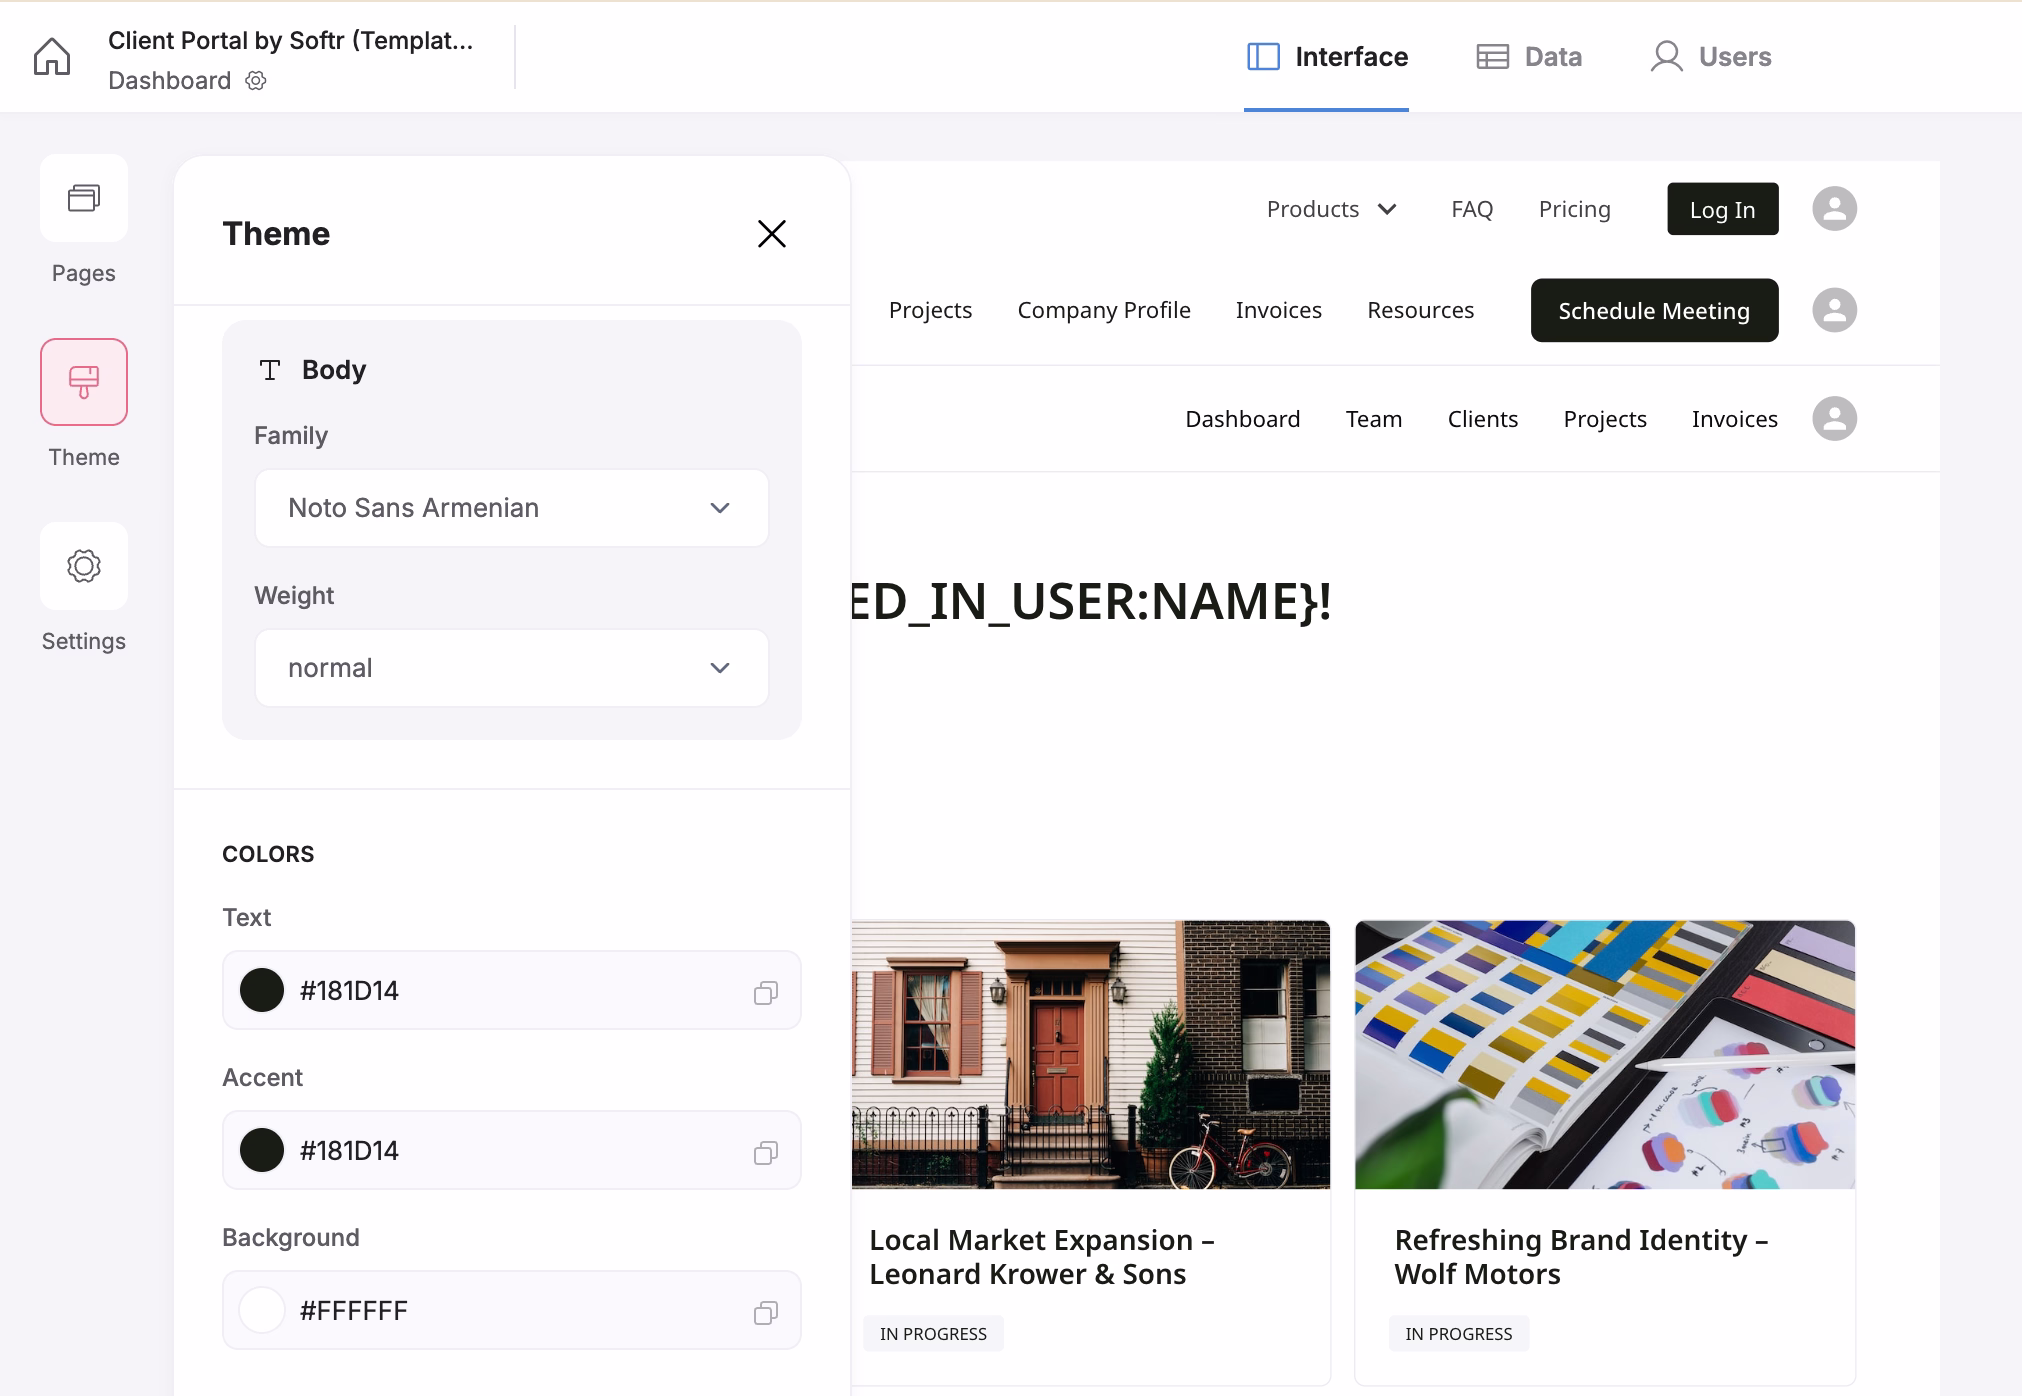
3.2. Set up the theme
A consistent theme makes your application look professional.
- Go to the Theme tab.
- Typography: Choose a font (e.g., Noto Sans) and set the weight for headings and body text.
- Colors: Select a primary text color and an accent color. A simple, clean palette is best.
- App Styles: Adjust settings like text size (medium is a good default), corner roundness, and shadows to match your brand.
Part 4: Building the core features
Now for the exciting part: building out the functionality of your portal, page by page.
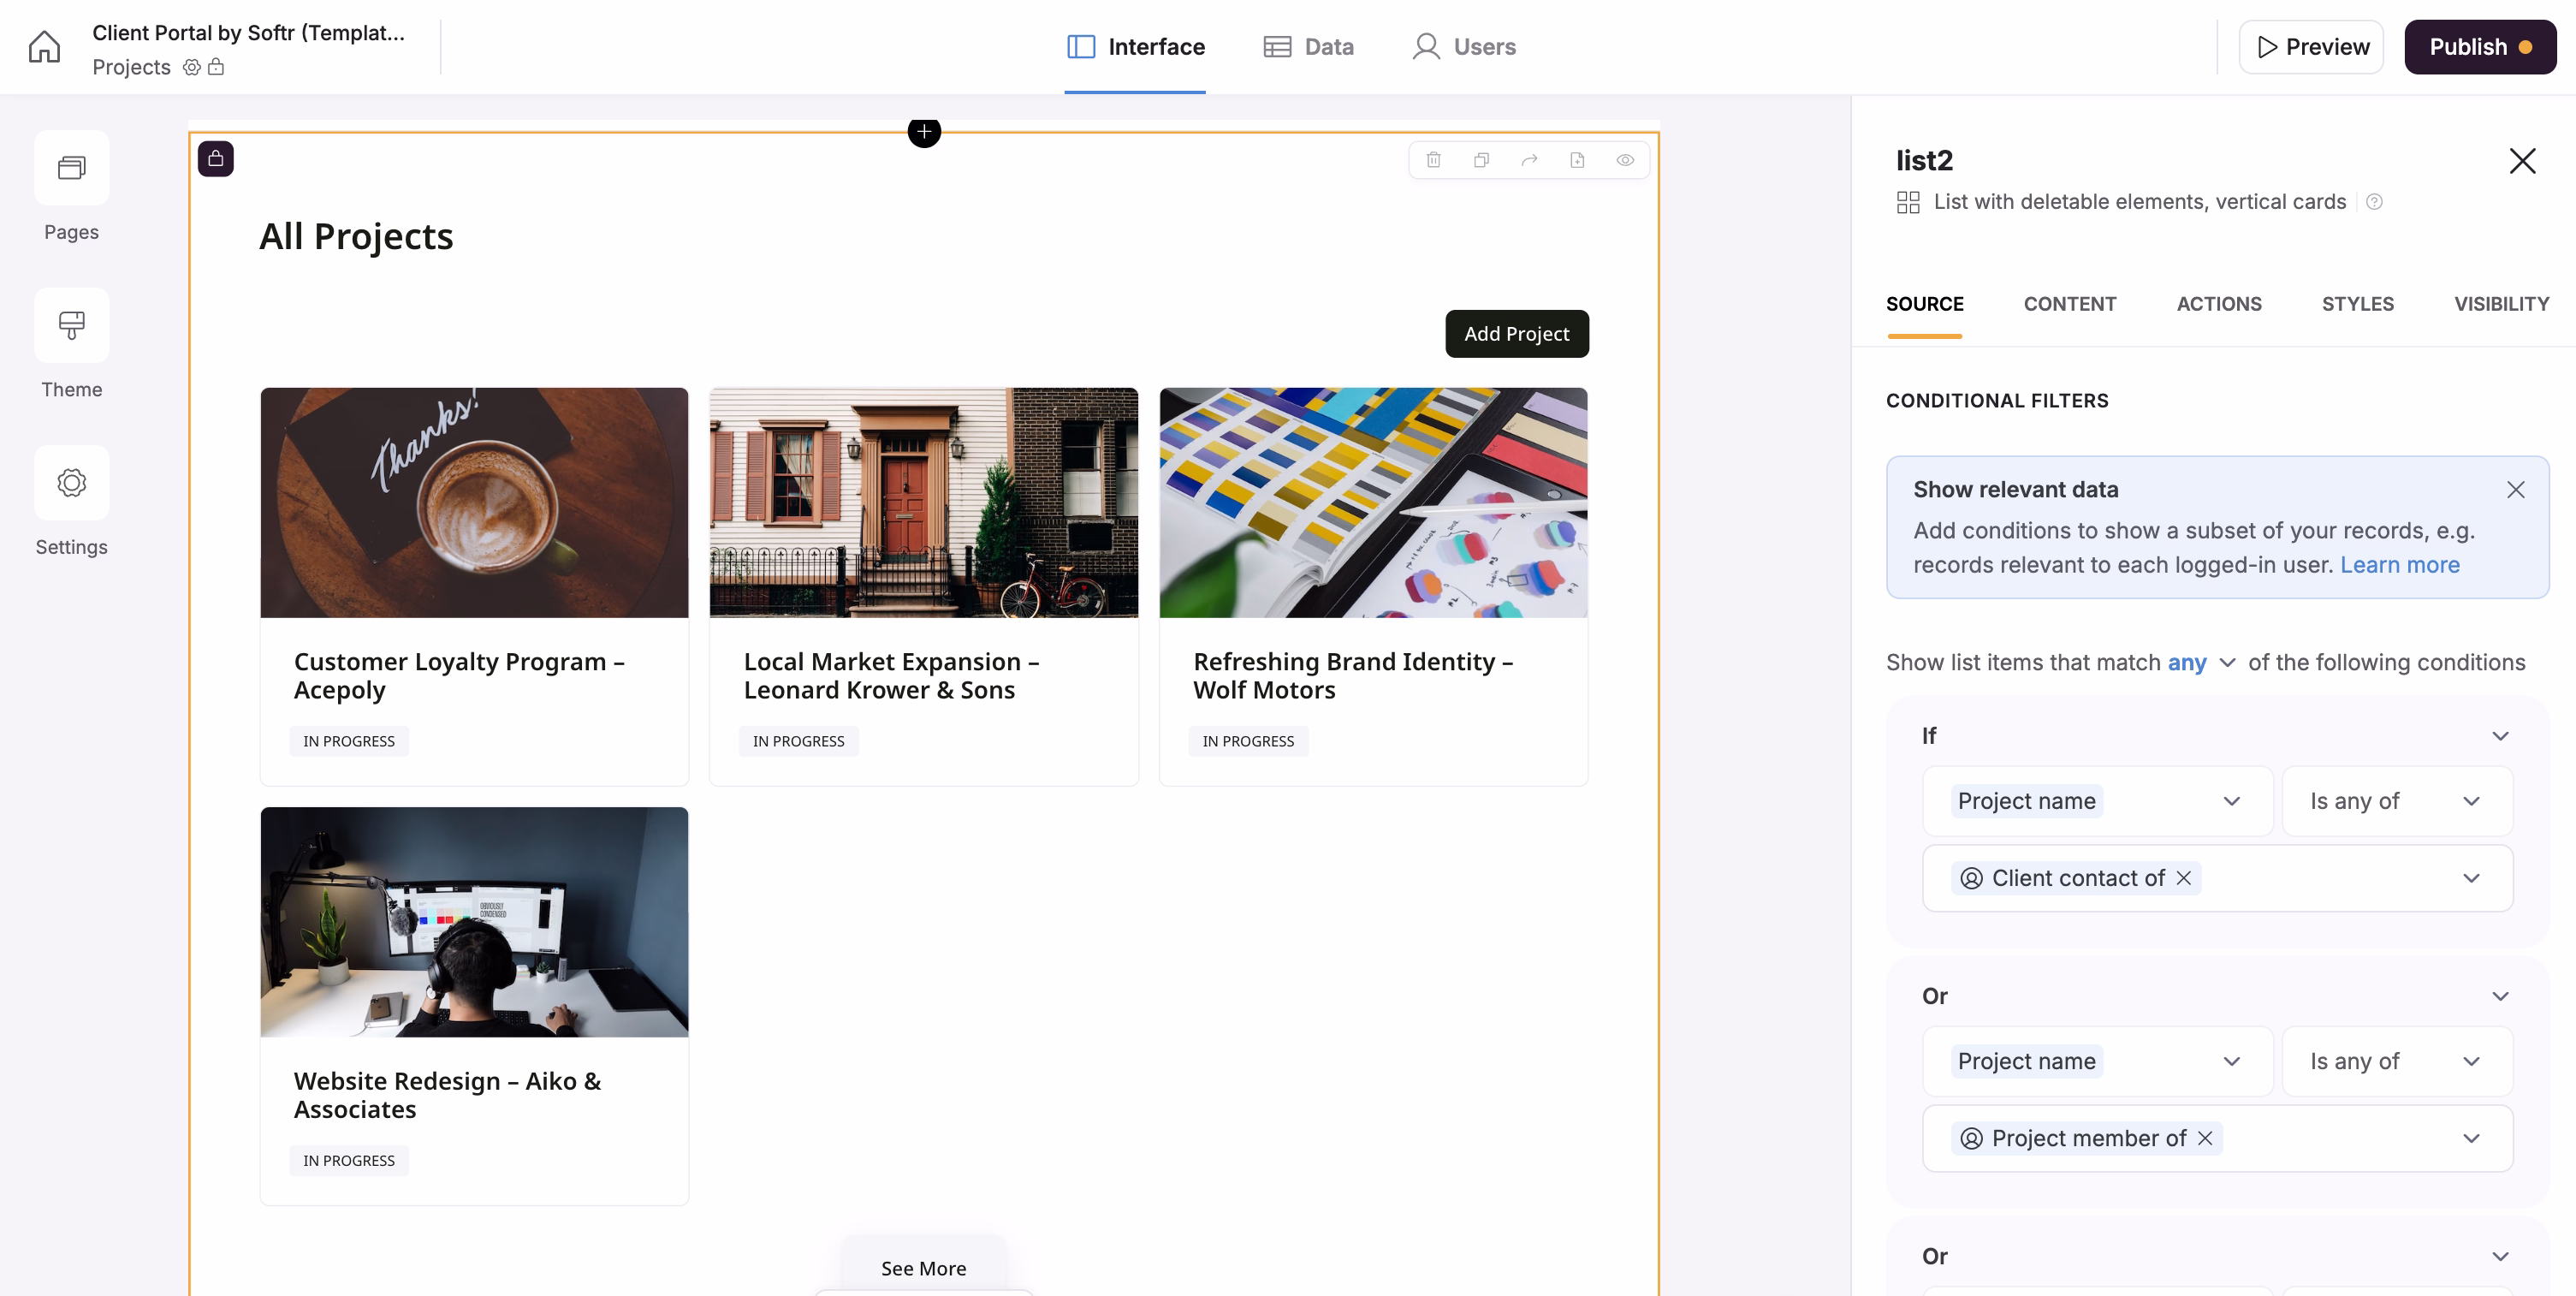
4.1. The project listing page
This page will display a list of projects.
- Go to the Projects page.
- Click Add block and select a Dynamic > List block.
- Connect the Data Source:
- In the block's settings, select your Airtable base.
- Set the table to Projects.
- Map the content:
- Map the Image field to your
Cover Imagefield from Airtable. - Map the heading to the
Project Name. - Map a text or tag element to the
Project Status.
- Map the Image field to your
- Configure actions:
- Find the Add Record button. Change its text to "Add Project".
- In the button's Visibility settings, set it to Admin only. This ensures only admins can create new projects.
- Create two experiences (Client vs. Admin):
- For Clients: On the list block, add a Conditional Filter:
Project Members includes any of Logged In User. This ensures clients only see projects they are assigned to. Set the block's visibility to the Client user group. - For Admins: Duplicate the block. Remove the conditional filter so admins can see all projects. Set this new block's visibility to the Admin user group.
- For Clients: On the list block, add a Conditional Filter:
4.2. The project detail page
This page shows the details of a single project.
- On the Projects page, click on an item in the list block. Set the Item On Click action to Open Detail Page. Point it to your "Project Details" page.
- Go to the Project Details page and add a Details > List Details block.
- Connect the data source to the Projects table.
- Map the fields like
Project Name,Cover Image, andProject Description. - Add a Linked List for Project Members:
- Add a new List block below the details block.
- Set its data source to the Users table.
- Add a Conditional Filter:
Projects includes any of Current Record's Project Name. This will display only the users who are members of the project being viewed.
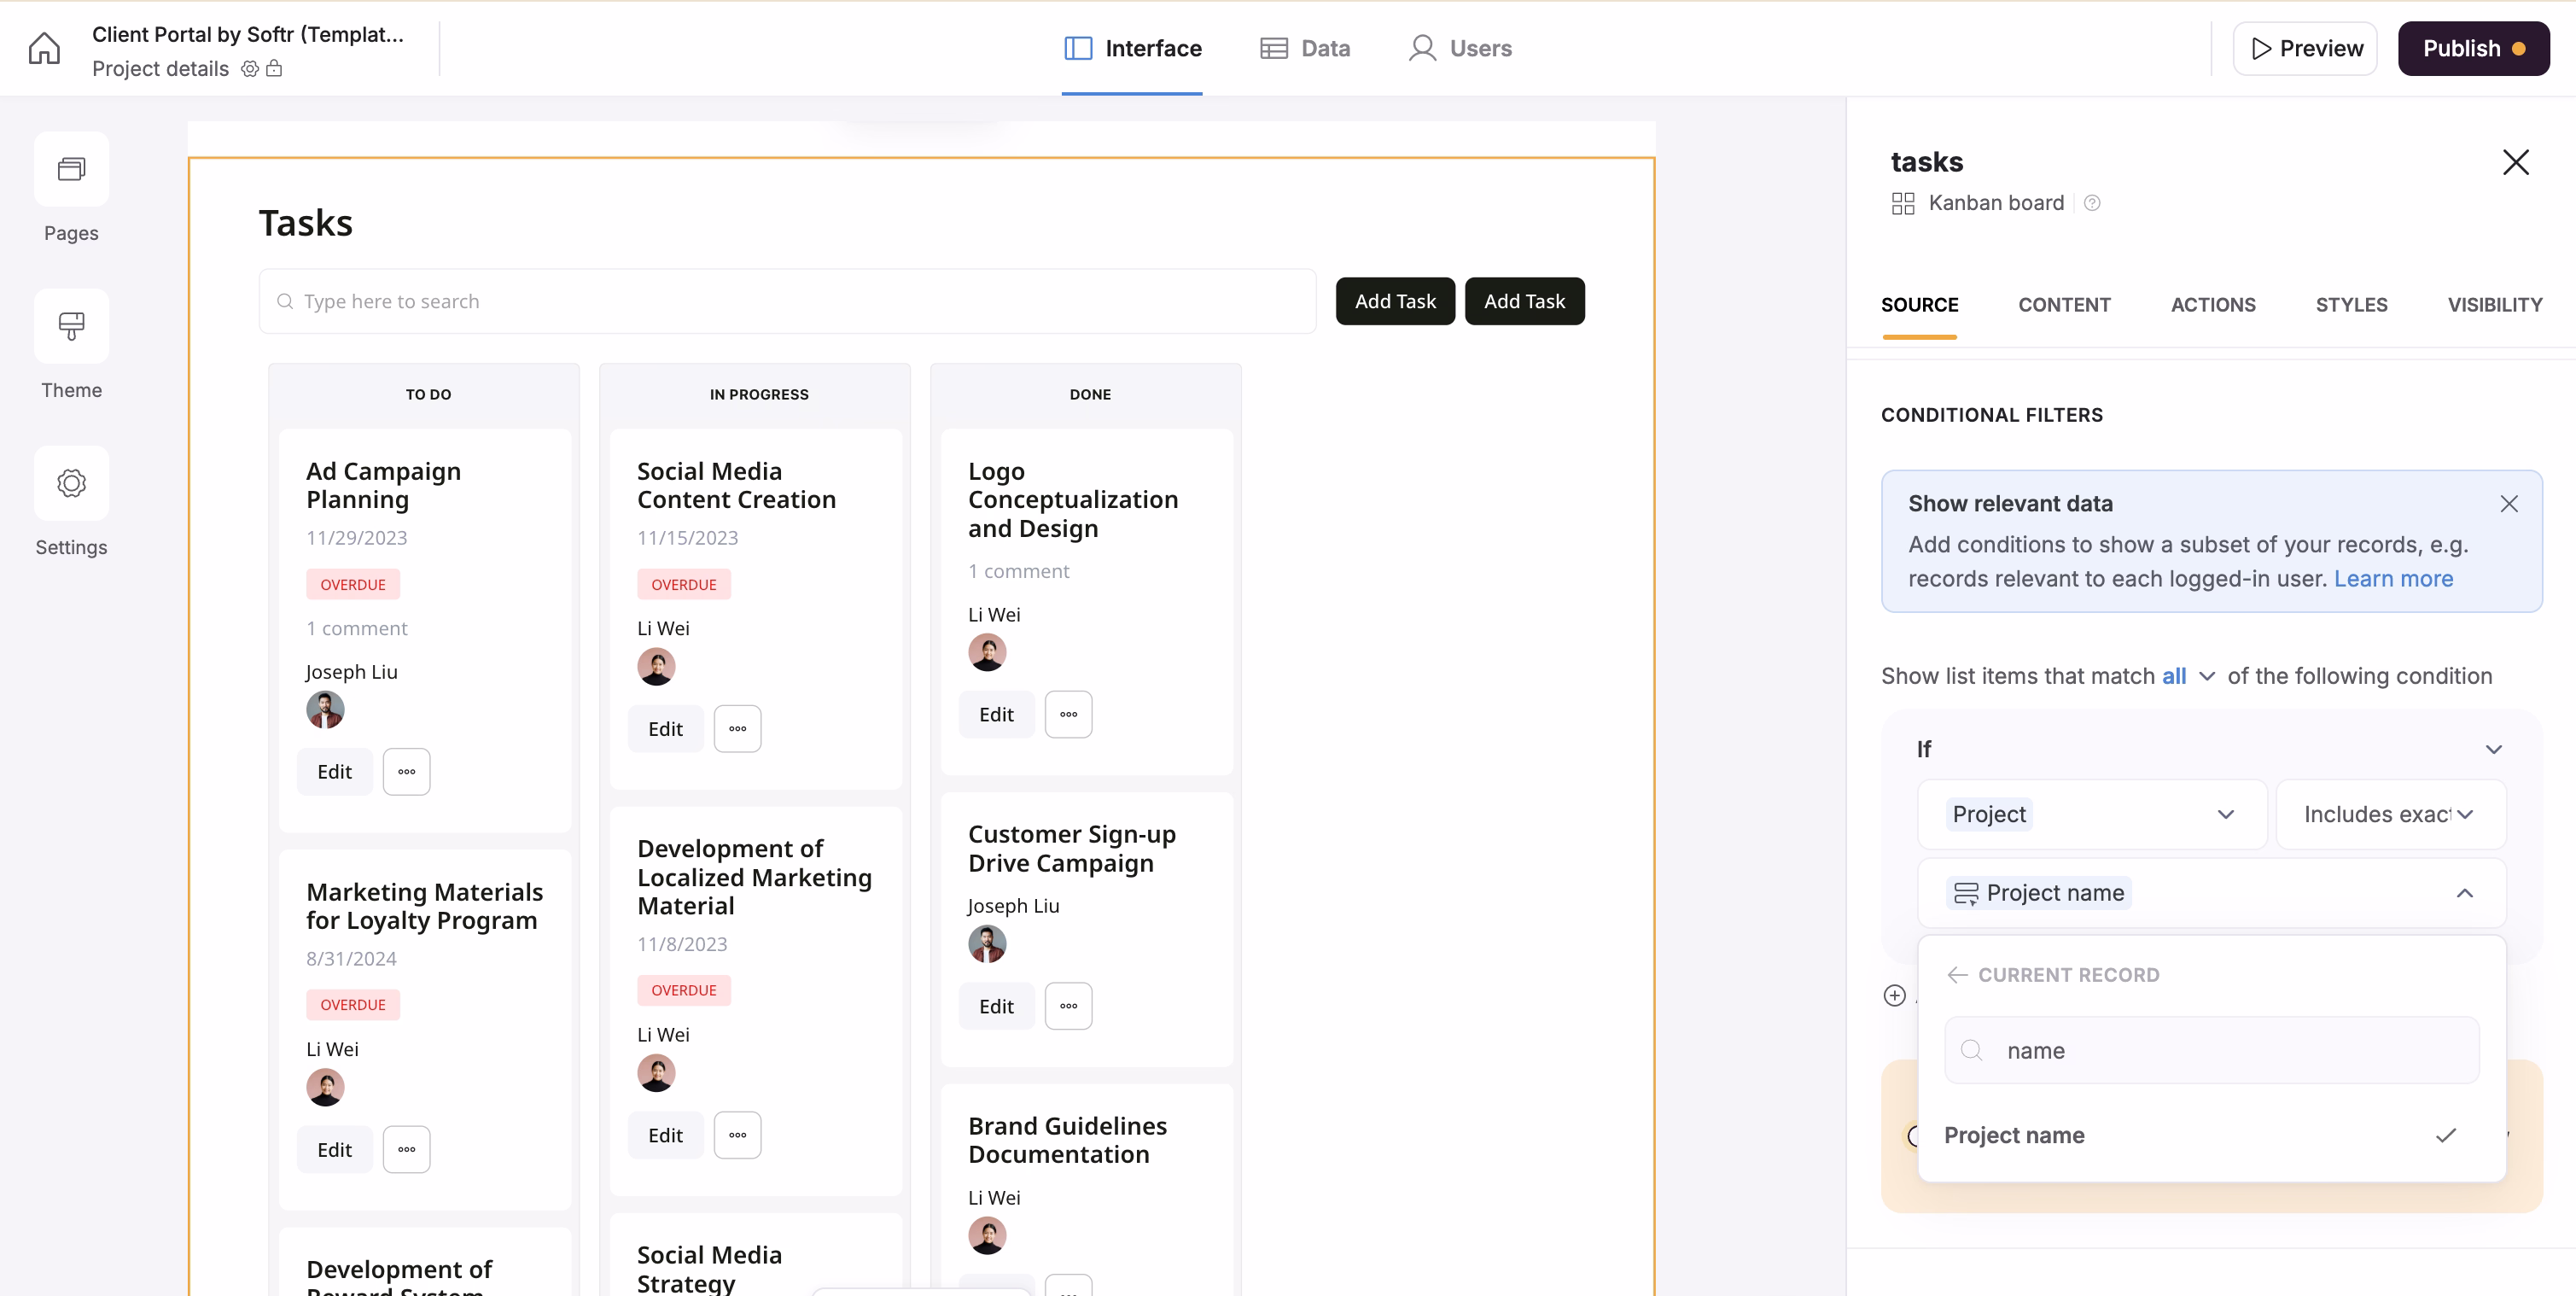
4.3. Task management with a kanban board
Let's add a way to manage tasks for each project.
- Database Setup: In Airtable, create a Tasks table with fields for
Task Name,Task Description,Assignee(linked to Users),Status(single select),Project(linked to Projects), andDeadline(date). - Add the Kanban Block:
- On the Project Details page, add a Kanban block.
- Set its data source to the Tasks table.
- Add a Conditional Filter:
Project includes any of Current Record's Project Nameto show only tasks for that project.
- Configure the Kanban:
- Group by the
Statusfield. - Map the card fields to
Task Name,Deadline, andAssignee. - Configure the Add Task and Edit Task actions.
- Group by the
4.4. Task details and commenting
- Duplicate the "Project Files" page (which we'll create next) to create a "Task Details" page. This is a quick way to get a pre-configured modal page.
- On the new page, change the main block's data source to the Tasks table. Map the fields to show task details.
- Add a Commenting feature:
- Open the settings of the Task block and reach the Actions tab
- Enable comments (requires the Pro plan)
- Display it as you like, either as a block below or in a side panel.
- Reach the app settings to further configure the Comments feature.
- Link the Kanban: On the project detail page, set the Item On Click action for the Kanban cards to open the "Task Details" page in a side modal.
4.5. File management
- Database: Create a Files table in Airtable linked to the Projects table.
- Create a "Project Files" page. This page will open as a modal.
- Add a List Details block at the top, connected to the Projects table. This is a trick to pass the project's context to the page. You can hide most of its content.
- Add a List block below it, connected to the Files table.
- Add a Conditional Filter to the file list:
Project is any of Current Record's Project.
- Link from Project Details: On the project detail page, add a "Files" button that opens the "Project Files" page in a side modal.
4.6. Invoicing
- Database: Create an Invoices table in Airtable with fields like
Invoice ID(autonumber),Project(linked),Amount(currency),Status(single select: Unpaid, Paid, etc.), andPayment Link(URL). - Create "Project Invoices" and "Invoices" pages. The "Project Invoices" page will show invoices for a specific project (similar to the files setup), while the "Invoices" page will be an admin-only view of all invoices.
- Build the Invoice List: Use a Table block to display invoices. Configure columns for ID, Amount, Due Date, and Status. Add action buttons to view, edit, and delete invoices (for admins).
Part 5: The dashboard
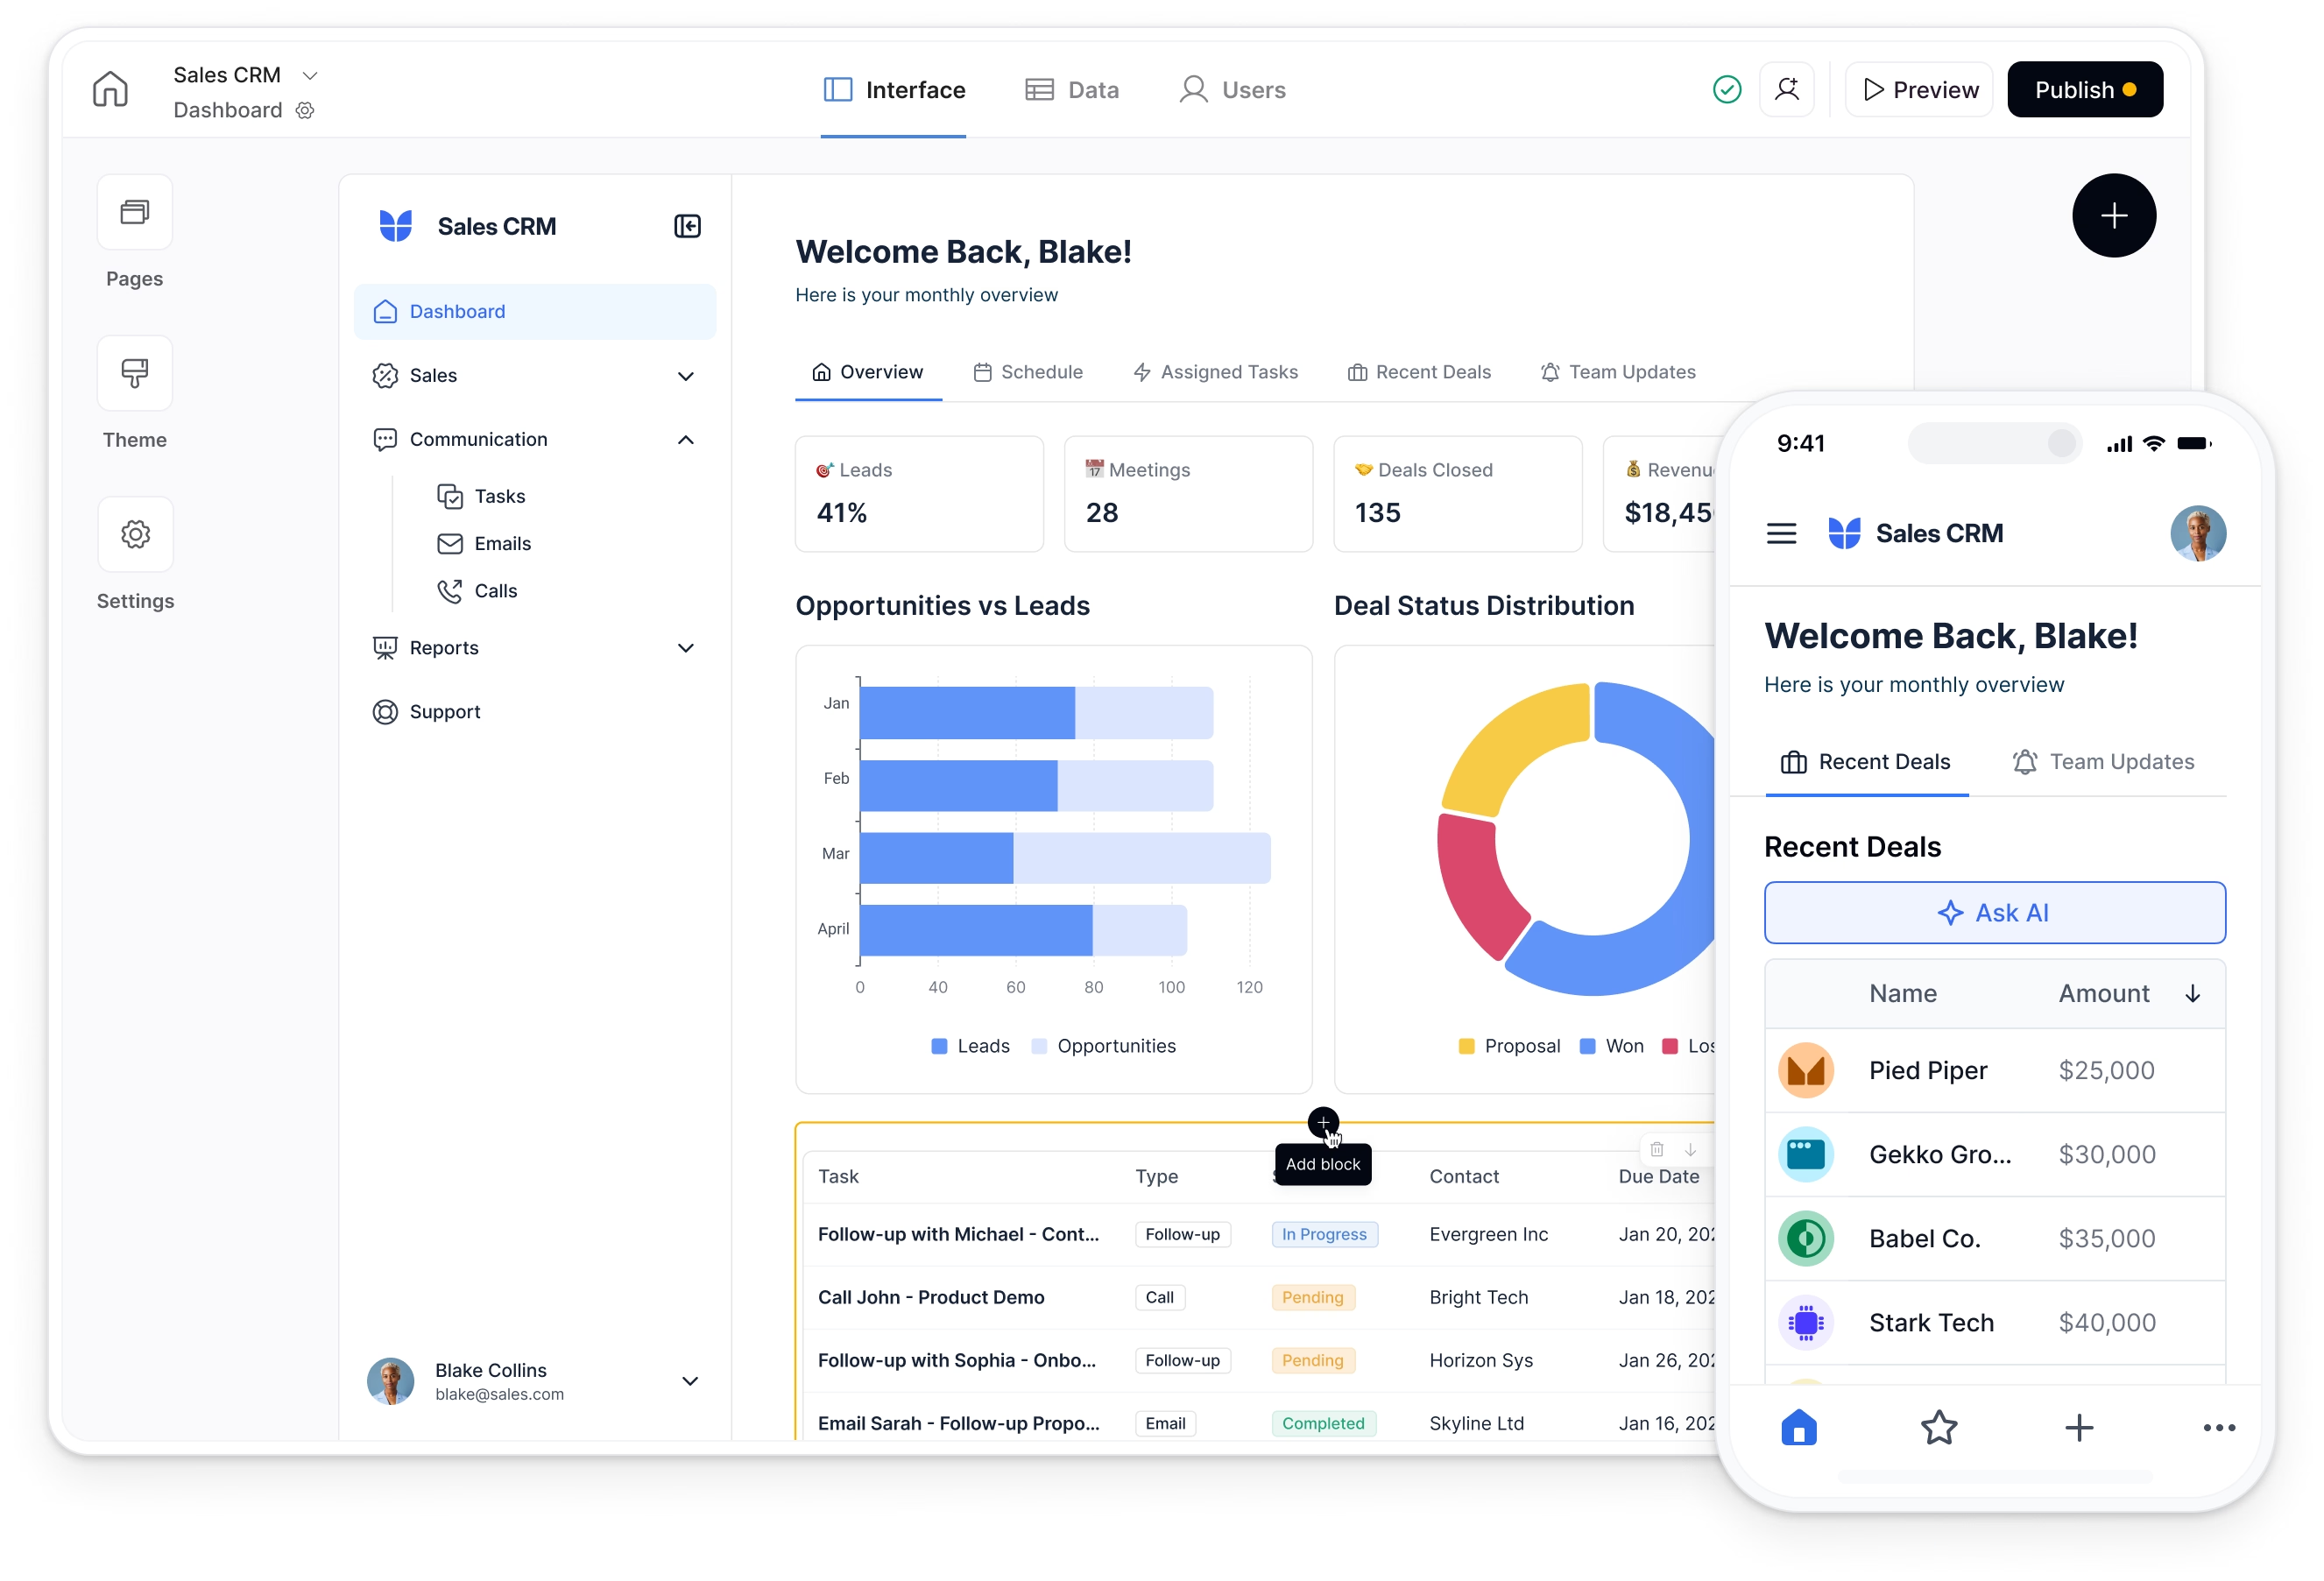
The dashboard is the first thing users see after logging in. We'll create a different experience for clients and admins.
- Go to the Dashboard page.
- Client Dashboard:
- Add blocks to show the client's company info, their projects, and their unpaid invoices.
- Use conditional filters on each block to ensure data is specific to the logged-in user's company.
- Set the visibility of these blocks to the Client user group.
- Admin Dashboard:
- Create a separate set of blocks showing open projects across all clients and all open invoices.
- Set the visibility of these blocks to the Admin user group.

Part 6: Publishing and finalizing your app
You're almost done! Here are the final steps to get your portal live.
- Publishing:
- Click the Publish button in the top right.
- You can customize your Softr subdomain (e.g.,
yourclientportal.softr.app). - You can also connect a custom domain for a fully branded experience.
- Page Rules:
- In Settings > Page Rules, define where users are sent after signing in, signing out, or encountering an unauthorized page. This ensures a smooth user flow.
- Global Data Restrictions:
- For an extra layer of security, go to Settings > Data Restrictions
- Here, you can set app-wide rules. For example, you can create a rule that the Client user group can only view projects they are a member of. This applies everywhere, regardless of individual block settings. Learn more about it here in our docs.
Your app is live
Congratulations! You have successfully built a powerful, custom client portal using Softr. You've learned how to structure a database, connect it to a front end, manage user permissions, and build a feature-rich application—all without writing a single line of code. From here, you can continue to customize and expand your portal to perfectly fit your business needs. Happy building!