How to import airtable records from one base to another [step by step guide]


Airtable is one of the fastest-growing no-code tools, known for its ease of use, rich functionality, and customization. There are countless ways you can manage and store your data in Airtable in no time. One of the aspects users need to deal with when working with Airtable is importing data between their busy bases with large tables, which new users may find challenging. Thankfully, you are in the right place. In this article, we will do an overview of all the methods you can use to import Airtable records from one base to another.
Let’s dive in.
Using copy and paste function
The easiest method to import Airtable records from one base to another is the copy and paste function. The method allows you to paste a single cell, a range of cells, or an entire field.
To import Airtable records successfully:
Step 1: Create a blank base where you want to import your records. The primary field should be the only existent field.
Step 2: Use combinations, Ctrl+C for PC; ⌘+C for Mac, to select and copy all the records you want to import.
Step 3: Use combinations, Ctrl+V for PC; ⌘+V for Mac, to paste the records to the blank base.
This way you successfully import the full configuration of selected fields with a slightly different format.
Though the copy and paste method is the easiest, it won’t do for importing linked or calculated records, since the method only allows pasting over the display text.
Importing a table using the CSV Import app
Slightly difficult compared to the first method, importing Airtable records from one base to another will be available by exporting and importing a table as a CSV file with the CSV import app.
Before importing data into your base, Airtable recommends taking a base snapshot. Airtable already takes base snapshots automatically, but it’s also important to take a snapshot manually right before implying a big number of changes to your base. This will allow you to back up a base and restore an earlier version
To manually take a snapshot:
Step 1:
Open the history menu from your base.
Step 2:
Select the "Snapshot" option.
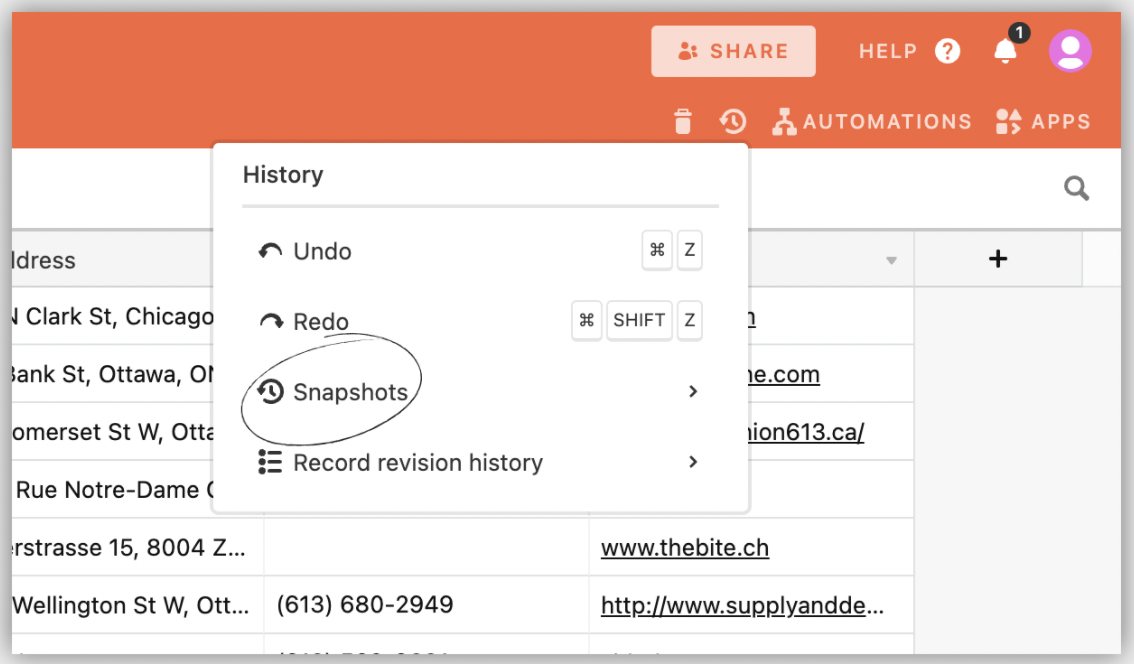
Once it has been completed, the snapshot will show up in the snapshots menu.
Now you’re safe to start the exporting/importing process.
Export the chosen table as a CSV
To start, export the given table as a CSV by opening the current View menu and selecting the “Download CSV” option to download the file.
For the next stage, you will need to work with the CSV import app. Open the table where you want to import your records and follow the instructions:
Step 1: Install the CSV import app by clicking the "Apps" button at the top right of your base, and then clicking "Install an app".
Step 2: search and install the CSV import app.
Step 3: Drag and drop the exported CSV file into the app.
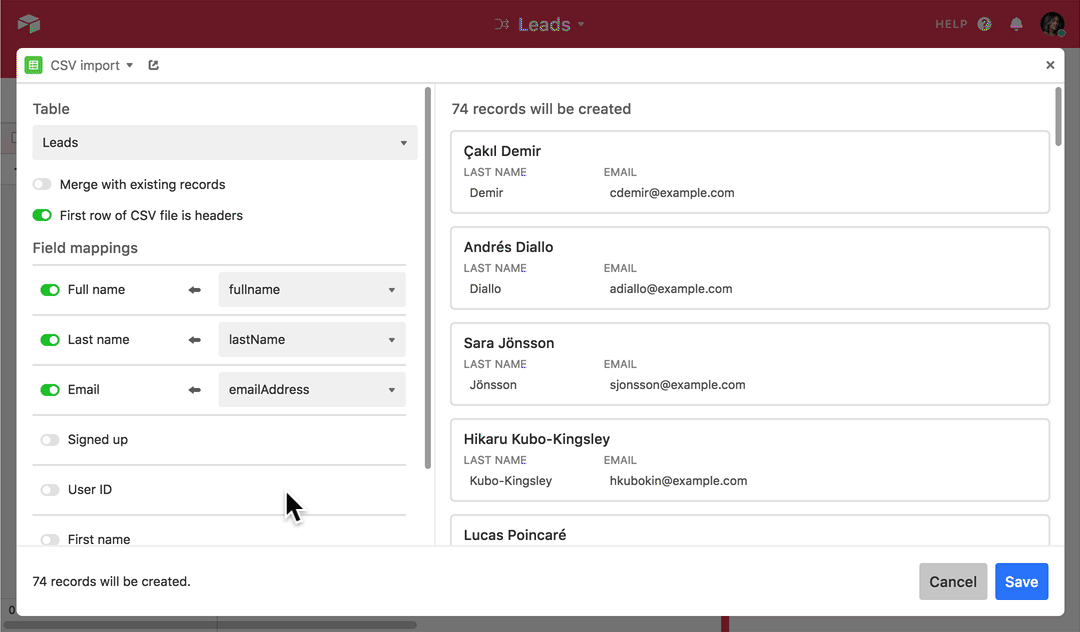
Step 4: Configure settings and field mappings before importing the CSV file into your base.
The next steps are optional but important for importing your data without errors and complications.
Step 1
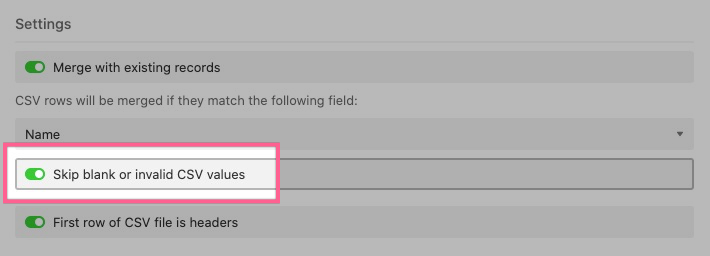
If you have existing records, enable the “Merge with existing records” option.

Step 2
After you toggle on “Merge with existing records” another option will appear: “Skip blank or invalid CSV values", which we advise you to enable if there are blank fields in the CSV.
Step 3
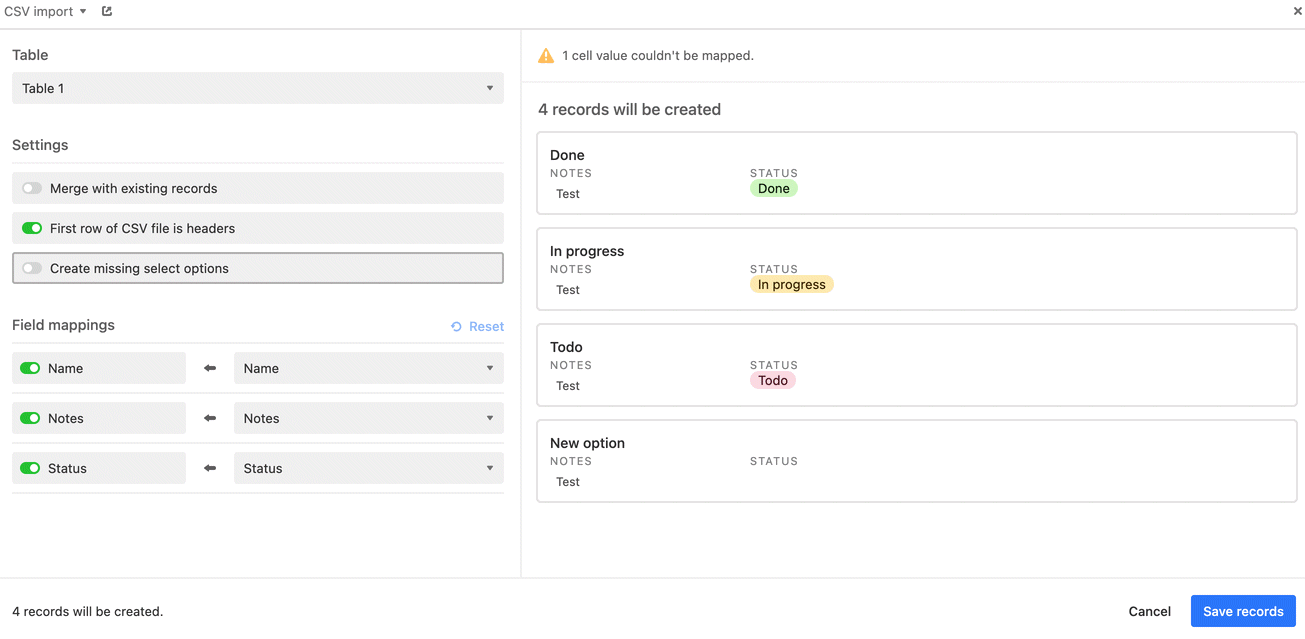
Toggle on “Create missing select options”. Enabling this option indicates there is single/multiple select fields in your table, for which a new option will be created.
Step 4
Set field mappings if the records of your CSV and names of the fields don’t have matching names, making it impossible for Airtable to match them automatically. To successfully set field mappings, simply select the field toggle, choose a column from the drop-down menu, and map the value however you like.
CSV import app is available for premium users and has a 25,000-row limit, which allows you to add and edit the imported records and merge data with existing records.
Same with the first option, if your CSV has linked records or calculated fields the CSV import app will import it as a displayed text.
Importing a table as a CSV
If importing your records with CSV import apps seems way too complex and daunting to you, we have another solution. If you’re looking for a less customized option, importing your table as a CVS file will also work when importing Airtable records from one base to another.
Keep in mind, this option doesn’t have many mapping or editing functionalities, so we recommend cleaning and organizing the files before importing them.
Here is how you can import CSV data from a CSV file.
Step 1: Start with opening the table and the view where you want to import your file.
Step 2: Click on “Add or Import” next to the list of tables.
Step 3: Click the “CSV file” button.
Step 4: Select the CSV file of exported Airtable base. (Note, the file size limit on CSV uploads is 5MB).
The imported adjustment window will open up, where you can preview your CSV file, imply changes and adjust field mappings.
After you’re done with adjusting and changing the file, click “Import” and you have your records successfully imported to your base.
Using Airtable Sync
Airtable Sync will also be a helpful option if you want to import your records from one base to another automatically. The main function of the feature is to enable syncing records from a source base to a destination base.
To use the feature, follow these steps:
Step 1: Create a syncable view share link in the source base.
Step 2: Select "Allow data in this view to be synced to other bases".
Step 3: Click on “Sync this view to another base”.
Step 4: Click the "Use this data" button on the opened view page.
Step 5: Choose the destination base to turn on your Airtable Sync and click “Create Table”.
A window will pop up enabling you to imply final touches before you can view your destination base.
After you’re done setting up the base click on “Sync now” and you’re good to go.
After you’re done with syncing, you can always unsync the table to remove the sync while leaving the records and fields moved in the destination base.
Create Record Action
A more automated and simplified solution will be using the “Create Record Action” function.
To start click on the “Automations” button at the upper right corner of the table, then click “Create a custom automation” to begin the automation process.
Next up you’ll need to choose a trigger. Airtable has a set of triggers you can choose from, in our case, we’ll need the "When a record enters a view" trigger.
Next, choose the table and the view you want the Automation to appear. Before you move on to the next step, test the trigger to check everything is up and running.
For the next phase, you’ll need to add an action.
Step 1: Click on the “Add Action" button.
Step 2: Choose the "Create record" option.
Step 3: Select your desired table and view it to create the new record.
Step 4: Choose which information from the trigger to add to the table you have chosen for this step.
Step 5: Make sure to test the action before you turn the Automation on.
You can always turn the Automation off when you’re done with importing your base.
The only problem with this option is that it won’t work for existing data. There are other automation triggers you might need when importing records from one base to another you can learn about here.
Final Thoughts
There are a lot of ways you can interact with your data in Airtable. In the article, we’ve demonstrated the most efficient ways of how you can import Airtable records from one base to another. At first, it may seem fairly complicated and time-consuming, but, trust us it won’t take much effort or time if you follow the steps covered in the article accordingly. Good luck!
About Softr
Softr is an easy-to-use no-code platform that turns Airtable bases into powerful web apps, member-only websites, and client portals. Softr offers a way for you to authenticate your end-users, control access to your content and data based on conditional rules like roles, logged-in status, subscription plans, etc. If you're using Airtable as a product catalog you can use a Softr template to build your e-commerce website. Or maybe you'd like to build a custom website for your travel journal, there's a template for that too!