

If you're spending your day digging through files or handling updates people could do themselves, you probably don’t need a better spreadsheet, you need a proper system.
A CRUD application builder helps you build just that. It lets you create internal tools and portals where users can add, view, update, or remove data without relying on developers or stitching together tools that were never meant to scale.
In this guide, we’ll show you what a CRUD app is, why it matters, and exactly how to use a CRUD builder to create one, step by step.
What is a CRUD app?
A CRUD app (or a CRUD application builder) is a tool, usually no-code or low-code, that lets you create apps where users can create, read, update, and delete data without writing backend logic from scratch.
These builders connect to data sources like databases, spreadsheets, or APIs, and give you a visual interface to manage that data.
Here’s what each letter in CRUD means:
- Create: Add a new contact, task, or record to your system
- Read: View existing data, like client profiles or project statuses
- Update: Edit information, such as changing a due date or updating an email address
- Delete: Remove data that’s no longer needed
Why use a CRUD application builder?
CRUD app builders are for users with little to no coding experience. They let you build data-driven apps, like portals, dashboards, or internal tools, without a big budget or writing backend code.
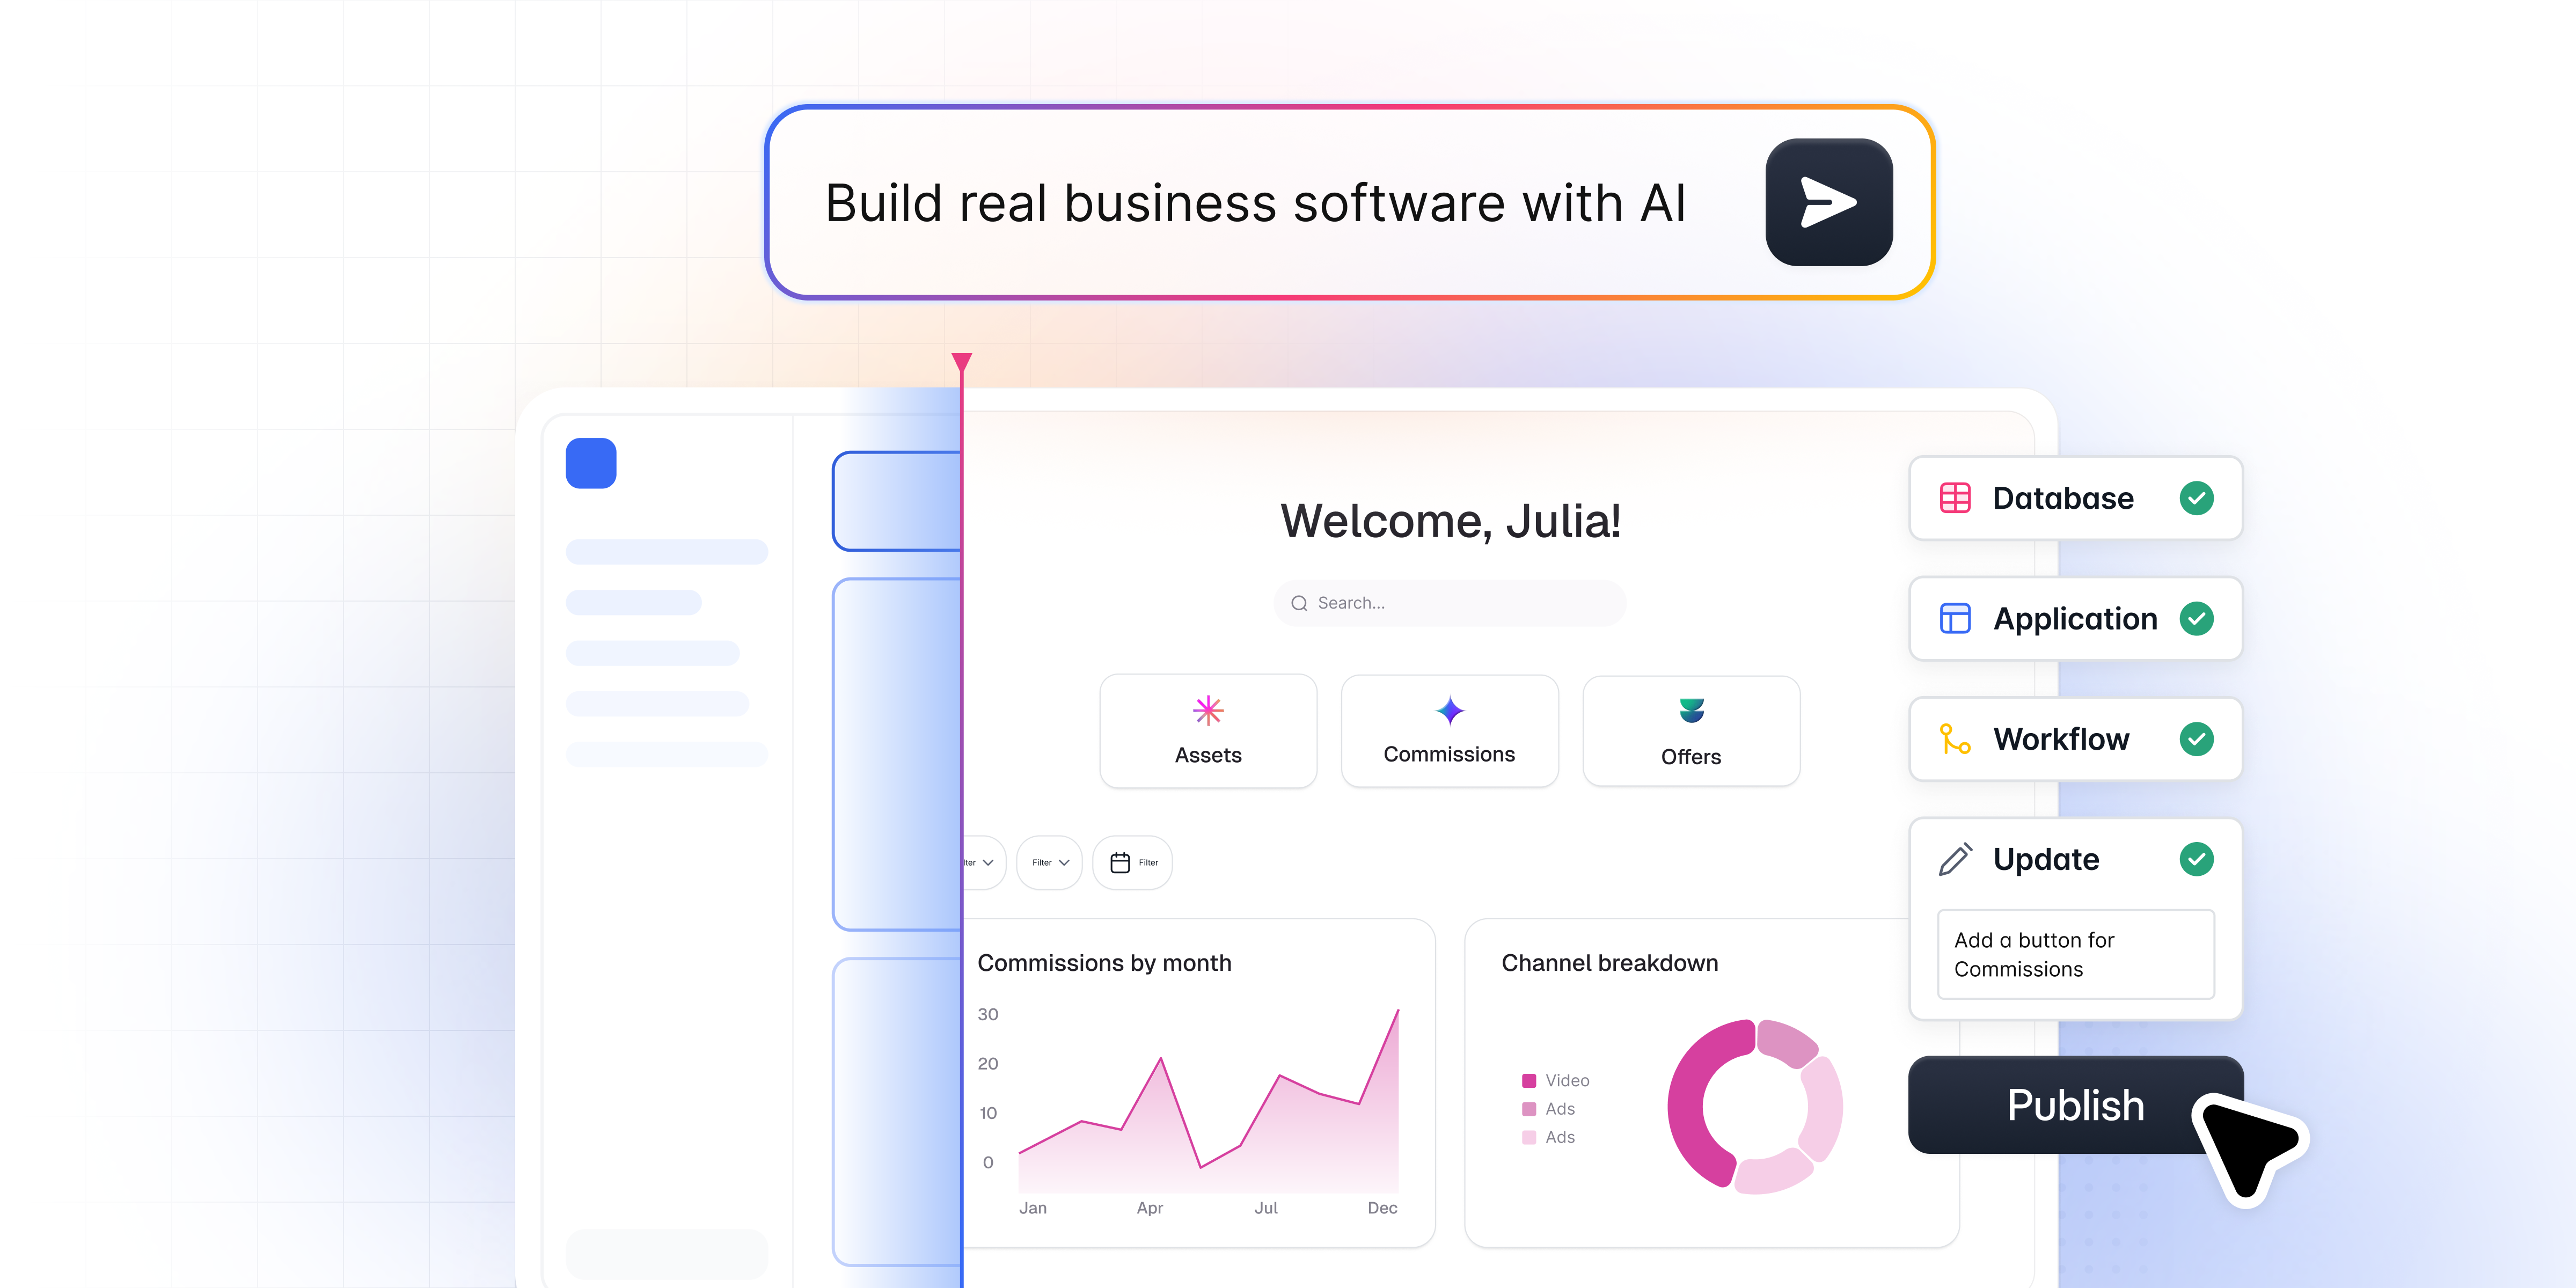
The best ones go further. Softr is the first AI-native no-code platform, so you can describe what you need in plain language and the AI Co-Builder generates a complete app for you: the database, the pages, and the user permissions, all from a single prompt. You stay in control with three build paths (generate with AI, start from a template, or build from scratch), AI-first rather than AI-only.
Crucially, the apps you build are production-ready and secure from day one, with role-based permissions and reliable infrastructure baked in, unlike the fragile apps that pure vibe-coding tools tend to produce.
Key benefits
- Let you build without code: Use visual drag-and-drop blocks to create apps, even if you’re not a developer.
- Handle core data actions: Easily add, view, edit, or delete records without setting up the logic yourself.
- Work with your existing data: Connect to databases, spreadsheets, or APIs so you’re not starting from scratch.
- Control access: Control who can do what with the data securely, ideal for teams or client use.
- Skip repetitive setup: Forms, lists, and layouts are ready to go, so you don’t have to build them by hand.
- Adapt as you grow: Start small, then add features or users as your needs evolve.
With a CRUD builder like Softr, you can describe the app you need and let the AI Co-Builder generate it, or start from a ready-made template (for example, a client portal template) and adjust it to your needs.
Once set up, your users can:
- Create requests, upload files, or submit forms
- Read project updates, timelines, invoices, and shared documents
- Update their contact info, preferences, or submissions
- Delete outdated data to keep their records clean and accurate
Everything stays secure and accessible across devices, with personalized access based on user roles.
How to build a CRUD app with Softr
Building a CRUD app on Softr is faster than you might expect. Here's the path from idea to live app:
- Structure your data. Decide on the records you need to manage (contacts, tasks, projects, invoices) and the fields for each. Good data structure is most of the work.
- Generate the app with the AI Co-Builder, a template, or from scratch. Describe your use case and let the AI Co-Builder scaffold the database, pages, and user groups, pick a ready-made template, or build manually if you prefer full control.
- Set up user groups and data restrictions. Define who can see and do what with role-based user groups, then enforce row-level security with global data restrictions so each user only sees their own records.
- Build your pages with native CRUD blocks. Use tables, lists, Kanban boards, forms, and detail pages that natively support Create, Read, Update, and Delete actions on your records.
- Automate with Softr Workflows. Trigger automations directly from UI interactions (like an action button) or when a record is created or updated, no external tools required.
- Publish and invite your users. Preview as different user groups to test permissions, then publish on a custom domain and invite your team or clients.
How to use Softr’s CRUD application builder
Softr is the first AI-native no-code platform, letting you build user-friendly, customizable public-facing portals, intranets, or other internal tools using your existing data. As a full-stack ecosystem, it brings together the interface, native Softr Databases, and native Softr Workflows in one place.
You can create CRUD apps using Softr’s drag-and-drop building blocks for various views and functionalities (charts, tables, Kanban, forms, calendar) without writing a single line of code. Even better, you can describe what you need and let the AI Co-Builder build it for you, or choose from hundreds of pre-built, easy-to-customize templates to save time.
Here’s a step-by-step guide for using Softr to create a CRUD app in less than 10 minutes:
Step 1: Log in to Softr or create an account if you haven’t already
To start building your CRUD app, log into your Softr account. If you don’t have an existing account, sign up for free.
Step 2: Generate with AI, pick a template, or start from scratch
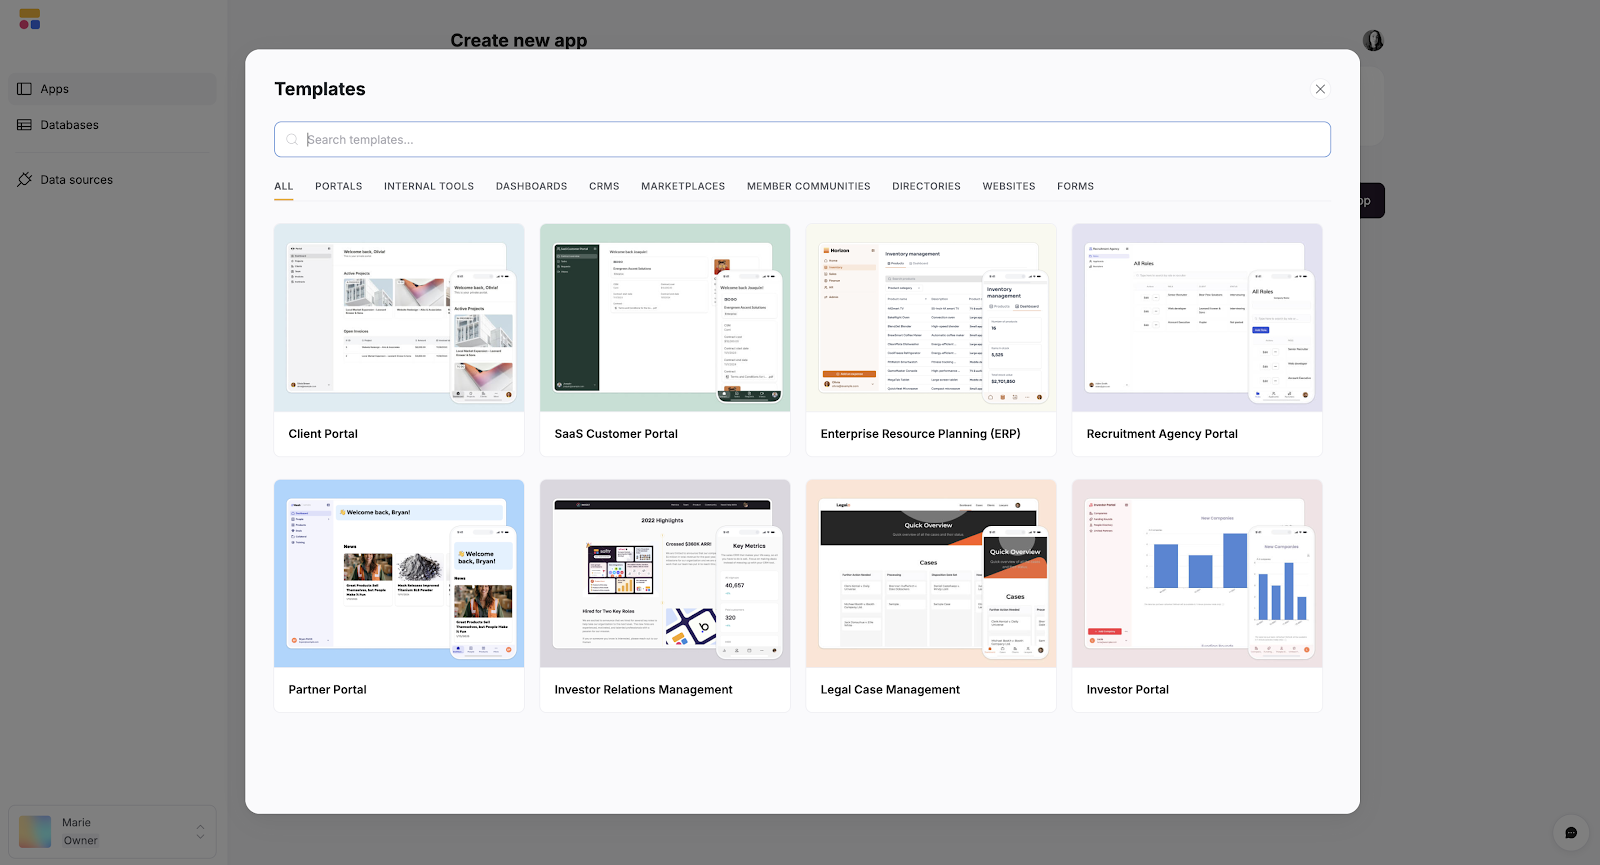
The fastest path is to describe your app in plain language and let the AI Co-Builder generate the database, pages, and permissions for you. If you prefer, Softr also has a library of responsive pre-built templates you can choose from, so you don’t have to build your CRUD app from scratch. After logging in or completing the sign-up process, click on “all templates” to choose the best one for your project.
If you prefer to build from scratch, click on “start from scratch.”

Step 2.1 Search for the right template
There are three ways to find the template you need.
- Click on any of the categories and scroll until you find one that matches the CRUD app you want to build.
- Scroll down the “ALL” until you find one that matches the CRUD app you want to build.
- Use the search bar to type a keyword for the template you want to use and hit “Enter.”
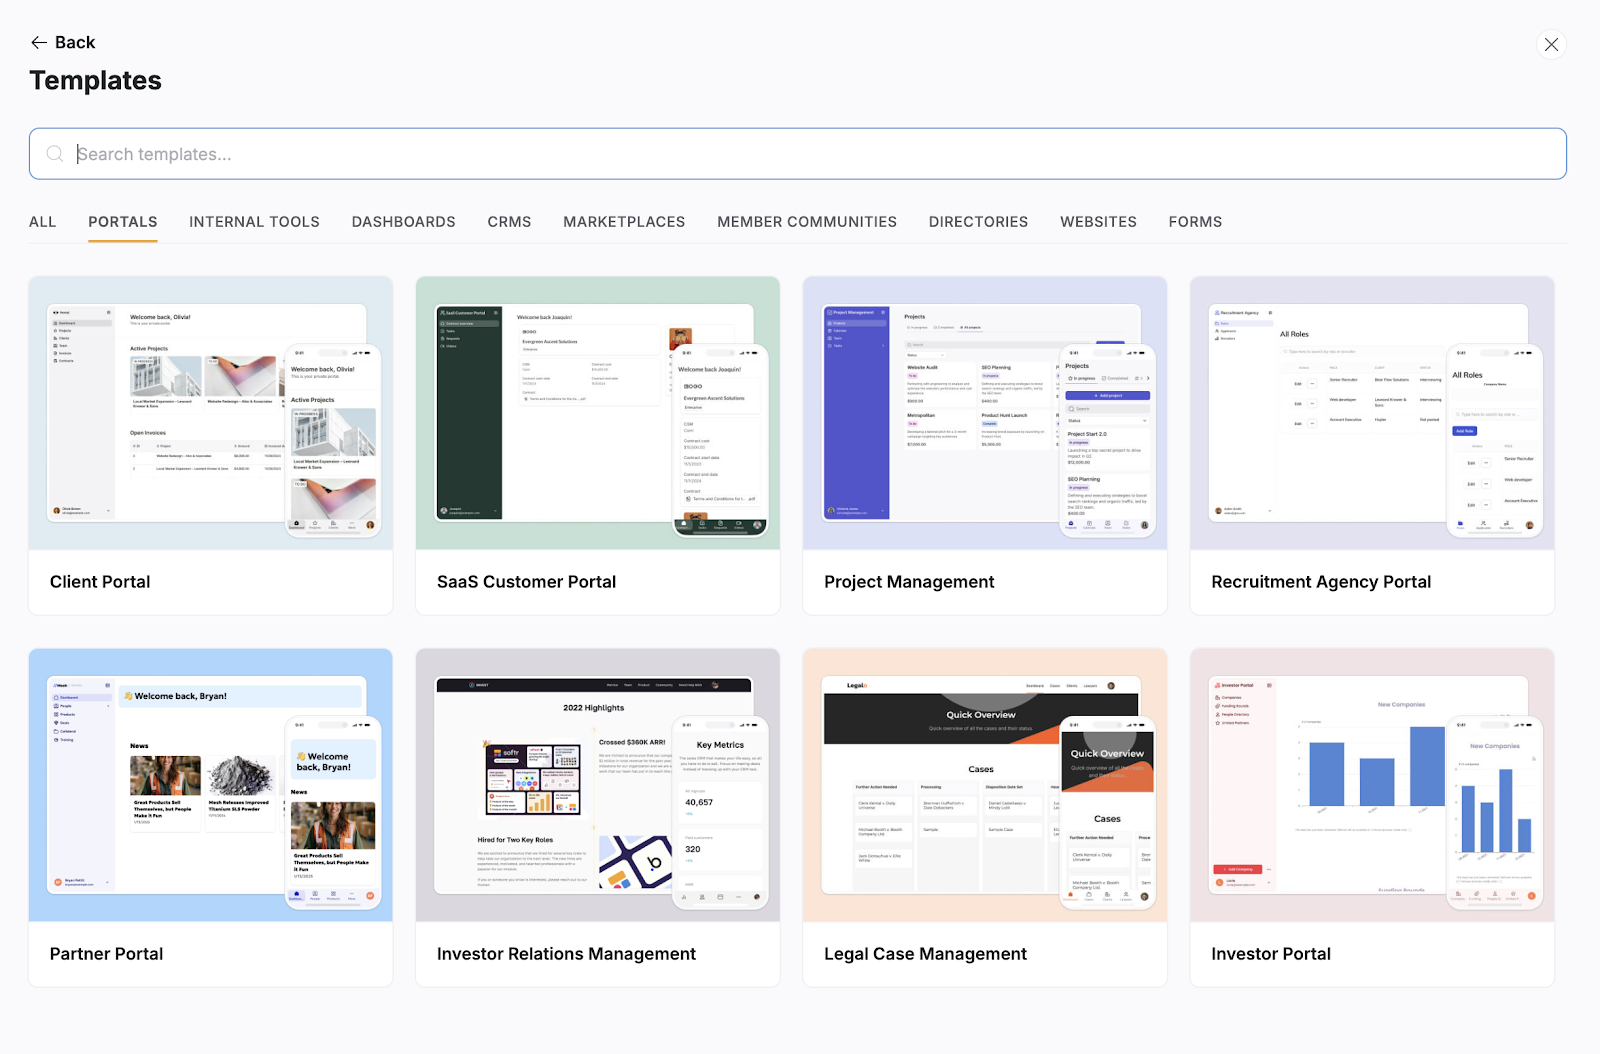
For this example, we will use the client portal template.
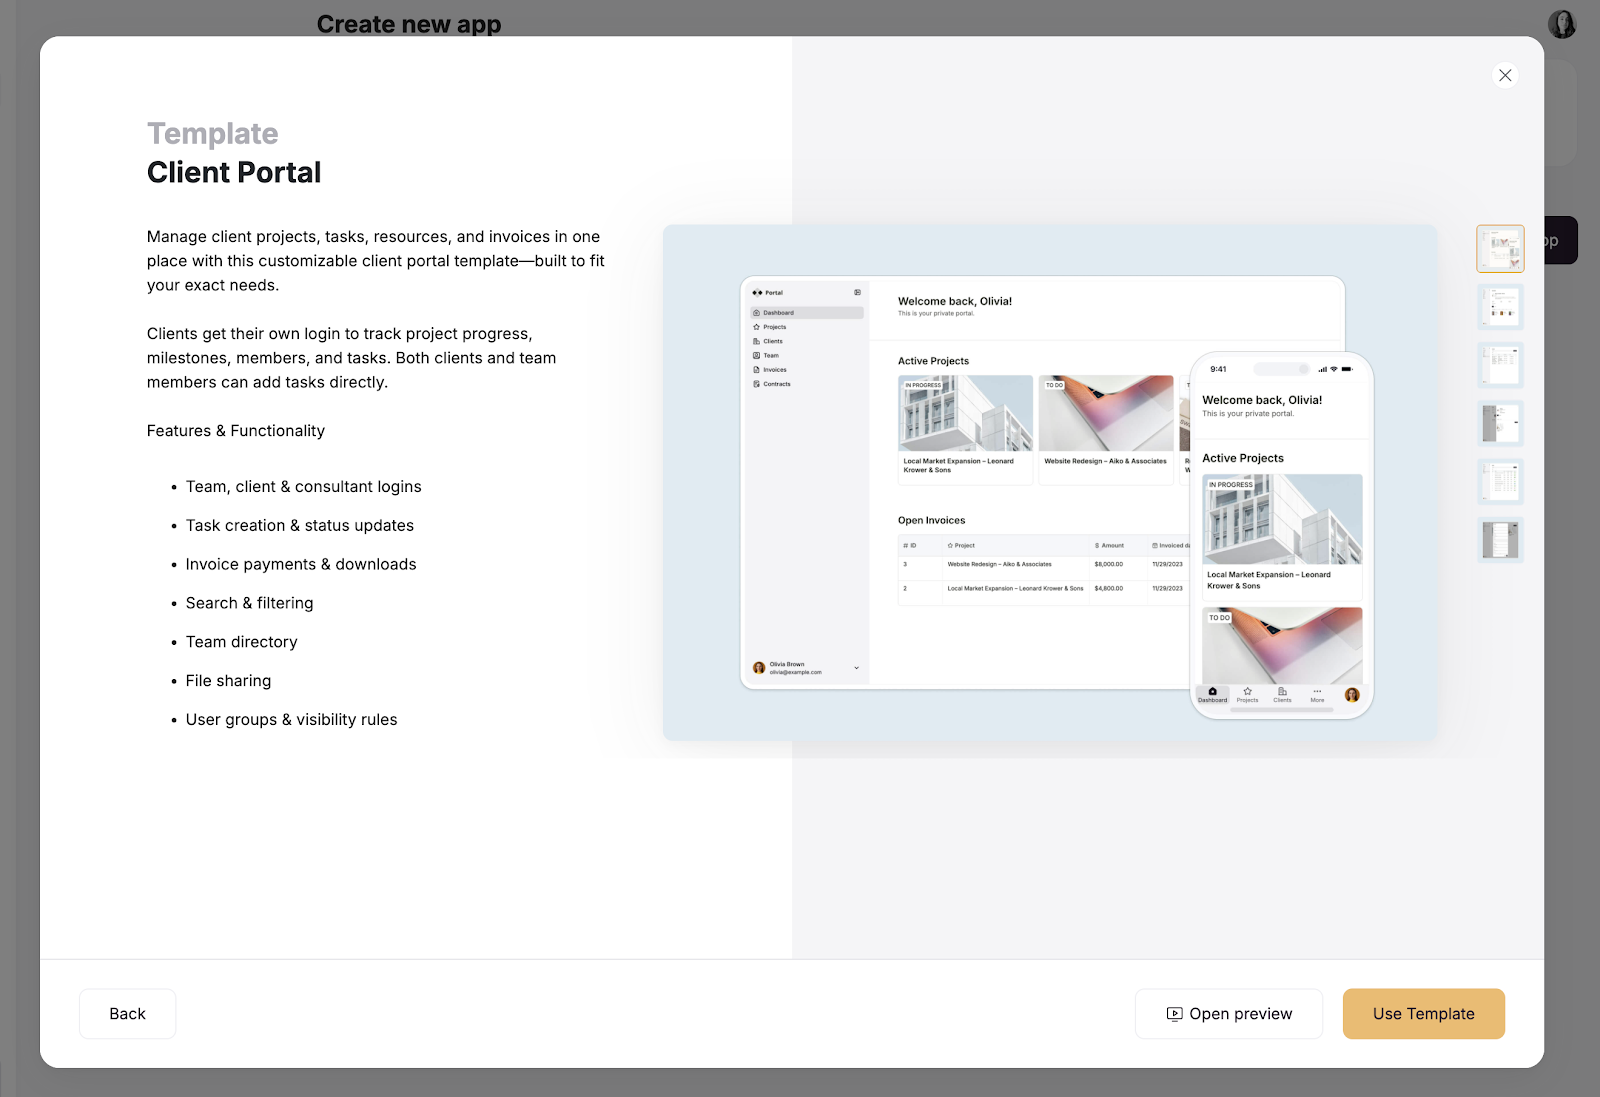
Step 2.2: Click on the template you want to use
After selecting a template, click “Open preview” for an overview of the template, and then click on the “Use Template” button to start building.
Step 3: Connect your data
Now, you can store all of your data directly within your app with Softr Databases, which is the recommended option because keeping your data, workflows, and interface in one native platform gives the best performance. If your data must stay where it already lives, you can also connect your app to one of 17+ external data sources such as Notion, monday.com, or Google Sheets. It natively works with dynamic data; changes made in one system are automatically reflected in the other in real-time. You can even ask the Database AI Co-Builder to generate your tables, fields, and relationships from a plain-language description.
Our templates also include sample databases to help you understand the necessary data structure, especially if you're building for the first time.
Step 4: Edit your interface
A good user interface gives users autonomy to create, view, update, and delete data every time they need to do so. To make your application user-friendly:
Step 4.1: Select the page you want to edit
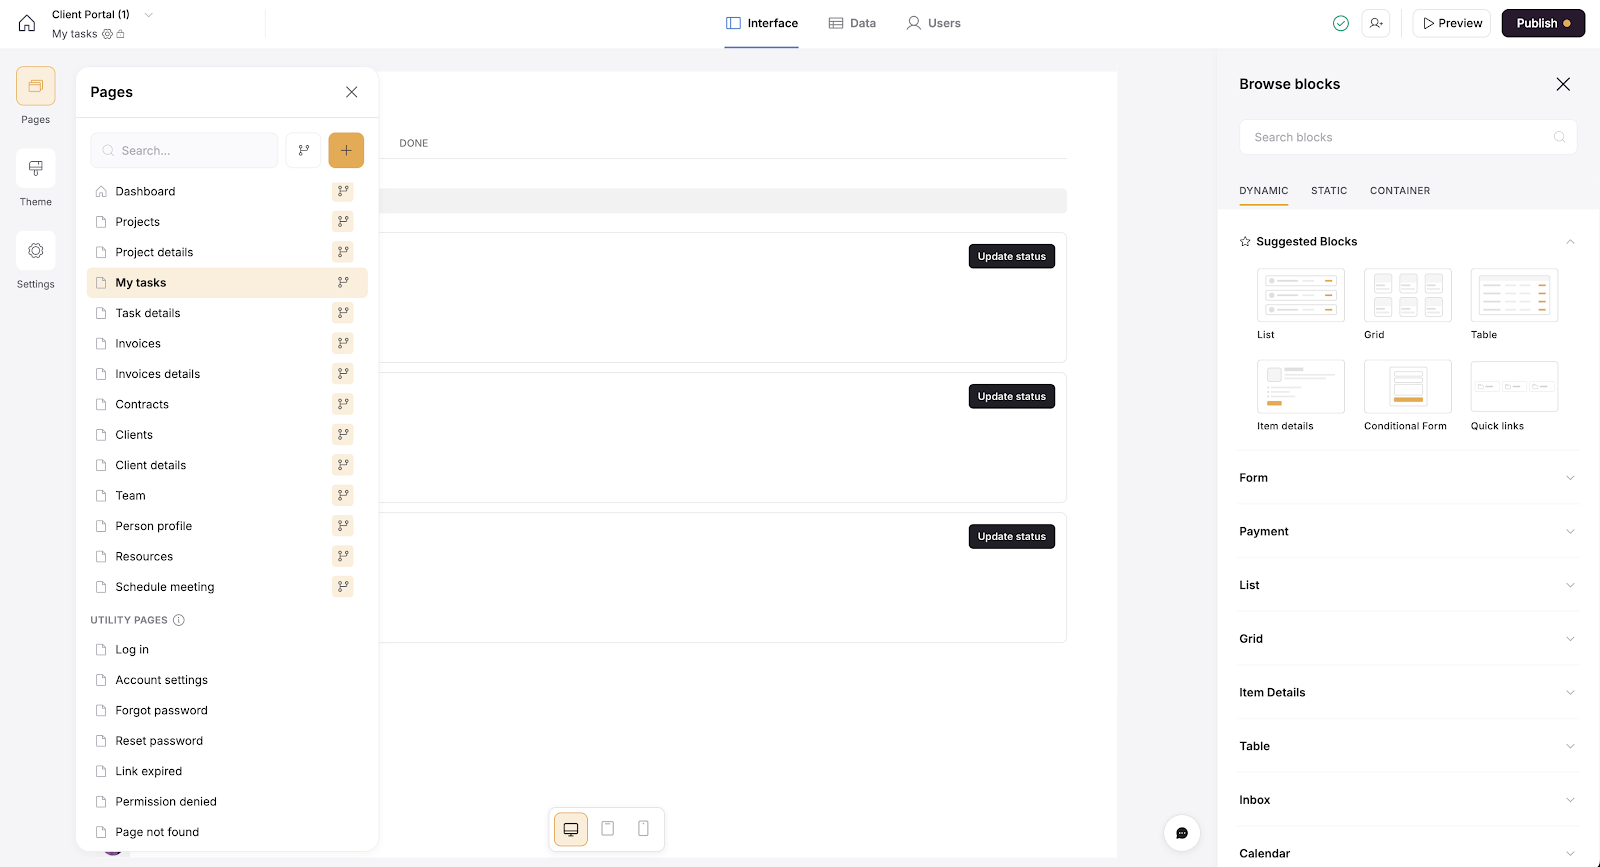
All Softr templates include all the necessary and optional pages that make up the user interface you’re creating, and you can customize each one. To do so, click on "Pages" on the left side of your screen, then click on the page you want to edit.
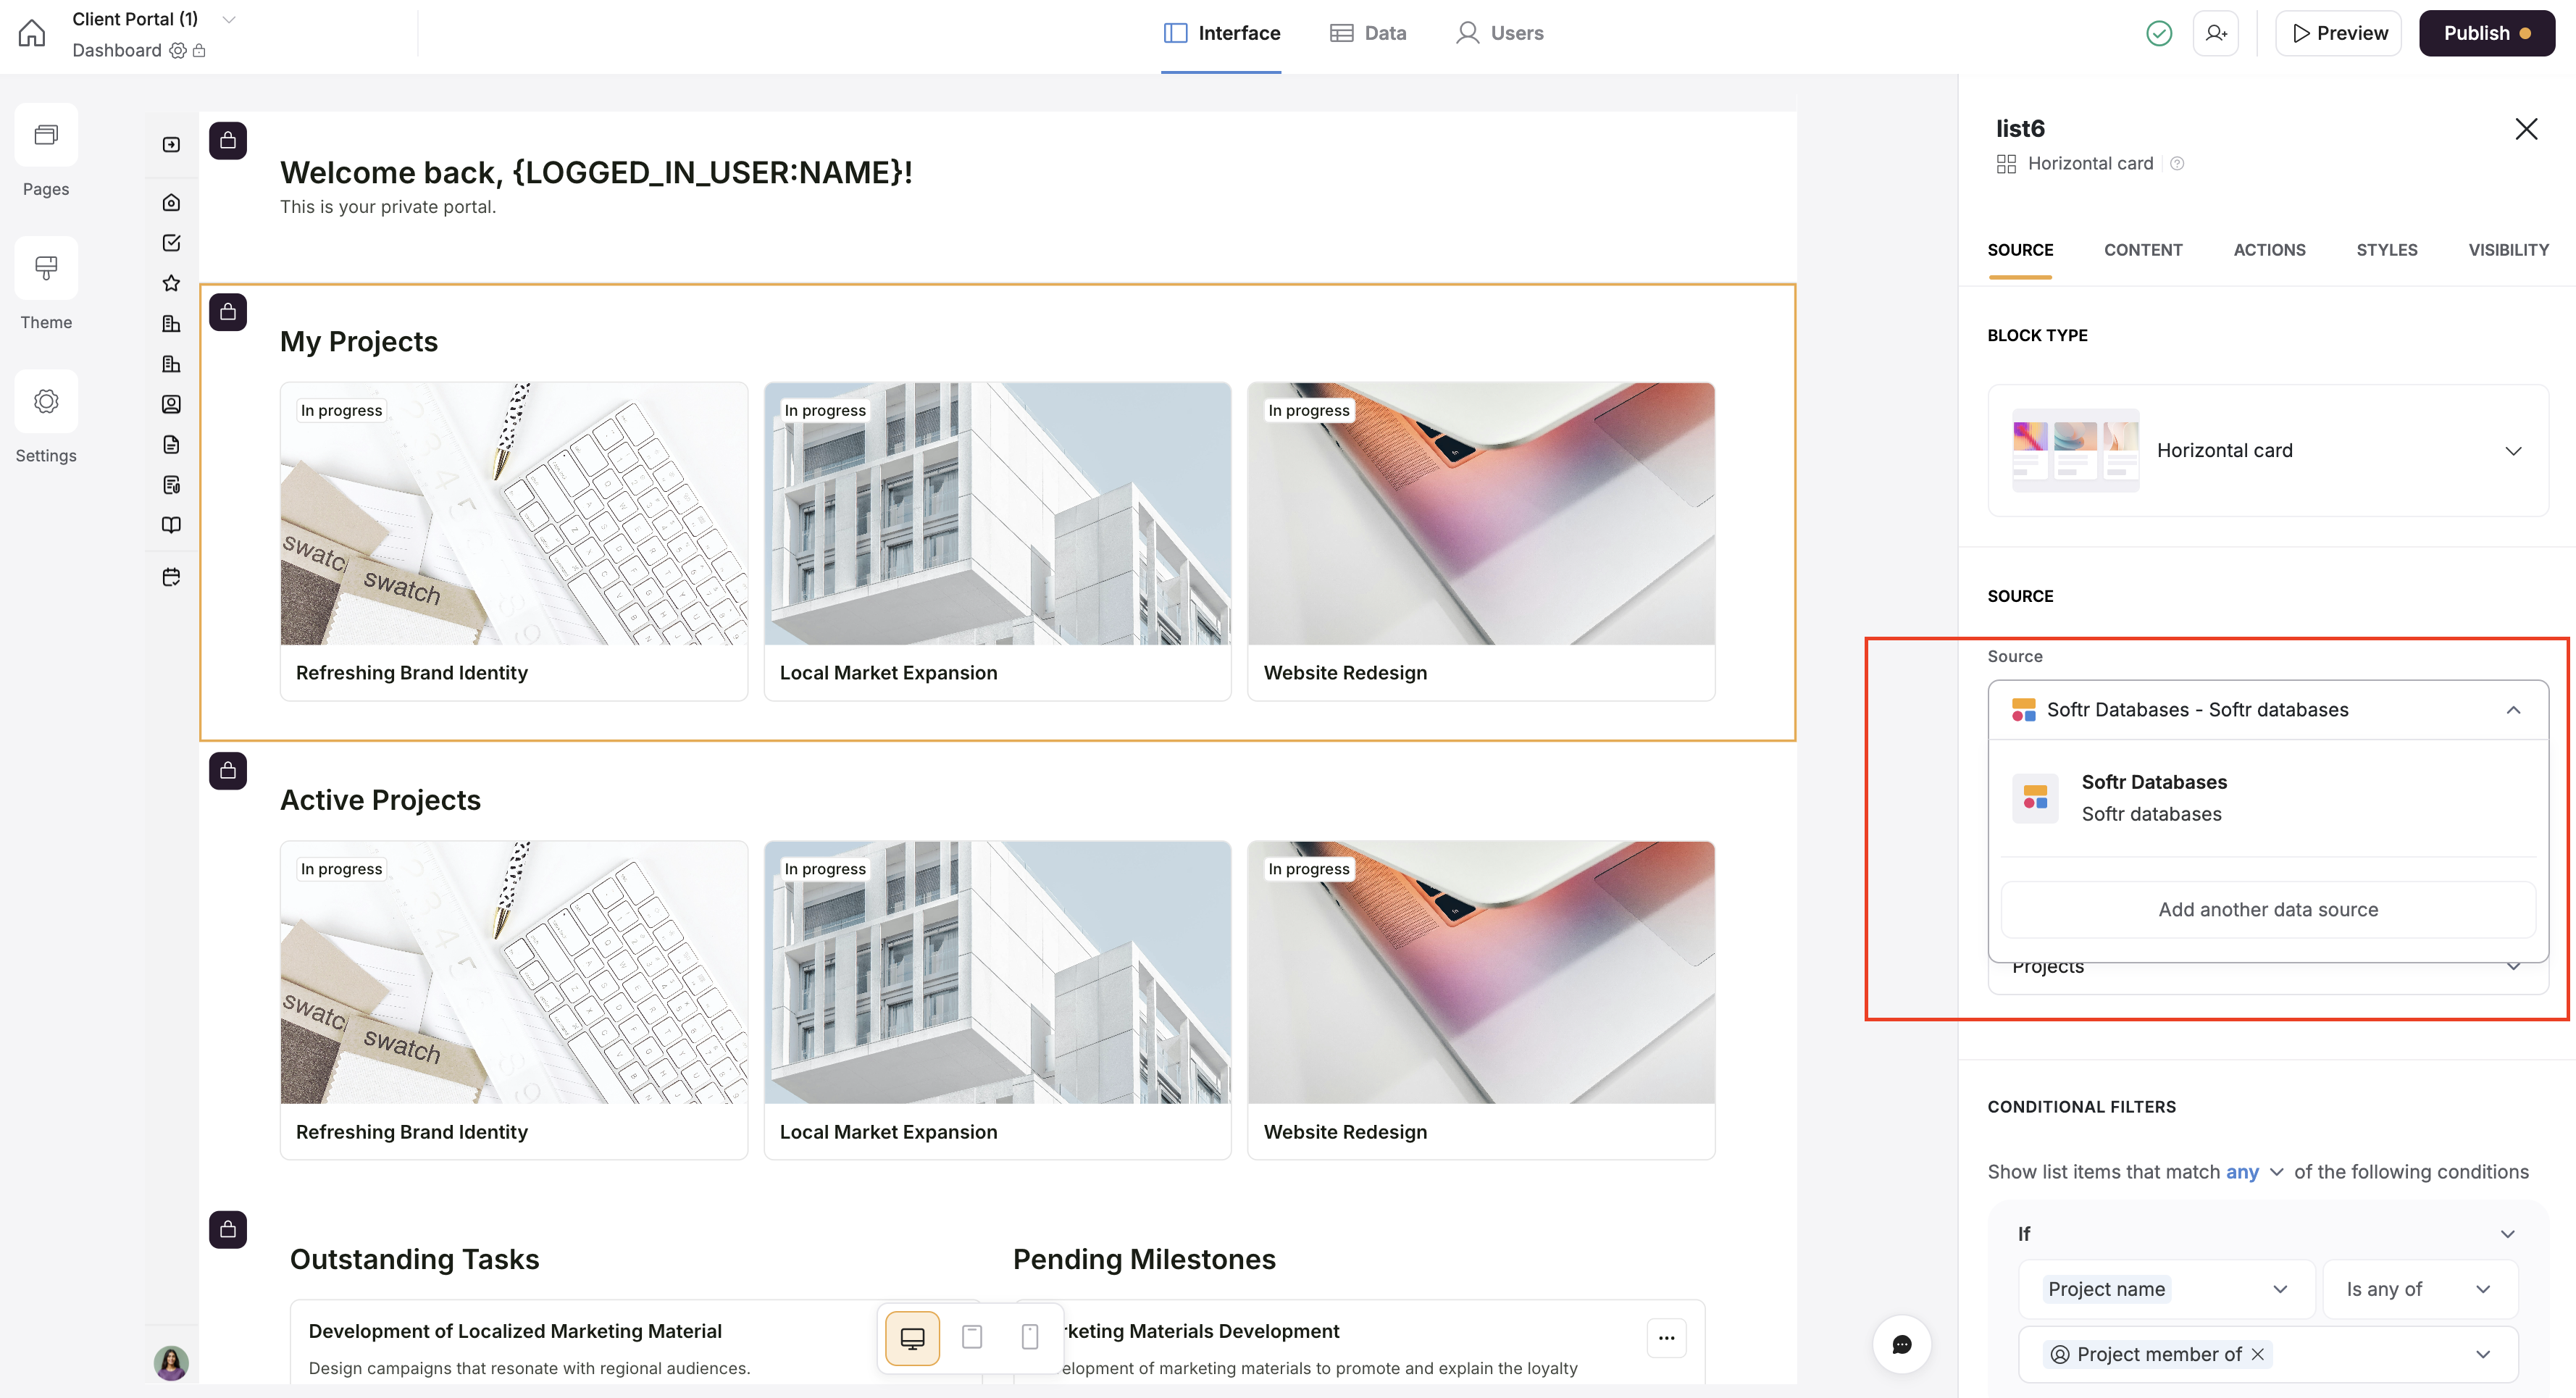
Step 4.2: Edit existing blocks that come with the templates or add new ones
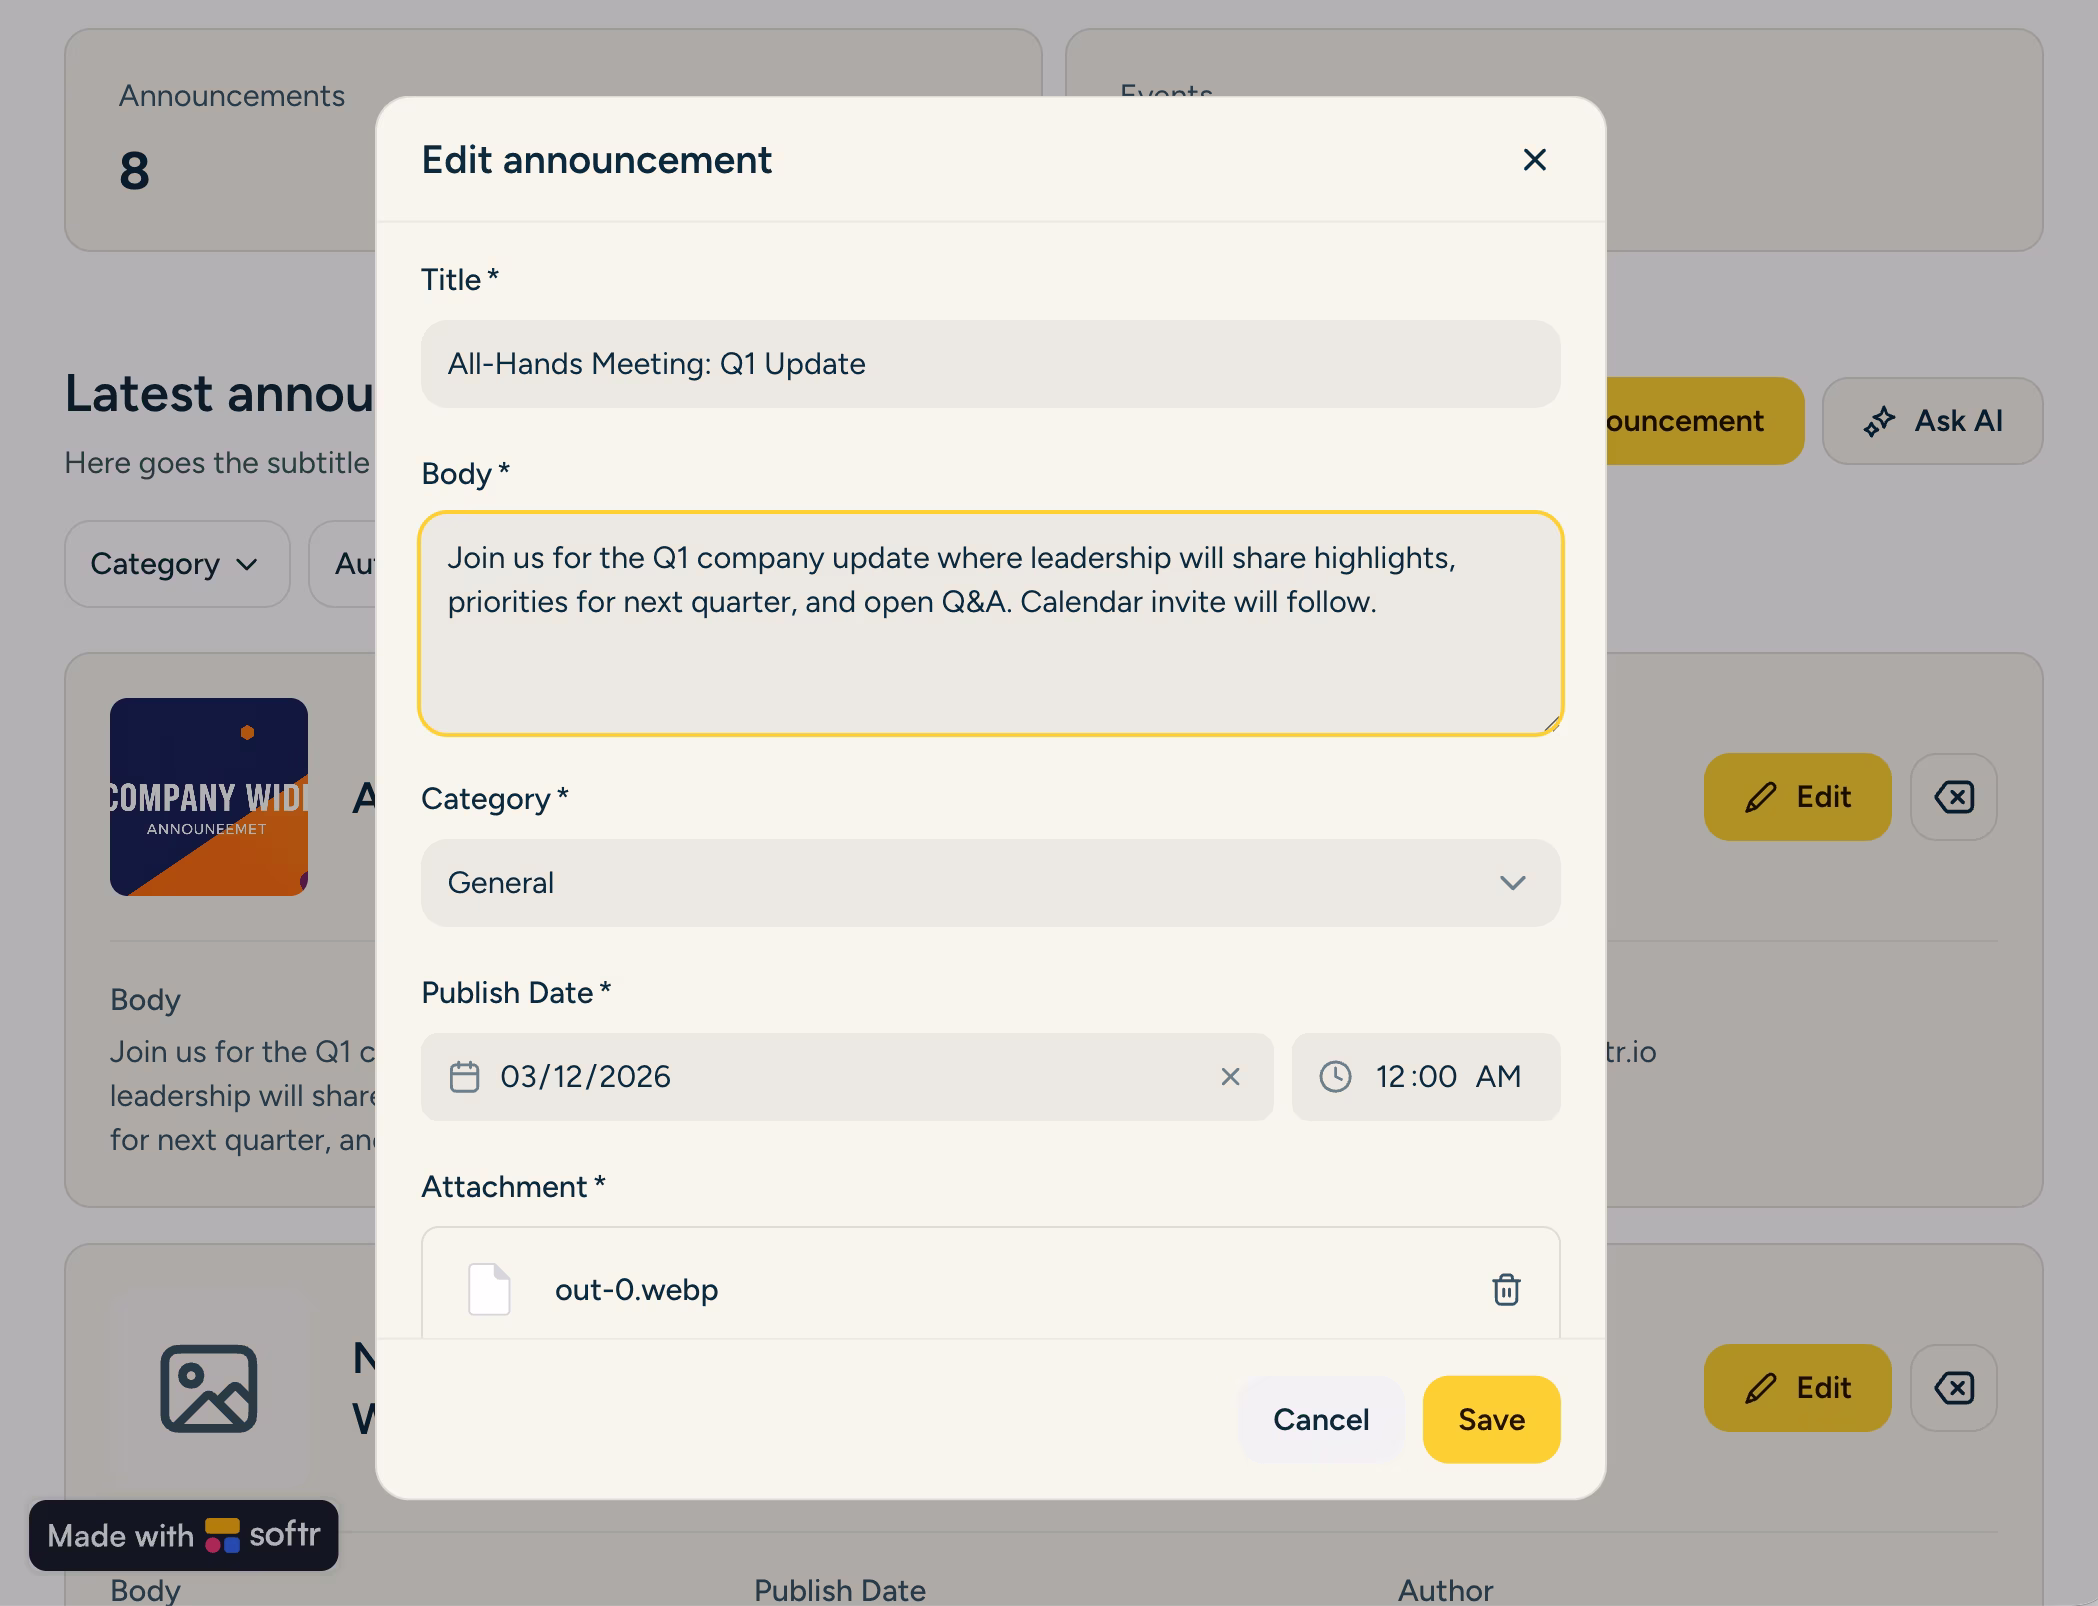
The template comes with pre-built blocks you can arrange in multiple ways to customize your app’s layout so it fits your needs and preferences. To edit an existing block, click the one you want to work on, and the editor panel will slide in.
From the source tab in the editor panel, you can update the existing conditional filters or add a new one. This helps to filter irrelevant data so that users can quickly find the information most relevant to their current task.

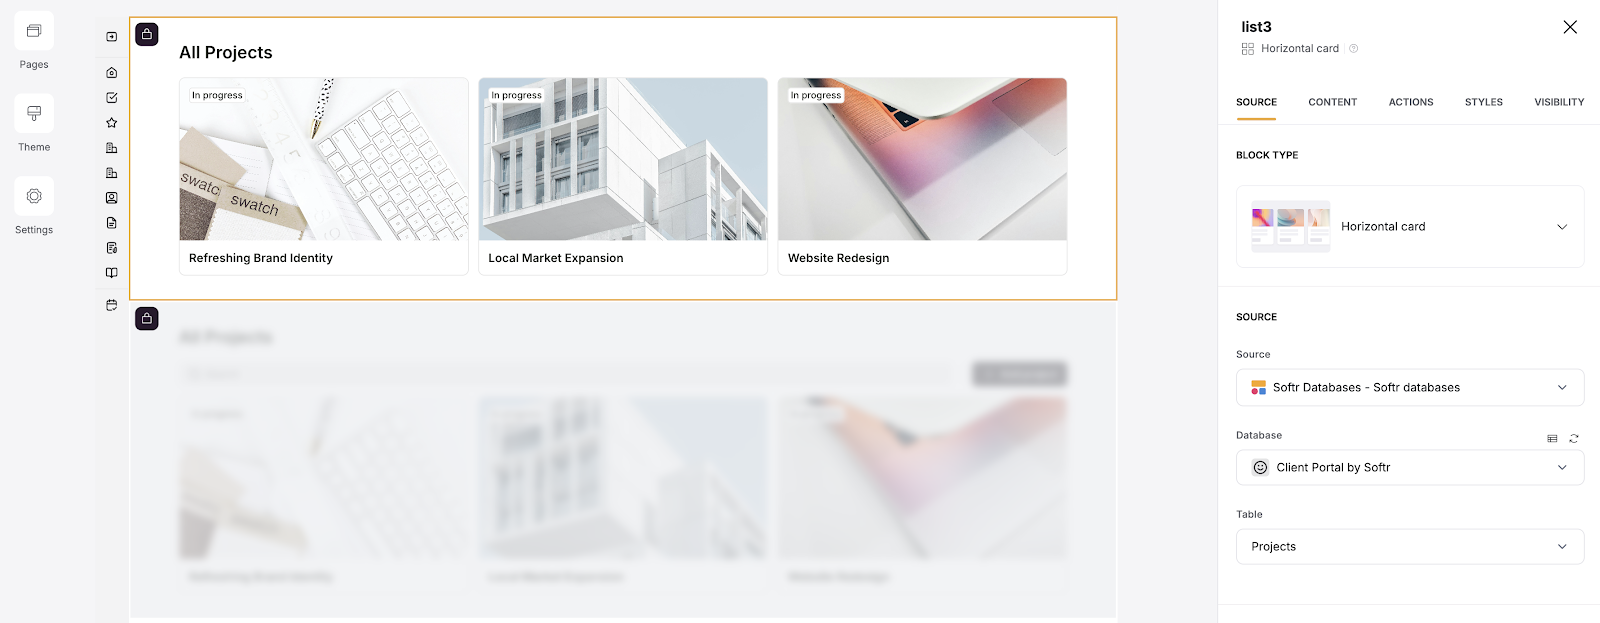
Step 4.3: Customize your page content
Click on the “content” tab to edit the block’s title and subtitle, as well as their positions.

Next, scroll down to the “Items fields” and hover over each option to hide or reveal blocks of information you don’t want to be a part of your app. If the eye is closed, it’s hidden. But if open, users can see the info on the card before clicking it.
Click the eye symbol to hide or reveal these blocks.
There are many other customization options to make your user interface friendlier.
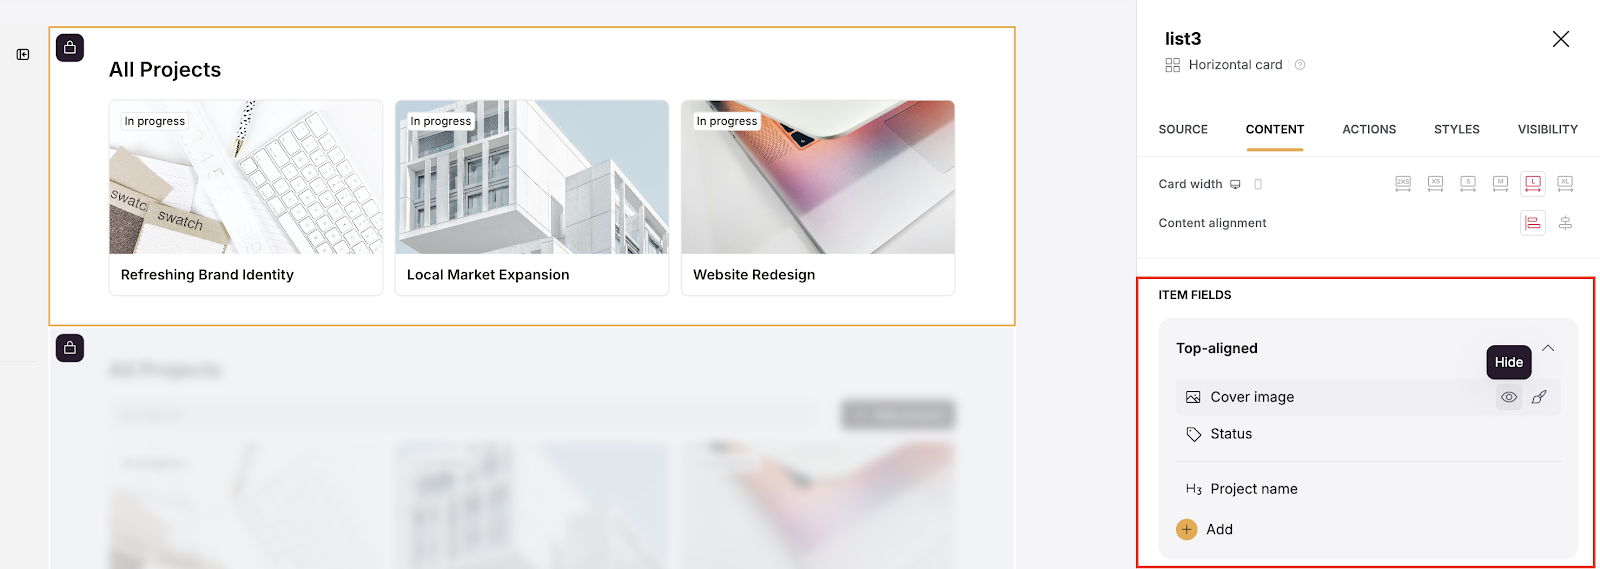
Step 5: Set up user groups
Softr lets you set granular, role-based permissions to control what users can see and do. These permissions are called “user groups.” This means that different users can have different levels of access and capabilities depending on their roles. For multi-tenant apps, you can also add global data restrictions (row-level security) so each user only ever sees their own records, even if a block filter is forgotten.
For each user group, you define what actions the users in that group can perform. These actions include viewing, editing, creating, or deleting data. You can also specify which parts of your application or data each group can access. For example:
- Admin: Full access to all data and functionalities, including the ability to manage other users.
- Manager: Access to most data, with capabilities to create and update records but limited ability to delete.
- Employee: Access to view and update their own data and certain shared resources.
- Guest: Limited access, mainly to view certain public data.

To create a user group,
- Click on “user groups” tab and click on “Add custom group” at the right side of your screen.
- After clicking on “Add custom group,” a text box will pop up asking you to name your user group. Type the name you use to identify a group of people, such as “New Clients,” then click “Save.”
- Once you have a user group, you have to add users to it, either manually or by adding users based on their attributes with conditions.

You can also hover over the user group you want to delete and click the delete icon.
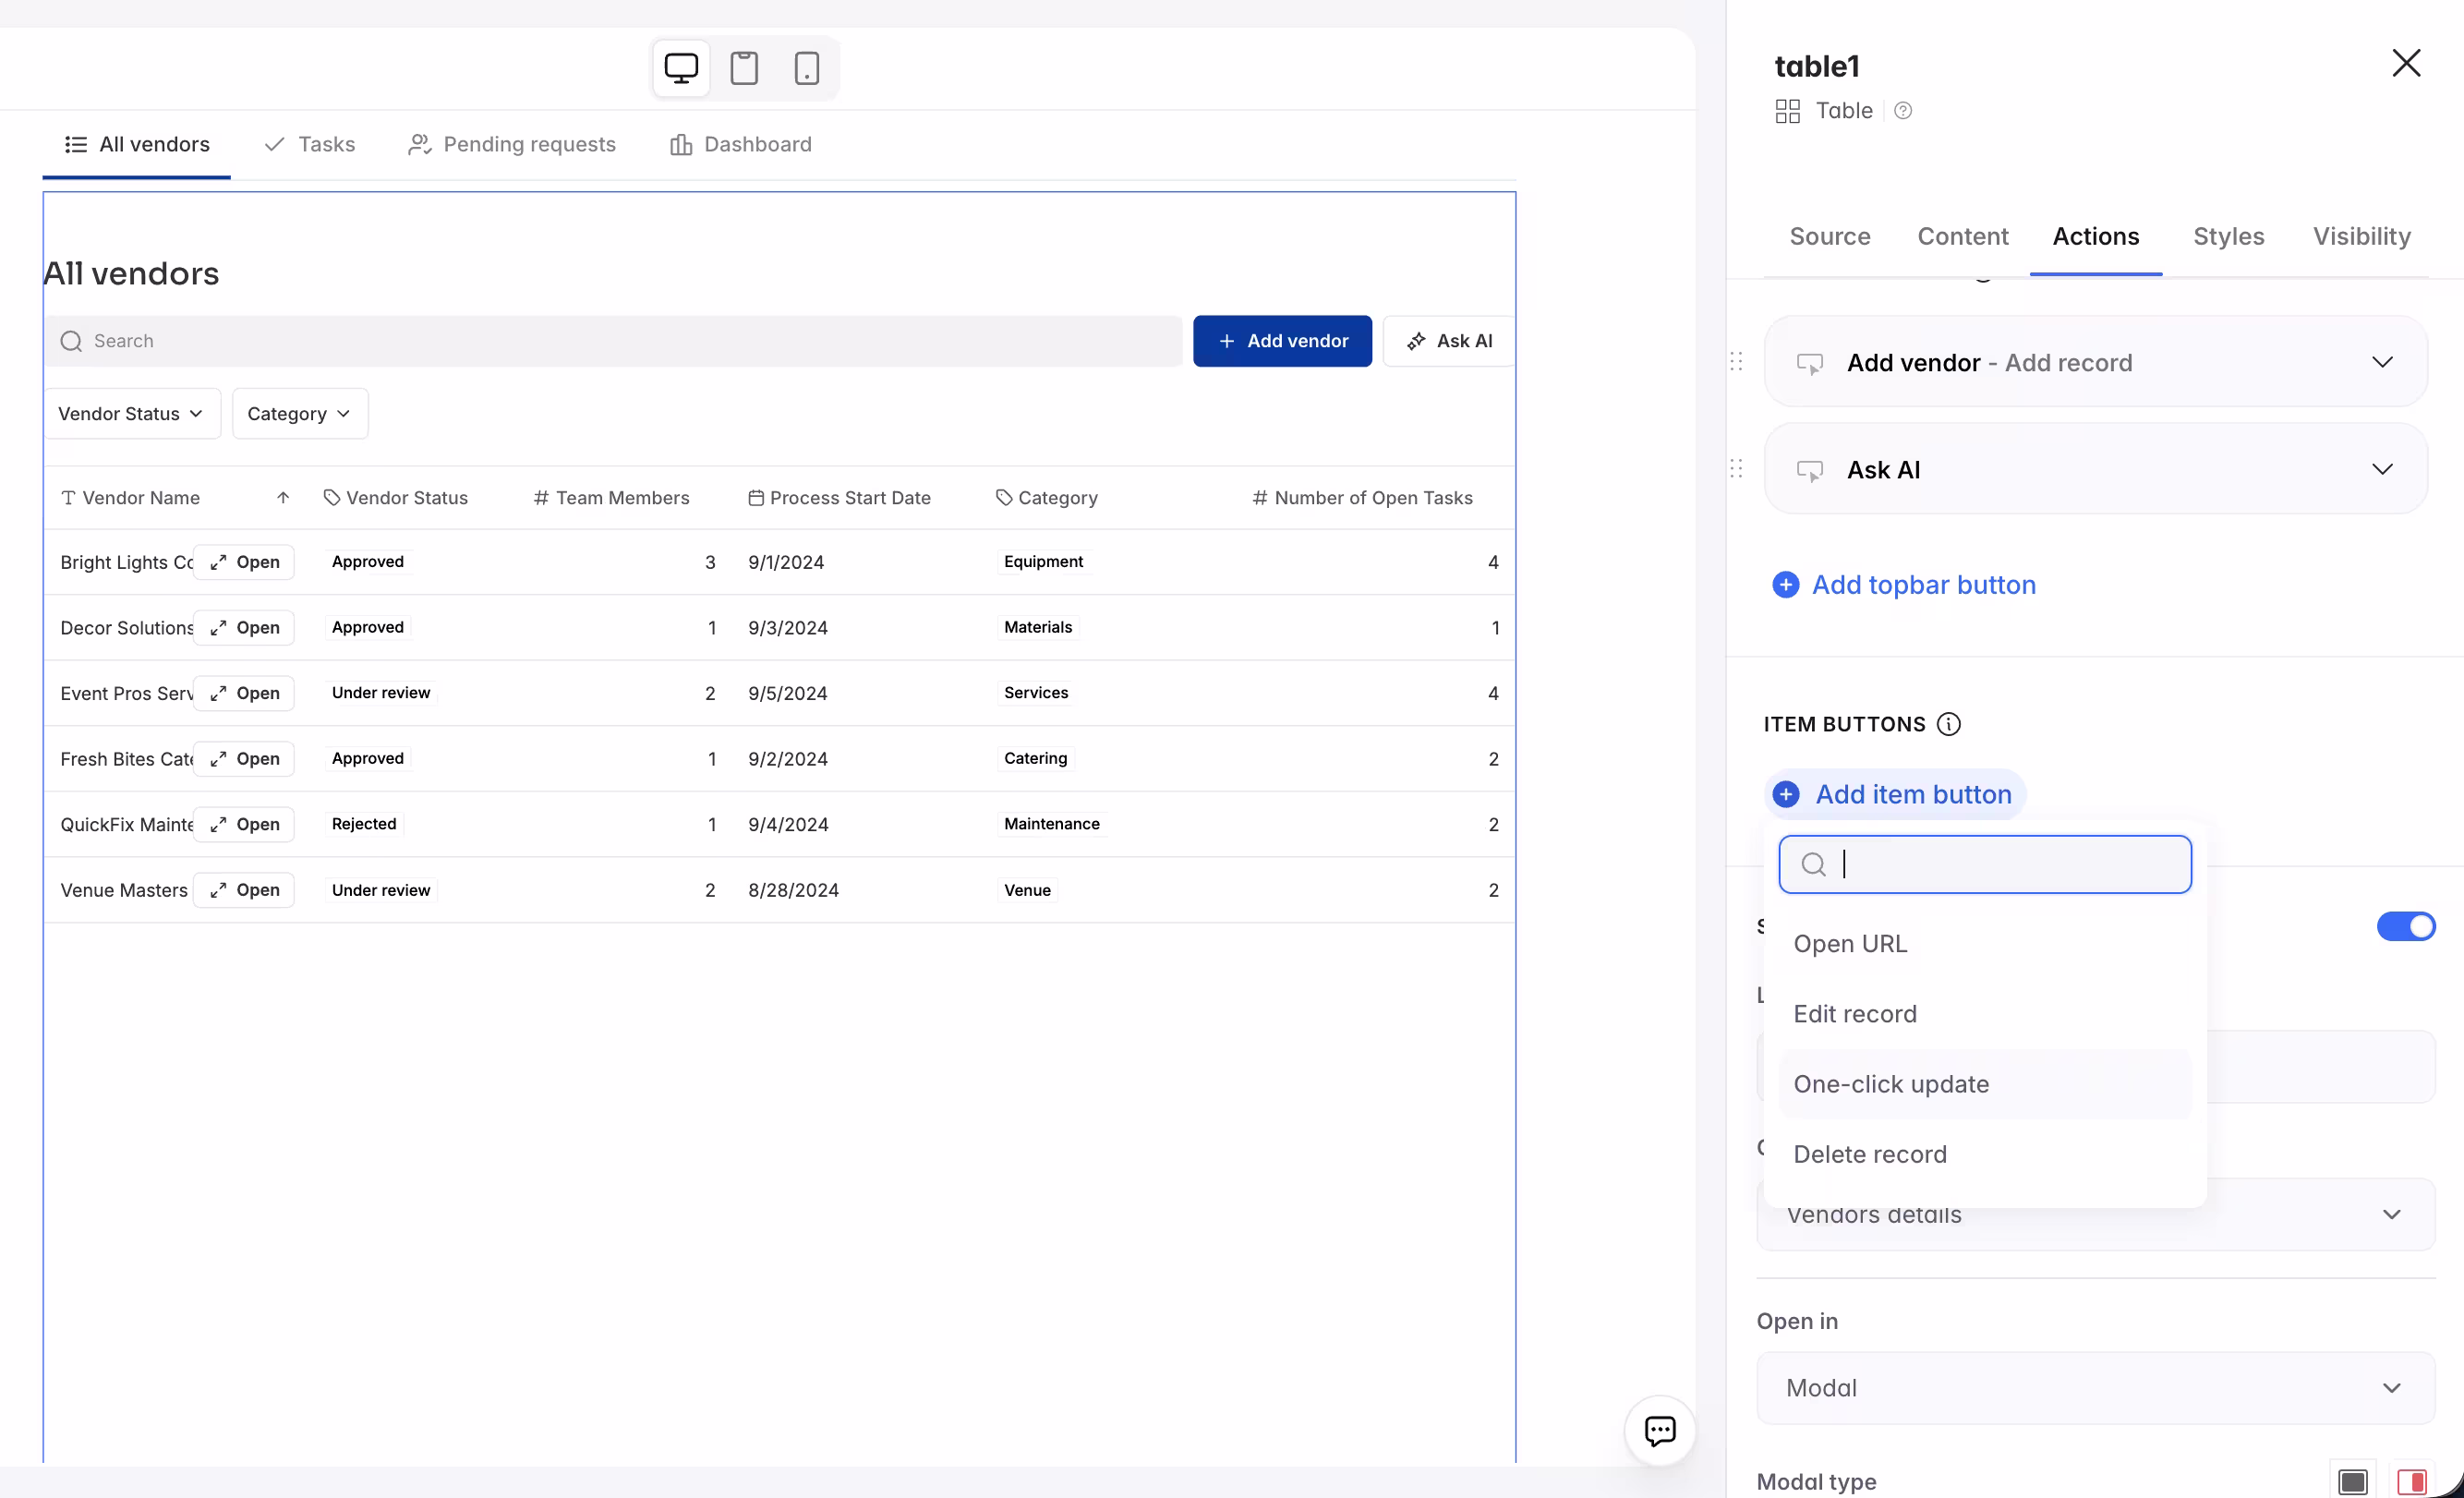
Step 6: Create action buttons
Once you’ve created user groups for your CRUD app, you can start setting up create, update, or delete actions for those user groups through action buttons. These actions are native to Softr's blocks, so your users get full Create, Read, Update, and Delete control directly from the interface.
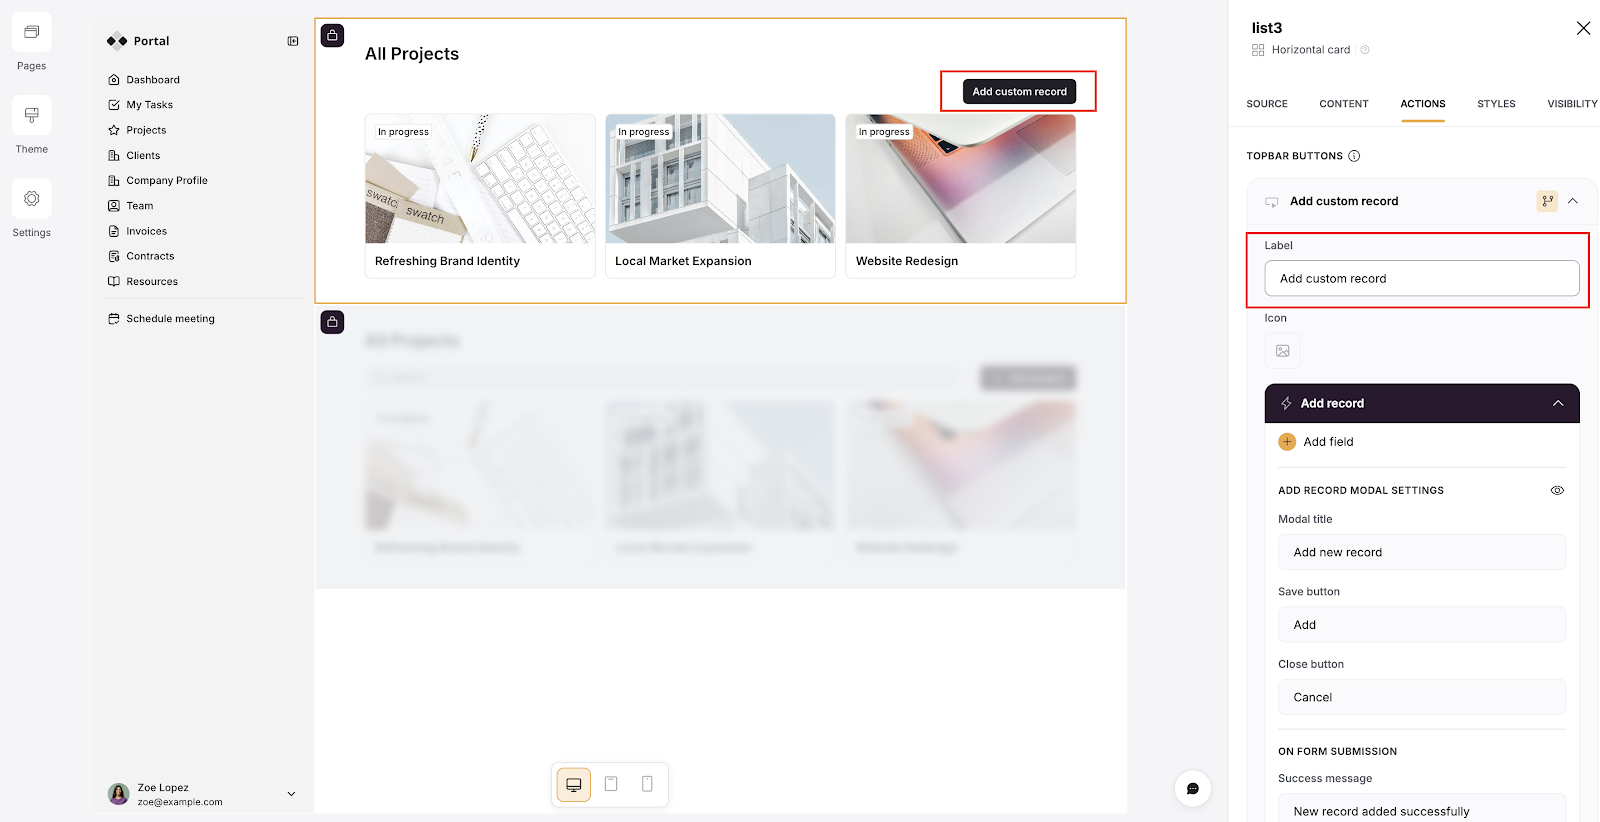
For example, say you want users to be able to add a new record from the top bar; click on the “Actions” tab and scroll to the “Topbar buttons." Click on the “+” and select “Add record.” If you would rather not configure these one by one, you can also ask the AI Co-Builder to add the action buttons for you by describing what each one should do.
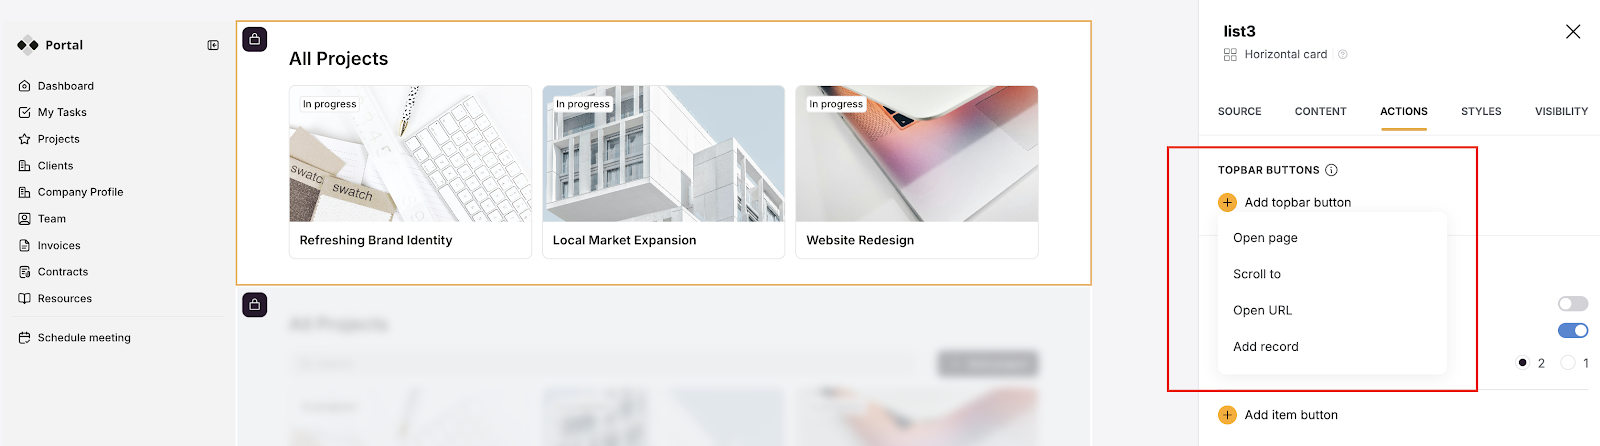
You can edit the label, add a field, and choose what happens when a user creates a record. The result is a clean form your users fill in to add new records, like this "New Product" form in a partner portal:
Also, with the action buttons, you can manage navigation actions like opening a URL.
Click on the “Actions” tab and scroll to the “Add topbar button” section. Then click on the dropdown and select what a user should see when they click on a card.
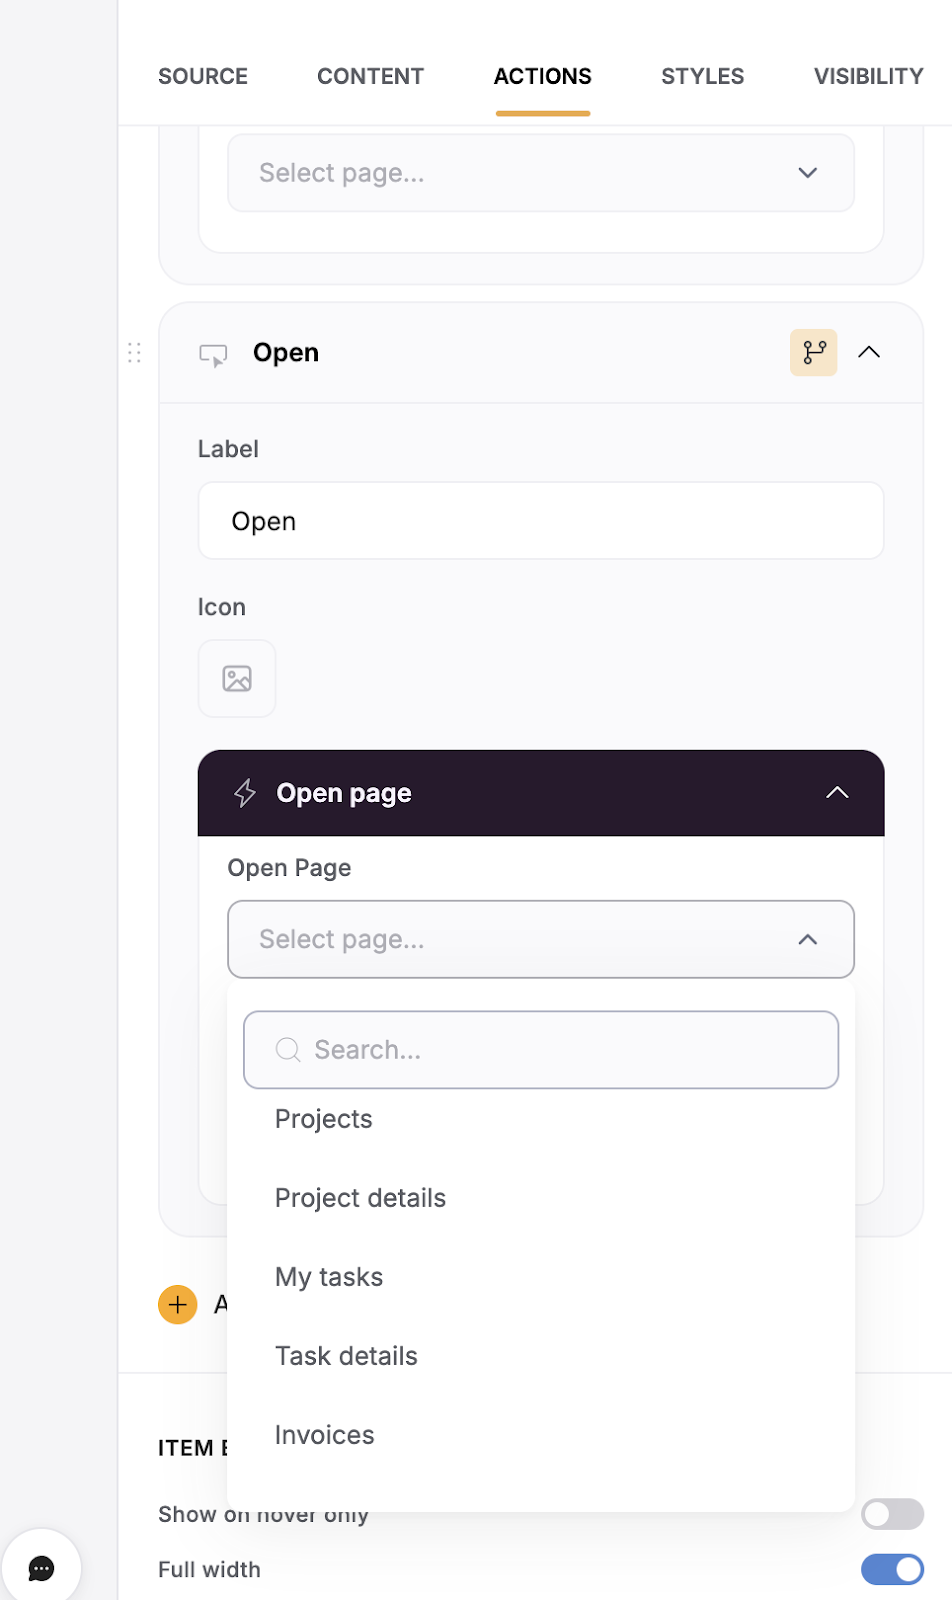
In our example, we selected the option “Open page” and picked the "Project details" page so that users can see everything they need to know.
You can also connect these actions to Softr Workflows to automate what happens next. Because workflows are triggered directly by UI interactions (like an action button) or by record changes in your database, they fire instantly without the polling delays of external tools. If external services are needed, Softr connects natively to tools like Zapier, Make, and n8n. You can even describe the automation you need to the Workflow AI Co-Builder and it will build the logic for you.
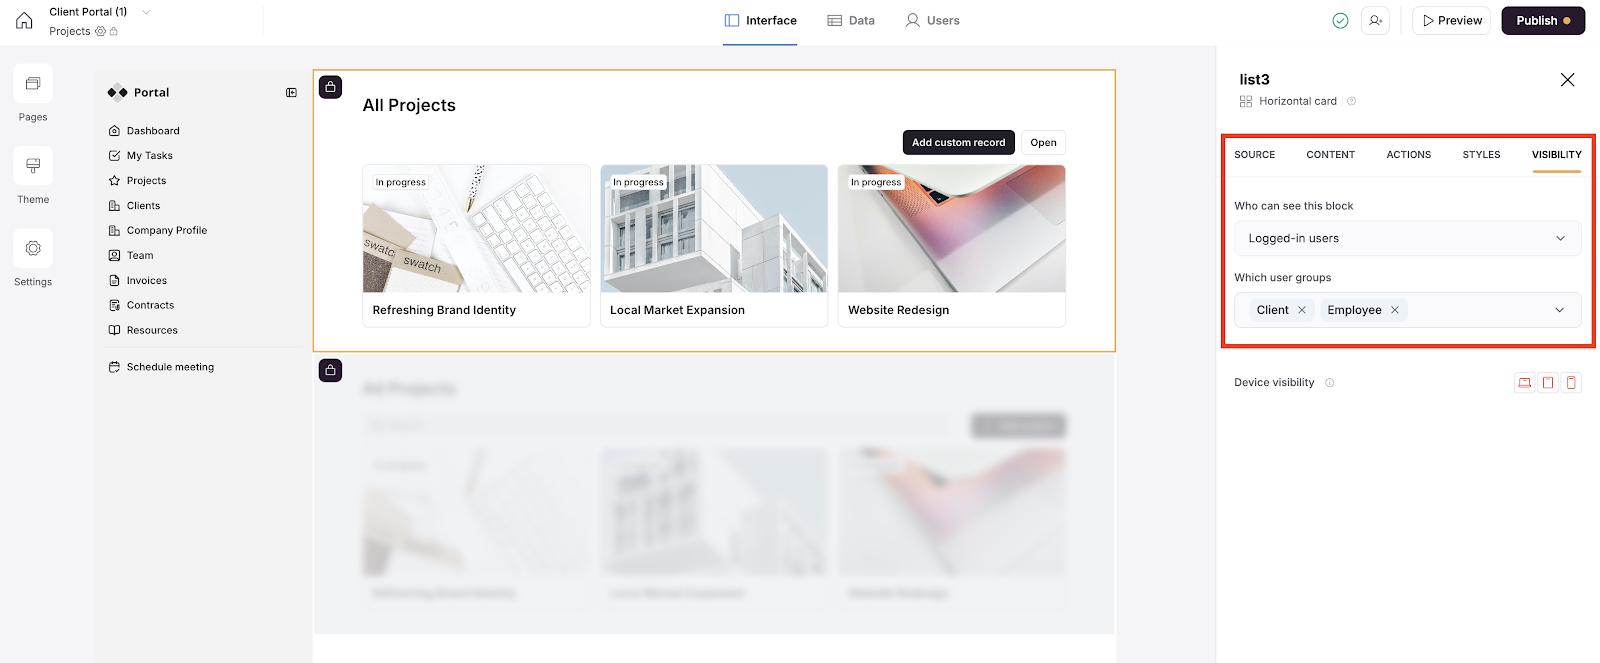
Step 7: Set up visibility
Navigate to the Visibility tab to choose who you want to see your user interface. There are three options to choose from:
- Everyone: includes those who are logged in and those who aren’t;
- Logged-in users: only those user groups who have the necessary password to access the data;
- Non-logged-in users(Visitors): only those who don’t have a password to access the data.

Choose who you’d like to see your specific blocks on your client portal and on what device. If you want to limit access, select “Logged-in users.” But if you want everyone to access the data, choose “Everyone.”
Softr's User groups lets you assign and choose the specific group of people you want to view details about your clients. If you want only a certain category of your logged-in users to access the specific block, click the “which user groups” dropdown and select your choice group.
Step 8: Preview your CRUD app
After customizing the look and feel of your app and setting up permissions, you can see how it looks before publishing and sharing it with your team. Click on the play icon in the top right corner of your screen to preview.

Step 9: Publish and share your CRUD app
Once you’re satisfied with your app, click on “Publish” in the top right corner of your screen.
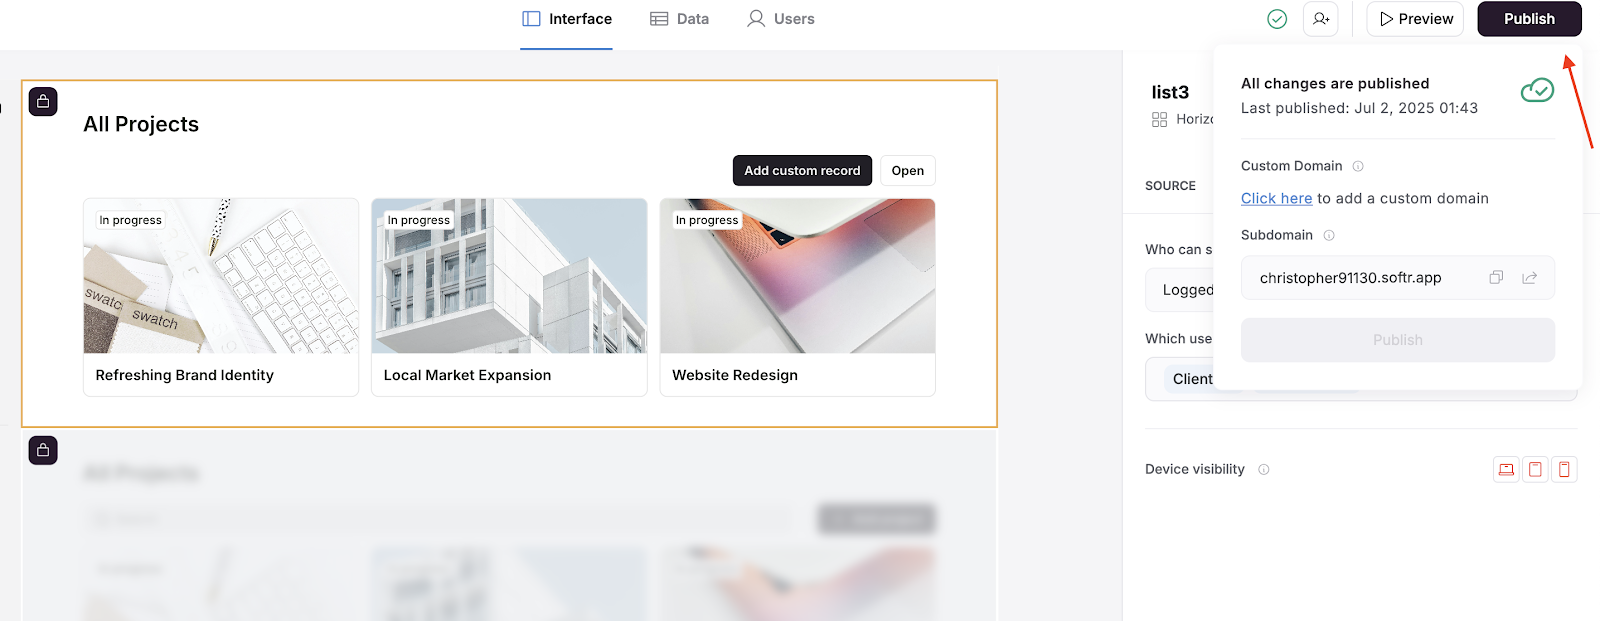
You can publish on a custom domain by clicking on the hyperlinked “Click here” text (image above).
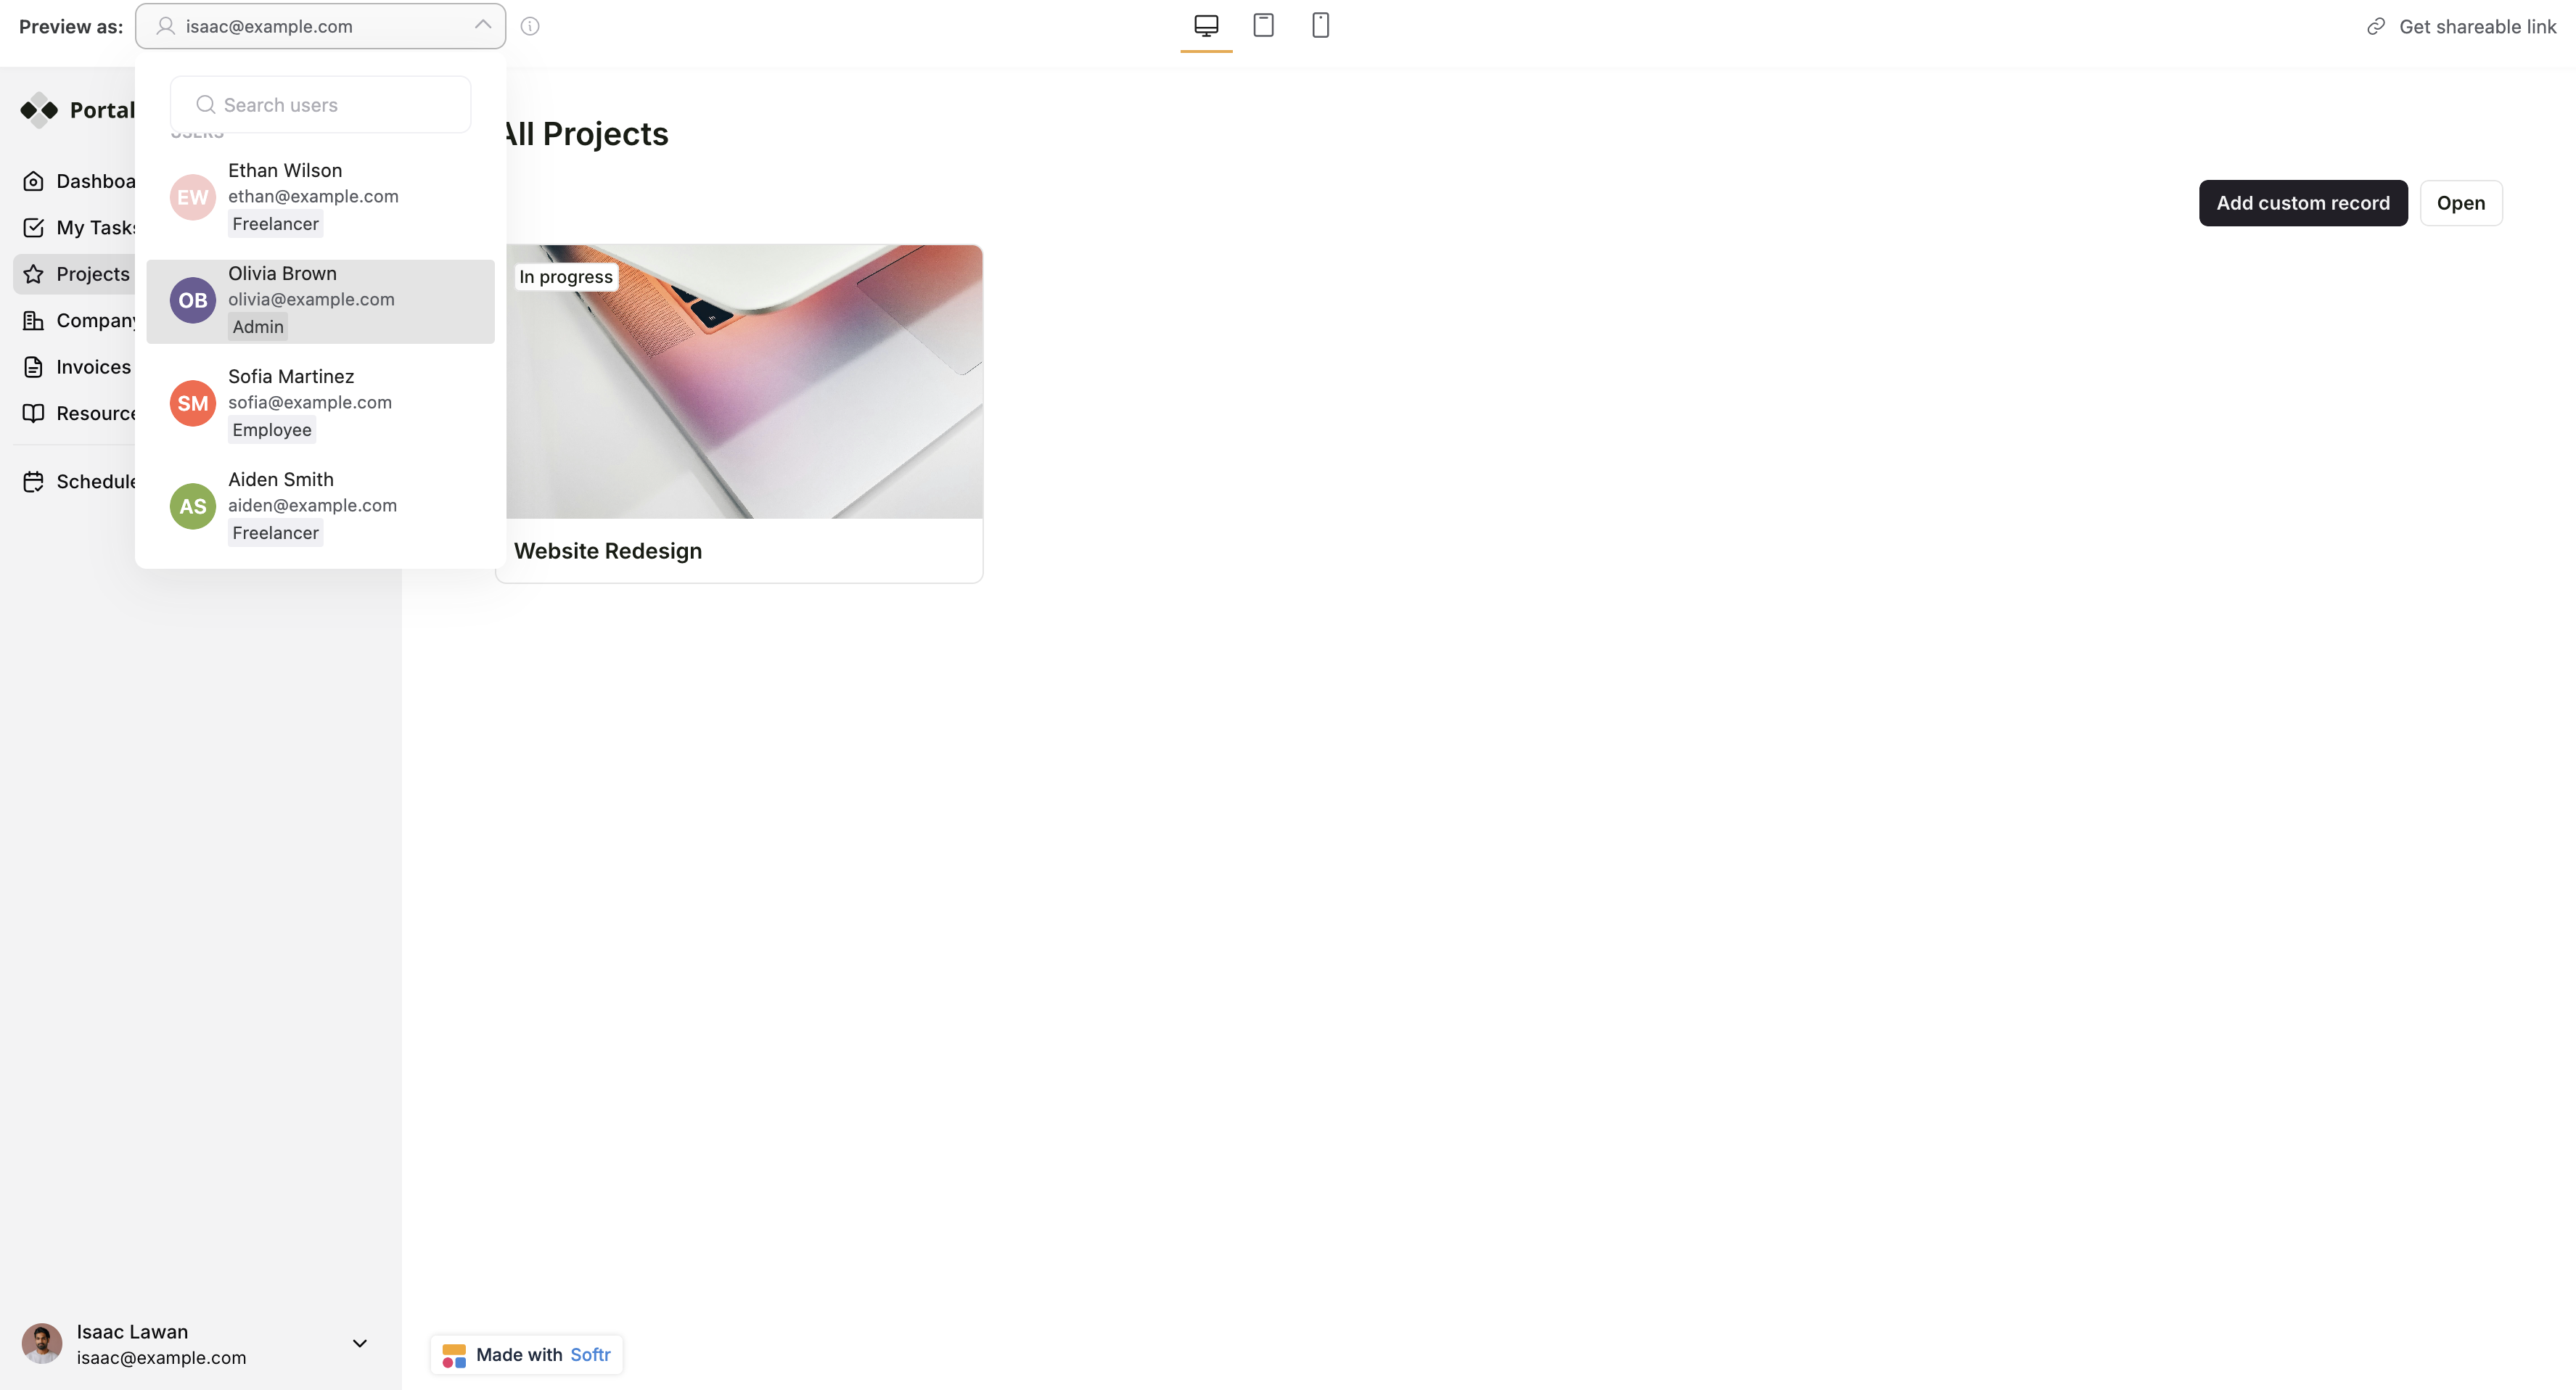
Now, after publishing, hit that "Preview" button again to test your visibility settings by clicking the dropdown in the top left corner of your screen to see what your page looks like for a non-logged-in user, a logged-in user, and users in different user groups.
And that's it — your app is now live. Sign up for free and give his same process a try today.
How to choose the best CRUD application builder
With over 150 app builders listed on review sites like G2 and Capterra, narrowing down the right platform can feel overwhelming. Here’s how to evaluate your options with clarity:
1. Focus on real-world features and value
Look beyond what’s technically possible and ask: can this tool help me build a working app that solves a real problem, quickly and clearly?
2. Test with a real use case
Instead of just browsing features, try building a small part of your actual workflow, like a client intake form or internal dashboard. The best platforms let you go from idea to working version in under an hour.
3. Look at data flexibility
Evaluate how easily you can:
- Connect to your actual data source (not just import CSVs)
- Keep that data live and in sync
- Structure relationships (linked records, user filtering, etc.)
Many tools fall short here, especially when you're moving beyond static data or need multi-user filtering.
4. Check permission and visibility control
Test how easy it is to:
- Create different user views
- Set role-based access
- Restrict or show content conditionally
CRUD tools are often used for internal or client-facing apps, where fine-grained control is a must.
5. Assess learning curve and team fit
Let a non-technical teammate build something. See if they get stuck, how much documentation they need, and what their learning curve looks like.
6. Audit how extensible it is
Even no-code tools should support growth. Check:
- Can you embed custom code if needed?
- Does it support automations, APIs, or webhooks?
- How easy is it to add new logic or integrations?
Additionally, check if the platform has a strong user community and customer support, including direct support channels. These will come in handy when you hit a wall and need help.
Build your first (or next) CRUD app in minutes
If you’re looking for a faster, more flexible way to manage data, a CRUD application builder is a smart place to start. You don’t need to code, hire a dev team, or wait on exports. Just choose your data source, set permissions, and go live.
With Softr, you can build a working tool in minutes. Whether it’s a client portal, internal tracker, or team dashboard, you get full control over how your data is accessed, updated, and shared. Teams are already doing exactly this:
"Softr is helping me build a unified, multi-tenant portal to create visibility for the team and help create a better onboarding experience for property owners. The AI Builder is great to use, and the Vibe Coding block is great to use to build custom blocks. It is easy to set up databases, link databases, and preview the UI." — Max M., Operational Excellence Lead, G2 review
Ready to try it? Describe your app to the AI Co-Builder, pick a template, or start from scratch. Your app is just a few clicks away.